2008 Seat Ibiza 5D instrument panel
[x] Cancel search: instrument panelPage 59 of 260
Cockpit57
Safety First
Operating instructions
Practical tips
Te c h n i c a l D a t a
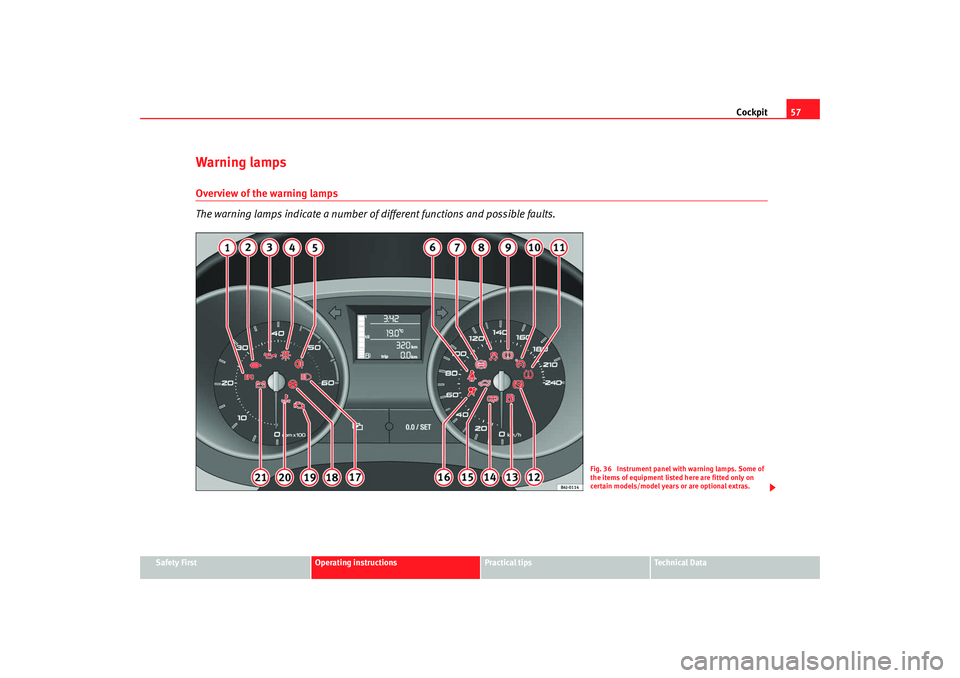
Warning lampsOverview of the warning lamps
The warning lamps indicate a number of different functions and possible faults.
Fig. 36 Instrument panel with warning lamps. Some of
the items of equipment listed here are fitted only on
certain models/model years or are optional extras.
Ibiza250_angles Seite 57 Dienstag, 5. August 2008 1:11 13
Page 68 of 260
Cockpit
66If the warning lamp lights up again after driving on for a short distance, stop
the vehicle and switch the engine off . Contact an Authorised Service Centre
or a qualified workshop.
Coolant level too low
If the warning li ght lights up, stop the vehicle, switch the engine off and wait
for it to cool down. First check the coolant level. If the level is below the “MIN”
mark, top up with coolant ⇒.
WARNING
•
If your vehicle is immobilised for any technical reasons, move it to a
safe distance from traffic. Turn the engine off, turn the hazard lights on and
place the warning triangle.
•
Never open the bonnet if you can see or hear steam or coolant escaping
from the engine compartment. Risk of scalding. Wait until you can no
longer see or hear escaping steam or coolant.
•
The engine compartment is a dangerous area! Before carrying out any
work in the engine compartment, swit ch off the engine and allow it to cool
down. Always note the corresponding warnings ⇒page 181.
Alternator
This warning lamp signals a fault in the alternator.
The warning lamp
lights up when the ignition is switched on. It should go
out when the engine has started running.
If the warning lamp lights up while driving, the alternator is no longer
charging the battery. You should immediately drive to the nearest qualified
workshop.
You should avoid using electrical equipm ent that is not absolutely necessary
because this will drain the battery. If the indicator flashes the voltage is insufficient for normal vehicle
operation.
Turn sig nals
The warning lamp flashes when the indicators are in opera-
tion.Depending on which indicator is operating, either the left
or right
indi-
cator lamp flashes. Both warning lamps will flash at the same time when the
hazard warning lights are switched on.
If any of both indicators fails, the warni ng lamp will start flashing twice faster
than normal.
Further information on the indicators ⇒page 94.
Electronic immobiliser* “Safe”
This warning lamp flashes if an unauthorised key is used.Inside the key there is a chip that deac tivates the electronic immobiliser auto-
matically when the key is inserted into the ignition. The immobiliser will be
activated again automatically as soon as you pull the key out of the ignition
lock.
The instrument panel display shows the following message
6): SAFE . The
vehicle cannot be started in this case.
The engine can, however, be started if the appropriate coded SEAT genuine
key is used.
6)Depending on the version of the model.
Ibiza250_angles Seite 66 Dienstag, 5. August 2008 1:11 13
Page 84 of 260
Unlocking and locking
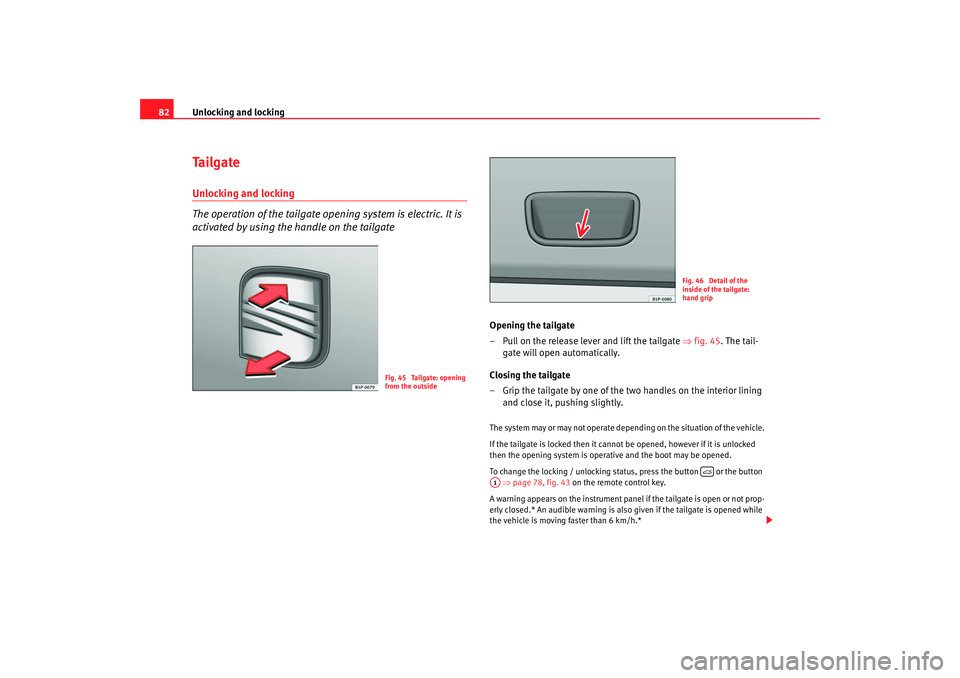
82Ta i l g a t eUnlocking and locking
The operation of the tailgate opening system is electric. It is
activated by using the handle on the tailgate
Opening the tailgate
– Pull on the release lever and lift the tailgate ⇒fig. 45 . The tail-
gate will open automatically.
Closing the tailgate
– Grip the tailgate by one of the two handles on the interior lining and close it, pushing slightly.The system may or may not operate depending on the situation of the vehicle.
If the tailgate is locked then it cannot be opened, however if it is unlocked
then the opening system is operat ive and the boot may be opened.
To change the locking / unlocking status, press the button or the button ⇒ page 78, fig. 43 on the remote control key.
A warning appears on the instrument panel if the tailgate is open or not prop-
erly closed.* An audible warning is also given if the tailgate is opened while
the vehicle is moving faster than 6 km/h.*
Fig. 45 Tailgate: opening
from the outside
Fig. 46 Detail of the
inside of the tailgate:
hand grip
A1
Ibiza250_angles Seite 82 Dienstag, 5. August 2008 1:11 13
Page 91 of 260
Lights and visibility89
Safety First
Operating instructions
Practical tips
Te c h n i c a l D a t a
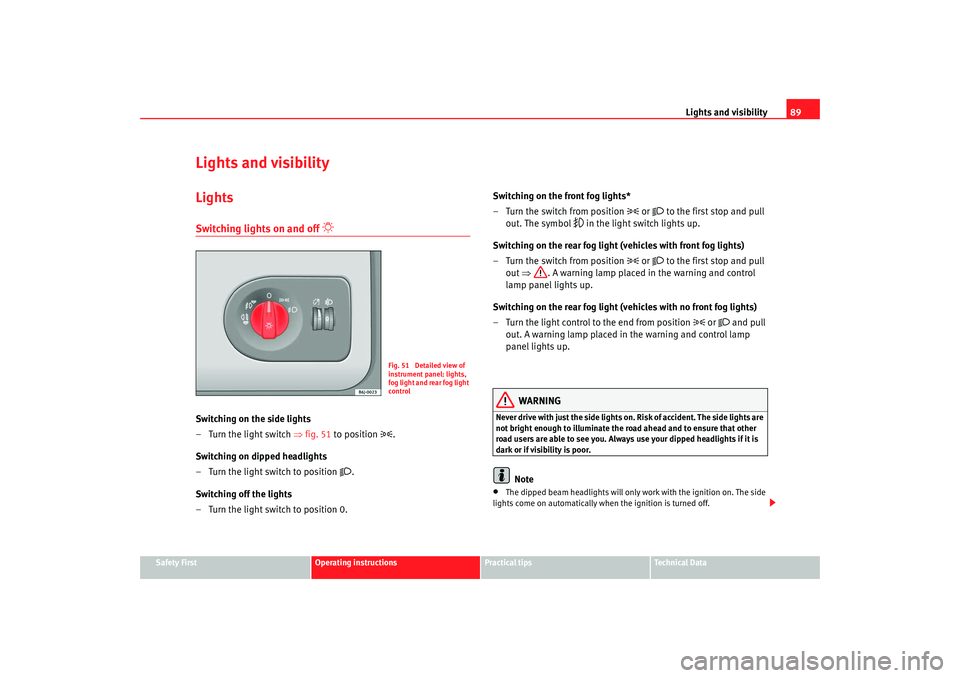
Lights and visibilityLightsSwitching lights on and off
Switching on the side lights
– Turn the light switch ⇒ fig. 51 to position
.
Switching on dipped headlights
– Turn the light switch to position
.
Switching off the lights
– Turn the light switch to position 0. Switching on the front fog lights*
– Turn the switch from position
or
to the first stop and pull
out. The symbol
in the light switch lights up.
Switching on the rear fog light (vehicles with front fog lights)
– Turn the switch from position
or
to the first stop and pull
out ⇒ . A warning lamp placed in the warning and control
lamp panel lights up.
Switching on the rear fog light (vehicles with no front fog lights)
– Turn the light control to the end from position
or
and pull
out. A warning lamp placed in the warning and control lamp
panel lights up.
WARNING
Never drive with just the side lights on . Risk of accident. The side lights are
not bright enough to illuminate the road ahead and to ensure that other
road users are able to see you. Always use your dipped headlights if it is
dark or if visibility is poor.
Note
•
The dipped beam headlights will only work with the ignition on. The side
lights come on automatically when the ignition is turned off.
Fig. 51 Detailed view of
instrument panel: lights,
fog light and rear fog light
control
Ibiza250_angles Seite 89 Dienstag, 5. August 2008 1:11 13
Page 92 of 260
Lights and visibility
90•
If the lights are left on after the key has been taken out of the ignition lock,
a buzzer will sound while the driver door remains open. This is a reminder to
switch the lights off.
•
The rear fog light is so bright that it can dazzle drivers behind you. You
should use the rear fog light only when visibility is very poor.
•
The use of the lighting described here is subject to the relevant statutory
requirements.
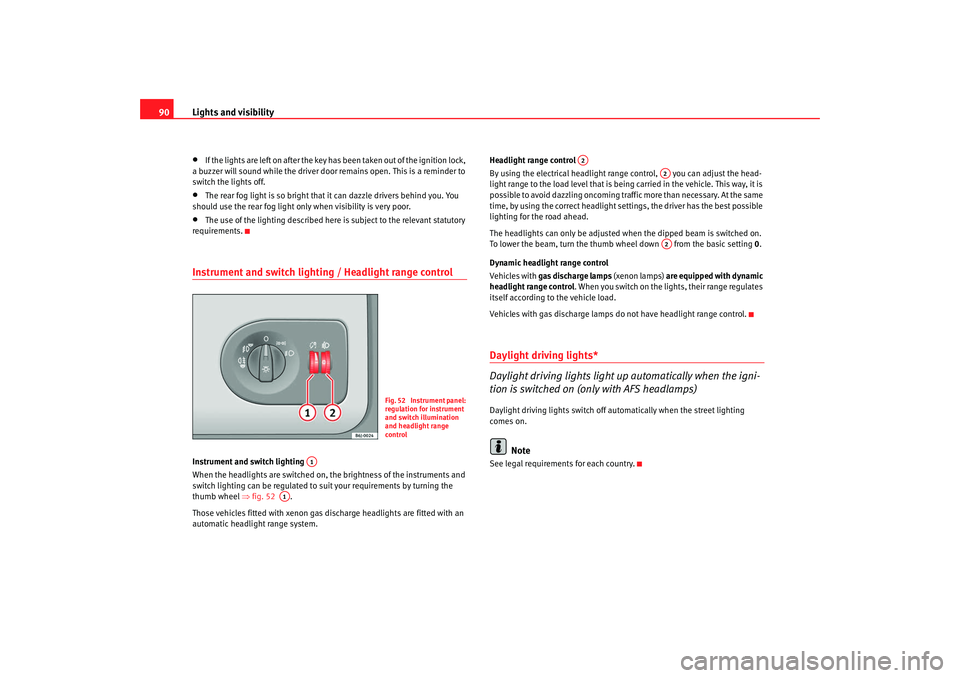
Instrument and switch lighting / Headlight range controlInstrument and switch lighting
When the headlights are switched on, the brightness of the instruments and
switch lighting can be regulated to suit your requirements by turning the
thumb wheel ⇒fig. 52 .
Those vehicles fitted with xenon gas discharge headlights are fitted with an
automatic headlight range system. Headlight range control
By using the electrical headlight range control, you can adjust the head-
light range to the load level that is being
carried in the vehicle. This way, it is
possible to avoid dazzling oncoming tra ffic more than necessary. At the same
time, by using the correct headlight settings, the driver has the best possible
lighting for the road ahead.
The headlights can only be adjusted when the dipped beam is switched on.
To lower the beam, turn the thumb wheel down from the basic setting 0.
Dynamic headlight range control
Vehicles with gas discharge lamps (xenon lamps) are equipped with dynamic
headlight range control . When you switch on the li ghts, their range regulates
itself according to the vehicle load.
Vehicles with gas discharge lamps do not have headlight range control.
Daylight driving lights*
Daylight driving lights light up automatically when the igni-
tion is switched on (only with AFS headlamps)Daylight driving lights switch off au tomatically when the street lighting
comes on.
Note
See legal requirements for each country.
Fig. 52 Instrument panel:
regulation for instrument
and switch illumination
and headlight range
control
A1
A1
A2
A2A2
Ibiza250_angles Seite 90 Dienstag, 5. August 2008 1:11 13
Page 96 of 260
Lights and visibility
94Indicator and main beam headlight lever
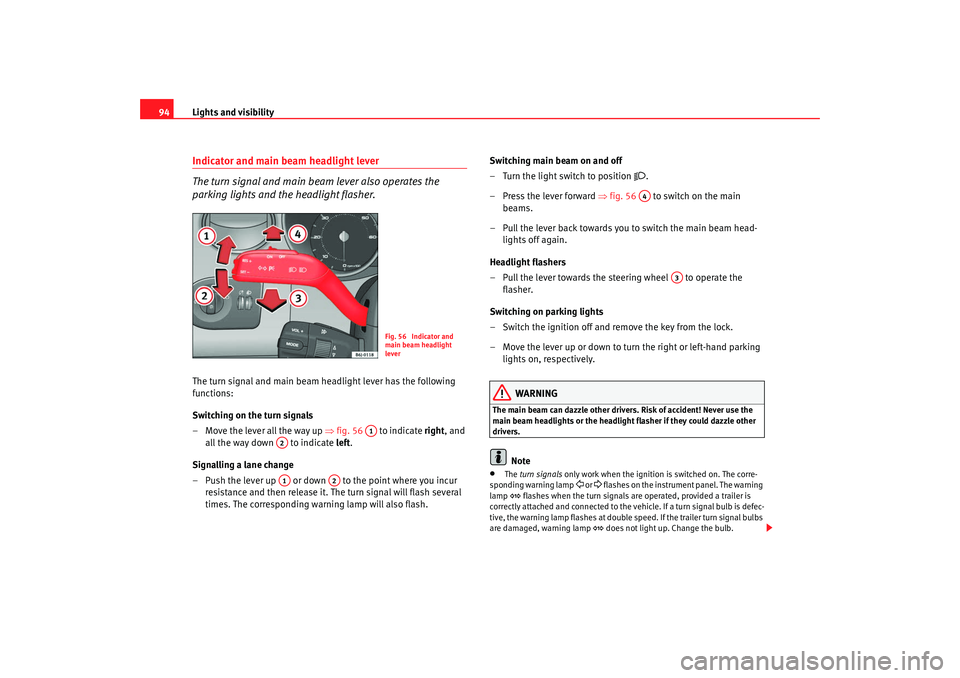
The turn signal and main beam lever also operates the
parking lights and the headlight flasher.The turn signal and main beam headlight lever has the following
functions:
Switching on the turn signals
– Move the lever all the way up ⇒fig. 56 to indicate right, and
all the way down to indicate left.
Signalling a lane change
– Push the lever up or down to the point where you incur resistance and then release it. The turn signal will flash several
times. The corresponding warning lamp will also flash. Switching main beam on and off
– Turn the light switch to position
.
–Press the lever forward ⇒ fig. 56 to switch on the main
beams.
– Pull the lever back towards you to switch the main beam head- lights off again.
Headlight flashers
– Pull the lever towards the steering wheel to operate the flasher.
Switching on parking lights
– Switch the ignition off and remove the key from the lock.
– Move the lever up or down to turn the right or left-hand parking lights on, respectively.
WARNING
The main beam can dazzle other driver s. Risk of accident! Never use the
main beam headlights or the headligh t flasher if they could dazzle other
drivers.
Note
•
The turn signals only work when the ignition is switched on. The corre-
sponding warning lamp
or flashes on the instrument panel. The warning
lamp
flashes when the turn signals are operated, provided a trailer is
correctly attached and connected to the vehicle. If a turn signal bulb is defec-
tive, the warning lamp flashes at double speed. If the trailer turn signal bulbs
are damaged, warning lamp
does not light up. Change the bulb.
Fig. 56 Indicator and
main beam headlight
lever
A1
A2A1
A2
A4
A3
Ibiza250_angles Seite 94 Dienstag, 5. August 2008 1:11 13
Page 105 of 260
Seats and stowage103
Safety First
Operating instructions
Practical tips
Te c h n i c a l D a t a
Seats and stowageThe importance of correct seat adjustmentProper seat adjustment optimi ses the level of protection
offered by seat belts and airbags.Your vehicle has five seats, two on the front part and three on the rear part.
Each seat is equipped with a three-point seat belt.
The driver seat and the front passenger seat can be adjusted in many ways to
suit the physical requirements of the vehicle occupants. The correct seat
position is very important for:•
a fast and easy operation of all controls on the instrument panel,
•
a relaxed posture which does not cause drowsiness,
•
a safe driving ⇒page 7,
•
ensuring that the seat belts and airbag system provide maximum protec-
tion ⇒page 16.
WARNING
•
If the driver and passengers assume improper sitting positions, they
may sustain critical injuries.
•
More people than available seats must never be transported in your
vehicle.
•
Every passenger in the vehicle must properly fasten and wear the seat
belt belonging to his or her seat. Children must be protected with an appro-
priate child restraint system ⇒page 40, “Child safety”.
•
The front seats and all head restraints must always be adjusted to body
size and the seat belt must always be properly adjusted to provide you and
your passengers with optimum protection.
•
Always keep your feet on the foot well when the vehicle is moving;
never rest them on the dash panel, out of the window or on the seat. This
is also applied to passengers. An inco rrect sitting position exposes you to
an increased risk of injury in case of a sudden braking or an accident. If the
airbag is triggered, you could sustain severe injuries due to an incorrect
sitting position.
•
It is important for the driver and front passenger to keep a distance of
at least 25 cm from the steering wheel or dash panel. Failure to respect the
minimum distance means that the airbag will not protect you. Risk of fatal
injury. The distance between the driver and the steering wheel or between
the front passenger and the dash panel should always be as great as
possible.
•
Adjust the driver or front passenger seat only when the vehicle is
stationary. Otherwise, your seat could move unexpectedly while the
vehicle is moving. This could increase the risk of an accident and therefore,
injury. In addition, while adjusting your seat, you will assume an incorrect
sitting position. Risk of fatal accidents.
•
Special guidelines apply to installing a child seat on the front
passenger seat. When installing a child seat, observe the warning note in
the ⇒page 40, “Child safety”.WARNING (continued)
Ibiza250_angles Seite 103 Dienstag, 5. August 2008 1:11 13
Page 112 of 260
Seats and stowage
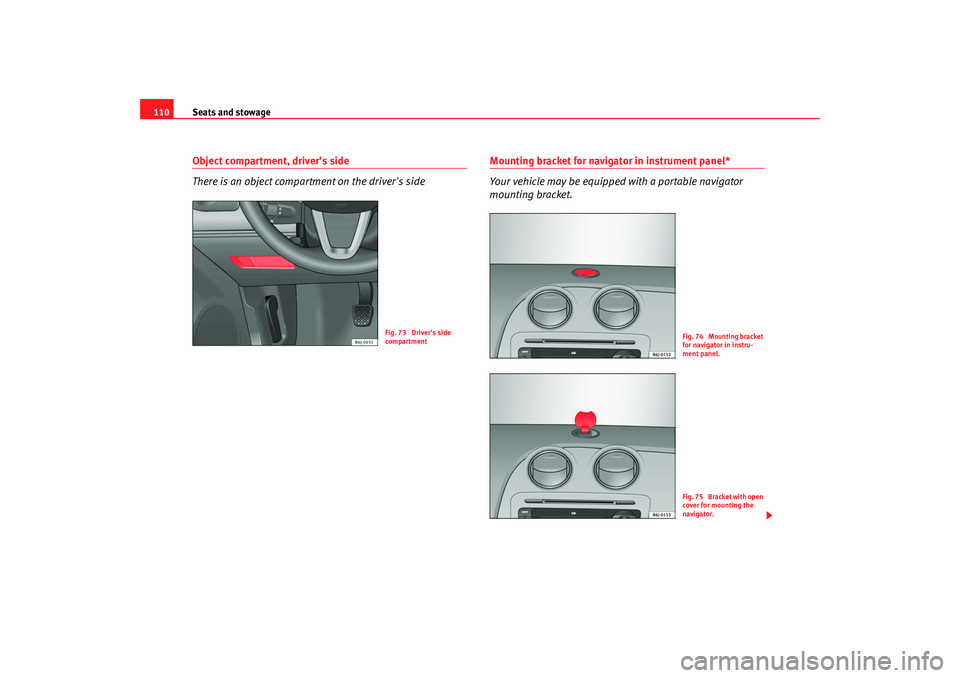
110Object compartment, driver's side
There is an object compartment on the driver's side
Mounting bracket for navigator in instrument panel*
Your vehicle may be equipped with a portable navigator
mounting bracket.
Fig. 73 Driver's side
compartment
Fig. 74 Mounting bracket
for navigator in instru-
ment panel.F i g . 7 5 B r a c k e t w i t h o p e n
cover for mounting the
navigator.
Ibiza250_angles Seite 110 Dienstag, 5. August 2008 1:11 13