2008 Seat Ibiza 5D light
[x] Cancel search: lightPage 200 of 260
Checking and refilling levels
198
2. The tyre pressures should only be checked when the tyres are cold. The slightly raised pressures of warm tyres must not be
reduced.
3. Adjust the tyre pressure to the load you are carrying.Tyre pressure
The correct tyre pressure is especially important at high speeds. The pressure
should therefore be checked at least once a month and before starting a
journey.
WARNING
A tyre can easily burst if the pressure is too low, causing an accident!•
At continuously high speeds, a tyre with insufficient pressure flexes
more. In this way it becomes too hot, and this can cause tread separation
and tyre blow-out. Always observ e the recommended tyre pressures.
•
If the tyre pressure is too low or too high, the tyres will wear prema-
turely and the vehicle will not h andle well. Risk of accident!For the sake of the environment
Under-inflated tyres will increase fuel consumption.
Tyre service life
The service life of tyres is dependent on tyre pressure, driving
style and fitting.
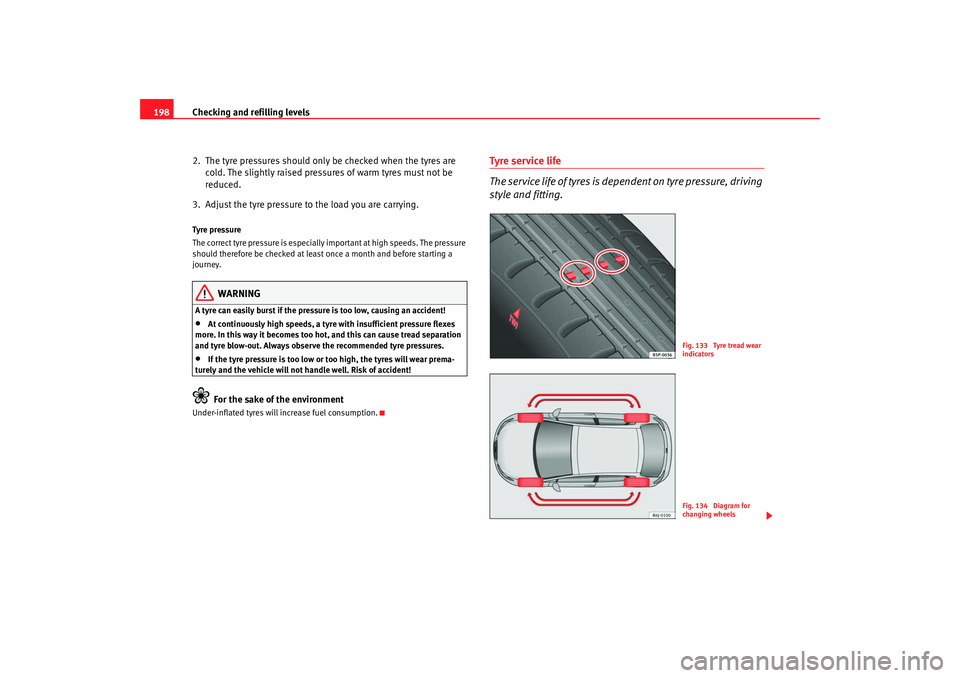
Fig. 133 Tyre tread wear
indicatorsFig. 134 Diagram for
changing wheels
Ibiza250_angles Seite 198 Dienstag, 5. August 2008 1:11 13
Page 206 of 260
If and when
204Snow chains
For technical reasons, snow chains must not be used on the compact tempo-
rary spare wheel.
If you should have a puncture on one of the front wheels when using snow
chains, fit the compact temporary spare in place of one of the rear wheels.
You can then attach the snow chains to the wheel taken from the rear and use
this wheel to replace the punctured front wheel.
WARNING
•
The tyre pressures must be checked and corrected as soon as possible.
•
Do not drive faster than 80 km/h. Hi gher speeds can cause an accident.
•
Avoid heavy acceleration, hard braking and fast cornering. Risk of acci-
dent.
•
Never use two or more compact spare tyres at the same time, risk of
accident.
•
No other type of tyre (normal summer or winter tyre) may be fitted on
the compact temporary spare wheel rim.
Tyre repair kit*
The tyre repair kit (for vehicles not including a spare wheel) is
stored under the floor panel in the luggage compartment.Your vehicle is equipped with the Tyre Mobility System “Tyre repair kit”.
The tyre repair kit consists of a container with sealing compound to repair the
puncture and a compressor to generate the required tyre pressure. The kit will
reliably seal punctures up to a size of about 4 mm caused by the penetration
of a foreign body into the tyre.
Note
•
Seek professional assistance if the repair of a tyre puncture is not
possible with the sealing compound.
Wheel changePreparation work
What you must do before changing a wheel.– If you have a flat tyre or puncture, park the vehicle as far away from the flow of traffic as possible. Choose a location that is as
level as possible.
– All passengers should leave the vehicle. They should wait in a
safe area (for instance behind the roadside crash barrier).
– Switch the engine off. Switch the hazard warning lights on and place the warning triangles in position.
–Apply the handbrake firmly.
– Engage the first gear, or put the selector lever to position P for
those vehicles with an automatic gearbox.
– If you are towing a trailer, unhitch it from your vehicle.
–Take the vehicle tools and the spare wheel out of the luggage
compartment.
Ibiza250_angles Seite 204 Dienstag, 5. August 2008 1:11 13
Page 207 of 260
If and when205
Safety First
Operating instructions
Practical tips
Te c h n i c a l D a t a
WARNING
Switch on the hazard warning lights on and place the warning triangles in
position. This is for your own safety and also warns other road users.
Caution
If you have to change the wheel on a s lope, it is essential to lock the wheel
parallel and on the same axle as that to be changed, with a wedge or similar
in order to immobilise the vehicle.
Note
Please observe legal requirements when doing so.Changing a wheelChange the wheel as described below
– Remove the hub caps or the integral trim .
– Slacken the wheel bolts.
– Raise the car with the jack in the corresponding zone.
– Remove the wheel and then put on the spare wheel.
– Lower the vehicle.
– Tighten the wheel bolts firmly with the box spanner.
–Replace the hub cap.
After changing a wheel
After changing the wheel there are still tasks to complete.– Put the tools and jack back in the luggage compartment.
– Place the wheel with the defective tyre in the luggage compart-
ment and secure it.
– Check the tyre pressure of the newly fitted tyre as soon as
possible.
– Have the tightening torque of the wheel bolts checked as soon as possible with a torque wrench. The prescribed torque must be
120 Nm.
Note•
If you notice that the wheel bolts are corroded and difficult to turn when
changing a wheel, they must be replaced before having the wheel bolt torque
checked.
•
For your safety, drive at moderate speeds until the wheel bolt torque has
been checked.
Ibiza250_angles Seite 205 Dienstag, 5. August 2008 1:11 13
Page 210 of 260
If and when
208a large and stable base, if necessary. On a hard, slippery surface (such as
tiles) use a rubber mat or similar to prevent the jack from slipping.
WARNING
•
Take all precautions so that the base of the jack does not slip. Failure to
do so could result in an accident.
•
The vehicle can be damaged if the jack is not applied at the correct
jacking points. There is also a risk of injury since the jack can slip off
suddenly if it is not properly engaged.
Removing and fitting the wheel
For removal and fitting the wheel, the following tasks must be
completed.After loosening the wheel bolts and raising the vehicle with the jack,
cange the wheel as described below: Removing a wheel
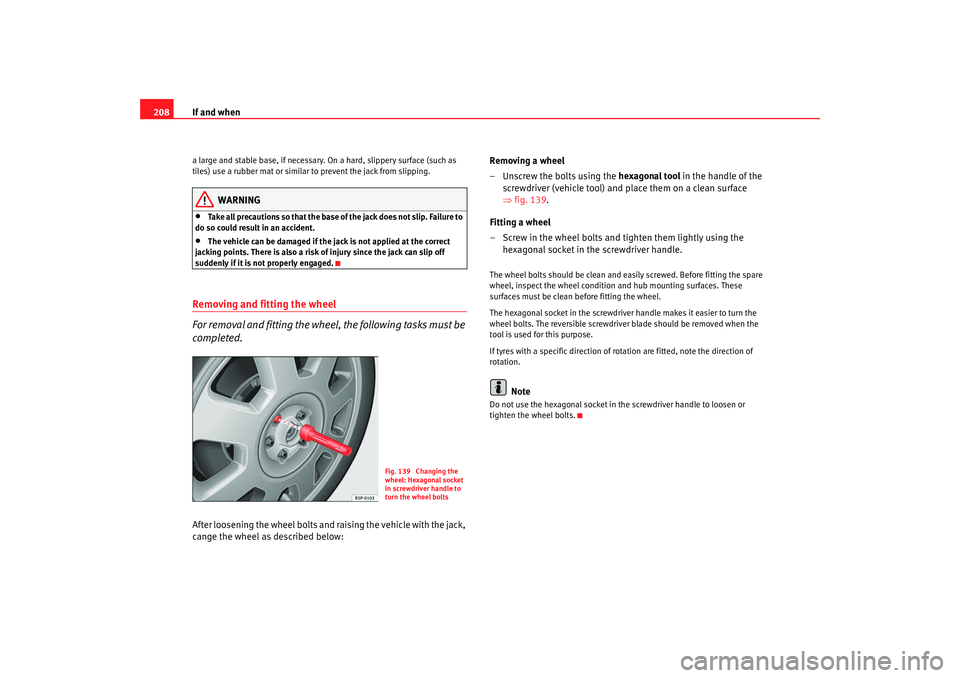
– Unscrew the bolts using the
hexagonal tool in the handle of the
screwdriver (vehicle tool) and place them on a clean surface
⇒ fig. 139.
Fitting a wheel
– Screw in the wheel bolts and tighten them lightly using the hexagonal socket in the screwdriver handle.
The wheel bolts should be clean and easily screwed. Before fitting the spare
wheel, inspect the wheel condition and hub mounting surfaces. These
surfaces must be clean before fitting the wheel.
The hexagonal socket in the screwdriver handle makes it easier to turn the
wheel bolts. The reversible screwdriver blade should be removed when the
tool is used for this purpose.
If tyres with a specific di rection of rotation are fitt ed, note the direction of
rotation.
Note
Do not use the hexagonal socket in the screwdriver handle to loosen or
tighten the wheel bolts.
Fig. 139 Changing the
wheel: Hexagonal socket
in screwdriver handle to
turn the wheel bolts
Ibiza250_angles Seite 208 Dienstag, 5. August 2008 1:11 13
Page 212 of 260
If and when
210It also contains instructions for using the compressor.
WARNING
•
Do not attempt to repair a puncture with the sealing compound if the
tyre has been damaged by driving the car after the tyre has lost its air.
•
Always observe warnings and follow safety instructions concerning
compressor and sealing compound carefully.
•
Do not drive faster than 80 km/h, avoid heavy acceleration, hard
braking and fast cornering.
•
Tyres which have been repaired with sealing compound are only suit-
able for temporary use over a short period. Therefore, please drive carefully
to the next available qualified workshop.For the sake of the environment
•
Used sealing compound containers should be disposed of at a proper
facility.
•
The bottle containing sealing compound must be recycled in its correct
container.Note
Seek professional assistance if the repair of a tyre puncture is not possible
with the sealing compound.What to do first
Certain steps must be taken before repairing a tyre.– If you have a flat tyre or puncture, park the vehicle as far away from the flow of traffic as possible. –Apply the handbrake
firmly.
– Engage first gear, or put the selector lever to position P.
– All passengers should leave the vehicle. They should wait in a
safe area (for instance behind the roadside crash barrier).
– Check whether a repair is possible using the Tyre Mobility System “General information and safety notes.”
– Unscrew inflation cap from the affected wheel.
–Take the tyre repair kit out of the luggage compartment.
WARNING
Switch on the hazard warning lights on and place the warning triangles in
position. This is for your own safety and also warns other road users.
Caution
Take special care if you have to repair a tyre on a slope.
Note
•
Please observe legal requirements when doing so.
•
Remember to replace the sealing compound as soon as possible.
Ibiza250_angles Seite 210 Dienstag, 5. August 2008 1:11 13
Page 215 of 260
If and when213
Safety First
Operating instructions
Practical tips
Te c h n i c a l D a t a
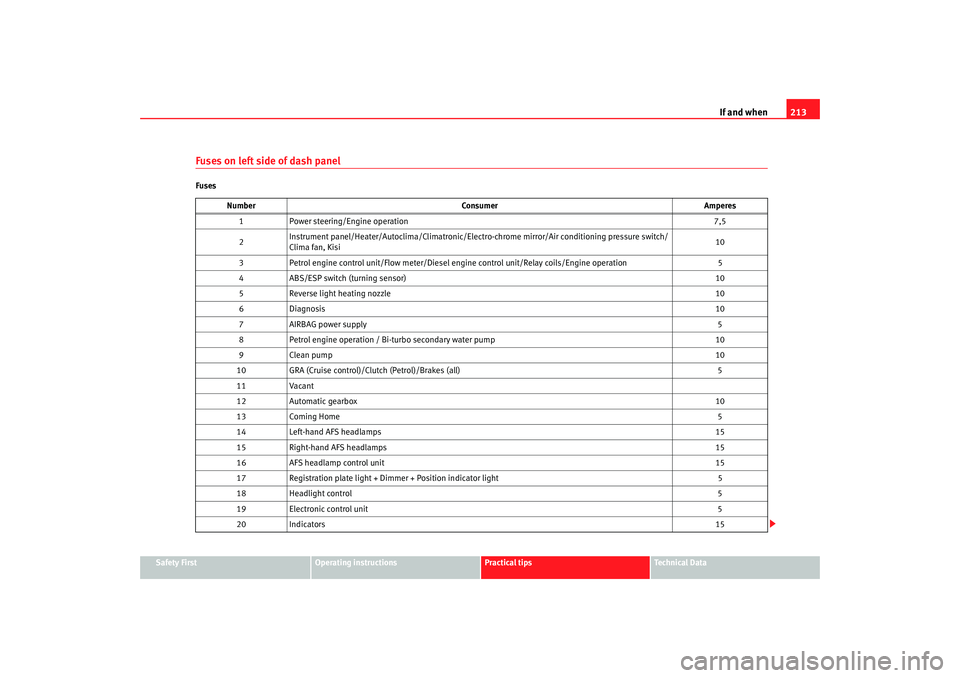
Fuses on left side of dash panelFuses
Number Consumer Amperes
1 Power steering/Engine operation 7,5
2 Instrument panel/Heate
r/Autoclima/Climatronic/Electro-chrome mirror/Air conditioning pressure switch/
Clima fan, Kisi 10
3 Petrol engine control unit/Flow meter/Diesel engine control unit/Relay coils/Engine operation 5
4 ABS/ESP switch (turning sensor) 10
5 Reverse light heating nozzle 10
6 Diagnosis 10
7 AIRBAG power supply 5
8 Petrol engine operation / Bi-turbo secondary water pump 10
9C le a n p um p 10
10 GRA (Cruise control)/Clutch (Petrol)/Brakes (all) 5
11 Vacant
12 Automatic gearbox 10
13 Coming Home 5
14 Left-hand AFS headlamps 15
15 Right-hand AFS headlamps 15
16 AFS headlamp control unit 15
17 Registration plate light + Di mmer + Position indicator light 5
18 Headlight control 5
19 Electronic control unit 5
20 Indicators 15
Ibiza250_angles Seite 213 Dienstag, 5. August 2008 1:11 13
Page 216 of 260
If and when
214
21 Light control 10
22 Electronic control unit 5
23 Engine injection module 5
24 Glovebox light, boot light, interior light 10
25 Parking aid 20
26 Towing hook
27 12 Volt Input/Cigarette lighter 15
28 Lambda probe 10
29 Engine power supply 20
30 Petrol engine operation 10
31 Petrol engine operation/Glow plugs/Relay coil/Bi-turbo electric fan 10
32 Diesel engine control unit 15
33 Power supply to clutch heater switch 5
34 Fuel control unit / Bi-turbo engine supply 15
35 Engine control unit (petrol) 15
36 Main beam headlight, right 10
37 Main beam headlight, left 10
38 Start power supply disconnection 15
39 Rear windscreen wiper 10
40 Electric exterior mirror 15
41 Electric fan motor (heater/semi-automatic climatiser/climatronic) 25
42 Horn 20
43 Instrument panel/Diagnosis 5
44 Windscreen wipers 20
Number
Consumer Amperes
Ibiza250_angles Seite 214 Dienstag, 5. August 2008 1:11 13
Page 217 of 260
If and when215
Safety First
Operating instructions
Practical tips
Te c h n i c a l D a t a
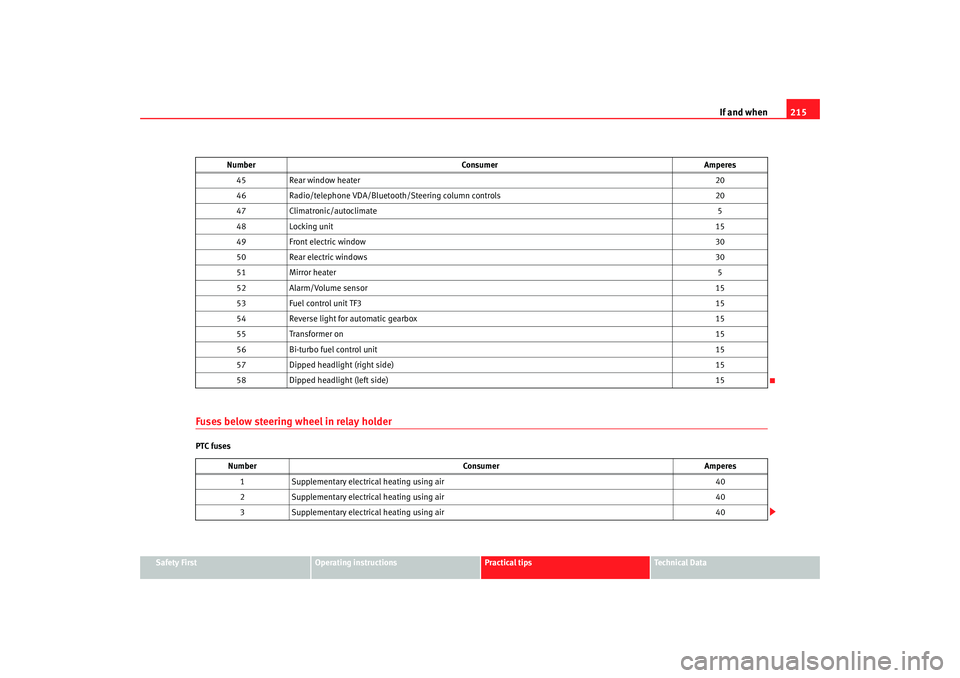
Fuses below steering wheel in relay holderPTC fuses45
Rear window heater 20
46 Radio/telephone VDA/Bluetooth/Steering column controls 20
47 Climatronic/autoclimate 5
48 Locking unit 15
49 Front electric window 30
50 Rear electric windows 30
51 Mirror heater 5
52 Alarm/Volume sensor 15
53 Fuel control unit TF3 15
54 Reverse light for automatic gearbox 15
55 Transformer on 15
56 Bi-turbo fuel control unit 15
57 Dipped headlight (right side) 15
58 Dipped headlight (left side) 15
Number Consumer Amperes
1 Supplementary electrical heating using air 40
2 Supplementary electrical heating using air 40
3 Supplementary electrical heating using air 40
Number
Consumer Amperes
Ibiza250_angles Seite 215 Dienstag, 5. August 2008 1:11 13