Page 105 of 303

Unlocking and locking103
Safety First
Operating instructions
Practical tips
Te c h n i c a l D a t a
Locking the vehicle
– Press button for about 1 second.
Opening the tailgate
– Press button and hold for at least one second.The indicators will flash twice as confirmation when you unlock the car. The
vehicle will be locked again automatically if you do not open one of the doors
or the tailgate within 60 seconds after unlocking the car with button . This
function prevents the vehicle from remaining unlocked if the unlocking
button is pressed by mistake.
On vehicles with the security central locking* feature, you can unlock just the
driver's door and the tank flap by pressing button once, or the whole
vehicle by pressing the button twice.
The indicators flash once when the vehicle is locked to confirm that the doors
and tailgate are properly locked.
Moreover, apart from unlocking the vehicle, the seat* and mirror* memory
programmed in the key is activated. The dr iver's seat and exterior mirrors will
be automatically adjusted to the positions stored in the memory.
The interior lights will automatically light up when the vehicle is unlocked and
go out when the vehicle is locked, provided that the switch is in the courtesy
light position.
WARNING
Do not leave anyone (especially children) in the car if it is locked from the
outside and the anti- theft security system is enabled, as the doors and
windows cannot then be opened from the inside. Locked doors could delay
assistance in an emergency, potentially putting lives at risk.
Note
•
The remote control should only be us ed when the doors and the tailgate
are closed.
•
The remote control should not be used when the vehicle is out of sight.
•
The anti-theft alarm* can be accidentally triggered and the vehicle locked
if you press the locking button on th e remote control inside the vehicle
before inserting the key in the ignition. If this should happen by mistake,
press the unlock button .
Re-synchronising
Should the remote control fail to lock or unlock the vehicle,
the system must be re-synchronised.– If the vehicle is locked, use the key to unlock the driver's door.
– Press the unlock button on the remote control.
– Insert the key into the ignition and switch on the ignition.
– Switch off the ignition and remove the key.
– Press the unlock or the lock button .
AB
AC
AA
AA
Exeo_EN.book Seite 103 Freitag, 17. Oktober 2008 11:24 11
Page 106 of 303

Unlocking and locking
104Anti-theft alarm system*Description
The system triggers an alarm if anyone attempts to break into
the vehicle.The anti-theft alarm helps to prevent the vehicle being broken into or stolen.
If the system senses interference with the vehicle, it triggers an audible and
visible alarm.
How is the system enabled?
The anti-theft alarm system is enabled automatically when the vehicle is
locked with the remote control or by turning the key in the driver's door (if the
door is closed). The system is enabled about 30 seconds after the vehicle is
locked.
How is the system disabled?
The anti-theft alarm is only disabled when the vehicle is unlocked using the
remote control. The vehicle will lock again automatically if none of the doors
is opened within 60 seconds after pressing the remote control button.
If the vehicle is unlocked by turning the key in the driver's door, all the other
doors, the tailgate and the tank flap will remain locked.
If the vehicle has been unlocked with the key in the driver's door, the key must
be inserted in the ignition lock and the ignition switched on within 15
seconds of opening the door in order to disable the alarm. The alarm will be
triggered if the ignition is not switched on within 15 seconds.
When does the system trigger the alarm?
The following parts of the car are monitored when the vehicle is locked:•
Engine compartment (bonnet)
•
Boot
•
Doors
•
Tilt angle (tow-a way protection)
•
Ignition
•
Radio (only with a factory-fitted SEAT radio)
•
Interior ⇒page 105
If any of the named areas are entered, the alarm will be triggered.
How is the alarm disabled?
The alarm can be switched off by unlocking the vehicle using the remote
control, or by switching on the igniti on with the key, thus “disabling” the
alarm system. The alarm will also switch off when it comes to the end of its
cycle.
Indicators
The indicators flash briefly when the vehicle is locked to confirm that the
doors, the engine bonnet and the tailgate are properly closed and locked.
If the indicators do not flash, check the doors, the bonnet and the tailgate to
make sure they are properly closed. The indicators will also flash briefly if one
of the doors or the tailgate or engine bonnet are closed after the alarm system
has been enabled.
LED
When the vehicle is locked, the LED on the top of the driver's door trim will
flash rapidly for about 30 seconds and then continue flashing slowly. This is
to indicate that the anti-theft alarm system (including the interior monitor
and tow-away protection) is operative. If the LED lights up continuously for
about 30 seconds when the vehicle is locked instead of flashing, this means
the alarm system is not working properly.Note
•
To make sure that the alarm is fully operative when leaving the vehicle,
briefly check that all the doors and windows and the sun roof* are closed.
Exeo_EN.book Seite 104 Freitag, 17. Oktober 2008 11:24 11
Page 107 of 303

Unlocking and locking105
Safety First
Operating instructions
Practical tips
Te c h n i c a l D a t a
•
The alarm is triggered immediately if one of the battery cables is discon-
nected while the alarm system is enabled.
Interior monitoring*
The interior monitor triggers an alarm if it detects movement
inside the vehicle.You should disable the interior monitor if there is a possibility that
the alarm could be triggered, e.g. by a pet or by an object moving
about inside the car ⇒. The tow-away protection feature, which
is integrated into the alarm system, should be disabled if the car is
being towed or transported (e.g. by rail or ship).
Disabling the interior monitor
– Open the door and pull out th e switch (with the symbol
) on
the storage compartment side, in the driver's door ⇒fig. 77 . – Then lock the vehicle.
Disabling the tow-away protection
– Open the door and pull out th
e switch (with the symbol
)
on the storage compartment side, in the driver's door ⇒fig. 77 .
– Then lock the vehicle.
The LED on switch will light up when the interior monitor is disabled. The
LED on the top of the driver's door trim will also light up for about 3 seconds.
When the vehicle is locked, the LED on the top of the driver's door trim will
flash rapidly for about 3 seconds. The interior monitor is automatically
enabled again the next time the vehicle is locked.
The LED on switch will light up when the tow-away protection function is
disabled. The LED on the top of the driver 's door trim will also light up for
about 3 seconds. When the vehicle is locked, the LED on the top of the
driver's door trim will flash rapidly for about 3 seconds. The tow-away protec-
tion is automatically enabled again the next time the vehicle is locked.
WARNING
Do not leave anyone (especially children) in the car if it is locked from the
outside and the anti-theft security system is enabled, as the doors and
windows cannot then be opened from the inside. Locked doors could delay
assistance in an emergency, potentially putting lives at risk.
Fig. 77 Interior monitor
switch
AA
AB
Exeo_EN.book Seite 105 Freitag, 17. Oktober 2008 11:24 11
Page 108 of 303

Unlocking and locking
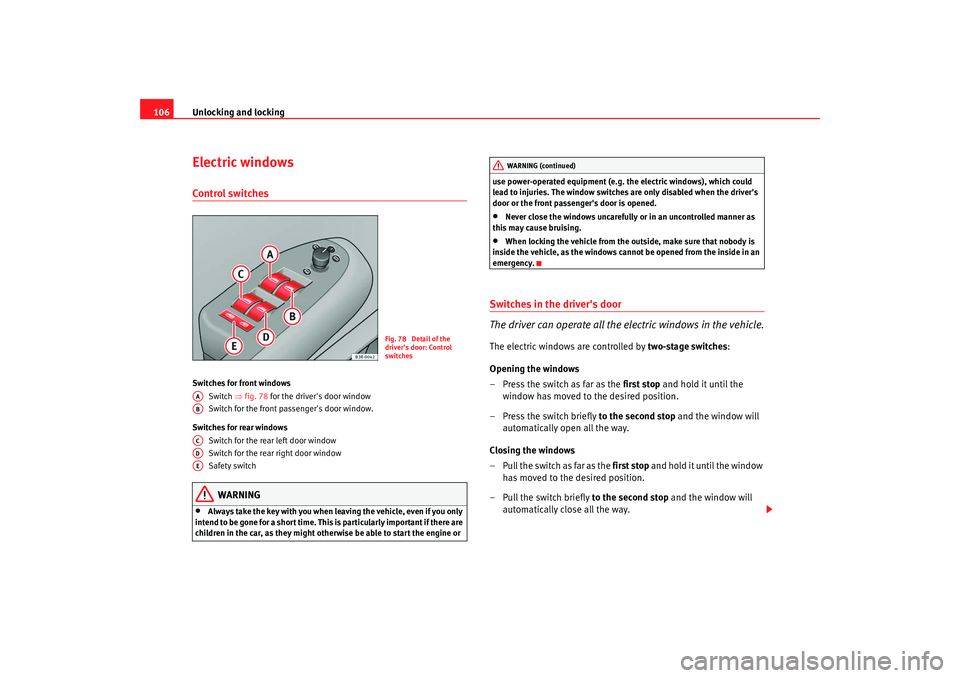
106Electric windowsControl switchesSwitches for front windows
Switch ⇒fig. 78 for the driver's door window
Switch for the front passenger's door window.
Switches for rear windows Switch for the rear left door window
Switch for the rear right door window
Safety switch
WARNING
•
Always take the key with you when leaving the vehicle, even if you only
intend to be gone for a short time. This is particularly important if there are
children in the car, as they might otherwise be able to start the engine or use power-operated equipment (e.g. the electric windows), which could
lead to injuries. The window switches are only disabled when the driver's
door or the front passenger's door is opened.
•
Never close the windows uncarefully or in an uncontrolled manner as
this may cause bruising.
•
When locking the vehicle from the outside, make sure that nobody is
inside the vehicle, as the windows cannot be opened from the inside in an
emergency.
Switches in the driver's door
The driver can operate all the electric windows in the vehicle.The electric windows are controlled by two-stage switches:
Opening the windows
– Press the switch as far as the first stop and hold it until the
window has moved to the desired position.
– Press the switch briefly to the second stop and the window will
automatically open all the way.
Closing the windows
– Pull the switch as far as the first stop and hold it until the window has moved to the desired position.
– Pull the switch briefly to the second stop and the window will
automatically close all the way.
Fig. 78 Detail of the
driver's door: Control
switches
AAABACADAE
WARNING (continued)
Exeo_EN.book Seite 106 Freitag, 17. Oktober 2008 11:24 11
Page 109 of 303

Unlocking and locking107
Safety First
Operating instructions
Practical tips
Te c h n i c a l D a t a
Safety switch
The safety switch
⇒page 106, fig. 78 can deactivate the rear door
switches. The windows can only be operated from the rear when the safety
switch is pressed in.
The symbol
lights up on the safety switch when the electric windows in the
rear doors are disabled (switch not pressed in).
Note
The windows will work for about ten minutes after the ignition has been
switched off. The window switches are only disabled when the driver's door
or the front passenger's door is opened.Switch on the front passenger's door and on the rear doors
Each of these doors has a switch for its own window.The electric windows are controlled by two-stage switches :Opening the windows
– Press the switch as far as the
first stop and hold it until the
window has moved to the desired position.
– Press the switch briefly to the second stop and the window will
automatically open all the way.
Closing the windows
– Pull the switch as far as the first stop and hold it until the window
has moved to the desired position.
– Pull the switch briefly to the second stop and the window will
automatically close all the way.
Note
The windows will work for about ten minutes after the ignition has been
switched off. The window switches are only disabled when one of the front
doors is opened.Opening and closing the windows using the central locking function
The windows can be opened or closed simultaneously when
the vehicle is unlocked or locked.Opening the windows using the remote control
– Press and hold the unlock button on the remote control until the windows reach the desired position.
AE
Fig. 79 Switch on front
passenger's door
Exeo_EN.book Seite 107 Freitag, 17. Oktober 2008 11:24 11
Page 110 of 303

Unlocking and locking
108
Opening the windows using the ignition key
– unlock the driver's door with the key and hold the key in the unlock position until all the windows are open.
Closing the windows using the remote control
– Press and hold the lock button until all windows are closed ⇒ .
Closing the windows using the ignition key
– Lock the driver's door with the key and hold the key in the lock position until all the windows are closed ⇒.The windows will stop moving when you release the remote control button or
turn the key back to its initial position in the door lock.
WARNING
•
Be careful when closing the windows to ensure nobody is hurt.
•
For safety reasons, you should only use the remote control open and
close functions within about 2 metres of the vehicle. To avoid injuries,
always keep an eye on the windows wh en pressing the button to close
them. The windows stop moving as soon as the button is released.
Possible malfunctionsAutomatic open and close function not working
The automatic open and close function will not work if the battery has been
temporarily disconnected. The function can be restored as follows:•
Close the window as far as it will go by lifting and holding the window
switch.
•
Release the switch and then lift it again for one second. This will re-enable
the automatic function.
Sun roof / deflector*DescriptionThe sliding/tilting sun roof is o perated using the rotary control ⇒page 109,
fig. 80 . The rotary control for sliding the ro of open can be adjusted to several
different settings (with click stops). This control only works when the ignition
is switched on. The rotary control must be in the position if you want to tilt
the roof up at the rear.
The sun roof will work for about ten minutes after the ignition has been
switched off. However, it is immediatel y disabled when one of the front doors
is opened.
A0
Exeo_EN.book Seite 108 Freitag, 17. Oktober 2008 11:24 11
Page 111 of 303

Unlocking and locking109
Safety First
Operating instructions
Practical tips
Te c h n i c a l D a t a
Sliding/Tilting
The sun roof will create less wind noise if it is opened in the
comfort setting.Comfort setting
– Turn the control until it engages at position ⇒fig. 80 . The sun
roof will now only open as far as the comfort setting which means
there is less wind noise.
Opening completely
– Turn the switch to position and hold it until the sun roof reaches the desired position. This position can cause more wind
noise.
Tilting open
– Turn the control to position . – With the control in position 0, press the control
briefly to make
the roof tilt open all the way.
– To open the roof as far as an intermediate setting, press and hold
the control until the roof has moved to the desired position.
When you release the switch it will auto matically spring back from position
to position .
The sliding sun blind in the headliner automatically opens when the sunroof
is slid open. If required, it can be closed by hand when the sunroof is closed.
It is advisable to close the sun blind when the vehicle is left standing in the
sun. It is important to remember to close the sunroof when parking the
vehicle or if it suddenly starts raining – especially when the sun blind is
extended.
For further information on the automatic close function, see ⇒page 110.ClosingClosing
–Turn the control to position ⇒ fig. 80 to close the sunroof
⇒ .
Closing the sunroof from the tilt position
– Pull the specially formed rear end of the control and hold it until
the sunroof has moved down to the desired position.
–Pull the switch briefly to lower the sunroof automatically to the
fully closed position. If required, the sunroof can be stopped in
any position by briefly pulling the control again ⇒.
Fig. 80 Details of head-
liner: Rotary sun roof
controlA1
A2A0
A2
A1
A0
Exeo_EN.book Seite 109 Freitag, 17. Oktober 2008 11:24 11
Page 112 of 303

Unlocking and locking
110
WARNING
Take care when closing the sliding/tilting roof. There is a risk of suffering
injury. For this reason, always take out the ignition key when leaving the
vehicle.Automatic close function
The sun roof can also be closed from outside the vehicle.– Turn the key in the lock on the driver's door and hold it in the lock
position or press the lock button on the remote control until the
roof has closed all the way ⇒.
WARNING
Take care when closing the sunroof. There is a risk of suffering injury.Sunroof / deflector*The solar cells in the roof power the climate control fan.
The solar roof is operated in the same way as the normal sliding/tilting sun
roof.
The interior trim is fixed to the solar roof and cannot be opened and closed
separately.
Closing the sunroof by overriding the safety cut-out
It is possible to override the safety cut-out to close the
sunroof.The sliding sunroof mechanism is equipped with a safety cut-out. If
the roof should fail to close normally, it can be closed by overriding
the safety cut-out.
– Turn the control to position ⇒page 109, fig. 80 .
– Pull on the control switch until the roof closes.
WARNING
Take care when closing the sunroof. There is a risk of suffering injury. For
this reason, always take out the ignition key when leaving the vehicle.
A0
Exeo_EN.book Seite 110 Freitag, 17. Oktober 2008 11:24 11