Page 169 of 317

Driving167
Safety First
Operating instructions
Tips and Maintenance
Te c h n i c a l D a t a
Caution
If the engine has been driven hard for a long period, the engine could over-
heat when it is switched off. Risk of engine damage. For this reason, you
should idle the engine for approx. 2 minutes before you switch it off.Manual gearboxDriving a car with a manual gearbox
Selecting the reverse gear
– T h e v e h i c l e s h o u l d b e s t a t i o n a r y with the engine idling. Press the
clutch right down.
–Place the gear lever into neutra l gate and push the lever all the
way down.
– Slide the gearstick to the left, and then into the reverse position shown on the gearstick.The reverse gear can only be engaged when the vehicle is stationary. When
the engine is running, before engaging this gear wait about 6 seconds with
the clutch pressed in fully in order to protect the gearbox.
The reversing lights come on when the reverse gear is selected and the igni-
tion is on.
Fig. 138 Detail of the
centre console: gear shift
pattern of a 5-speed
manual gearbox
Fig. 139 Detail of the
centre console: gear shift
pattern of a 6-speed
manual gearbox
altea_XL ingles.book Seite 167 Donnerstag, 13. September 2007 10:36 10
Page 170 of 317

Driving
168
WARNING
•
When the engine is running, the vehicle will start to move as soon as a
gear is engaged and the clutch released.
•
Never select the reverse gear when the vehicle is in motion. Risk of acci-
dent.Note
•
Do not rest your hand on the gear lever when driving. The pressure of your
hand could cause premature wear on the selector forks in the gearbox.
•
When changing gear, you should always depress the clutch fully to avoid
unnecessary wear and damage.
•
Do not hold the car “on the clutch” on hills. This causes premature wear
and damage to the clutch.
Automatic gearbox* / DSG automatic
gearbox*Selector lever positionsSelector lever positions indicated on the cover
P Parking position (lever locked).
R Reverse position.
N Neutral position (lever locked). This position is similar to the neutral
position for manual gearboxes).
D Drive position (economic driving programme).
S Sports driving position.
+/- Tiptronic driving position (this progra mme is similar to the operation of
a manual gearbox).
Fig. 140 Central console:
selector lever for auto-
matic gearbox / direct
shift gearbox DSG
altea_XL ingles.book Seite 168 Donnerstag, 13. September 2007 10:36 10
Page 171 of 317

Driving169
Safety First
Operating instructions
Tips and Maintenance
Te c h n i c a l D a t a
Driving programmes
The automatic gearbox / direct shift gearbox has three
programmes.Selecting the economy programme
– This programme selects a higher gear earlier rather than remain
in a lower gear.
– Put the selector lever into position D to drive forwards
– Put the selector lever into position R to reverse. This position is
shared by all programmes for reversing.
Selecting the sport programme
– Move the lever to position S .If you select the sport programme, S, the program is designed for a sports
mode, that is, a programme which changes up at higher engine speeds to use the full power of the engine. This pr
ogramme is not recommended for use on
the motorway or in the city.
Selecting the manual programme (tiptronic)
This programme allows driving similar to a manual gearbox.
You can access this program from the gear stick or from the paddles on the
steering wheel, if this option exists ⇒page 172.
Selector lever locking
The selector lever lock prevents gears from being engaged
inadvertently, which would cause the vehicle to move.Releasing the selector lever lock
–Start the vehicle.
Fig. 141 Program selec-
tion
Fig. 142 Deactivating the
lock
altea_XL ingles.book Seite 169 Donnerstag, 13. September 2007 10:36 10
Page 172 of 317

Driving
170
– Press and release the brake pedal, at the same time press the button on the selector lever.The lock is only activated when the vehicle is stopped or at a speed of less
than 5 km/h. At higher speeds, the lock is automatically released in position
N.
For rapid changes of position (e.g. from R to D) the lever will not lock. If the
lever remains in the position N more than one second then it is locked. With
the automatic lock, the lever is prevented passing from P and N to any other
gear without first pressing the brake pedal.
The selector lever must be put in the position P in order to remove the key.Driving with an automatic gearbox* / DSG automatic gearbox*
The drive and reverse gears are automatically engaged.
Driving
– Press and hold the foot brake.
– Pre ss on the button on the se lector lever knob (on the lef t
)
⇒ fig
. 143.
– Select a gear for driving ( R, D or S).
– Release the button and wait a few seconds for the gear to engage, a light jerk will be felt.
– Release the brake and accelerate.
Short stop
– Hold the vehicle stationary with the brake pressed down (for example at traffic lights). The sele ctor lever does not need to be
put into the positions P or N for this.
– Do not press the accelerator.
Parking the vehicle
– Press the foot brake and hold to bring the vehicle to a stop.
–Apply the handbrake firmly.
– Press in the button on the selector lever knob, move the lever to the position P and release the button.
Driving slowly
– Move the selector lever to the position D and press to the right to
put the lever into Tiptronic mode.
– Press the gear lever towards (-) to select a lower gear.
Fig. 143 Driving
altea_XL ingles.book Seite 170 Donnerstag, 13. September 2007 10:36 10
Page 173 of 317

Driving171
Safety First
Operating instructions
Tips and Maintenance
Te c h n i c a l D a t a
Hill stop
– Hold the vehicle, in all cases, using the foot brake to prevent
rolling back.
– Do not try to slow the vehicle using another forward gear (engine braking).
Descending gradients
– With the gear engaged, release the brake and accelerate.The steeper the gradient the lower the gear must be for effective engine
braking. For example, if 3rd gear is used on a very steep gradient, the engine
braking is insufficient and vehicle accelerates. So that the engine speed does
not become excessive, the gearbox changes to the next highest gear. Depress
the brake pedal and move the selector lever to the Tiptronic gate to return to
3rd gear.
WARNING
•
The driver should never leave the vehicle while the engine is running or
with any gear selected. If for any reason you must leave the vehicle with the
engine running, apply the handbrake and move the selector lever to posi-
tion P.
•
When the engine is running and the po sitions D, S or R are selected, it
is necessary to hold the vehicle with the foot brake because the vehicle will
creep at a low speed.
•
Never accelerate while changing the position of the selector lever (risk
of an accident).
•
The selector lever must never be mo ved into the positions R or P while
moving (risk of an accident).
•
Before descending a steep gradient, reduce speed and use the Tiptronic
programme to select a lower gear.
•
If you must stop on a hill, always hold the vehicle using the footbrake
to avoid rolling back.
•
The footbrake must not be held for a long period of time, not even
lightly; continuous braking will ca use overheating of the brakes and a
reduction or even a loss of braking power and a significant increase in
braking distances.
•
Never allow the vehicle to coast down a gradient with the selector lever
in positions N or D, even when the engine is not running. For descents, the
use of the Tiptronic programme is recommended to keep the speed
reduced.Caution
•
Never use the automatic gearbox to hold the vehicle stationary on a hill,
even for short periods, as this may overheat the gearbox and cause damage.
Apply the handbrake or depress the foot brake to hold the vehicle in position.
•
If the vehicle is allowed to roll with the engine stopped but the selector in
position N then the gearbox may be damaged because it will not be
lubricated.WARNING (continued)
altea_XL ingles.book Seite 171 Donnerstag, 13. September 2007 10:36 10
Page 174 of 317

Driving
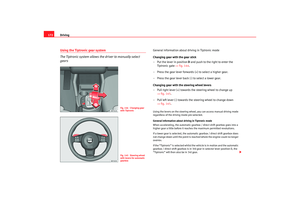
172Using the Tiptronic gear system
The Tiptronic system allows the driver to manually select
gears
General information about driving in Tiptronic mode
Changing gear with the gear stick
–Put the lever in position D and push to the right to enter the
Tiptronic gate ⇒fig. 144.
– Press the gear lever forwards (+) to select a higher gear.
– Press the gear lever back (-) to select a lower gear.
Changing gear with th e steering wheel levers
– Pull right lever (+) towards the steering wheel to change up ⇒fig. 145.
– Pull left lever (-) towards the steering wheel to change down ⇒fig. 145.Using the levers on the steering wheel, you can access manual driving mode
regardless of the driving mode pre-selected.
General information about driving in Tiptronic mode
When accelerating, the automatic gearbox / direct shift gearbox goes into a
higher gear a little before it reaches the maximum permitted revolutions.
If a lower gear is selected, the automatic gearbox / direct shift gearbox does
not change down until the point is reached where the engine could no longer
overrev.
If the “Tiptronic” is selected whilst the vehicle is in motion and the automatic
gearbox / direct shift gearbox is in 3rd gear in selector lever position D, the
“Tiptronic” will then also be in 3rd gear.
Fig. 144 Changing gear
with TiptronicFig. 145 Steering wheel
with levers for automatic
gearbox
altea_XL ingles.book Seite 172 Donnerstag, 13. September 2007 10:36 10
Page 175 of 317

Driving173
Safety First
Operating instructions
Tips and Maintenance
Te c h n i c a l D a t a
Note
•
The gearbox controls on the steering wheel can operate with the gear stick
in any position and with the vehicle in motion.
HandbrakeUsing the handbrake
The handbrake should be applied firmly to prevent the
vehicle from accidentally rolling away.Always apply the handbrake when you leave your vehicle and when
you park. Applying the handbrake
– Pull the handbrake lever up firmly
⇒fig. 146.
Releasing the handbrake
– Pull the lever up slightly and press the locking knob in the direc- tion of the arrow ⇒fig. 146 and guide the handbrake lever down
fully ⇒ .
Always apply the handbrake firmly. This prevents you driving with the hand-
brake applied ⇒.
The handbrake warning lamp
lights up when the handbrake is applied
and the ignition switched on. The wa rning lamp goes out when the hand-
brake is released.
If you drive faster than 6 km/h with the handbrake on, the following
message* will appear in the instrument panel display: HANDBRAKE ON. Also,
an audible warning is given.
WARNING
•
Never use the handbrake to slow down the vehicle when it is in motion.
The braking distance is considerably longer, as braking is only applied to
the rear wheels. Ri sk of accident!
•
If it is only partially released this will cause overheating of the rear
brakes, which can impair the function of the brake system and could lead
to an accident. This also causes premature wear on the rear brake
pads/linings.Caution
Always apply the handbrake before you leave the vehicle. The first gear
should also be selected.
Fig. 146 Handbrake
between the front seats
altea_XL ingles.book Seite 173 Donnerstag, 13. September 2007 10:36 10
Page 176 of 317

Driving
174Parking
The handbrake should always be firmly applied when the
vehicle is parked.Always note the following points when parking the vehicle:
– Use the foot brake to stop the vehicle.
–Apply the handbrake.
– The first gear should also be selected.
– Switch off the engine and remove the key from the ignition lock.
Turn the steering wheel slightly to engage the steering lock.
– Always take you car keys with you when you leave the vehicle ⇒ .Additional notes on parking the vehicle on gradients:
Turn the steering wheel so that the vehicle would roll against the kerb if it did
start to roll.•
If the vehicle is facing downhill, turn the front wheels so that they point
towards the kerb.
•
If the vehicle is facing uphill, turn the front wheels so that they point away
from the kerb .
•
Secure the vehicle as normal by applying the handbrake firmly and
selecting first gear.
WARNING
•
Take measures to reduce the risk of injury when you leave your vehicle
unattended.
•
Never park where the hot exhaust system could ignite inflammable
materials, such as dry grass, low bushes, spilt fuel etc.
•
Never allow vehicle occupants to remain in the vehicle when it is
locked. They would be unable to open the vehicle from the inside, and
could become trapped in the vehicle in an emergency. In the event of an
emergency, locked doors will delay assistance to occupants.
•
Never leave children unsupervised in the vehicle. They could set the
vehicle in motion, for example, by releasing the handbrake or the gear
lever / selector lever.
•
Depending on weather conditions, it may become extremely hot or cold
inside the vehicle. This can be fatal.
Acoustic parking aid system*Rear parking aid
The parking aid system will use an acoustic signal to warn of
the approach of any object towards the rear of the vehicle.Description
The acoustic parking aid system will measure the distance between the rear
of the vehicle and any possible obstacle using four ultrasonic sensors located
on the rear bumper. The measuring range of the sensors starts at approxi-
mately and depending on the nature of the obstacle at a distance of:•
side of the rear bumper: 0.8 m
•
middle of the rear bumper: 1.5 mWARNING (continued)
altea_XL ingles.book Seite 174 Donnerstag, 13. September 2007 10:36 10