2008 PONTIAC GRAND PRIX warning light
[x] Cancel search: warning lightPage 138 of 450

Electric Power Management
The vehicle has Electric Power Management (EPM) that
estimates the battery’s temperature and state of charge.
It then adjusts the voltage for best performance and
extended life of the battery.
When the battery’s state of charge is low, the voltage is
raised slightly to quickly put the charge back in. When the
state of charge is high, the voltage is lowered slightly to
prevent overcharging. If the vehicle has a voltmeter gage
or voltage display on the Driver Information Center (DIC),
you may see the voltage move up or down. This is
normal. If there is a problem, an alert will be displayed.
The battery can be discharged at idle if the electrical
loads are very high. This is true for all vehicles.
This is because the generator (alternator) may not be
spinning fast enough at idle to produce all the power
that is needed for very high electrical loads.
A high electrical load occurs when several of the
following loads are on: headlamps, high beams, fog
lamps, rear window defogger, climate control fan at
high speed, heated seats, engine cooling fans, trailer
loads, and loads plugged into accessory power outlets.
EPM works to prevent excessive discharge of the
battery. It does this by balancing the generator’s output
and the vehicle’s electrical needs. It can increase
engine idle speed to generate more power, whenever
needed. It can temporarily reduce the power demands
of some accessories.Normally, these actions occur in steps or levels, without
being noticeable. In rare cases at the highest levels
of corrective action, this action may be noticeable to
the driver. If so, a Driver Information Center (DIC)
message might be displayed, such as Battery Saver
Active. If this message is displayed, it is recommended
that the driver reduce the electrical loads as much
as possible. SeeDIC Warnings and Messages
on page 3-67.
Battery Run-Down Protection
The vehicle has a feature to help prevent the battery
from draining in case the interior, trunk, or underhood
lamps are accidentally left on. If any of these lamps are
left on while the ignition is in LOCK/OFF, they will
automatically turn off after 10 minutes. The lamps will not
come back on again until any of the following are done:
The ignition is turned to ON/RUN or
ACC/ACCESSORY.
The interior lamps control is turned completely to
the right, then back slightly to the left.
Open, or close and reopen, a door that is closed.
If the vehicle has less than 15 miles (25 km) on the
odometer, the battery saver will turn off the lamps
after only three minutes.
3-22
Page 140 of 450

When the ignition key is turned to ON/RUN, the HUD
will display an introductory message for a short
time, until the HUD has warmed up.
The following indicator lights come on the instrument
panel when activated and will also appear on the HUD:
Turn Signal Indicators
High-Beam Indicator Symbol
The HUD will temporarily display CHECK TRIP
COMPUTER when there are messages on the
DIC trip computer.
The HUD will also display the following messages when
these systems, if the vehicle has them, are active:
TRACTION CONTROL ACTIVE
STABILITY CONTROL ACTIVE
The HUD will temporarily display the TRACTION
CONTROL OFF message when the traction control
system is turned off.
The HUD will temporarily display the CRUISE SET
message when cruise control is activated or cruise
speed is increased.
Notice:If you try to use the HUD image as a
parking aid, you may misjudge the distance and
damage your vehicle. Do not use the HUD image
as a parking aid.When the HUD is on, the speedometer reading will
continually be displayed. The current radio station or
CD track number will display for a short period of time
after the radio or CD track status changes. This will
happen whenever one of the radio controls is pressed.
The speedometer size will be reduced when radio,
CD information, warnings, or turn-by-turn guidance
information are displayed on the HUD.
The HUD control is
located on the console.
To adjust the HUD image so that items are properly
displayed, do the following:
1. Adjust the driver’s seat to a comfortable position.
2. Start the engine.
3. Adjust the HUD controls.
3-24
Page 141 of 450

Use the following settings to adjust the HUD.
9(Off):Turn the outer ring on the HUD control to
this position to turn the HUD off.
I II III IIII (Brightness):Turn the outer ring on the
HUD control clockwise to dim the display and
counterclockwise to brighten it.
w(Up):Press this portion of the switch on the
HUD control to move the image up.
x(Down):Press this portion of the switch on the HUD
control to move the image down. Move the image as
low as possible on the windshield, keeping it in full view.
?(Page):Press this button to select the display
formats. Release the page button when the format
number with the desired display is shown on the HUD.
Format One:This display gives the speedometer
reading (in English or metric units), transmission
positions, compass direction, and the outside
air temperature.
Format Two:This display includes the information
in Format One without the compass direction and
the outside air temperature.
Format Three:This display includes all the
information in Format One, but turns the instrument
cluster lighting off. Format three is only available
at night.All formats will show the turn-by-turn guidance
information. It will display the next turn, direction,
street name, and distance to the selected destination.
When you near your destination, the HUD will display a
distance bar that will �ll in the closer you get to your
destination. All navigation information is provided to the
HUD by the navigation radio, if the vehicle has one.
The warning indicators still appear on the instrument
panel when required. The HUD will display Stealth
Mode On.
The HUD will store the last display format selected.
If the last format displayed was Format One or
Format Three, then Format One will be displayed
when the vehicle is started.
If the last format was Format Two, then Format Two
will be displayed.
The HUD image displayed on the windshield will
automatically dim and brighten to compensate for
outside lighting.
The HUD image can temporarily light up depending
on the angle and position of the sunlight on the
HUD display. This is normal and will change when the
angle of the sunlight on the HUD display changes.
Polarized sunglasses could make the HUD image
harder to see.
3-25
Page 154 of 450

Warning Lights, Gages,
and Indicators
This part describes the warning lights and gages on
your vehicle. The pictures help to locate them.
Warning lights and gages can signal that something
is wrong before it becomes serious enough to cause
an expensive repair or replacement. Paying attention
to the warning lights and gages could also save
you or others from injury.
Warning lights come on when there may be or is
a problem with one of your vehicle’s functions. As the
details show on the next few pages, some warning lights
come on brie�y when you start the engine just to let
you know they are working. If you are familiar with
this section, you should not be alarmed when this
happens.Gages can indicate when there may be or is a problem
with one of your vehicle’s functions. Often gages
and warning lights work together to let you know when
there is a problem with your vehicle.
When one of the warning lights comes on and stays on
as you are driving, or when one of the gages shows
there may be a problem, check the section that tells
you what to do about it. Please follow this manual’s
advice. Waiting to do repairs can be costly and even
dangerous. So please get to know your vehicle’s
warning lights and gages. They can be a big help.
Your vehicle may also have a Driver Information
Center (DIC) that works along with the warning lights
and gages. SeeDriver Information Center (DIC)
on page 3-55for more information.
3-38
Page 155 of 450

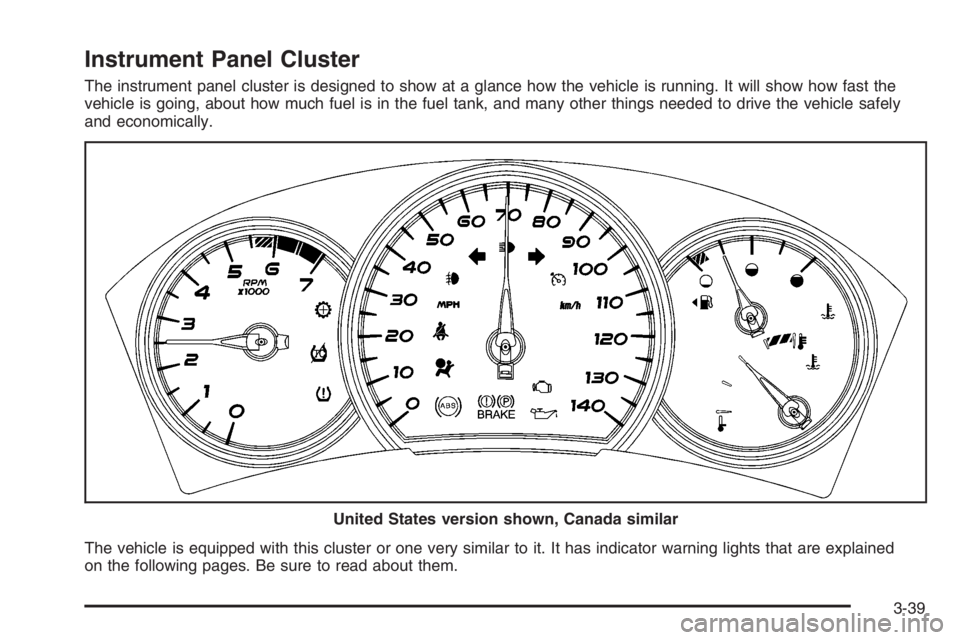
Instrument Panel Cluster
The instrument panel cluster is designed to show at a glance how the vehicle is running. It will show how fast the
vehicle is going, about how much fuel is in the fuel tank, and many other things needed to drive the vehicle safely
and economically.
The vehicle is equipped with this cluster or one very similar to it. It has indicator warning lights that are explained
on the following pages. Be sure to read about them.United States version shown, Canada similar
3-39
Page 158 of 450

Airbag Readiness Light
There is an airbag readiness light on the instrument
panel cluster, which shows the airbag symbol. The
system checks the airbag’s electrical system for
malfunctions. The light tells you if there is an electrical
problem. The system check includes the airbag
sensor, the pretensioners, the airbag modules, the
wiring and the crash sensing and diagnostic module.
For more information on the airbag system, seeAirbag
System on page 1-52.
This light will come on
when you start your
vehicle, and it will �ash
for a few seconds.
The light should go out
and the system is ready.
If the airbag readiness light stays on after you start
the vehicle or comes on when you are driving,
your airbag system may not work properly.
Have your vehicle serviced right away.{CAUTION:
If the airbag readiness light stays on after you
start your vehicle, it means the airbag system
may not be working properly. The airbags in
your vehicle may not in�ate in a crash, or they
could even in�ate without a crash. To help
avoid injury to yourself or others, have your
vehicle serviced right away if the airbag
readiness light stays on after you start your
vehicle.
The airbag readiness light should �ash for a few
seconds when you start the engine. If the light does not
come on then, have it �xed immediately. If there is a
problem with the airbag system, an airbag Driver
Information Center (DIC) message may also come on.
SeeDIC Warnings and Messages on page 3-67for
more information.
3-42
Page 161 of 450

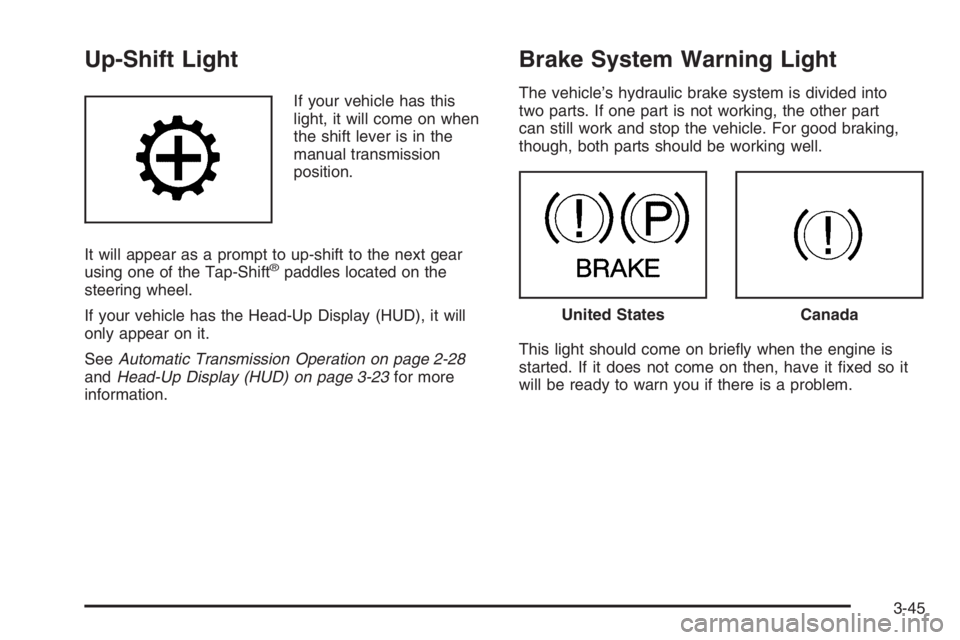
Up-Shift Light
If your vehicle has this
light, it will come on when
the shift lever is in the
manual transmission
position.
It will appear as a prompt to up-shift to the next gear
using one of the Tap-Shift
®paddles located on the
steering wheel.
If your vehicle has the Head-Up Display (HUD), it will
only appear on it.
SeeAutomatic Transmission Operation on page 2-28
andHead-Up Display (HUD) on page 3-23for more
information.
Brake System Warning Light
The vehicle’s hydraulic brake system is divided into
two parts. If one part is not working, the other part
can still work and stop the vehicle. For good braking,
though, both parts should be working well.
This light should come on brie�y when the engine is
started. If it does not come on then, have it �xed so it
will be ready to warn you if there is a problem.
United StatesCanada
3-45
Page 162 of 450

When the ignition is on, the brake system warning light
will also come on when the parking brake is set.
The light will stay on if the parking brake does not
release fully. If it stays on after the parking brake is fully
released, it means the vehicle has a brake problem.
The PARKING BRAKE ON message will also appear in
the Driver Information Center (DIC) when the parking
brake is set and the vehicle is going faster than 5 mph.
SeeDIC Warnings and Messages on page 3-67for
more information.
The brake warning light may also come on when the
brake �uid is low. If this occurs, the LOW BRAKE FLUID
message will also appear in the Driver Information
Center (DIC). SeeDIC Warnings and Messages
on page 3-67for more information.If the brake warning light comes on while the vehicle is
being driven, pull off the road and stop carefully.
The brake pedal may be harder to push, or it may go
closer to the �oor. It may also take the vehicle longer to
stop. If the light is still on, have the vehicle towed for
service. SeeTowing Your Vehicle on page 4-27.
{CAUTION:
Your brake system may not be working
properly if the brake system warning light is on.
Driving with the brake system warning light on
can lead to an accident. If the light is still on
after you have pulled off the road and stopped
carefully, have the vehicle towed for service.
3-46