2008 PONTIAC GRAND PRIX change wheel
[x] Cancel search: change wheelPage 247 of 450
Skidding
In a skid, a driver can lose control of the vehicle.
Defensive drivers avoid most skids by taking reasonable
care suited to existing conditions, and by not overdriving
those conditions. But skids are always possible.
The three types of skids correspond to your vehicle’s
three control systems. In the braking skid, the wheels are
not rolling. In the steering or cornering skid, too much
speed or steering in a curve causes tires to slip and lose
cornering force. And in the acceleration skid, too much
throttle causes the driving wheels to spin.
A cornering skid is best handled by easing your foot off
the accelerator pedal.
If you do not have the Enhanced Traction System (ETS)
or the Traction Control System (TCS), or if the system
is off, then an acceleration skid is also best handled
by easing your foot off the accelerator pedal. See
Enhanced Traction System (ETS) on page 4-7or
Traction Control System (TCS) on page 4-6.
If your vehicle starts to slide, ease your foot off the
accelerator pedal and quickly steer the way you want
the vehicle to go. If you start steering quickly enough,
your vehicle may straighten out. Always be ready
for a second skid if it occurs.Of course, traction is reduced when water, snow, ice,
gravel, or other material is on the road. For safety,
you will want to slow down and adjust your driving to
these conditions. It is important to slow down on slippery
surfaces because stopping distance will be longer and
vehicle control more limited.
While driving on a surface with reduced traction, try
your best to avoid sudden steering, acceleration, or
braking, including reducing vehicle speed by shifting to a
lower gear. Any sudden changes could cause the tires to
slide. You may not realize the surface is slippery until
your vehicle is skidding. Learn to recognize warning
clues — such as enough water, ice, or packed snow on
the road to make a mirrored surface — and slow down
when you have any doubt.
If you have the Antilock Brake System (ABS),
remember: It helps avoid only the braking skid. If you
do not have ABS, then in a braking skid, where the
wheels are no longer rolling, release enough pressure
on the brakes to get the wheels rolling again. This
restores steering control. Push the brake pedal down
steadily when you have to stop suddenly. As long as
the wheels are rolling, you will have steering control.
4-13
Page 256 of 450
Rocking Your Vehicle to Get It Out
First, turn the steering wheel left and right to clear
the area around the front wheels. Turn off any traction
or stability system. SeeTraction Control System
(TCS) on page 4-6,Enhanced Traction System (ETS)
on page 4-7, andStabiliTrak
®Plus System on page 4-8.
Then shift back and forth between REVERSE (R) and
a forward gear, spinning the wheels as little as possible.
To prevent transmission wear, wait until the wheels
stop spinning before shifting gears. Release the
accelerator pedal while you shift, and press lightly on
the accelerator pedal when the transmission is in gear.
By slowly spinning the wheels in the forward and
reverse directions, you will cause a rocking motion
that could free your vehicle. If that does not get
your vehicle out after a few tries, it might need to be
towed out. If your vehicle does need to be towed
out, seeTowing Your Vehicle on page 4-27.
Loading Your Vehicle
It is very important to know how much weight your
vehicle can carry. Two labels on your vehicle show
how much weight it may properly carry, the Tire
and Loading Information label and the Vehicle
Certi�cation label.
{CAUTION:
Do not load your vehicle any heavier than
the Gross Vehicle Weight Rating (GVWR),
or either the maximum front or rear Gross
Axle Weight Rating (GAWR). If you do,
parts on your vehicle can break, and it
can change the way your vehicle handles.
These could cause you to lose control
and crash. Also, overloading can shorten
the life of your vehicle.
4-22
Page 263 of 450
Towing a Trailer
{CAUTION:
If you do not use the correct equipment and
drive properly, you can lose control when you
pull a trailer. For example, if the trailer is too
heavy, the brakes may not work well — or
even at all. You and your passengers could
be seriously injured. You may also damage
your vehicle; the resulting repairs would
not be covered by your warranty. Pull a trailer
only if you have followed all the steps in this
section. Ask your dealer/retailer for advice
and information about towing a trailer with
your vehicle.The vehicle can tow a trailer if it is equipped with the
proper trailer towing equipment. To identify the trailering
capacity of the vehicle, read the information in “Weight of
the Trailer” that appears later in this section. Trailering is
different than just driving the vehicle by itself. Trailering
means changes in handling, durability, and fuel economy.
Successful, safe trailering takes correct equipment, and it
has to be used properly.
That is the reason for this part. In it are many
time-tested, important trailering tips and safety rules.
Many of these are important for your safety and that of
your passengers. So please read this section carefully
before pulling a trailer.
Load-pulling components such as the engine,
transmission, wheel assemblies, and tires are forced
to work harder against the drag of the added weight.
The engine is required to operate at relatively higher
speeds and under greater loads, generating extra heat.
The trailer also adds considerably to wind resistance,
increasing the pulling requirements.
4-29
Page 268 of 450
Following Distance
Stay at least twice as far behind the vehicle ahead as
when driving the vehicle without a trailer. This can
prevent situations that require heavy braking and
sudden turns.
Passing
More passing distance is needed up ahead when
towing a trailer. And, because the vehicle and trailer are
a good deal longer, distances between any vehicles
that are passed must be greater, before returning to
the proper lane.
Backing Up
Hold the bottom of the steering wheel with one hand.
Then, to move the trailer to the left, move that hand
to the left. To move the trailer to the right, move
that hand to the right. Always back up slowly and,
if possible, have someone guide you.
Making Turns
Notice:Making very sharp turns while trailering
could cause the trailer to come in contact with the
vehicle. Your vehicle could be damaged. Avoid
making very sharp turns while trailering.
When turning with a trailer, make wider turns than
normal. Do this so the trailer will not strike soft
shoulders, curbs, road signs, trees, or other objects.
Avoid jerky or sudden maneuvers. Signal well in
advance.
Turn Signals When Towing a Trailer
When towing a trailer, the vehicle may need a different
turn signal �asher and/or extra wiring. Check with
your dealer/retailer. The arrows on the instrument panel
will �ash whenever signaling a turn or lane change.
Properly hooked up, the trailer lamps will also �ash,
telling other drivers the vehicle and trailer are about to
turn, change lanes, or stop.
When towing a trailer, the arrows on the instrument
panel will �ash for turns even if the bulbs on the trailer
are burned out. You may think drivers behind you
are seeing the turn signal when they are not. It is
important to check occasionally to be sure the trailer
bulbs are still working.
4-34
Page 342 of 450

Federal Communications Commission
(FCC) and Industry and Science
Canada
The Tire Pressure Monitor System (TPMS) operates on
a radio frequency and complies with Part 15 of the
FCC Rules. Operation is subject to the following
two conditions:
1. This device may not cause harmful interference.
2. This device must accept any interference received,
including interference that may cause undesired
operation.
The Tire Pressure Monitor System (TPMS) operates on
a radio frequency and complies with RSS-210 of
Industry and Science Canada. Operation is subject to
the following two conditions:
1. This device may not cause interference.
2. This device must accept any interference received,
including interference that may cause undesired
operation of the device.
Changes or modi�cations to this system by other than
an authorized service facility could void authorization to
use this equipment.
Tire Pressure Monitor Operation
The Tire Pressure Monitor System (TPMS) is designed
to warn the driver when a low tire pressure condition
exists. TPMS sensors are mounted onto each tire and
wheel assembly, excluding the spare tire and wheel
assembly. The TPMS sensors monitor the air pressure in
the vehicle’s tires and transmits the tire pressure readings
to a receiver located in the vehicle.
When a low tire pressure
condition is detected, the
TPMS illuminates the low
tire pressure warning light,
located in the instrument
panel cluster.
5-72
Page 346 of 450

The purpose of a regular tire rotation is to achieve
a uniform wear for all tires on the vehicle. This will
ensure that your vehicle continues to perform most
like it did when the tires were new.
Any time you notice unusual wear, rotate your
vehicle’s tires as soon as possible and check the
wheel alignment. Also check for damaged tires
or wheels. SeeWhen It Is Time for New Tires on
page 5-77andWheel Replacement on page 5-82
for more information.
The correct rotation pattern shown here is only for
non-GXP tires.
Do not include a compact spare tire, if your
vehicle has one, in the vehicle’s tire rotation.After the tires have been rotated, adjust the front
and rear in�ation pressures as shown on the Tire
and Loading Information label, and reset the Tire
Pressure Monitor System. SeeTire Pressure
Monitor System on page 5-71for additional
information.
Make certain that all wheel nuts are properly
tightened. See “Wheel Nut Torque” under
Capacities and Specifications on page 5-128.
{CAUTION:
Rust or dirt on a wheel, or on the parts to
which it is fastened, can make wheel nuts
become loose after time. The wheel could
come off and cause an accident. When
you change a wheel, remove any rust or
dirt from places where the wheel attaches
to the vehicle. In an emergency, you can
use a cloth or a paper towel to do this; but
be sure to use a scraper or wire brush later,
if needed, to get all the rust or dirt off.
SeeChanging a Flat Tire on page 5-96.
Rotation Pattern for Non-GXP Tires Only
5-76
Page 355 of 450
If a Tire Goes Flat
It is unusual for a tire to blowout while you are driving,
especially if you maintain your tires properly. SeeTires
on page 5-62. If air goes out of a tire, it is much more
likely to leak out slowly. But if you should ever have a
blowout, here are a few tips about what to expect and
what to do:
If a front tire fails, the �at tire will create a drag that
pulls the vehicle toward that side. Take your foot off the
accelerator pedal and grip the steering wheel �rmly.
Steer to maintain lane position, and then gently brake to
a stop well out of the traffic lane.
A rear blowout, particularly on a curve, acts much like a
skid and may require the same correction you’d use in a
skid. In any rear blowout, remove your foot from the
accelerator pedal. Get the vehicle under control by
steering the way you want the vehicle to go. It may be
very bumpy and noisy, but you can still steer. Gently
brake to a stop, well off the road if possible.If a tire goes �at, and your vehicle has a spare tire, see
Changing a Flat Tire on page 5-96. This information
shows you how to use your vehicle’s tire changing
equipment and how to change a �at tire safely.
{CAUTION:
Lifting a vehicle and getting under it to do
maintenance or repairs is dangerous without
the appropriate safety equipment and training.
The jack provided with your vehicle is
designed only for changing a �at tire. If it is
used for anything else, you or others could be
badly injured or killed if the vehicle slips off
the jack. Use the jack provided with your
vehicle only for changing a �at tire.
5-85
Page 367 of 450
{CAUTION:
Changing a tire can be dangerous. The vehicle
can slip off the jack and roll over or fall on you
or other people. You and they could be badly
injured or even killed. Find a level place to
change your tire. To help prevent the vehicle
from moving:
1. Set the parking brake �rmly.
2. Put the shift lever in PARK (P).
3. Turn off the engine and do not restart
while the vehicle is raised.
4. Do not allow passengers to remain in the
vehicle.
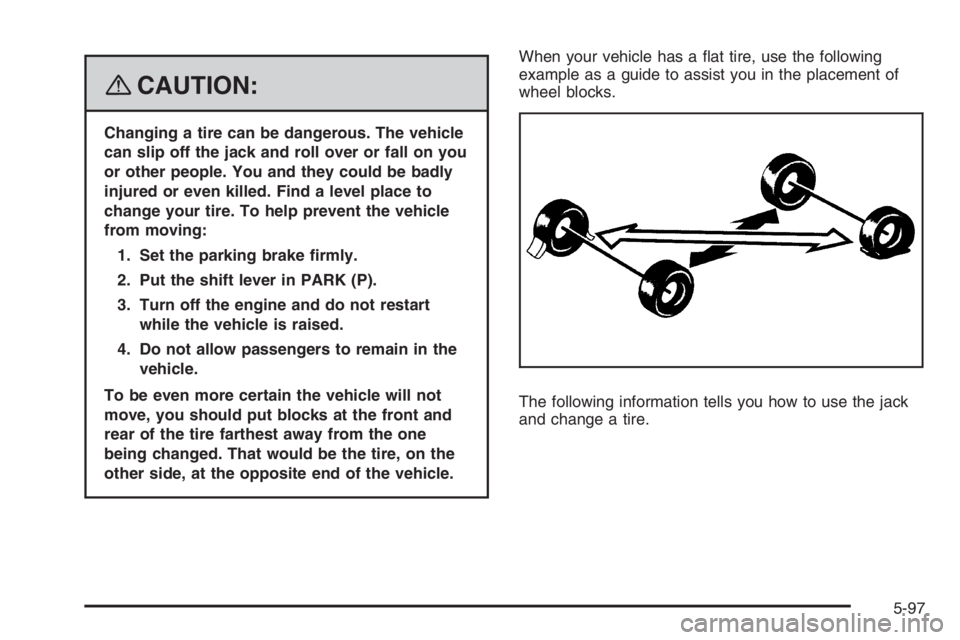
To be even more certain the vehicle will not
move, you should put blocks at the front and
rear of the tire farthest away from the one
being changed. That would be the tire, on the
other side, at the opposite end of the vehicle.When your vehicle has a �at tire, use the following
example as a guide to assist you in the placement of
wheel blocks.
The following information tells you how to use the jack
and change a tire.
5-97