Page 2196 of 2771
TURN SIGNAL AND HAZARD WARNING LAMPS
LT-59
< SERVICE INFORMATION >
C
D
E
F
G
H
I
J
L
MA
B
LT
N
O
P
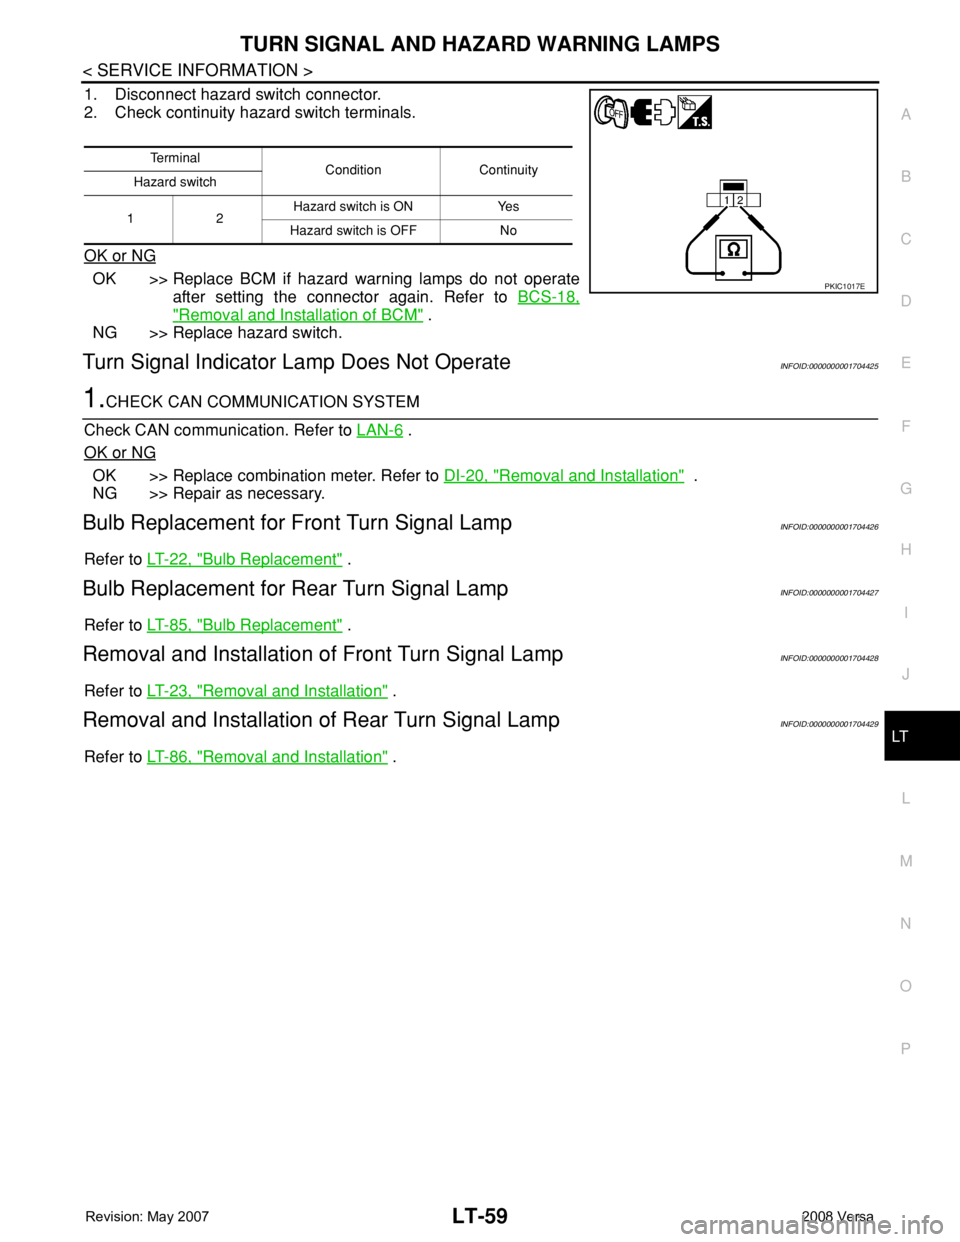
1. Disconnect hazard switch connector.
2. Check continuity hazard switch terminals.
OK or NG
OK >> Replace BCM if hazard warning lamps do not operate
after setting the connector again. Refer to BCS-18,
"Removal and Installation of BCM" .
NG >> Replace hazard switch.
Turn Signal Indicator Lamp Does Not OperateINFOID:0000000001704425
1.CHECK CAN COMMUNICATION SYSTEM
Check CAN communication. Refer to LAN-6
.
OK or NG
OK >> Replace combination meter. Refer to DI-20, "Removal and Installation" .
NG >> Repair as necessary.
Bulb Replacement for Front Turn Signal LampINFOID:0000000001704426
Refer to LT-22, "Bulb Replacement" .
Bulb Replacement for Rear Turn Signal LampINFOID:0000000001704427
Refer to LT-85, "Bulb Replacement" .
Removal and Installation of Front Turn Signal LampINFOID:0000000001704428
Refer to LT-23, "Removal and Installation" .
Removal and Installation of Rear Turn Signal LampINFOID:0000000001704429
Refer to LT-86, "Removal and Installation" .
Te r m i n a l
Condition Continuity
Hazard switch
12Hazard switch is ON Yes
Hazard switch is OFF No
PKIC1017E
Page 2205 of 2771
LT-68
< SERVICE INFORMATION >
STOP LAMP
SEDAN
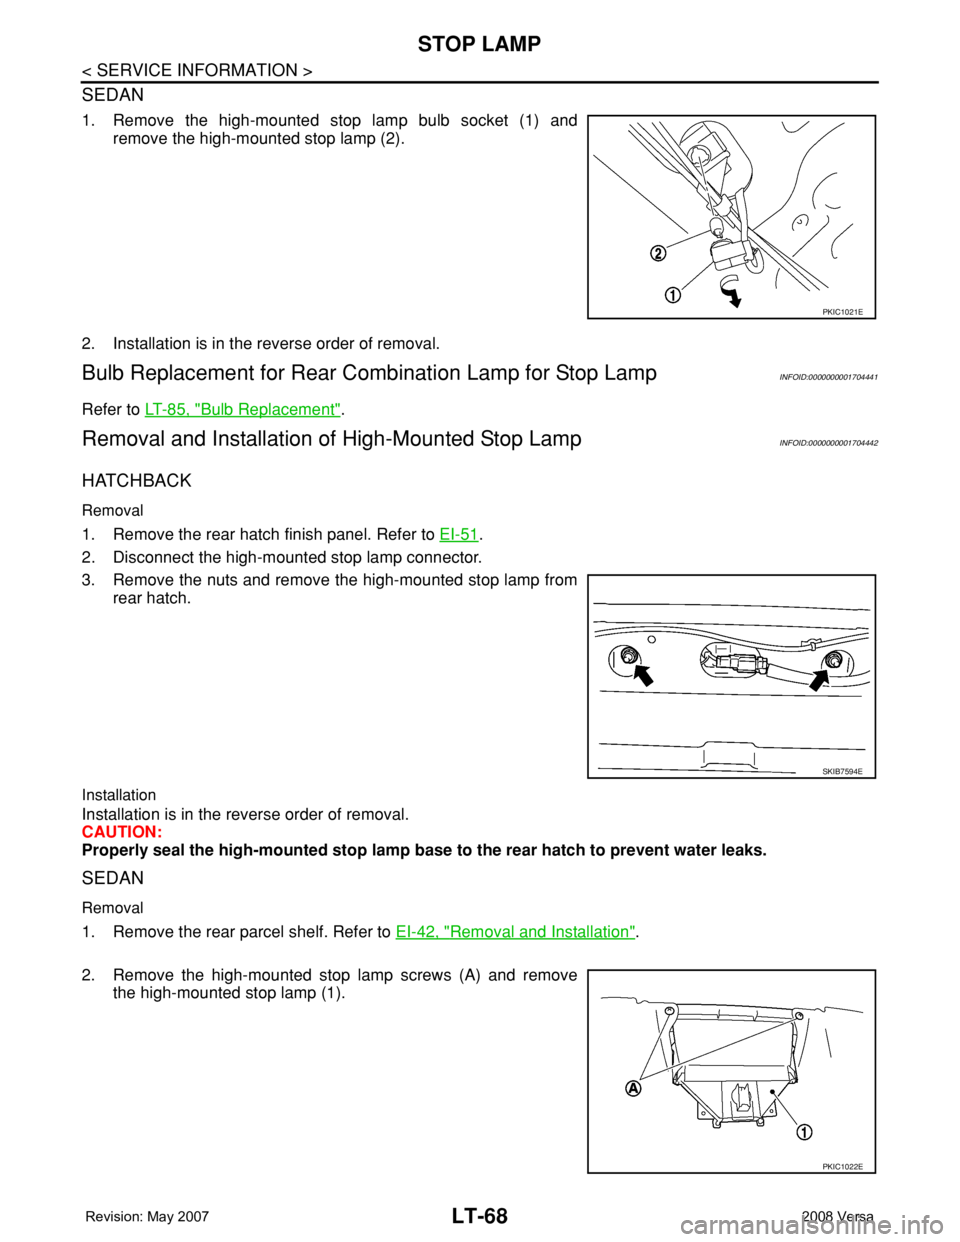
1. Remove the high-mounted stop lamp bulb socket (1) and
remove the high-mounted stop lamp (2).
2. Installation is in the reverse order of removal.
Bulb Replacement for Rear Combination Lamp for Stop LampINFOID:0000000001704441
Refer to LT-85, "Bulb Replacement".
Removal and Installation of High-Mounted Stop LampINFOID:0000000001704442
HATCHBACK
Removal
1. Remove the rear hatch finish panel. Refer to EI-51.
2. Disconnect the high-mounted stop lamp connector.
3. Remove the nuts and remove the high-mounted stop lamp from
rear hatch.
Installation
Installation is in the reverse order of removal.
CAUTION:
Properly seal the high-mounted stop lamp base to the rear hatch to prevent water leaks.
SEDAN
Removal
1. Remove the rear parcel shelf. Refer to EI-42, "Removal and Installation".
2. Remove the high-mounted stop lamp screws (A) and remove
the high-mounted stop lamp (1).
PKIC1021E
SKIB7594E
PKIC1022E
Page 2207 of 2771
LT-70
< SERVICE INFORMATION >
BACK-UP LAMP
BACK-UP LAMP
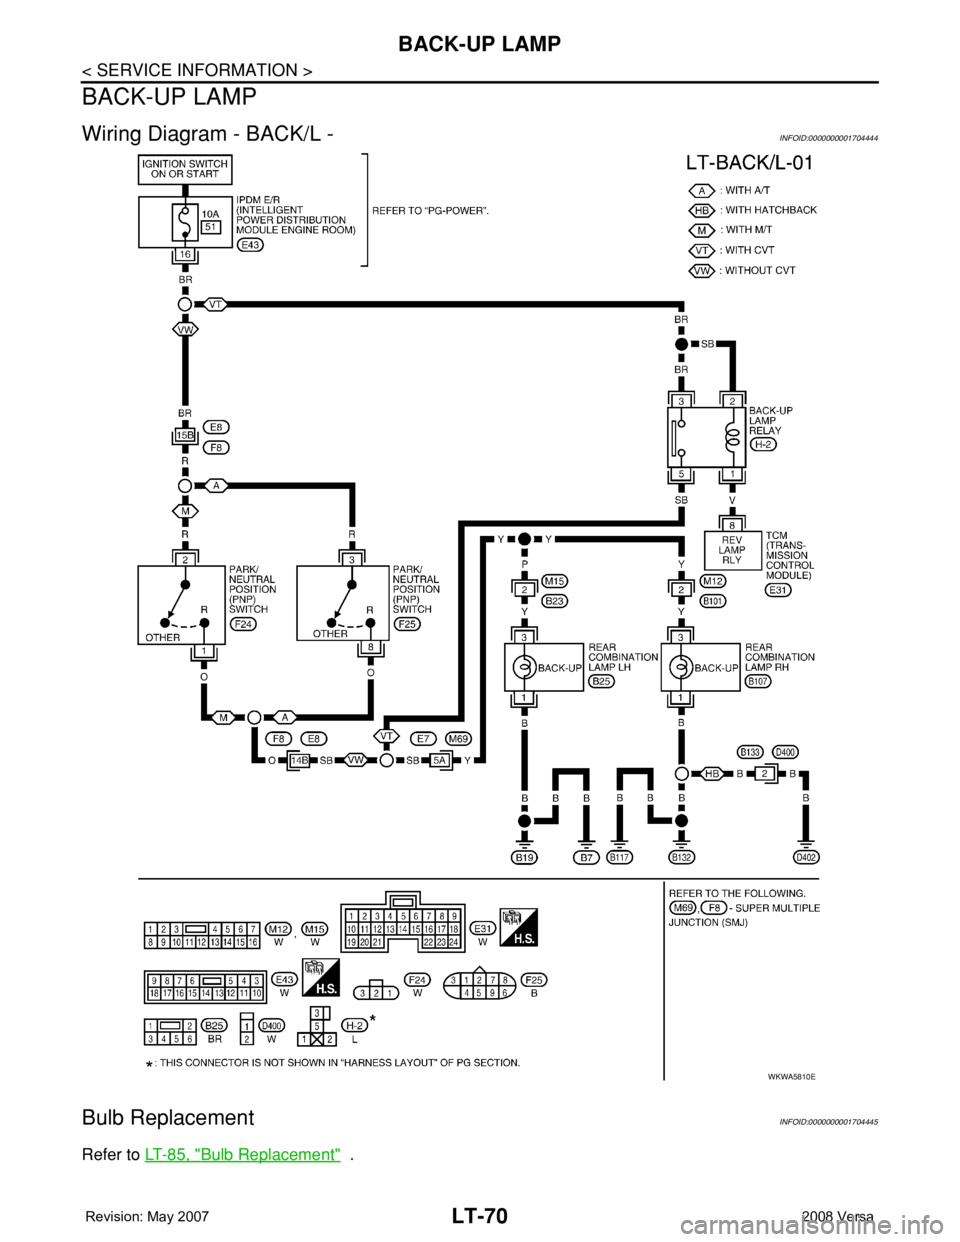
Wiring Diagram - BACK/L -INFOID:0000000001704444
Bulb ReplacementINFOID:0000000001704445
Refer to LT-85, "Bulb Replacement" .
WKWA5810E
Page 2219 of 2771
LT-82
< SERVICE INFORMATION >
PARKING, LICENSE PLATE AND TAIL LAMPS
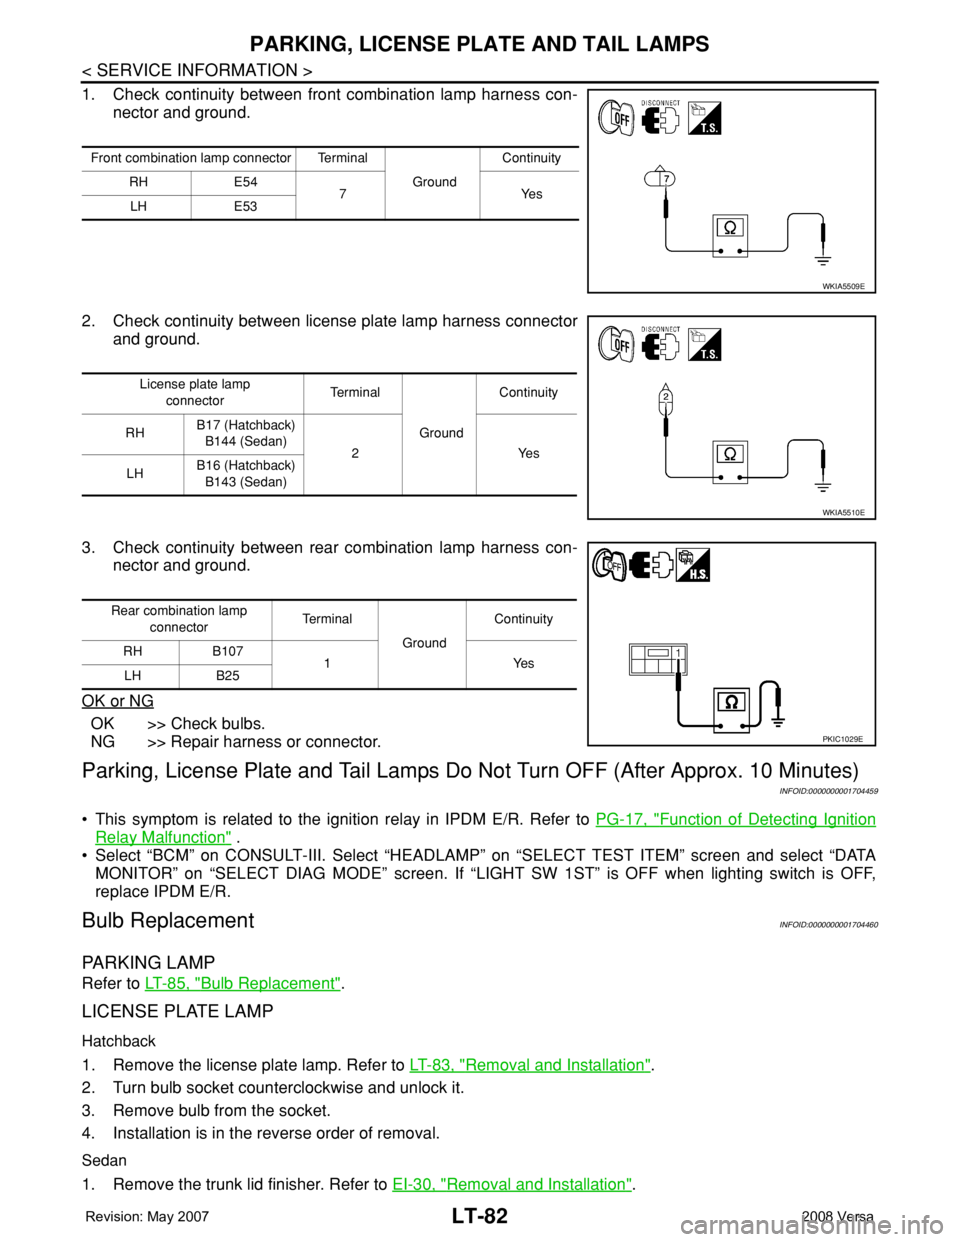
1. Check continuity between front combination lamp harness con-
nector and ground.
2. Check continuity between license plate lamp harness connector
and ground.
3. Check continuity between rear combination lamp harness con-
nector and ground.
OK or NG
OK >> Check bulbs.
NG >> Repair harness or connector.
Parking, License Plate and Tail Lamps Do Not Turn OFF (After Approx. 10 Minutes)
INFOID:0000000001704459
• This symptom is related to the ignition relay in IPDM E/R. Refer to PG-17, "Function of Detecting Ignition
Relay Malfunction" .
• Select “BCM” on CONSULT-III. Select “HEADLAMP” on “SELECT TEST ITEM” screen and select “DATA
MONITOR” on “SELECT DIAG MODE” screen. If “LIGHT SW 1ST” is OFF when lighting switch is OFF,
replace IPDM E/R.
Bulb ReplacementINFOID:0000000001704460
PARKING LAMP
Refer to LT-85, "Bulb Replacement".
LICENSE PLATE LAMP
Hatchback
1. Remove the license plate lamp. Refer to LT-83, "Removal and Installation".
2. Turn bulb socket counterclockwise and unlock it.
3. Remove bulb from the socket.
4. Installation is in the reverse order of removal.
Sedan
1. Remove the trunk lid finisher. Refer to EI-30, "Removal and Installation".
Front combination lamp connector Terminal
GroundContinuity
RH E54
7Yes
LH E53
WKIA5509E
License plate lamp
connectorTe r m i n a l
GroundContinuity
RHB17 (Hatchback)
B144 (Sedan)
2 Yes
LHB16 (Hatchback)
B143 (Sedan)
WKIA5510E
Rear combination lamp
connectorTe r m i n a l
GroundContinuity
RH B107
1Yes
LH B25
PKIC1029E
Page 2220 of 2771
PARKING, LICENSE PLATE AND TAIL LAMPS
LT-83
< SERVICE INFORMATION >
C
D
E
F
G
H
I
J
L
MA
B
LT
N
O
P
2. Remove the license plate lamp bulb socket (1) and remove the
license plate lamp bulb (2).
3. Installation is in the reverse order of removal.
TAIL LAMP
Refer to LT-85, "Bulb Replacement".
Removal and InstallationINFOID:0000000001704461
PA R K I N G L A M P
Refer to LT-86, "Removal and Installation".
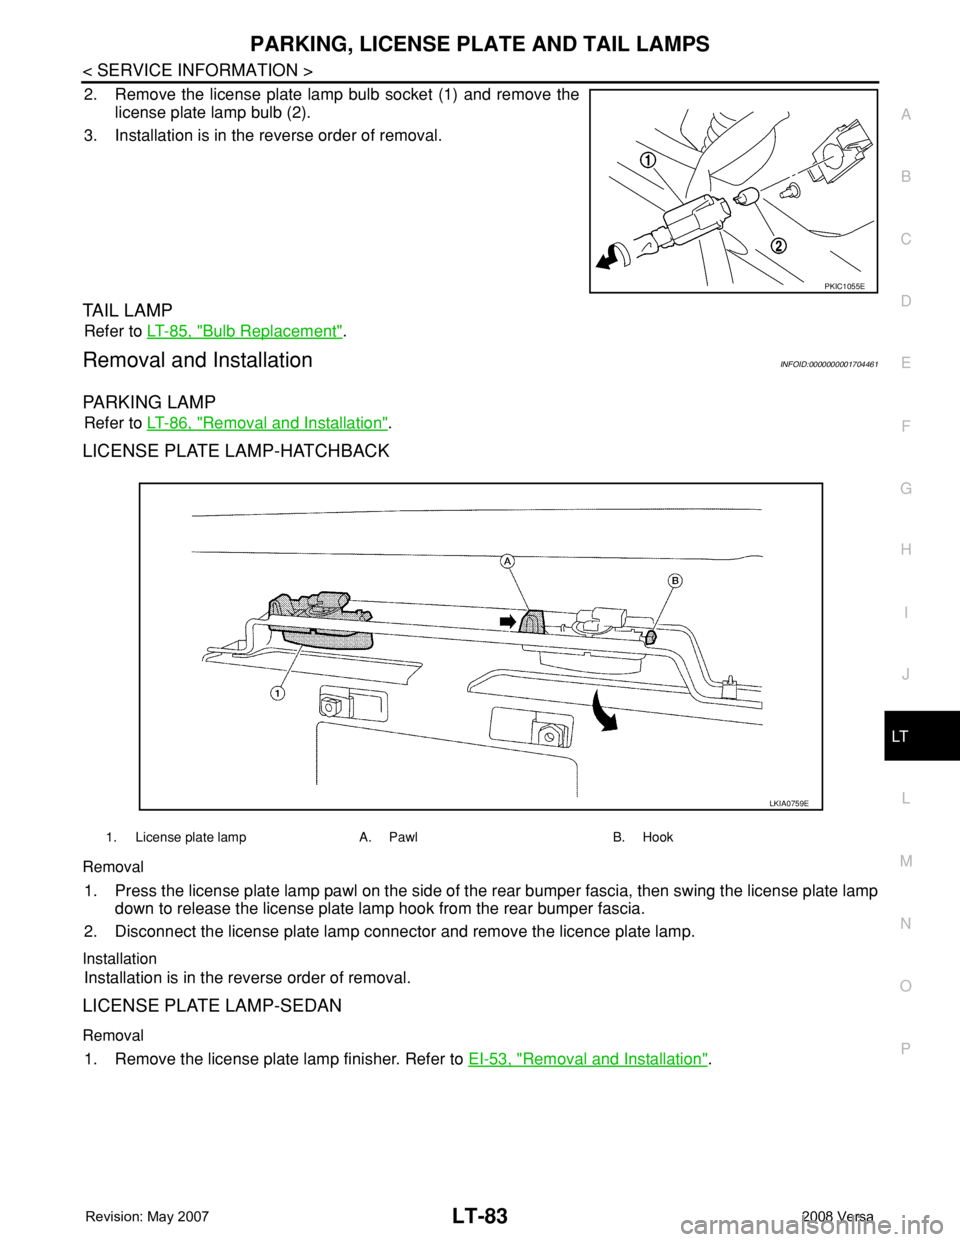
LICENSE PLATE LAMP-HATCHBACK
Removal
1. Press the license plate lamp pawl on the side of the rear bumper fascia, then swing the license plate lamp
down to release the license plate lamp hook from the rear bumper fascia.
2. Disconnect the license plate lamp connector and remove the licence plate lamp.
Installation
Installation is in the reverse order of removal.
LICENSE PLATE LAMP-SEDAN
Removal
1. Remove the license plate lamp finisher. Refer to EI-53, "Removal and Installation".
PKIC1055E
1. License plate lamp A. Pawl B. Hook
LKIA0759E
Page 2222 of 2771
REAR COMBINATION LAMP
LT-85
< SERVICE INFORMATION >
C
D
E
F
G
H
I
J
L
MA
B
LT
N
O
P
REAR COMBINATION LAMP
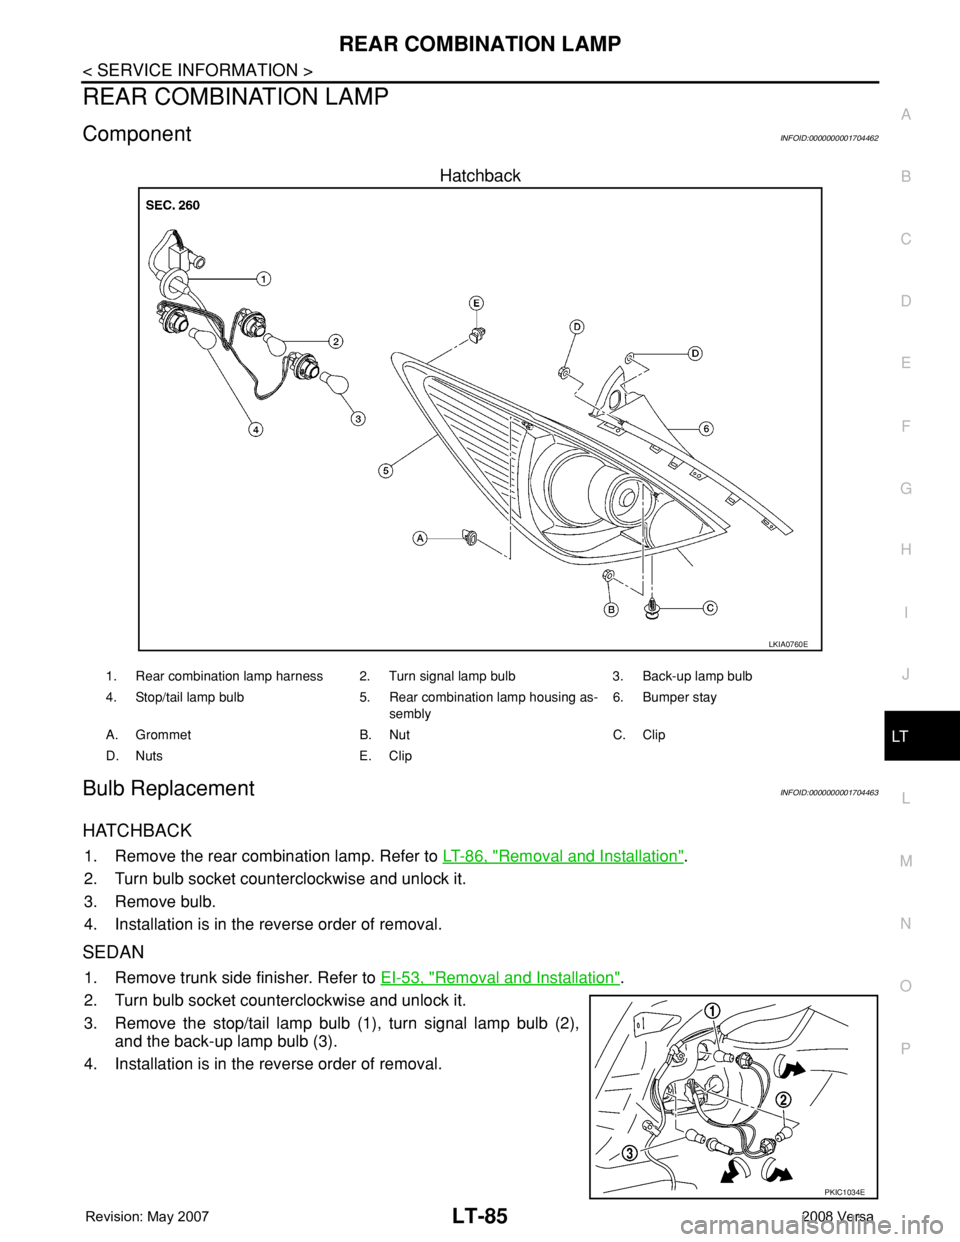
ComponentINFOID:0000000001704462
Hatchback
Bulb ReplacementINFOID:0000000001704463
HATCHBACK
1. Remove the rear combination lamp. Refer to LT-86, "Removal and Installation".
2. Turn bulb socket counterclockwise and unlock it.
3. Remove bulb.
4. Installation is in the reverse order of removal.
SEDAN
1. Remove trunk side finisher. Refer to EI-53, "Removal and Installation".
2. Turn bulb socket counterclockwise and unlock it.
3. Remove the stop/tail lamp bulb (1), turn signal lamp bulb (2),
and the back-up lamp bulb (3).
4. Installation is in the reverse order of removal.
LKIA0760E
1. Rear combination lamp harness 2. Turn signal lamp bulb 3. Back-up lamp bulb
4. Stop/tail lamp bulb 5. Rear combination lamp housing as-
sembly6. Bumper stay
A. Grommet B. Nut C. Clip
D. Nuts E. Clip
PKIC1034E