Page 1667 of 2771
EI-44
< ON-VEHICLE REPAIR >
FLOOR TRIM
6. Disconnect floor harness connector.
7. Remove diagnosis sensor unit. Refer to SRS-44
.
8. Remove key interlock cable. Refer to AT-213
.
9. Remove floor carpet hook.
10. Cut floor trim using a blade knife first between openings (1),
then at front edge (2) as shown.
11. Release floor trim metal clips after cutting, then pull out floor trim through door opening.
12. Remove floor spacer RH/LH.
INSTALLATION
Installation is in the reverse order of removal.
CAUTION:
When replacing the floor trim with a new one, prepare for installation by cutting it like the old one.
Make sure there is a quality fit between floor trim and instrument lower cover by tucking the cut edge
completely.
PIIB6046E
PIIB2580J
PIIB6047E
Page 1670 of 2771
HEADLINING
EI-47
< ON-VEHICLE REPAIR >
C
D
E
F
G
H
J
K
L
MA
B
EI
N
O
P
Removal and Installation - HatchbackINFOID:0000000001704240
REMOVAL
1. Remove the negative and positive battery cables.
2. Remove front seat assembly RH/LH. Refer to SE-11, "
Removal and Installation".
3. Remove rear seat cushion and rear seatback. Refer to SE-15, "
Removal and Installation".
4. Remove front seat belt shoulder anchor RH/LH. Refer to SB-3, "
Removal and Installation of Front Seat
Belt".
5. Remove center console body assembly. Refer to IP-10
.
6. Remove front pillar garnish RH/LH. Refer to EI-38, "
Removal and Installation".
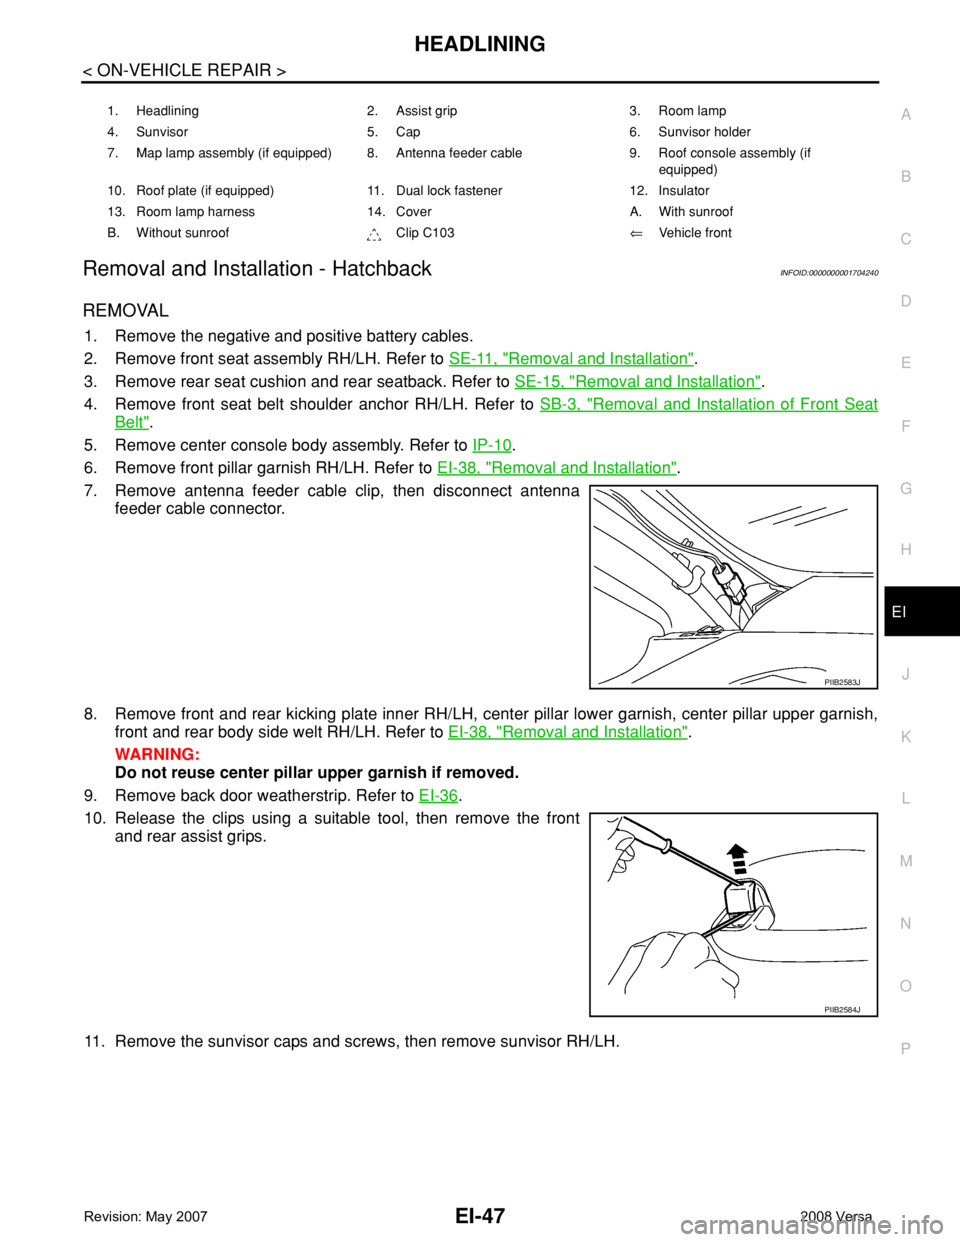
7. Remove antenna feeder cable clip, then disconnect antenna
feeder cable connector.
8. Remove front and rear kicking plate inner RH/LH, center pillar lower garnish, center pillar upper garnish,
front and rear body side welt RH/LH. Refer to EI-38, "
Removal and Installation".
WARNING:
Do not reuse center pillar upper garnish if removed.
9. Remove back door weatherstrip. Refer to EI-36
.
10. Release the clips using a suitable tool, then remove the front
and rear assist grips.
11. Remove the sunvisor caps and screws, then remove sunvisor RH/LH.
1. Headlining 2. Assist grip 3. Room lamp
4. Sunvisor 5. Cap 6. Sunvisor holder
7. Map lamp assembly (if equipped) 8. Antenna feeder cable 9. Roof console assembly (if
equipped)
10. Roof plate (if equipped) 11. Dual lock fastener 12. Insulator
13. Room lamp harness 14. Cover A. With sunroof
B. Without sunroof Clip C103⇐Vehicle front
PIIB2583J
PIIB2584J
Page 1672 of 2771
HEADLINING
EI-49
< ON-VEHICLE REPAIR >
C
D
E
F
G
H
J
K
L
MA
B
EI
N
O
P
Avoid headlining damage when installing by inserting rear clips first during assembly.
Removal and Installation - SedanINFOID:0000000001704241
REMOVAL
1. Remove the negative and positive battery cables.
2. Remove front seat assembly RH/LH. Refer to SE-11, "
Removal and Installation".
3. Remove rear seat cushion and rear seatback. Refer to SE-15, "
Removal and Installation".
4. Remove front seat belt shoulder anchor RH/LH. Refer to SB-3, "
Removal and Installation of Front Seat
Belt".
5. Remove center console body assembly. Refer to IP-10
.
6. Remove front pillar garnish RH/LH. Refer to EI-38, "
Removal and Installation".
7. Remove antenna feeder cable clip, then disconnect antenna
feeder cable connector.
8. Remove front and rear kicking plate inner RH/LH, center pillar lower garnish, center pillar upper garnish,
front and rear body side welt RH/LH. Refer to EI-38, "
Removal and Installation".
WARNING:
Do not reuse center pillar upper garnish if removed.
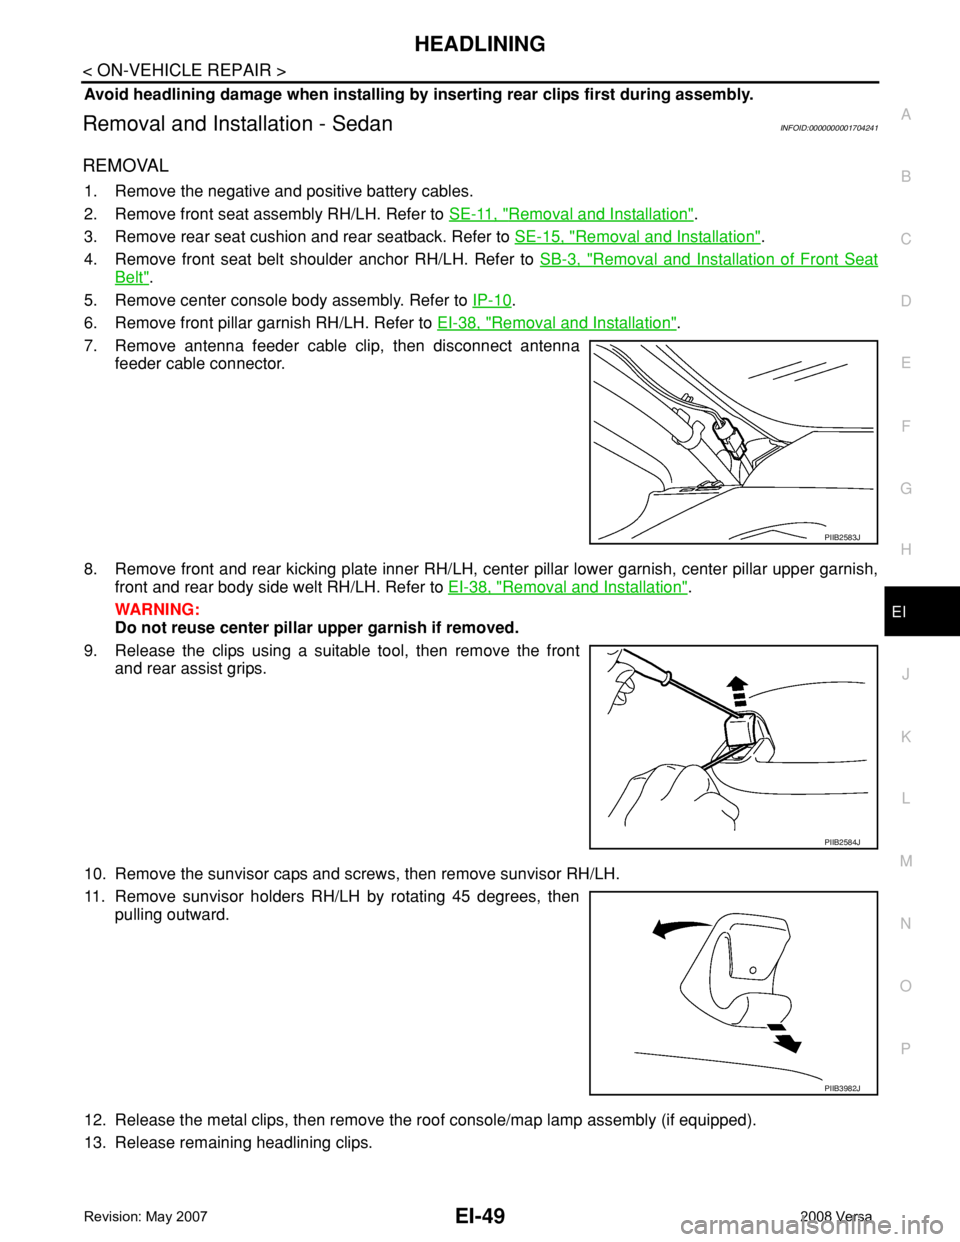
9. Release the clips using a suitable tool, then remove the front
and rear assist grips.
10. Remove the sunvisor caps and screws, then remove sunvisor RH/LH.
11. Remove sunvisor holders RH/LH by rotating 45 degrees, then
pulling outward.
12. Release the metal clips, then remove the roof console/map lamp assembly (if equipped).
13. Release remaining headlining clips.
PIIB2583J
PIIB2584J
PIIB3982J
Page 1675 of 2771
EI-52
< ON-VEHICLE REPAIR >
LUGGAGE FLOOR TRIM
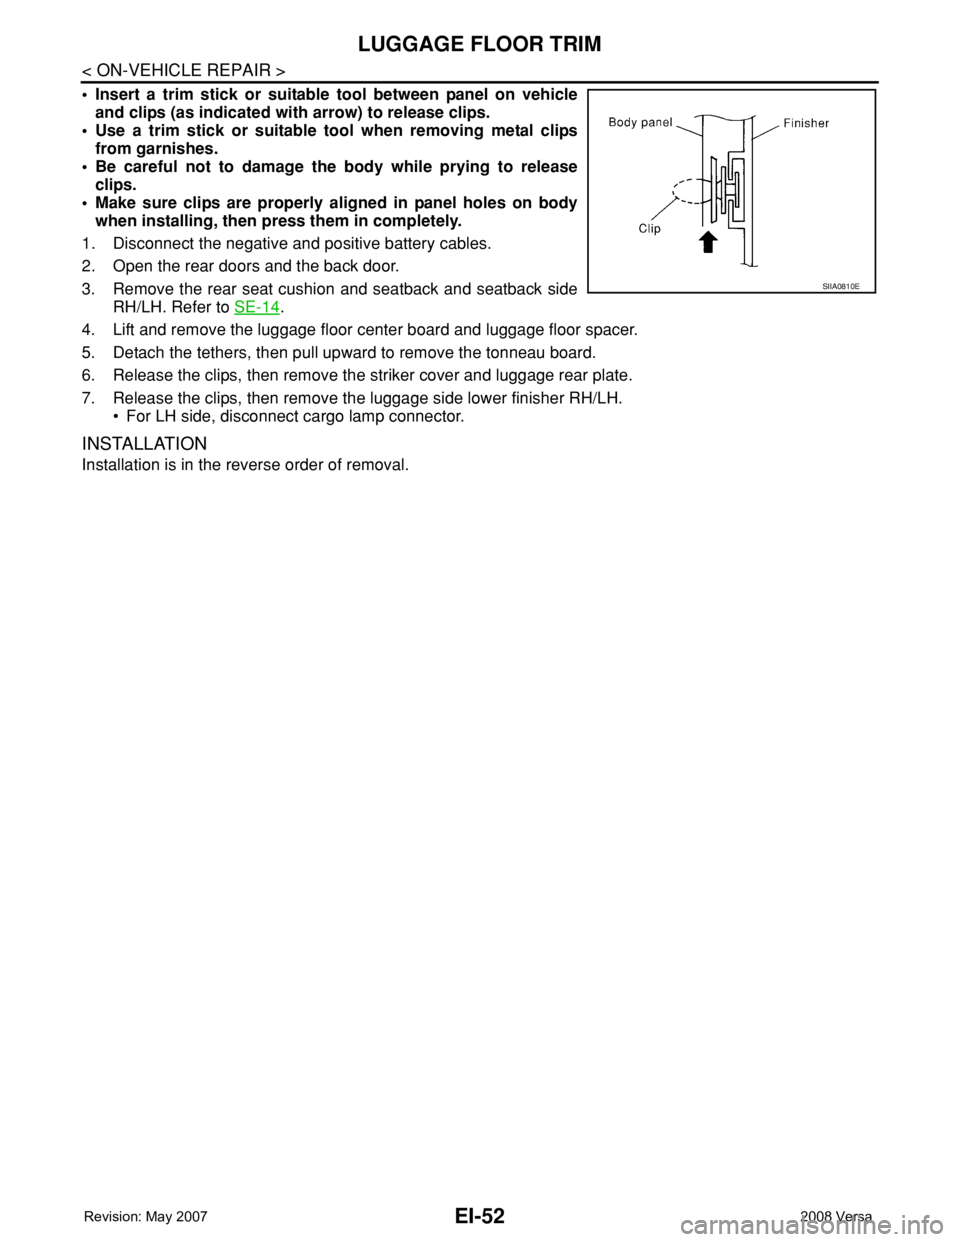
• Insert a trim stick or suitable tool between panel on vehicle
and clips (as indicated with arrow) to release clips.
• Use a trim stick or suitable tool when removing metal clips
from garnishes.
• Be careful not to damage the body while prying to release
clips.
• Make sure clips are properly aligned in panel holes on body
when installing, then press them in completely.
1. Disconnect the negative and positive battery cables.
2. Open the rear doors and the back door.
3. Remove the rear seat cushion and seatback and seatback side
RH/LH. Refer to SE-14
.
4. Lift and remove the luggage floor center board and luggage floor spacer.
5. Detach the tethers, then pull upward to remove the tonneau board.
6. Release the clips, then remove the striker cover and luggage rear plate.
7. Release the clips, then remove the luggage side lower finisher RH/LH.
• For LH side, disconnect cargo lamp connector.
INSTALLATION
Installation is in the reverse order of removal.
SIIA0810E
Page 1680 of 2771
PRECAUTIONS
EM-3
< SERVICE INFORMATION >
C
D
E
F
G
H
I
J
K
L
MA
EM
N
P O
SERVICE INFORMATION
PRECAUTIONS
Precaution for Supplemental Restraint System (SRS) "AIR BAG" and "SEAT BELT
PRE-TENSIONER"
INFOID:0000000001702460
The Supplemental Restraint System such as “AIR BAG” and “SEAT BELT PRE-TENSIONER”, used along
with a front seat belt, helps to reduce the risk or severity of injury to the driver and front passenger for certain
types of collision. This system includes seat belt switch inputs and dual stage front air bag modules. The SRS
system uses the seat belt switches to determine the front air bag deployment, and may only deploy one front
air bag, depending on the severity of a collision and whether the front occupants are belted or unbelted.
Information necessary to service the system safely is included in the SRS and SB section of this Service Man-
ual.
WARNING:
• To avoid rendering the SRS inoperative, which could increase the risk of personal injury or death in
the event of a collision which would result in air bag inflation, all maintenance must be performed by
an authorized NISSAN/INFINITI dealer.
• Improper maintenance, including incorrect removal and installation of the SRS, can lead to personal
injury caused by unintentional activation of the system. For removal of Spiral Cable and Air Bag
Module, see the SRS section.
• Do not use electrical test equipment on any circuit related to the SRS unless instructed to in this
Service Manual. SRS wiring harnesses can be identified by yellow and/or orange harnesses or har-
ness connectors.
Precaution for Procedure without Cowl Top CoverINFOID:0000000001702461
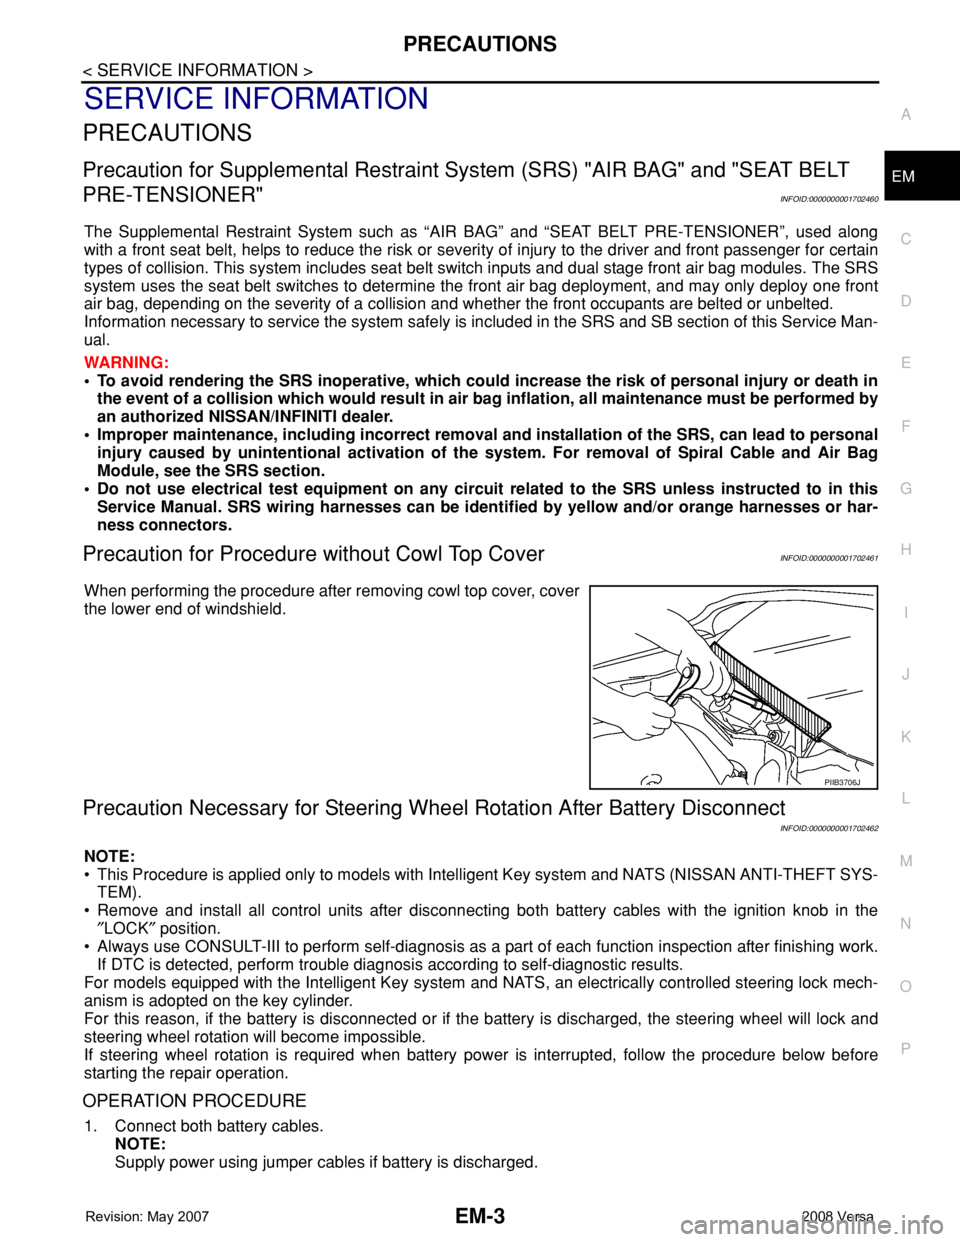
When performing the procedure after removing cowl top cover, cover
the lower end of windshield.
Precaution Necessary for Steering Wheel Rotation After Battery Disconnect
INFOID:0000000001702462
NOTE:
• This Procedure is applied only to models with Intelligent Key system and NATS (NISSAN ANTI-THEFT SYS-
TEM).
• Remove and install all control units after disconnecting both battery cables with the ignition knob in the
″LOCK″ position.
• Always use CONSULT-III to perform self-diagnosis as a part of each function inspection after finishing work.
If DTC is detected, perform trouble diagnosis according to self-diagnostic results.
For models equipped with the Intelligent Key system and NATS, an electrically controlled steering lock mech-
anism is adopted on the key cylinder.
For this reason, if the battery is disconnected or if the battery is discharged, the steering wheel will lock and
steering wheel rotation will become impossible.
If steering wheel rotation is required when battery power is interrupted, follow the procedure below before
starting the repair operation.
OPERATION PROCEDURE
1. Connect both battery cables.
NOTE:
Supply power using jumper cables if battery is discharged.
PIIB3706J
Page 1693 of 2771
EM-16
< SERVICE INFORMATION >
AIR CLEANER AND AIR DUCT
AIR CLEANER AND AIR DUCT
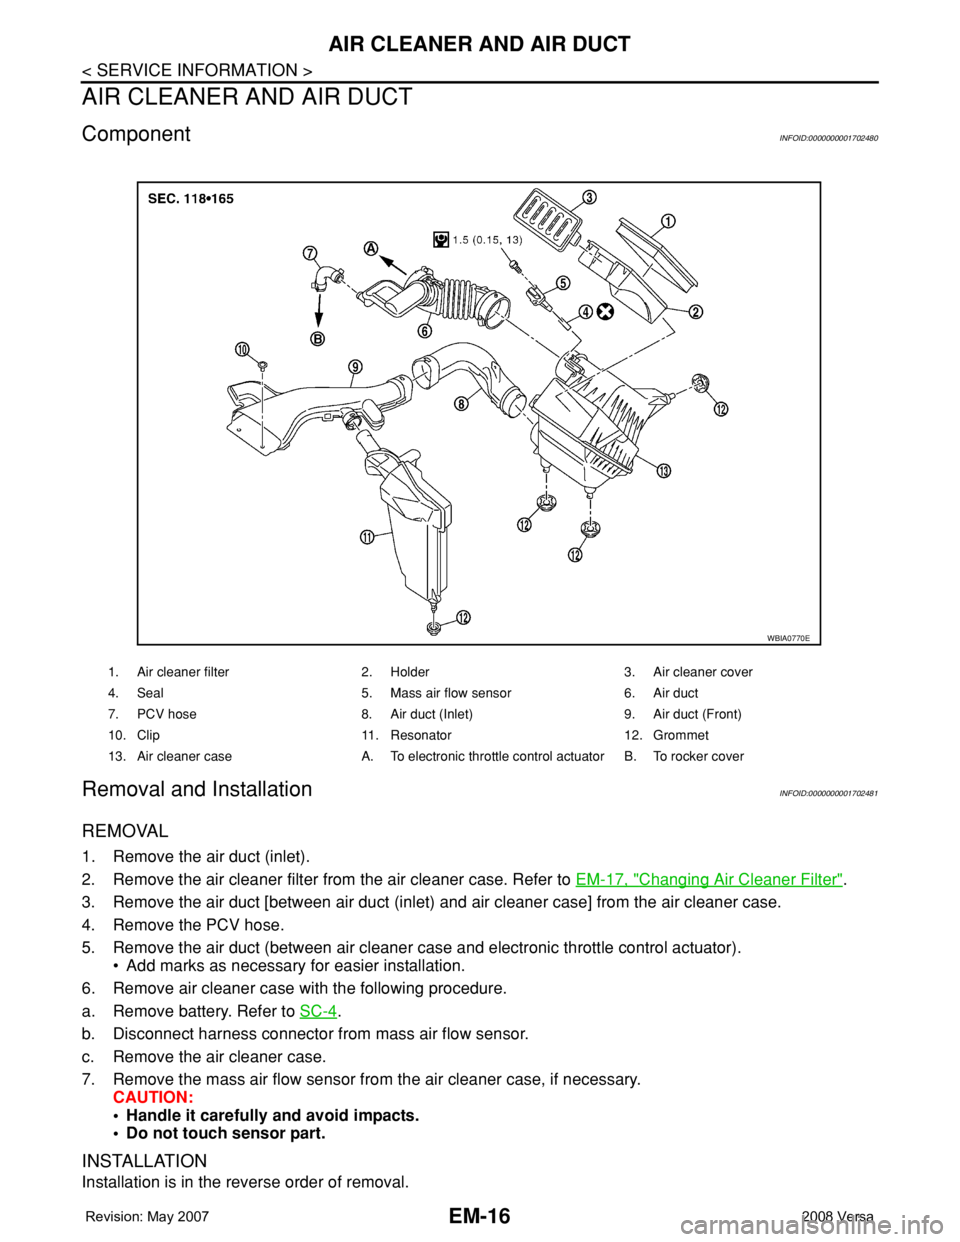
ComponentINFOID:0000000001702480
Removal and InstallationINFOID:0000000001702481
REMOVAL
1. Remove the air duct (inlet).
2. Remove the air cleaner filter from the air cleaner case. Refer to EM-17, "
Changing Air Cleaner Filter".
3. Remove the air duct [between air duct (inlet) and air cleaner case] from the air cleaner case.
4. Remove the PCV hose.
5. Remove the air duct (between air cleaner case and electronic throttle control actuator).
• Add marks as necessary for easier installation.
6. Remove air cleaner case with the following procedure.
a. Remove battery. Refer to SC-4
.
b. Disconnect harness connector from mass air flow sensor.
c. Remove the air cleaner case.
7. Remove the mass air flow sensor from the air cleaner case, if necessary.
CAUTION:
• Handle it carefully and avoid impacts.
• Do not touch sensor part.
INSTALLATION
Installation is in the reverse order of removal.
1. Air cleaner filter 2. Holder 3. Air cleaner cover
4. Seal 5. Mass air flow sensor 6. Air duct
7. PCV hose 8. Air duct (Inlet) 9. Air duct (Front)
10. Clip 11. Resonator 12. Grommet
13. Air cleaner case A. To electronic throttle control actuator B. To rocker cover
WBIA0770E
Page 1701 of 2771
EM-24
< SERVICE INFORMATION >
OIL PAN
OIL PAN
ComponentINFOID:0000000001702487
Removal and InstallationINFOID:0000000001702488
REMOVAL
WARNING:
• Be careful not to burn yourself, as the engine oil is hot.
• Prolonged and repeated contact with used engine oil may cause skin cancer; try to avoid direct skin
contact with used oil. If skin contact is made, wash thoroughly with soap or hand cleaner as soon as
possible.
1. Oil level gauge 2. Oil level gauge guide 3. Rear oil seal
4. O-ring 5. Oil pan (upper) 6. Oil pump drive chain
7. Crankshaft sprocket 8. Oil pump sprocket 9. Timing chain tensioner (for oil pump)
10. Oil pump 11. Drain plug 12. Drain plug washer
13. Oil pan (lower) 14. Oil filter 15. Connector bolt
16. O-ring
A. Refer to EM-24
: Oil pan side
PBIC4482E
Page 1710 of 2771
FUEL INJECTOR AND FUEL TUBE
EM-33
< SERVICE INFORMATION >
C
D
E
F
G
H
I
J
K
L
MA
EM
N
P O
FUEL INJECTOR AND FUEL TUBE
ComponentINFOID:0000000001702491
Removal and InstallationINFOID:0000000001702492
REMOVAL
WARNING:
• Put a “CAUTION: FLAMMABLE” sign in the workshop.
• Be sure to work in a well ventilated area and furnish workshop with a CO
2 fire extinguisher.
• Do not smoke while servicing fuel system. Keep open flames and sparks away from the work area.
1. Release the fuel pressure. Refer to EC-78, "
Fuel Pressure Check".
2. Remove quick connector cap (1) from quick connector connec-
tion.
1. Bracket 2. Bracket 3. Fuel tube
4. Clip 5. Fuel injector 6. O-ring (green)
7. O-ring (black)
WBIA0779E
PBIC3664E