2008 NISSAN ROGUE light
[x] Cancel search: lightPage 220 of 309
Black plate (226,1)
Model "S35-D" EDITED: 2007/ 12/ 19
unnecessary electrical systems (lights, hea-
ter, air conditioner, etc.) .
3. Remove vent caps on the battery (if so
equipped) . Cover the battery with a firmly
wrung out moist cloth to reduce explosion
hazard.
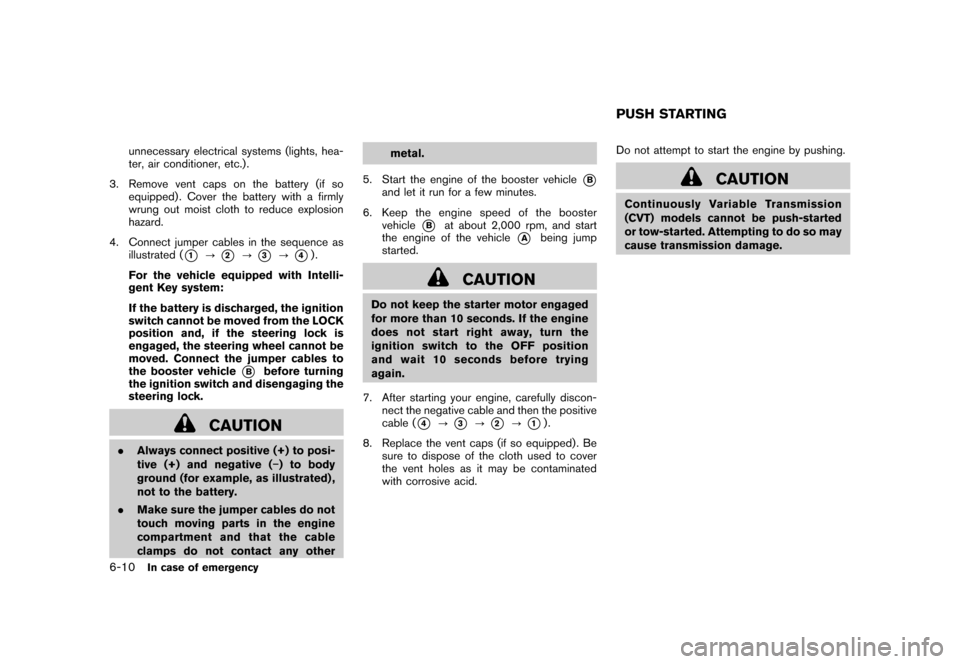
4. Connect jumper cables in the sequence as
illustrated (
*1
?
*2
?
*3
?
*4).
For the vehicle equipped with Intelli-
gent Key system:
If the battery is discharged, the ignition
switch cannot be moved from the LOCK
position and, if the steering lock is
engaged, the steering wheel cannot be
moved. Connect the jumper cables to
the booster vehicle
*B
before turning
the ignition switch and disengaging the
steering lock.
CAUTION
.Always connect positive (+) to posi-
tive (+) and negative (�) to body
ground (for example, as illustrated) ,
not to the battery.
.Make sure the jumper cables do not
touch moving parts in the engine
compartment and that the cable
clamps do not contact any othermetal.
5. Start the engine of the booster vehicle
*B
and let it run for a few minutes.
6. Keep the engine speed of the booster
vehicle
*B
at about 2,000 rpm, and start
the engine of the vehicle
*A
being jump
started.
CAUTION
Do not keep the starter motor engaged
for more than 10 seconds. If the engine
does not start right away, turn the
ignition switch to the OFF position
and wait 10 seconds before trying
again.
7. After starting your engine, carefully discon-
nect the negative cable and then the positive
cable (
*4
?
*3
?
*2
?
*1).
8. Replace the vent caps (if so equipped) . Be
sure to dispose of the cloth used to cover
the vent holes as it may be contaminated
with corrosive acid.Do not attempt to start the engine by pushing.
CAUTION
Continuously Variable Transmission
(CVT) models cannot be push-started
or tow-started. Attempting to do so may
cause transmission damage.PUSH STARTING
6-10
In case of emergency
Page 227 of 309
Black plate (234,1)
Model "S35-D" EDITED: 2007/ 12/ 19
In order to maintain the appearance of your
vehicle, it is important to take proper care of it.
To protect the paint surfaces, wash your vehicle
as soon as you can:
.after a rainfall to prevent possible damage
from acid rain
.after driving on coastal roads
.when contaminants such as soot, bird
droppings, tree sap, metal particles or bugs
get on the paint surface
.when dust or mud builds up on the surface
Whenever possible, store or park your vehicle
inside a garage or in a covered area.
When it is necessary to park outside, park in a
shady area or protect the vehicle with a body
cover.
Be careful not to scratch the paint surface
when putting on or removing the body
cover.WASHINGWash dirt off the vehicle with a wet sponge and
plenty of water. Clean the vehicle thoroughly
using a mild soap, a special vehicle soap or
general purpose dishwashing liquid mixed with
clean, lukewarm (never hot) water.
CAUTION
.Do not use car washes that use acid
in the detergent. Some car washes,
especially brushless ones, use some
acid for cleaning. The acid may react
with some plastic vehicle compo-
nents, causing them to crack. This
could affect their appearance, and
also could cause them not to func-
tion properly. Always check with
your car wash to confirm that acid
is not used.
.Do not wash the vehicle with strong
household soap, strong chemical
detergents, gasoline or solvents.
.Do not wash the vehicle in direct
sunlight or while the vehicle body is
hot, as the surface may become
water-spotted.
.Avoid using tight-napped or rough
cloths, such as washing mitts. Care
must be taken when removing
caked-on dirt or other foreign sub-
stances so the paint surface is not
scratched or damaged.
Rinse the vehicle thoroughly with plenty of clean
water.Inside flanges, seams and folds on the doors,
hatches and hood are particularly vulnerable to
the effects of road salt. Therefore, these areas
must be regularly cleaned. Take care that the
drain holes in the lower edge of the door are
open. Spray water under the body and in the
wheel wells to loosen the dirt and wash away
road salt.
Avoid leaving water spots on the paint surface
by using a damp chamois to dry the vehicle.
WAXINGRegular waxing protects the paint surface and
helps retain new vehicle appearance. Polishing
is recommended to remove built-up wax residue
and to avoid a weathered appearance before
reapplying wax.
A NISSAN dealer can assist you in choosing the
proper product.
.Wax your vehicle only after a thorough
washing. Follow the instructions supplied
with the wax.
.Do not use a wax containing any abrasives,
cutting compounds or cleaners that may
damage the vehicle finish.
Machine compound or aggressive polishing on a
base coat/clear coat paint finish may dull the
finish or leave swirl marks.
CLEANING EXTERIOR7-2
Appearance and care
Page 228 of 309
Black plate (235,1)
Model "S35-D" EDITED: 2007/ 12/ 19
REMOVING SPOTSRemove tar and oil spots, industrial dust,
insects, and tree sap as quickly as possible
from the paint surface to avoid lasting damage
or staining. Special cleaning products are
available at a NISSAN dealer or any automotive
accessory stores.UNDERBODYIn areas where road salt is used in winter, the
underbody must be cleaned regularly. This will
prevent dirt and salt from building up and
causing the acceleration of corrosion on the
underbody and suspension. Before the winter
period and again in the spring, the underseal
must be checked and, if necessary, re-treated.GLASSUse glass cleaner to remove smoke and dust
film from the glass surfaces. It is normal for glass
to become coated with a film after the vehicle is
parked in the hot sun. Glass cleaner and a soft
cloth will easily remove this film.
CAUTION
When cleaning the inside of the win-
dows, do not use sharp-edged tools,
abrasive cleaners or chlorine-based
disinfectant cleaners. They could da-mage the electrical conductors, radio
antenna elements or rear window
defroster elements.
ALUMINUM ALLOY WHEELSWash regularly with a sponge dampened in a
mild soap solution, especially during winter
months in areas where road salt is used. Salt
could discolor the wheels if not removed.
CAUTION
Follow the directions below to avoid
staining or discoloring the wheels:
.Do not use a cleaner that uses
strong acid or alkali contents to
clean the wheels.
.Do not apply wheel cleaners to the
wheels when they are hot. The
wheel temperature should be the
same as ambient temperature.
.Rinse the wheel to completely re-
move the cleaner within 15 minutes
after the cleaner is applied.CHROME PARTSClean chrome parts regularly with a non-
abrasive chrome polish to maintain the finish.
TIRE DRESSINGNISSAN does not recommend the use of tire
dressings. Tire manufacturers apply a coating to
the tires to help reduce discoloration of the
rubber. If a tire dressing is applied to the tires, it
may react with the coating and form a com-
pound. This compound may come off the tire
while driving and stain the vehicle paint.
If you choose to use a tire dressing, take the
following precautions:
.Use a water-based tire dressing. The coat-
ing on the tire dissolves more easily with an
oil-based tire dressing.
.Apply a light coat of tire dressing to help
prevent it from entering the tire tread/
grooves (where it would be difficult to
remove) .
.Wipe off excess tire dressing using a dry
towel. Make sure the tire dressing is
completely removed from the tire tread/
grooves.
.Allow the tire dressing to dry as recom-
mended by tire dressing manufacturer.
Appearance and care
7-3
Page 232 of 309
Black plate (25,1)
8 Maintenance and do-it-yourself
Model "S35-D" EDITED: 2007/ 12/ 25
Maintenance requirement..................................... 8-2
Scheduled maintenance ................................... 8-2
General maintenance ...................................... 8-2
Where to go for service ................................... 8-2
General maintenance .......................................... 8-2
Explanation of maintenance items ....................... 8-2
Maintenance precautions ..................................... 8-5
Engine compartment check locations ...................... 8-6
QR25DE engine ............................................ 8-6
Engine cooling system ......................................... 8-7
Checking engine coolant level ........................... 8-8
Changing engine coolant ................................. 8-8
Engine oil ......................................................... 8-8
Checking engine oil level ................................. 8-8
Changing engine oil and filter ............................ 8-9
Continuously Variable Transmission (CVT) fluid ........ 8-11
Brake fluid ...................................................... 8-11
Window washer fluid ........................................ 8-12
Battery .......................................................... 8-13
Jump starting .............................................. 8-14
Drive belts ...................................................... 8-14
Spark plugs .................................................... 8-15
Replacing spark plugs ................................... 8-15 Air cleaner
...................................................... 8-16
Windshield wiper blades .................................... 8-16
Cleaning .................................................... 8-16
Replacing ................................................... 8-17
Rear window wiper blade ................................... 8-18
Brakes ........................................................... 8-18
Self-adjusting brakes .................................... 8-18
Brake pad wear indicators .............................. 8-18
Fuses ............................................................ 8-19
Engine compartment ..................................... 8-19
Passenger compartment ................................ 8-20
Battery replacement .......................................... 8-21
Keyfob ....................................................... 8-21
Intelligent Key battery .................................... 8-22
Lights ............................................................ 8-24
Headlights .................................................. 8-25
Exterior and interior lights ............................... 8-26
Wheels and tires .............................................. 8-30
Tire pressure ............................................... 8-30
Tire labeling ................................................ 8-33
Types of tires .............................................. 8-35
Tire chains .................................................. 8-36
Changing wheels and tires ............................. 8-37
Page 234 of 309
Black plate (241,1)
Model "S35-D" EDITED: 2007/ 12/ 19
Lights*:Clean the headlights on a regular basis.
Make sure that the headlights, stop lights, tail
lights, turn signal lights, and other lights are all
operating properly and installed securely. Also
check headlight aim.
Road wheel nuts (lug nuts)*:When checking
the tires, make sure no wheel nuts are missing,
and check for any loose wheel nuts. Tighten if
necessary.
Tire rotation*:Tires should be rotated every
7,500 miles (12,000 km).
Tires*:Check the pressure with a gauge often
and always prior to long distance trips. If
necessary, adjust the pressure in all tires,
including the spare, to the pressure specified.
Check carefully for damage, cuts or excessive
wear.
Tire Pressure Monitoring System (TPMS)
transmitter components:Replace the TPMS
transmitter grommet seal, valve core and cap
when the tires are replaced due to wear or age.
Wheel alignment and balance:If the vehicle
should pull to either side while driving on a
straight and level road, or if you detect uneven or
abnormal tire wear, there may be a need for
wheel alignment.
If the steering wheel or seat vibrates at normal
highway speeds, wheel balancing may be
needed.For additional information regarding tires, refer
to “Important Tire Safety Information” (US) or
“Tire Safety Information” (Canada) in the War-
ranty Information Booklet.
Windshield:Clean the windshield on a regular
basis. Check the windshield at least every six
months for cracks or other damage. Have a
damaged windshield repaired by a qualified
repair facility.
Windshield wiper blades*:Check for cracks
or wear if they do not wipe properly.
Inside the vehicleThe maintenance items listed here should be
checked on a regular basis, such as when
performing scheduled maintenance, cleaning
the vehicle, etc.
Accelerator pedal:Check the pedal for
smooth operation and make sure the pedal
does not catch or require uneven effort. Keep
the floor mat away from the pedal.
Brake pedal:Check the pedal for smooth
operation. If the brake pedal suddenly goes
down further than normal, the pedal feels
spongy or the vehicle seems to take longer to
stop, see a NISSAN dealer immediately. Keep
the floor mat away from the pedal.
Brakes:Check that the brakes do not pull the
vehicle to one side when applied.Continuously Variable Transmission (CVT)
P (Park) position mechanism:On a fairly
steep hill, check that the vehicle is held securely
with the selector lever in the P (Park) position
without applying any brakes.
Parking brake:Check the parking brake
operation regularly. The vehicle should be
securely held on a fairly steep hill with only the
parking brake applied. If the parking brake needs
adjusted, see a NISSAN dealer.
Seat belts:Check that all parts of the seat belt
system (for example, buckles, anchors, adjusters
and retractors) operate properly and smoothly,
and are installed securely. Check the belt
webbing for cuts, fraying, wear or damage.
Seats:Check seat position controls such as
seat adjusters, seatback recliner, etc. to ensure
they operate smoothly and that all latches lock
securely in every position. Check that the head
restraints move up and down smoothly and that
the locks (if so equipped) hold securely in all
latched positions.
Steering wheel:Check for changes in the
steering conditions, such as excessive free play,
hard steering or strange noises.
Warning lights and chimes:Make sure that
all warning lights and chimes are operating
properly.
Windshield defroster:Check that the air
Maintenance and do-it-yourself
8-3
Page 241 of 309
Black plate (248,1)
Model "S35-D" EDITED: 2007/ 12/ 19
.Waste oil must be disposed of
properly.
.Check your local regulations.
Perform steps 4 to 9 when the engine oil
filter change is needed.
4. Remove the plastic cover over the oil filter
location by removing the small plastic clips.
5. Loosen the oil filter with an oil filter wrench.
Remove the oil filter by turning it by hand.
6. Wipe the engine oil filter mounting surface
with a clean rag.
CAUTION
Be sure to remove any old gasket
material remaining on the mounting
surface of the engine. Failure to do so
could lead to engine damage.
7. Coat the gasket on the new filter with clean
engine oil.
8. Screw in the oil filter clockwise until a slight
resistance is felt, then tighten additionally
more than 2/3 turn.
Oil filter tightening torque:
11 to 15 ft-lb
(14.7 to 20.5 N·m)
9. Install the plastic cover.10. Clean and re-install the drain plug with a
new washer. Securely tighten the drain plug
with a wrench.
Drain plug tightening torque:
22 to 29 ft-lb
(29 to 39 N·m)
Do not use excessive force.
11. Refill engine with recommended oil through
the oil filler opening, and install the oil filler
cap securely.
See “CAPACITIES AND RECOMMENDED
FUEL/LUBRICANTS” in the “9. Technical
and consumer information” section for drain
and refill capacity. The drain and refill
capacity depends on the oil temperature
and drain time. Use these specifications for
reference only. Always use the dipstick to
determine the proper amount of oil in the
engine.
12. Start the engine and check for leakage
around the drain plug and the oil filter.
Correct as required.
13. Turn the engine off and wait more than 10
minutes. Check the oil level with the dipstick.
Add engine oil if necessary.
After the operation1. Lower the vehicle carefully to the ground.
2. Dispose of waste oil and filter properly.
WARNING
.Prolonged and repeated contact
with used engine oil may cause skin
cancer.
.Try to avoid direct skin contact with
used oil. If skin contact is made,
wash thoroughly with soap or hand
cleaner as soon as possible.
.Keep used engine oil out of reach of
children.
8-10
Maintenance and do-it-yourself
Page 242 of 309
Black plate (249,1)
Model "S35-D" EDITED: 2007/ 12/ 19
CAUTION
.Use only Genuine NISSAN CVT Fluid
NS-2. Do not mix with other fluids.
.Using transmission fluid other than
Genuine NISSAN CVT Fluid NS-2
will damage the CVT, which is not
covered by the NISSAN new vehicle
limited warranty.
When checking or replacement is required, we
recommend a NISSAN dealer for servicing.For additional brake fluid information, see
“CAPACITIES AND RECOMMENDED FUEL/
LUBRICANTS” in the “9. Technical and con-
sumer information” section of this manual.
WARNING
.Use only new fluid from a sealed
container. Old, inferior or contami-
nated fluid may damage the brake
system. The use of improper fluids
can damage the brake system and
affect the vehicle’s stopping ability.
.Clean the filler cap before removing.
.Brake fluid is poisonous and should
be stored carefully in marked con-
tainers out of the reach of children.
CAUTION
Do not spill the fluid on any painted
surfaces. This will damage the paint. If
fluid is spilled, immediately wash the
surface with water.
SDI2130
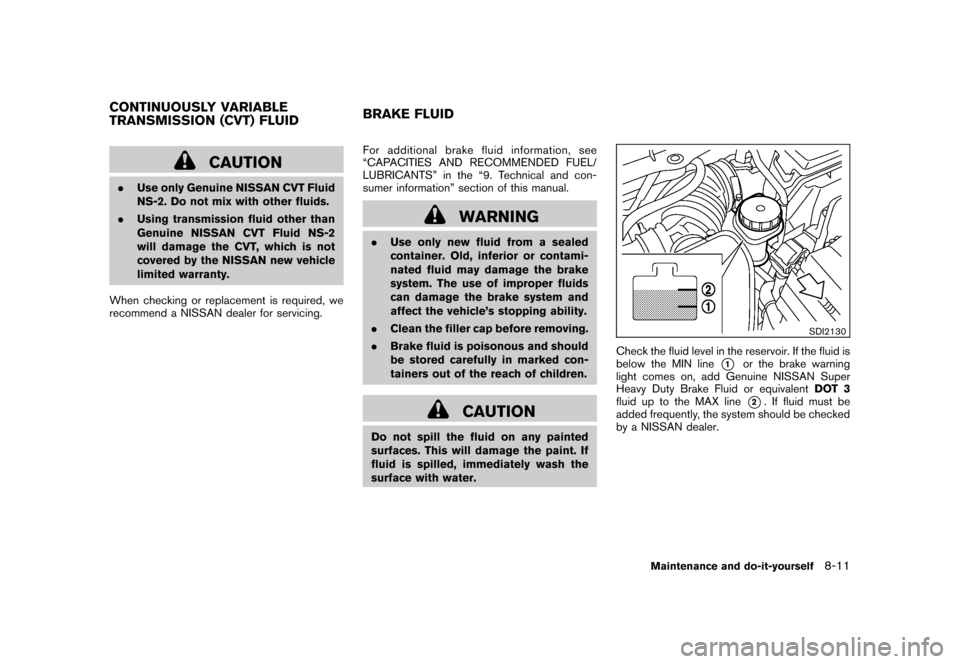
Check the fluid level in the reservoir. If the fluid is
below the MIN line
*1
or the brake warning
light comes on, add Genuine NISSAN Super
Heavy Duty Brake Fluid or equivalentDOT 3
fluid up to the MAX line*2. If fluid must be
added frequently, the system should be checked
by a NISSAN dealer.
CONTINUOUSLY VARIABLE
TRANSMISSION (CVT) FLUIDBRAKE FLUID
Maintenance and do-it-yourself
8-11
Page 243 of 309
Black plate (250,1)
Model "S35-D" EDITED: 2007/ 12/ 19
SDI2131
Type A
SDI2132
Type B
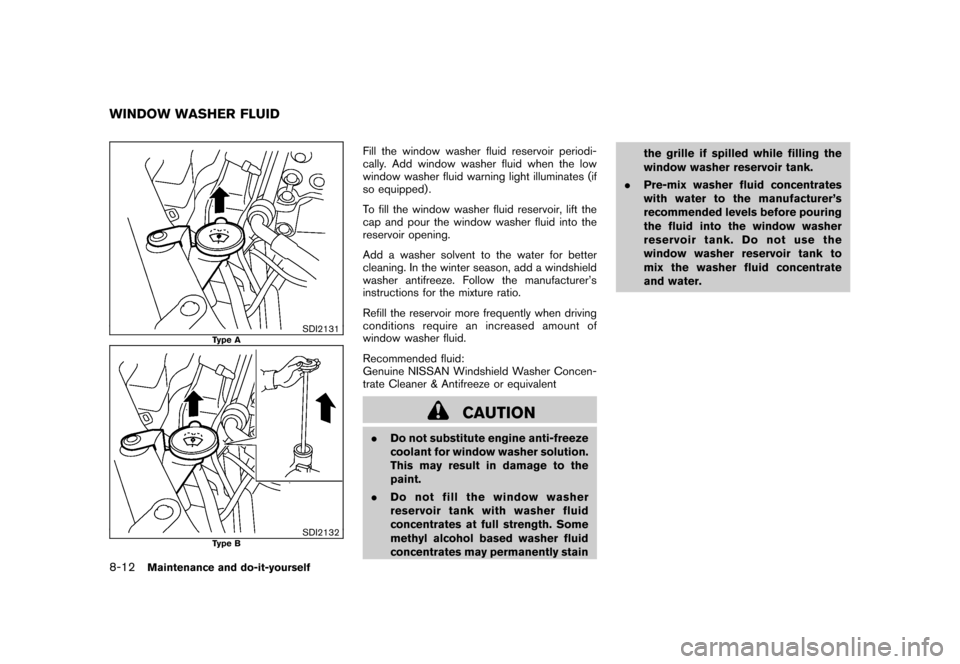
Fill the window washer fluid reservoir periodi-
cally. Add window washer fluid when the low
window washer fluid warning light illuminates (if
so equipped) .
To fill the window washer fluid reservoir, lift the
cap and pour the window washer fluid into the
reservoir opening.
Add a washer solvent to the water for better
cleaning. In the winter season, add a windshield
washer antifreeze. Follow the manufacturer’s
instructions for the mixture ratio.
Refill the reservoir more frequently when driving
conditions require an increased amount of
window washer fluid.
Recommended fluid:
Genuine NISSAN Windshield Washer Concen-
trate Cleaner & Antifreeze or equivalent
CAUTION
.Do not substitute engine anti-freeze
coolant for window washer solution.
This may result in damage to the
paint.
.Do not fill the window washer
reservoir tank with washer fluid
concentrates at full strength. Some
methyl alcohol based washer fluid
concentrates may permanently stainthe grille if spilled while filling the
window washer reservoir tank.
.Pre-mix washer fluid concentrates
with water to the manufacturer’s
recommended levels before pouring
the fluid into the window washer
reservoir tank. Do not use the
window washer reservoir tank to
mix the washer fluid concentrate
and water.
WINDOW WASHER FLUID8-12
Maintenance and do-it-yourself