Page 2 of 36
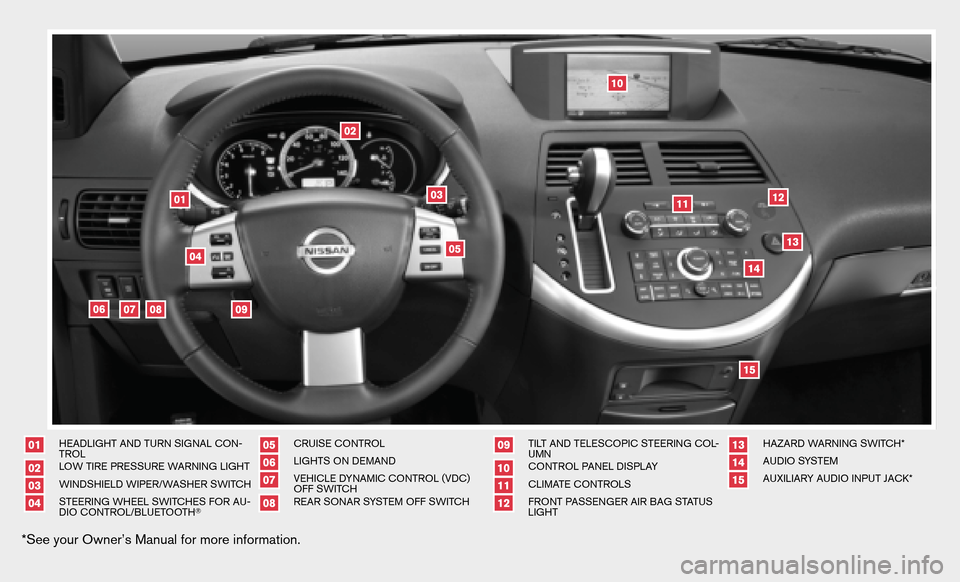
HEADLIGHT AND TURN SIGNAL CON-
TROLLOW TIRE PRESSURE WARNING LIGHTWINDSHIELD WIPER/WASHER SWITCHSTEERING WHEEL SWITCHES FOR AU-
DIO CONTROL/BLUETOOTH �
CRUISE CONTROLLIGHTS ON DEMANDVEHICLE DYNAMIC CONTROL (VDC)
OFF SWITCHREAR SONAR SYSTEM OFF SWITCH
TILT AND TELESCOPIC STEERING COL-
UMNCONTROL PANEL DISPLAYCLIMATE CONTROLSFRONT PASSENGER AIR BAG STATUS
LIGHT
HAZARD WARNING SWITCH*AUDIO SYSTEMAUXILIARY AUDIO INPUT JACK*
*See your Owner’s Manual for more information.
Page 3 of 36

TABLE OF CONTENTS
Remote Keyless Entry System..........................2
Windshield Wiper/Washer Switch .......................3
Headlight and Turn Signal Control .......................3
Lights on Demand (if so equipped) .......................4
Steering Wheel Switches for Audio Control/Bluetooth �
(if so equipped) .................................5
Cruise Control ...................................5
Auto Climate Control (if so equipped) .....................6
Rear Climate Control Dials ............................8
FM/AM/XM �* Radio with CD Changer (if so equipped) ...........8
Control Panel Display with Navigation System (if so equipped) ......10
RearView Monitor (if so equipped) ......................10
Clock Set/Adjustment ..............................11
Rear Sonar System Off Switch (if so equipped) ...............11
Vehicle Dynamic Control (VDC) Off Switch (if so equipped) .......11
Automatic Driver Positioner (if so equipped) .................12
Outside Mirror Control Switch .........................13
Pedal Position Adjustment Switch .......................13
Front-Passenger Air Bag Status Light ....................13
Tire Pressure Monitoring System (TPMS) ..................14
Seat Belt Warning Light and Chime ......................14
Child Safety Rear Door Lock ..........................14
Fuel-Filler Door Release .............................14
Fuel-Filler Cap ..................................15
Moonroof Controls (if so equipped) ......................15
Power Sliding Doors and Power Lift Gate (if so equipped) ........15
Front Seat Adjustments .............................16
Adjusting and Folding the 2nd Row Seat ...................17
Folding the 3rd Row Seat ............................18
Homelink �Universal Transceiver (if so equipped) ..............19
Bluetooth �Hands-Free Phone System (if so equipped) ..........20
NISSAN Mobile Entertainment System (if so equipped) ..........22
Navigation System (if so equipped) ......................26
This easy-to-use Quick Reference Guide is intended to help you more fully
appreciate some of the unique features and functions of your new vehicle.
However, it is not intended to replace your Owner’s Manual. The Owner’s
Manual contains more detailed information to help you better understand the
important safety warnings, features, operation, and maintenance of your
vehicle.
Page 12 of 36
 . The CD will then eject.
� EJECT ALL DISCS")
EJECT BUTTON
� EJECT A SINGLE DISC - Press the
button for less than 1.5 seconds. Select the
eject slot by pressing the CD insert select button ( 1-6 ) . The CD will then eject.
� EJECT ALL DISCS - Press and hold the
button for more than 1.5 seconds. The
CDs will be ejected one after another.
*XM � Satellite Radioisonly available onvehicles equipped withoptional XM�satellite
subscription service.
CONTROL PANEL DISPLAY WITH NAVIGATION SYSTEM (if so
equipped)
TRIP BUTTON
When the TRIPbutton is pressed, the following
modes will display on the screen:
� Warning messages (if there are any)
� TRIP 1(Elapsed Time,Driving Distance,
Average Speed)
� TRIP 2(Elapsed Time,Driving Distance,
Average Speed)
� FUEL ECONOMY (Average Fuel Economy, Distance to Empty)
� MAINTENANCE (Engine Oil, Tire Rotation and Tire Pressure)
� OFF
MAINTENANCE ITEMS
You cansetthe engine oiland thetirerotation interval. Todisplay thesetting ofthe
maintenance interval, select the ENGINE OILorTIRE ROTATION key using the joystick and
press the ENTER button.Toset the maintenance interval,selecttheMAINTENANCE
SCHEDULE keyusing thejoystick andpush thejoystick tothe right orleft. Toreset the
maintenance interval, select the RESETkey using the joystick and press the ENTERbutton.
DISPLAY SCREEN SETTINGS
The SETTING screenwillappear whentheSETTING buttonispressed. Selectthe
DISPLAY key with the joystick and press the ENTERbutton to choose from various display
screen options. The DISPLAYkey will allow you to personalize the information shown on the
display screen, such as climate control or audio system display.
REARVIEW MONITOR (if so equipped)
When theautomatic transmission leverismoved tothe R
(Reverse) position,themonitor displaywillautomatically
change to show the area directly behind the vehicle.
The colored linesonthe display screenindicate approximate
distances to objects.
� Red 1.5 ft (0.5 m); Yellow 3 ft (1 m); Green 7 ft (2 m) and
10 ft (3 m) .
10
Page 16 of 36

Thissystem monitors tirepressure. Ifthe low tirepressure warning
light illuminates, check the tire pressure in all four tires.
Adjust the low tire pressure to")
TIRE PRESSURE MONITORING SYSTEM (TPMS)
Thissystem monitors tirepressure. Ifthe low tirepressure warning
light illuminates, check the tire pressure in all four tires.
Adjust the low tire pressure to the recommended COLD tire pressure
shown on the Tire and Loading Information label located in the driver’s
door opening. After tire pressures are adjusted, the vehicle will need
to be driven at speeds above 16 MPH (25 km/h) to activate the TPMS
and turn off the low tire pressure warning light.
SEAT BELT WARNING LIGHT AND CHIME
� The light and chime remind you to fasten your seat belts. The light
illuminates whenevertheignition keyisturned tothe ON or
START position andremains illuminated untilthedriver’s seat
belt is fastened. At the same time, the chime sounds for approxi-
mately 6seconds unlessthedriver’s seatbeltissecurely fas-
tened.
� The seat beltwarning lightmayalso illuminate ifthe front pas-
senger’s seatbeltisnot fastened whenthefront passenger’s
seat is occupied. For 7 seconds after the ignition switch is in the ON position, the system
does not activate the warning light for the front passenger.
CHILD SAFETY REAR DOOR LOCK
Child safety lockshelpprevent therear doors frombeing
opened accidentally, especiallywhensmallchildren arein
the vehicle. The child safety lock levers are located on the
edge ofthe rear doors. Whenthelever isin the LOCK
position, the door can only be opened from the outside.
FUEL-FILLER DOOR RELEASE
� Press theswitch located onthe driver’s doortoopen the
fuel-filler door.
� Close the fuel-filler door securely to lock it.
� The driver’s sidepower sliding doorisdisabled whenthe
fuel-filler door is open. The sliding door can be partially opened
manually.
14