Page 3 of 36

TABLE OF CONTENTS
Remote Keyless Entry System..........................2
Windshield Wiper/Washer Switch .......................3
Headlight and Turn Signal Control .......................3
Lights on Demand (if so equipped) .......................4
Steering Wheel Switches for Audio Control/Bluetooth �
(if so equipped) .................................5
Cruise Control ...................................5
Auto Climate Control (if so equipped) .....................6
Rear Climate Control Dials ............................8
FM/AM/XM �* Radio with CD Changer (if so equipped) ...........8
Control Panel Display with Navigation System (if so equipped) ......10
RearView Monitor (if so equipped) ......................10
Clock Set/Adjustment ..............................11
Rear Sonar System Off Switch (if so equipped) ...............11
Vehicle Dynamic Control (VDC) Off Switch (if so equipped) .......11
Automatic Driver Positioner (if so equipped) .................12
Outside Mirror Control Switch .........................13
Pedal Position Adjustment Switch .......................13
Front-Passenger Air Bag Status Light ....................13
Tire Pressure Monitoring System (TPMS) ..................14
Seat Belt Warning Light and Chime ......................14
Child Safety Rear Door Lock ..........................14
Fuel-Filler Door Release .............................14
Fuel-Filler Cap ..................................15
Moonroof Controls (if so equipped) ......................15
Power Sliding Doors and Power Lift Gate (if so equipped) ........15
Front Seat Adjustments .............................16
Adjusting and Folding the 2nd Row Seat ...................17
Folding the 3rd Row Seat ............................18
Homelink �Universal Transceiver (if so equipped) ..............19
Bluetooth �Hands-Free Phone System (if so equipped) ..........20
NISSAN Mobile Entertainment System (if so equipped) ..........22
Navigation System (if so equipped) ......................26
This easy-to-use Quick Reference Guide is intended to help you more fully
appreciate some of the unique features and functions of your new vehicle.
However, it is not intended to replace your Owner’s Manual. The Owner’s
Manual contains more detailed information to help you better understand the
important safety warnings, features, operation, and maintenance of your
vehicle.
Page 16 of 36

Thissystem monitors tirepressure. Ifthe low tirepressure warning
light illuminates, check the tire pressure in all four tires.
Adjust the low tire pressure to")
TIRE PRESSURE MONITORING SYSTEM (TPMS)
Thissystem monitors tirepressure. Ifthe low tirepressure warning
light illuminates, check the tire pressure in all four tires.
Adjust the low tire pressure to the recommended COLD tire pressure
shown on the Tire and Loading Information label located in the driver’s
door opening. After tire pressures are adjusted, the vehicle will need
to be driven at speeds above 16 MPH (25 km/h) to activate the TPMS
and turn off the low tire pressure warning light.
SEAT BELT WARNING LIGHT AND CHIME
� The light and chime remind you to fasten your seat belts. The light
illuminates whenevertheignition keyisturned tothe ON or
START position andremains illuminated untilthedriver’s seat
belt is fastened. At the same time, the chime sounds for approxi-
mately 6seconds unlessthedriver’s seatbeltissecurely fas-
tened.
� The seat beltwarning lightmayalso illuminate ifthe front pas-
senger’s seatbeltisnot fastened whenthefront passenger’s
seat is occupied. For 7 seconds after the ignition switch is in the ON position, the system
does not activate the warning light for the front passenger.
CHILD SAFETY REAR DOOR LOCK
Child safety lockshelpprevent therear doors frombeing
opened accidentally, especiallywhensmallchildren arein
the vehicle. The child safety lock levers are located on the
edge ofthe rear doors. Whenthelever isin the LOCK
position, the door can only be opened from the outside.
FUEL-FILLER DOOR RELEASE
� Press theswitch located onthe driver’s doortoopen the
fuel-filler door.
� Close the fuel-filler door securely to lock it.
� The driver’s sidepower sliding doorisdisabled whenthe
fuel-filler door is open. The sliding door can be partially opened
manually.
14
Page 18 of 36

�To activate the power assist feature, manually move a sliding door toward the open or
close position using the inside or outside handle. The power assist feature will automati-
cally complete the motion.
POWER LIFT GATE
The power lift gate can be activated by the buttons on the keyfob, the overhead console, and
the rear door pillar.
� Toopen, closeorreverse theliftgate, theautomatic transmission levermust beinP
(Park) .
� To open, close or reverse the lift gate with the keyfob, press and hold the keyfob button
for longer than 0.5 seconds.
� To close the lift gate with the rear door pillar button, the main ON/OFFswitch must be
on.
The power sliding doors and the power lift gate have an anti-pinch safety feature. Please refer
to your Owner’s Manual for more information regarding this feature.
FRONT SEAT ADJUSTMENTS
With manual seats (if so equipped):
� Pull up on the lever
under the front of the seat
and slide backward or forward; release.
� Lift the lever
on the side of the seat to adjust
your seatback backward or forward; release when
you have found a comfortable angle and the seat
belt fits properly.
� Use the dials
at the side of the driver’s seat to adjust the angle and height of the
seat cushion.
With power seats (if so equipped)
� Move thecontrol
forward orbackward to
adjust the seat cushion forward or backward.
� Pull uptoraise thedriver’s seatcushion; press
down to lower the cushion.
� Push the switchforward to move the seatback forward; press it back to move the
seatback backward.
Your driver’s seathasalumbar support; adjustitby
moving the lever
forward or backward.
16
Page 20 of 36
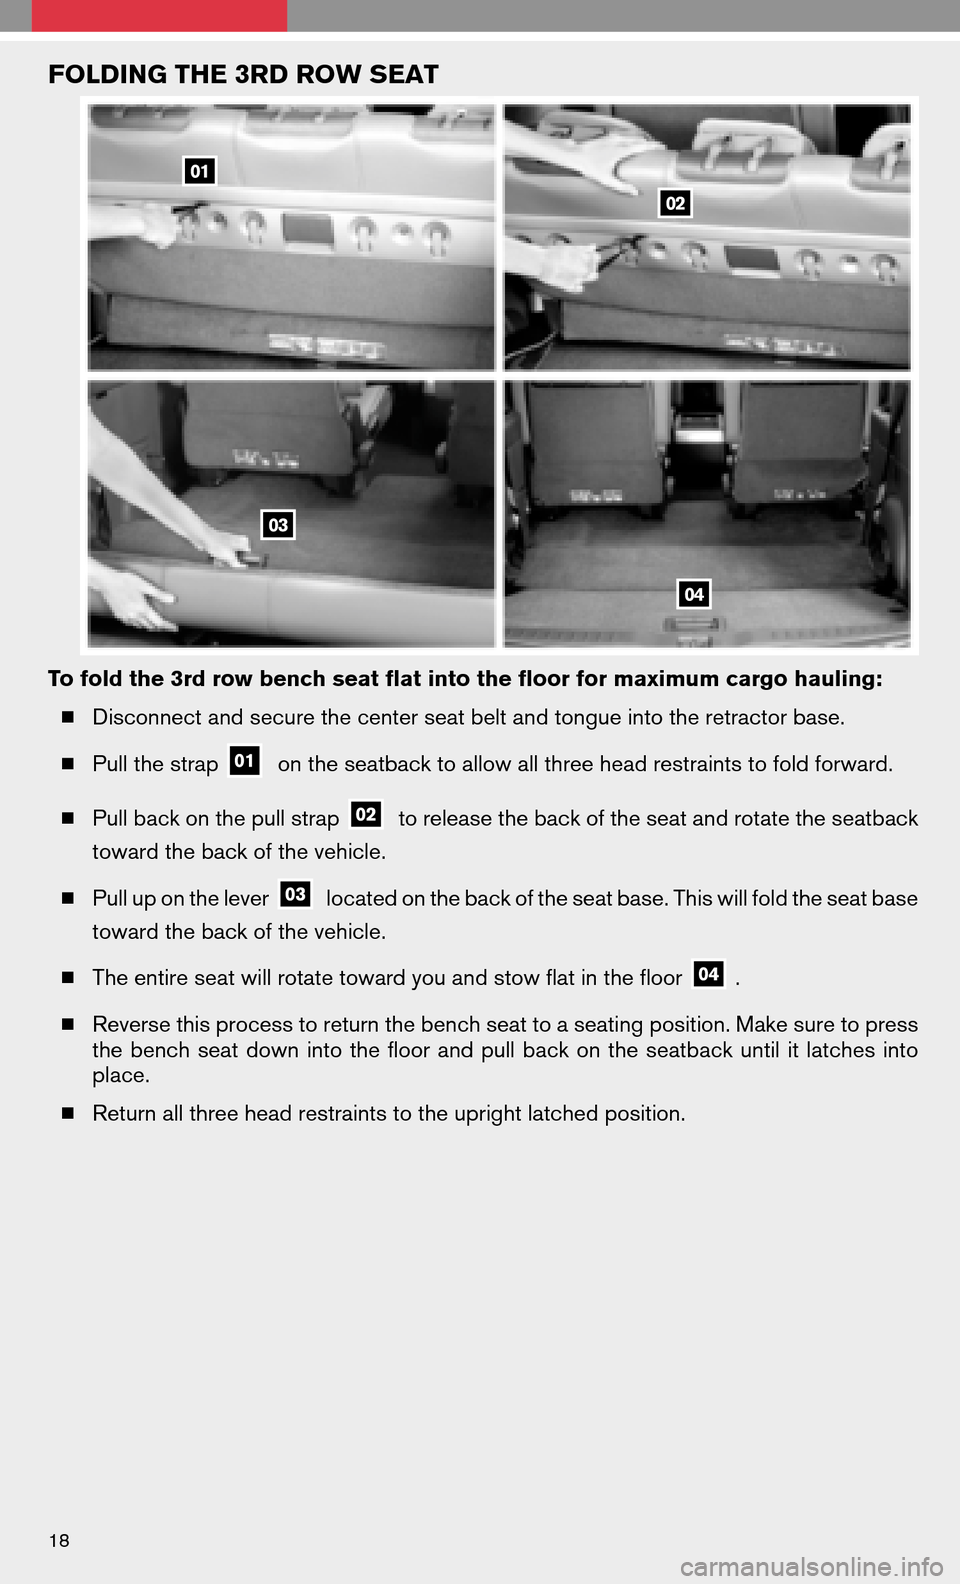
FOLDING THE 3RD ROW SEAT
To fold the 3rd row bench seat flat into the floor for maximum cargo hauling: � Disconnect and secure the center seat belt and tongue into the retractor base.
� Pull the strap
on the seatback to allow all three head restraints to fold forward.
� Pull back on the pull strap
to release the back of the seat and rotate the seatback
toward the back of the vehicle.
� Pull up on the lever
located on the back of the seat base. This will fold the seat base
toward the back of the vehicle.
� The entire seat will rotate toward you and stow flat in the floor
.
� Reverse this process to return the bench seat to a seating position. Make sure to press
the bench seatdown intothefloor andpullback onthe seatback untilitlatches into
place.
� Return all three head restraints to the upright latched position.
18