2008 NISSAN QUEST lock
[x] Cancel search: lockPage 159 of 376

stored memory position can be set again.
Drive the vehicle over 25 MPH (40 km/h) to
restart the memory storage function. You
can also restart the memory storage function
using the following procedure.
1. Connect the battery cable or replace the
fuse.
2. Open and close the driver’s door more than
two times with the ignition key in the LOCK
position.
Once the memory storage function has been
restarted, you can store a memory position.
See “Memory storage function” earlier in this
section.
Selecting the memorized position
Set the shift selector lever to the P (Park) posi-
tion, then:
cWithin 45 seconds of opening the driver’s
door, push the memory switch (1 or 2) fully
for at least 1 second, or
cTurn the ignition switch to the ON position
and push the memory switch (1 or 2) fully for
at least 1 second.
The driver’s seat, accelerator and brake pedals,
and outside mirrors will move to the memorized
position with the indicator light blinking, and then
the light will stay on for approximately 5 seconds.
ENTRY/EXIT FUNCTION
This system is designed so that the driver’s seat
will automatically move when the shift selector
lever is in the P (Park) position. This allows the
driver to get into and out of the driver’s seat more
easily.
The driver’s seat will slide backward:
cWhen the key is removed from the ignition
switch and the driver’s door is opened.
cWhen the driver’s door is opened with the
key turned to LOCK.
cWhen the key is turned from ACC to LOCK
with the driver’s door open.
The driver’s seat will return to previous position:
cWhen the key is inserted into the ignition
switch and the driver’s door is closed.
cWhen the driver’s door is closed with the key
turned to LOCK.
cWhen the key is turned from ACC to ON
while the shift selector lever is in the P (Park)
position.
The entry/exit function can be adjusted or can-
celed. See “Vehicle electronic systems” in the
“Display screen, heater, air conditioner, audio
and phone systems” section of this manual.
Restarting the entry/exit function
If the battery cable is disconnected or if the fuse
opens, the entry/exit function will be disabled.
Drive the vehicle over 25 MPH (40 km/h) to
restart the entry/exit function. You can also restart
the entry/exit function using the following proce-
dure.
1. Connect the battery cable or replace the
fuse.
2. Open and close the driver’s door more than
two times with the ignition key in the LOCK
position.
The entry/exit function should now work properly.
SYSTEM OPERATION
The automatic drive positioner system will not
work or will stop operating under the following
conditions:
cWhen the vehicle speed is above 4 MPH (7
km/h) .
cWhen any of the memory switches are
pushed while the automatic drive positioner
is operating.
cWhen the adjusting switch for the driver’s
seat is turned on while the automatic drive
positioner is operating.
Pre-driving checks and adjustments3-27
ZREVIEW COPYÐ2008 Quest(van)
Owners ManualÐUSA_English(nna)
06/29/07Ðdebbie
X
Page 167 of 376

In case of low tire pressure, a message “LOW
PRESSURE” or “CHECK ALL TIRES” is dis-
played on the screen:
LOW PRESSURE — CHECK ALL TIRES.
WARNING
cWhen a spare tire is mounted or a wheel
is replaced, tire pressure will not be
indicated, the Tire Pressure Monitoring
System (TPMS) will not function and
the low tire pressure warning light will
flash for approximately 1 minute. The
light will remain on after 1 minute. Con-
tact your NISSAN dealer as soon as
possible for tire replacement and/or
system resetting.
cReplacing tires with those not originally
specified by NISSAN could affect the
proper operation of the TPMS.
HOW TO USE THE SETTING
BUTTON
Pressing the SETTING button will change the
settings menu as follows:
Backlight!Day Mode Brightness!Night
Mode Brightness!Clock Adjust HOURS!Clock Adjust MINUTES!Units!Lang!MP3
Disp Type (if so equipped)!Audio or OFF!
Backlight
Backlight
To turn off the screen, select “OFF” of the Back-
light mode by pressing the TUNE button.
The message “Press SETTINGS to resume” will
display for approximately 5 seconds then the
screen will turn off.
To turn on the screen, press the SETTING button
and select “ON” by pressing the TUNE button.
When any button besides SETTING is pressed
with the screen off, the screen turns on for further
operation. The screen will turn off automatically
after the operation is finished.
Day mode brightness
The brightness of the screen during the day can
be changed by pressing the TUNE button.
For additional information, see “
button”
later in this section.
Night mode brightness
The brightness of the screen during the night can
be changed by pressing the TUNE button.
For additional information, see “
button”
later in this section.
Clock operation
The digital clock displays time when the ignition
key is in ACC or ON.
If the power supply is disconnected, the
clock will not indicate the correct time.
Readjust the time.
Clock adjust hours
Press the SETTING button until Clock Adjust
HOURS is shown in the display. Press the TUNE
button up or down to adjust the hour.
Clock adjust minutes
Press the SETTING button again Clock Adjust
Minutes is shown in the display. Press the TUNE
button up or down to adjust the minutes.
To exit the clock adjustment, press the SETTING
button repeatedly. The screen will return to the
audio display if the audio is on. If the audio is not
on, the screen will return to a blank display.
Units
To change the units press the TUNE button to
select “ENGLISH” or “METRIC”.
Unit: US — MI, °F, MPG
Metric — km, °C, L/100 km
Display screen, heater, air conditioner, audio and phone systems4-5
ZREVIEW COPYÐ2008 Quest(van)
Owners ManualÐUSA_English(nna)
06/29/07Ðdebbie
X
Page 176 of 376

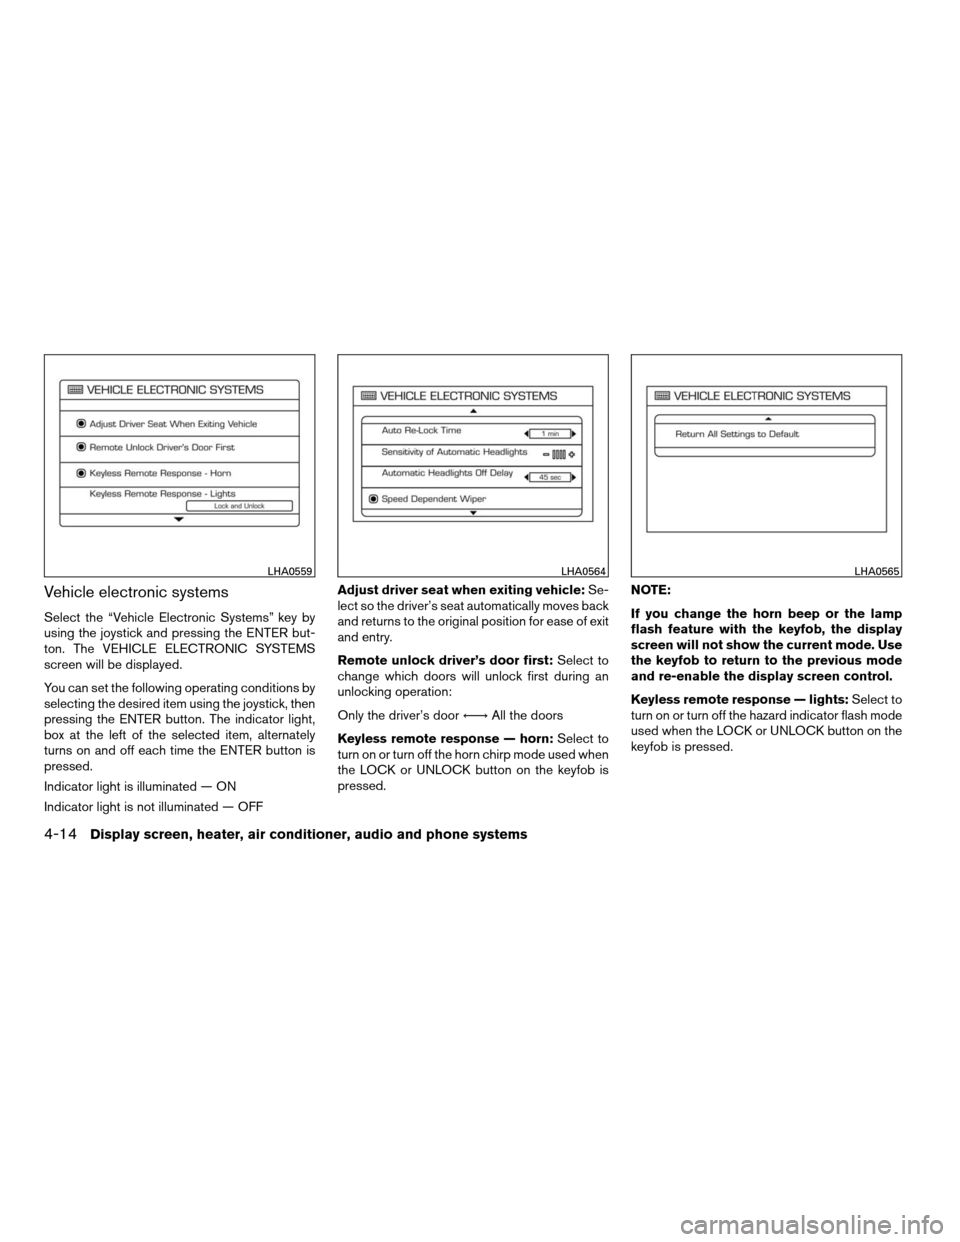
Vehicle electronic systems
Select the “Vehicle Electronic Systems” key by
using the joystick and pressing the ENTER but-
ton. The VEHICLE ELECTRONIC SYSTEMS
screen will be displayed.
You can set the following operating conditions by
selecting the desired item using the joystick, then
pressing the ENTER button. The indicator light,
box at the left of the selected item, alternately
turns on and off each time the ENTER button is
pressed.
Indicator light is illuminated — ON
Indicator light is not illuminated — OFFAdjust driver seat when exiting vehicle:Se-
lect so the driver’s seat automatically moves back
and returns to the original position for ease of exit
and entry.
Remote unlock driver’s door first:Select to
change which doors will unlock first during an
unlocking operation:
Only the driver’s doorÃ!All the doors
Keyless remote response — horn:Select to
turn on or turn off the horn chirp mode used when
the LOCK or UNLOCK button on the keyfob is
pressed.NOTE:
If you change the horn beep or the lamp
flash feature with the keyfob, the display
screen will not show the current mode. Use
the keyfob to return to the previous mode
and re-enable the display screen control.
Keyless remote response — lights:Select to
turn on or turn off the hazard indicator flash mode
used when the LOCK or UNLOCK button on the
keyfob is pressed.
LHA0559LHA0564LHA0565
4-14Display screen, heater, air conditioner, audio and phone systems
ZREVIEW COPYÐ2008 Quest(van)
Owners ManualÐUSA_English(nna)
06/29/07Ðdebbie
X
Page 177 of 376

NOTE:
If you change the horn beep or the lamp
flash feature with the keyfob, the mode will
not be changed with the display. Use the
keyfob to return to the previous mode and
re-enable the display control.
Auto re-lock time:Select to set the length of
time before doors automatically re-lock.
Sensitivity of automatic headlights:Select
to change the sensitivity setting of the automatic
headlights:
cLower: less sensitive, automatic headlights
will take longer to come on when the head-
light sensor senses less ambient light.
cHigher: more sensitive, automatic headlights
will come on quicker when the headlight
sensor senses less ambient light.
Automatic headlights off delay:Select to
change the setting for the length of time the
automatic headlights remain on after exiting the
vehicle.
Speed dependent wiper:Select to turn on or
turn off the driving speed dependent intermittent
wiper function.
Return all settings to default:Select to
change all VEHICLE ELECTRONICS SYSTEMS
to their default settings.
System settings
Select the “System Settings” key by using the
joystick and pressing the ENTER button. The
SYSTEM SETTINGS menu will be displayed.
Language/unit
The LANGUAGE/UNIT screen will appear when
selecting the “Language/Unit” key and pressing
the ENTER button.
Language: English or French
Unit: US — mile, °F, MPG
Metric — km, °C, L/100 kmYou can select the language and unit using the
joystick or pressing the ENTER button.
The settings are automatically saved when you
exit the menu by pressing the BACK button or
any other mode button.
LHA0561
Display screen, heater, air conditioner, audio and phone systems4-15
ZREVIEW COPYÐ2008 Quest(van)
Owners ManualÐUSA_English(nna)
06/29/07Ðdebbie
X
Page 178 of 376

Clock
Adjusting the time:
Select the “Hours” or “Minutes” key and move the
joystick to the right or left to adjust the time.
The time will change step by step.
The new settings are automatically saved when
you exit the setting screen by pressing the BACK
or any other mode button.
Beep setting
With this option ON, a beep will sound if any
audio button is pressed.
BUTTON
To change the display brightness, press
thebutton. Pressing the button again will
change the display to “DAY” or “NIGHT” display.
Then, adjust the brightness by moving the joy-
stick right or left.
If no operation is done within 10 seconds, or if the
BACK button is pressed, the display will return to
the previous display.
LHA0600
4-16Display screen, heater, air conditioner, audio and phone systems
ZREVIEW COPYÐ2008 Quest(van)
Owners ManualÐUSA_English(nna)
06/29/07Ðdebbie
X
Page 186 of 376

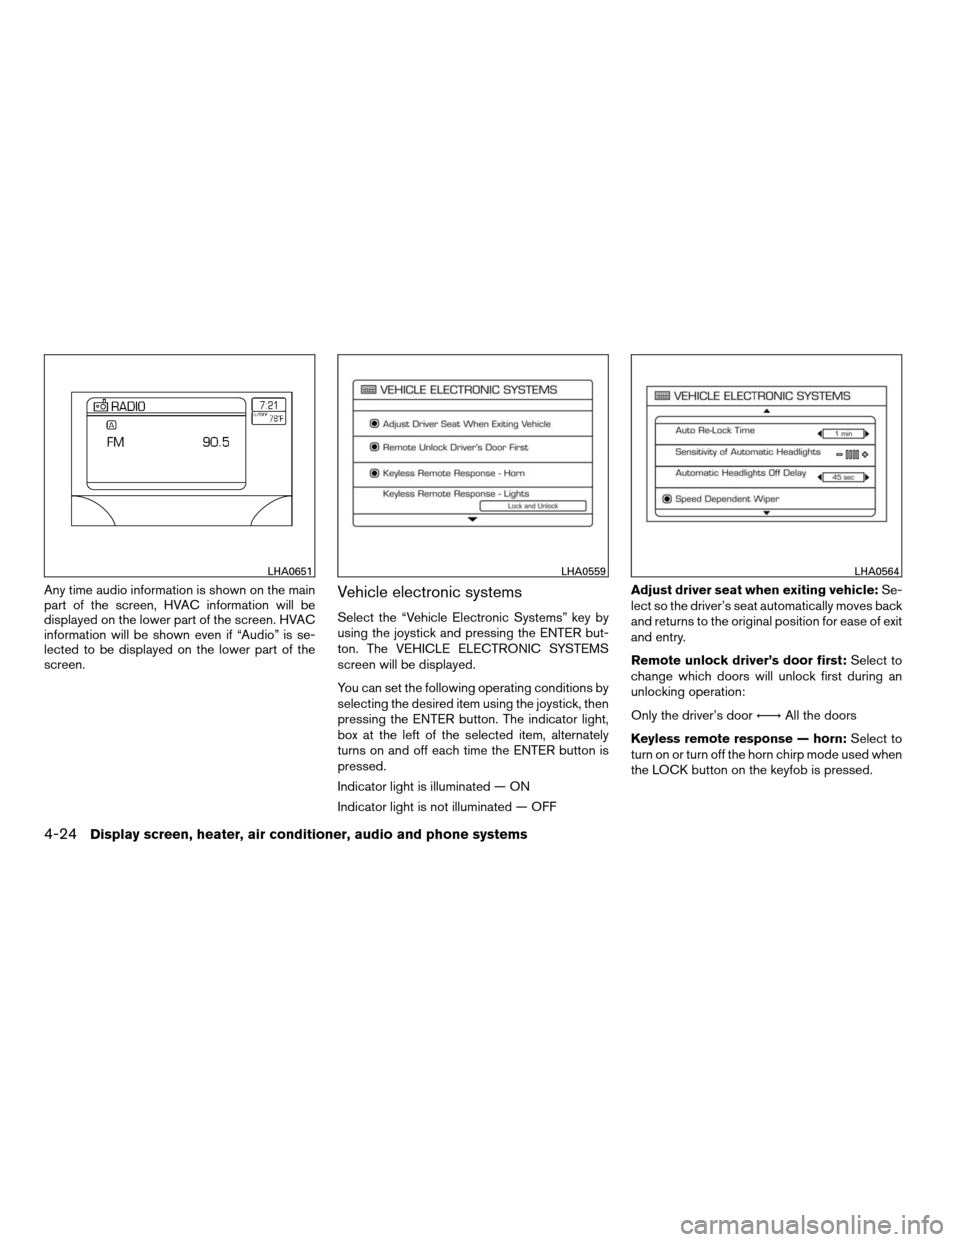
Any time audio information is shown on the main
part of the screen, HVAC information will be
displayed on the lower part of the screen. HVAC
information will be shown even if “Audio” is se-
lected to be displayed on the lower part of the
screen.Vehicle electronic systems
Select the “Vehicle Electronic Systems” key by
using the joystick and pressing the ENTER but-
ton. The VEHICLE ELECTRONIC SYSTEMS
screen will be displayed.
You can set the following operating conditions by
selecting the desired item using the joystick, then
pressing the ENTER button. The indicator light,
box at the left of the selected item, alternately
turns on and off each time the ENTER button is
pressed.
Indicator light is illuminated — ON
Indicator light is not illuminated — OFFAdjust driver seat when exiting vehicle:Se-
lect so the driver’s seat automatically moves back
and returns to the original position for ease of exit
and entry.
Remote unlock driver’s door first:Select to
change which doors will unlock first during an
unlocking operation:
Only the driver’s doorÃ!All the doors
Keyless remote response — horn:Select to
turn on or turn off the horn chirp mode used when
the LOCK button on the keyfob is pressed.
LHA0651LHA0559LHA0564
4-24Display screen, heater, air conditioner, audio and phone systems
ZREVIEW COPYÐ2008 Quest(van)
Owners ManualÐUSA_English(nna)
06/29/07Ðdebbie
X
Page 187 of 376

NOTE:
If you change the horn beep or the lamp
flash feature with the keyfob, the display
screen will not show the current mode. Use
the keyfob to return to the previous mode
and re-enable the display screen control.
Keyless remote response — lights:Select to
turn on or turn off the hazard indicator flash mode
used when the LOCK or UNLOCK button on the
keyfob is pressed.
NOTE:
If you change the horn beep or the lamp
flash feature with the keyfob, the mode will
not be changed with the display. Use the
keyfob to return to the previous mode and
re-enable the display control.
Auto re-lock time:Select to set the length of
time before doors automatically re-lock.
Sensitivity of automatic headlights:Select
to change the sensitivity setting of the automatic
headlights:
cLower: less sensitive, automatic headlights
will take longer to come on when the head-
light sensor senses less ambient light.cHigher: more sensitive, automatic headlights
will come on quicker when the headlight
sensor senses less ambient light.
Automatic headlights off delay:Select to
change the setting for the length of time the
automatic headlights remain on after exiting the
vehicle.
Speed dependent wiper:Select to turn on or
turn off the driving speed dependent intermittent
wiper function.
Return all settings to default:Select to
change all VEHICLE ELECTRONICS SYSTEMS
to their default settings.
System settings
Select the “System Settings” key by using the
joystick and pressing the ENTER button. The
SYSTEM SETTINGS screen will be displayed.
Language/unit
The LANGUAGE/UNIT screen will appear when
selecting the “Language/Unit” key and pressing
the ENTER button.
Language: English or French
Unit: US — mile, °F, MPG
Metric — km, °C, L/100 km
LHA0561
Display screen, heater, air conditioner, audio and phone systems4-25
ZREVIEW COPYÐ2008 Quest(van)
Owners ManualÐUSA_English(nna)
06/29/07Ðdebbie
X
Page 188 of 376

You can select the language and unit using the
joystick or pressing the ENTER button.
The settings are automatically saved when you
exit the menu by pressing the BACK button or
any other mode button.
Clock
Adjusting the time:
Select the “Hours” or “Minutes” key and move the
joystick to the right or left to adjust the time.
The time will change step by step.
The new settings are automatically saved when
you exit the setting screen by pressing the BACK
button or any other mode button.Setting daylight savings time:
Use the “Daylight Saving Time” key to adjust the
clock to daylight savings time.
ON: Automatically adjusts for daylight savings
time.
OFF: The current time is displayed.
LHA0562LHA0566
4-26Display screen, heater, air conditioner, audio and phone systems
ZREVIEW COPYÐ2008 Quest(van)
Owners ManualÐUSA_English(nna)
06/29/07Ðdebbie
X