2008 NISSAN QUEST lights
[x] Cancel search: lightsPage 320 of 376

4. Rotate the bulb counterclockwise and re-
move.
5. Remove by pulling it straight out of the fog
light assembly. Do not shake or rotate the
bulb when removing it. Do not touch the
glass envelope.
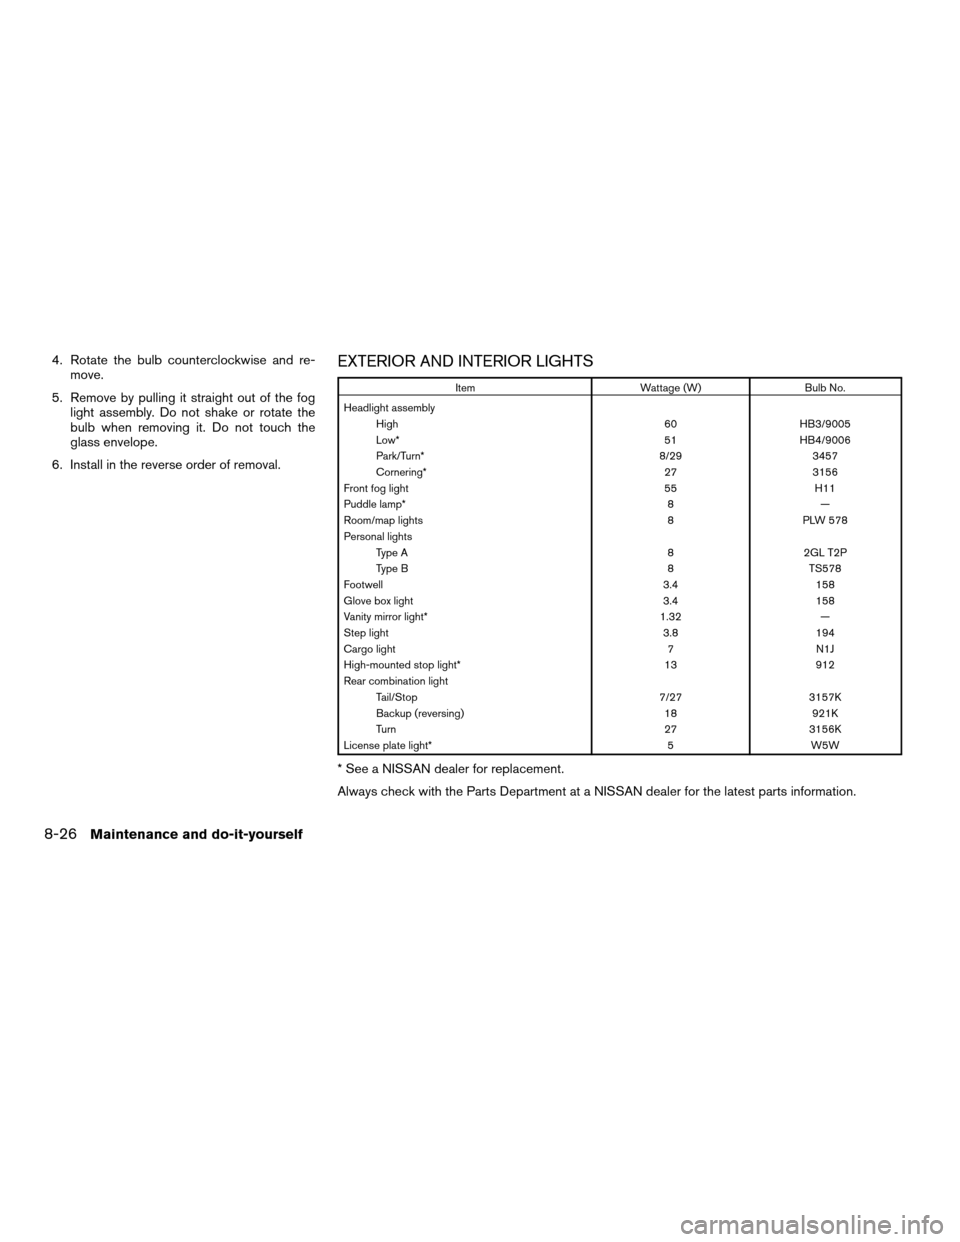
6. Install in the reverse order of removal.EXTERIOR AND INTERIOR LIGHTS
Item Wattage (W) Bulb No.
Headlight assembly
High 60 HB3/9005
Low* 51 HB4/9006
Park/Turn* 8/29 3457
Cornering* 27 3156
Front fog light 55 H11
Puddle lamp* 8 —
Room/map lights 8 PLW 578
Personal lights
Type A 8 2GL T2P
Type B 8 TS578
Footwell 3.4 158
Glove box light 3.4 158
Vanity mirror light* 1.32 —
Step light 3.8 194
Cargo light 7 N1J
High-mounted stop light* 13 912
Rear combination light
Tail/Stop 7/27 3157K
Backup (reversing) 18 921K
Turn 27 3156K
License plate light* 5 W5W
* See a NISSAN dealer for replacement.
Always check with the Parts Department at a NISSAN dealer for the latest parts information.
8-26Maintenance and do-it-yourself
ZREVIEW COPYÐ2008 Quest(van)
Owners ManualÐUSA_English(nna)
06/29/07Ðdebbie
X
Page 321 of 376

1. Room/map light
2. Front personal lights
3. Step light
4. Puddle lamp
5. High-mounted stoplight
6. Cargo light
7. License plate light
8. Rear combination light
9. Headlight assembly
10. Fog light
Replacement procedures
All other lights are either type A, B, C or D. When
replacing a bulb, first remove the lens, lamp
and/or cover.
Indicates bulb removal
Indicates bulb installationLDI0360
WDI0263
Maintenance and do-it-yourself8-27
ZREVIEW COPYÐ2008 Quest(van)
Owners ManualÐUSA_English(nna)
06/29/07Ðdebbie
X
Page 322 of 376

Use a cloths1to protect the housing. Use a cloths1to protect the housing. Use a cloths1to protect the housing.
Room/map lights
LDI0517
Personal lights – Type A
LDI0364
Personal lights – Type B
LDI0365
8-28Maintenance and do-it-yourself
ZREVIEW COPYÐ2008 Quest(van)
Owners ManualÐUSA_English(nna)
06/29/07Ðdebbie
X
Page 354 of 376

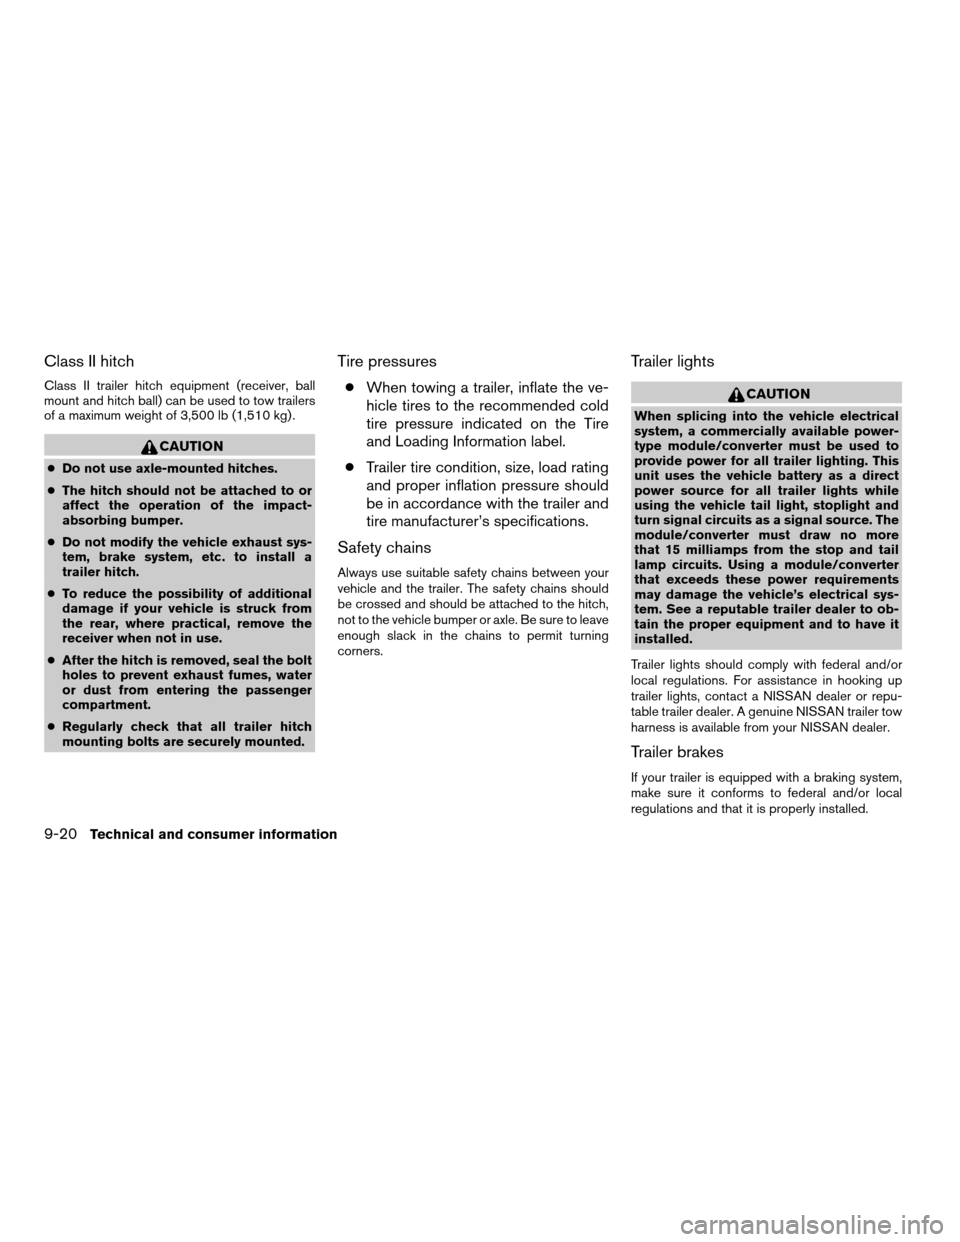
Class II hitch
Class II trailer hitch equipment (receiver, ball
mount and hitch ball) can be used to tow trailers
of a maximum weight of 3,500 lb (1,510 kg) .
CAUTION
cDo not use axle-mounted hitches.
cThe hitch should not be attached to or
affect the operation of the impact-
absorbing bumper.
cDo not modify the vehicle exhaust sys-
tem, brake system, etc. to install a
trailer hitch.
cTo reduce the possibility of additional
damage if your vehicle is struck from
the rear, where practical, remove the
receiver when not in use.
cAfter the hitch is removed, seal the bolt
holes to prevent exhaust fumes, water
or dust from entering the passenger
compartment.
cRegularly check that all trailer hitch
mounting bolts are securely mounted.
Tire pressures
cWhen towing a trailer, inflate the ve-
hicle tires to the recommended cold
tire pressure indicated on the Tire
and Loading Information label.
cTrailer tire condition, size, load rating
and proper inflation pressure should
be in accordance with the trailer and
tire manufacturer’s specifications.
Safety chains
Always use suitable safety chains between your
vehicle and the trailer. The safety chains should
be crossed and should be attached to the hitch,
not to the vehicle bumper or axle. Be sure to leave
enough slack in the chains to permit turning
corners.
Trailer lights
CAUTION
When splicing into the vehicle electrical
system, a commercially available power-
type module/converter must be used to
provide power for all trailer lighting. This
unit uses the vehicle battery as a direct
power source for all trailer lights while
using the vehicle tail light, stoplight and
turn signal circuits as a signal source. The
module/converter must draw no more
that 15 milliamps from the stop and tail
lamp circuits. Using a module/converter
that exceeds these power requirements
may damage the vehicle’s electrical sys-
tem. See a reputable trailer dealer to ob-
tain the proper equipment and to have it
installed.
Trailer lights should comply with federal and/or
local regulations. For assistance in hooking up
trailer lights, contact a NISSAN dealer or repu-
table trailer dealer. A genuine NISSAN trailer tow
harness is available from your NISSAN dealer.
Trailer brakes
If your trailer is equipped with a braking system,
make sure it conforms to federal and/or local
regulations and that it is properly installed.
9-20Technical and consumer information
ZREVIEW COPYÐ2008 Quest(van)
Owners ManualÐUSA_English(nna)
06/29/07Ðdebbie
X
Page 357 of 376

cSome states or provinces have specific
regulations and speed limits for vehicles that
are towing trailers. Obey the local speed
limits.
cCheck your hitch, trailer wiring harness con-
nections, and trailer wheel lug nuts after 50
miles (80 km) of travel and at every break.
cWhen stopped in traffic for long periods of
time in hot weather, put the vehicle in the P
(Park) position.
cWhen launching a boat, don’t allow the wa-
ter level to go over the exhaust tail pipe or
rear bumper.
cMake sure you disconnect the trailer lights
before backing the trailer into the water or
the trailer lights may burn out.
When towing a trailer, final drive gear oil
should be replaced and transmission
oil/fluid should be changed more fre-
quently. For additional information, see the
“Maintenance and do-it-yourself” section
earlier in this manual.FLAT TOWING
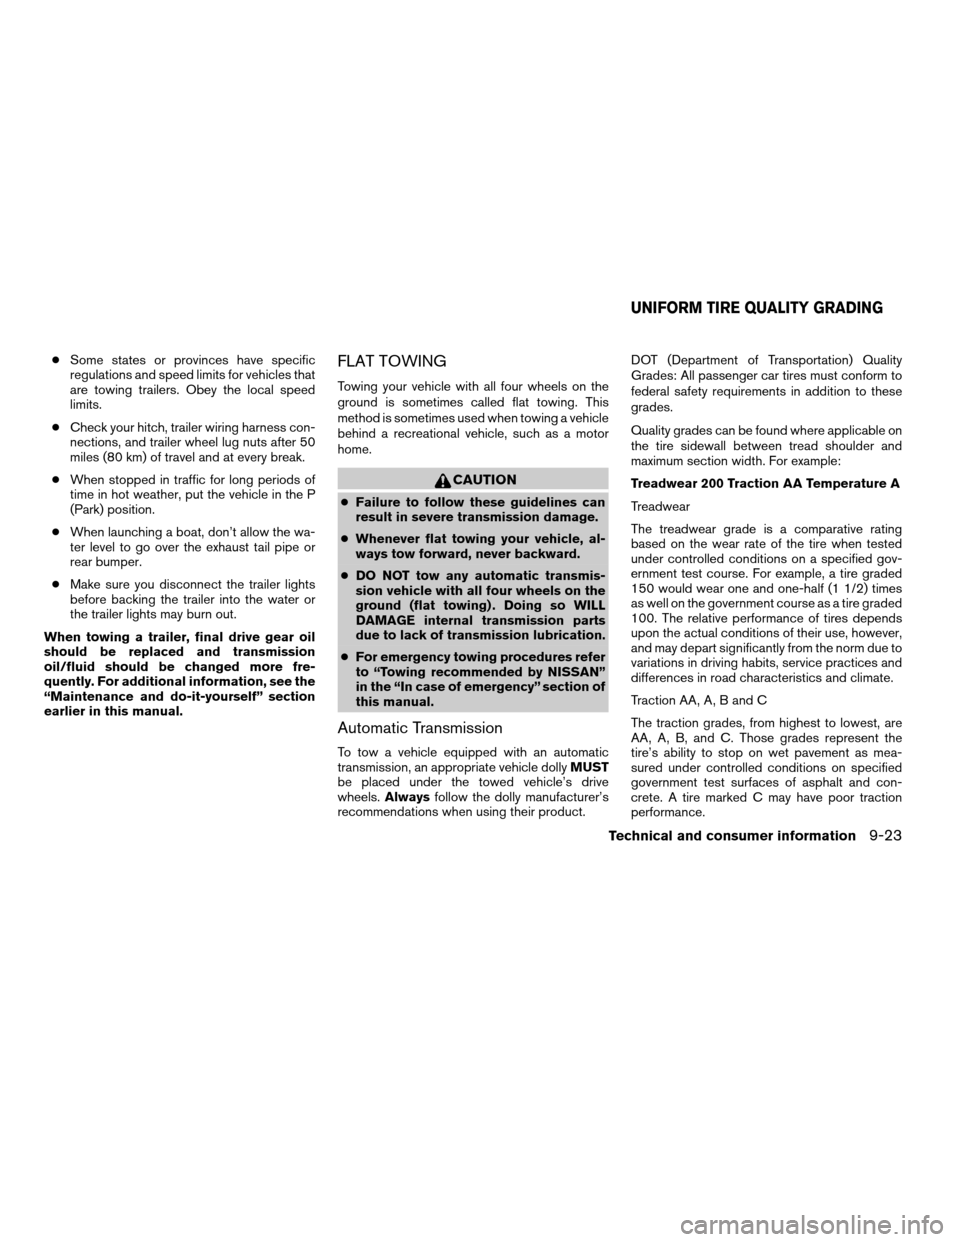
Towing your vehicle with all four wheels on the
ground is sometimes called flat towing. This
method is sometimes used when towing a vehicle
behind a recreational vehicle, such as a motor
home.
CAUTION
cFailure to follow these guidelines can
result in severe transmission damage.
cWhenever flat towing your vehicle, al-
ways tow forward, never backward.
cDO NOT tow any automatic transmis-
sion vehicle with all four wheels on the
ground (flat towing) . Doing so WILL
DAMAGE internal transmission parts
due to lack of transmission lubrication.
cFor emergency towing procedures refer
to “Towing recommended by NISSAN”
in the “In case of emergency” section of
this manual.
Automatic Transmission
To tow a vehicle equipped with an automatic
transmission, an appropriate vehicle dollyMUST
be placed under the towed vehicle’s drive
wheels.Alwaysfollow the dolly manufacturer’s
recommendations when using their product.DOT (Department of Transportation) Quality
Grades: All passenger car tires must conform to
federal safety requirements in addition to these
grades.
Quality grades can be found where applicable on
the tire sidewall between tread shoulder and
maximum section width. For example:
Treadwear 200 Traction AA Temperature A
Treadwear
The treadwear grade is a comparative rating
based on the wear rate of the tire when tested
under controlled conditions on a specified gov-
ernment test course. For example, a tire graded
150 would wear one and one-half (1 1/2) times
as well on the government course as a tire graded
100. The relative performance of tires depends
upon the actual conditions of their use, however,
and may depart significantly from the norm due to
variations in driving habits, service practices and
differences in road characteristics and climate.
Traction AA, A, B and C
The traction grades, from highest to lowest, are
AA, A, B, and C. Those grades represent the
tire’s ability to stop on wet pavement as mea-
sured under controlled conditions on specified
government test surfaces of asphalt and con-
crete. A tire marked C may have poor traction
performance.
UNIFORM TIRE QUALITY GRADING
Technical and consumer information9-23
ZREVIEW COPYÐ2008 Quest(van)
Owners ManualÐUSA_English(nna)
06/29/07Ðdebbie
X
Page 365 of 376

F
Flashers
(See hazard warning flasher switch)......2-23
Flat tire......................6-2
Floor mat positioning aid.............7-4
Fluid
Brake fluid..................8-11
Capacities and recommended
fuel/lubricants.................9-2
Engine coolant................8-7
Engine oil...................8-8
Power steering fluid.............8-11
Window washer fluid............8-12
F.M.V.S.S. certification label..........9-10
Fog light switch.................2-22
Front air bag system
(See supplemental restraint system).....1-59
Front seats....................1-2
Fuel
Capacities and recommended
fuel/lubricants.................9-2
Fuel economy................5-15
Fuel gauge..................2-6
Fuel octane rating..............9-4
Fuel recommendation............9-3
Fuel-filler door and cap...........3-19
Fuel-filler door lock opener lever......3-19
Fuel economy setting........4-4, 4-8, 4-19
Fuses......................8-20
Fusible links...................8-21G
Garage door opener, HomeLinkTUniversal
Transceiver...................2-44
Garment hook..................2-35
Gascap.....................3-19
Gauge
Engine coolant temperature gauge.....2-5
Fuel gauge..................2-6
Odometer...................2-4
Speedometer.................2-4
Tachometer..................2-5
Trip odometer.................2-4
General maintenance..............8-2
Glove box....................2-30
Glove box lock.................2-30
Grocery hooks.................2-31
H
Hands-free phone system, BluetoothT. . . .4-75
Hazard warning flasher switch.........2-23
Head restraints..................1-8
Active Head Restraint............1-7
Headlight and turn signal switch........2-18
Headlight control switch............2-18
Headlights....................8-24
Headphones
(See DVD entertainment system).......4-68
Heated seats..................2-24
Heater
Heater and air conditioner
controls................4-31, 4-40
Heater operation...........4-32, 4-41Rear seat air conditioner..........4-42
HomeLinkTUniversal Transceiver.......2-44
Hood release..................3-14
Horn.......................2-24
I
Ignition switch..................5-6
Immobilizer system..........2-15, 3-2, 5-7
Important vehicle information label.......9-10
In-cabin microfilter...............8-16
Increasing fuel economy............5-15
Indicator lights and audible reminders
(See warning/indicator lights and audible
reminders).....................2-7
Inside automatic anti-glare mirror.......3-23
Inside mirror...................3-23
Instrument brightness control.........2-21
Instrument panel..............0-6, 2-2
Instrument panel dimmer switch........2-21
Interior lights
(see Lights on demand switch)........2-41
ISOFIX child restraints.............1-28
J
Jump starting...................6-7
K
Key ........................3-2
Keyfob battery replacement..........8-23
10-3
ZREVIEW COPYÐ2008 Quest(van)
Owners ManualÐUSA_English(nna)
06/29/07Ðdebbie
X
Page 366 of 376

Keyless entry system
(See remote keyless entry system).......3-9
L
Labels
Air conditioner specification label.....9-11
C.M.V.S.S. certification label........9-10
Emission control information label.....9-10
Engine serial number............9-10
F.M.V.S.S. certification label........9-10
Vehicle identification number (VIN) plate . .9-9
Warning labels (for SRS)..........1-66
Language setting..........4-6, 4-15, 4-25
LATCH (Lower Anchors and Tethers for CHildren)
System......................1-28
License plate
Installing the license plate.........9-11
Lift gate.....................3-14
Lift gate release.................3-18
Light
Air bag warning light.........1-66, 2-10
Brake light (See stop light).........8-26
Bulb check/instrument panel........2-7
Bulb replacement..............8-26
Charge warning light.............2-8
Cornering light...............2-23
Fog light switch...............2-22
Headlight and turn signal switch......2-18
Headlight control switch..........2-18
Headlights..................8-24
Light bulbs..................8-24
Low tire pressure warning light.......2-9
Low washer fluid warning light.......2-10
Passenger air bag and status light.....1-60Personal lights...............2-42
Security indicator light...........2-12
Warning/indicator lights and audible
reminders...................2-7
Lights
Map lights..................2-43
Lights on demand switch............2-41
Lock
Child safety sliding door lock........3-9
Door locks..................3-3
Fuel-filler door lock opener lever......3-19
Glove box lock...............2-30
Lift gate release...............3-18
Power door locks...............3-5
Low fuel warning light..............2-9
Low tire pressure warning light.........2-9
Low washer fluid warning light.........2-10
Luggage (See vehicle loading information) . .9-12
M
Main ON/OFF switch
(for power doors).............3-6, 3-15
Maintenance
Changing the maintenance
interval.................4-9, 4-20
Displaying the maintenance notice
reminder...............4-10, 4-20
General maintenance............8-2
Inside the vehicle...............8-3
Maintenance precautions..........8-5
Outside the vehicle..............8-2
Resetting the maintenance
interval................4-10, 4-20
Seat belt maintenance...........1-25Setting.................4-9, 4-19
Under the hood and vehicle.........8-4
Malfunction indicator light...........2-11
Manual front seat adjustment..........1-2
Manual vent windows..............2-39
Map lights....................2-43
Map pocket...................2-30
Meters and gauges................2-3
Instrument brightness control.......2-21
Mirror
Automatic anti-glare inside mirror.....3-23
Inside mirror.................3-23
Vanity mirror.................3-22
Moonroof....................2-40
N
NISSAN vehicle immobilizer
system................2-15, 3-2, 5-7
O
Octane rating (See fuel octane rating).....9-4
Odometer.....................2-4
Oil
Capacities and recommended
fuel/lubricants.................9-2
Changing engine oil.............8-9
Changing engine oil filter..........8-10
Checking engine oil level..........8-8
Engine oil...................8-8
Engine oil and oil filter recommendation . .9-5
Engine oil viscosity..............9-5
Overdrive switch................5-11
10-4
ZREVIEW COPYÐ2008 Quest(van)
Owners ManualÐUSA_English(nna)
06/29/07Ðdebbie
X
Page 367 of 376

Overheat
If your vehicle overheats...........6-9
Owner’s manual order form..........9-27
Owner’s manual/service manual order
information....................9-27
P
Parking
Parking brake operation..........5-12
Parking/parking on hills...........5-16
Pedal position adjustment...........3-21
Personal lights.................2-42
Phone, BluetoothThands-free system. . . .4-75
Power
Front seat adjustment............1-4
Power door locks...............3-5
Power outlet.................2-26
Power steering fluid.............8-11
Power steering system...........5-17
Power vent windows............2-38
Power windows...............2-36
Precautions
Maintenance precautions..........8-5
Precautions on child
restraints............1-26, 1-41, 1-47
Precautions on seat belt usage......1-15
Precautions on supplemental restraint
system....................1-52
Precautions when starting and driving . . .5-2
Pre-tensioner seat belt system.........1-64
Programmable features......4-5, 4-11, 4-22
Push starting...................6-9R
Radio
Car phone or CB radio...........4-75
Compact Disc (CD) changer.......4-59
FM/AM/SAT radio with compact disc (CD)
changer...................4-56
FM/AM/SAT radio with compact disc (CD)
player....................4-50
Rear audio controls.............4-64
Steering wheel audio control switch. . . .4-62
Readiness for inspection maintenance (I/M)
test........................9-25
Rear audio controls...............4-64
Rear center seat belt..............1-22
Rear seat air conditioner............4-42
Rear sonar system...............5-21
Rear sonar system off switch.........2-25
Rear view monitor................4-28
Rear window and outside mirror defroster
switch......................2-18
Rear window wiper and washer switches . . .2-17
Recorders
Event data..................9-26
Refrigerant recommendation..........9-6
Registering your vehicle in another country. . .9-9
Remote controller (See DVD entertainment
system).....................4-67
Remote keyless entry system..........3-9
Reporting safety defects (US only)......9-25
Resetting average speed............4-4
Resetting the fuel economy.....4-4, 4-9, 4-19
Resetting trip 1 and trip 2.........4-8, 4-18S
Safety
Child safety sliding door lock........3-9
Child seat belts........1-26, 1-41, 1-47
Reporting safety defects (US only). . . .9-25
Screen (See DVD entertainment system) . . .4-67
Seat adjustment
Front manual seat adjustment........1-2
Front power seat adjustment........1-4
Second row captain’s chair.........1-6
Third row bench seat.........1-7, 1-12
Seat belt
Child safety.................1-17
Infants and small children.........1-18
Injured Person................1-19
Larger children...............1-18
Precautions on seat belt usage......1-15
Pregnant women..............1-19
Pre-tensioner seat belt system.......1-64
Rear center seat belt............1-22
Seat belt extenders.............1-25
Seat belt maintenance...........1-25
Seat belts..................1-15
Shoulder belt height adjustment......1-24
Three-point type with retractor.......1-19
Seat belt warning light.............2-10
Seatback pockets................2-31
Seats
Adjustment..................1-2
Automatic drive positioner.........3-25
Front seats..................1-2
Heated seats................2-24
Manual front seat adjustment........1-2
Second row captain’s chair adjustment.....1-6
10-5
ZREVIEW COPYÐ2008 Quest(van)
Owners ManualÐUSA_English(nna)
06/29/07Ðdebbie
X