2008 NISSAN QUEST oil pressure
[x] Cancel search: oil pressurePage 15 of 376

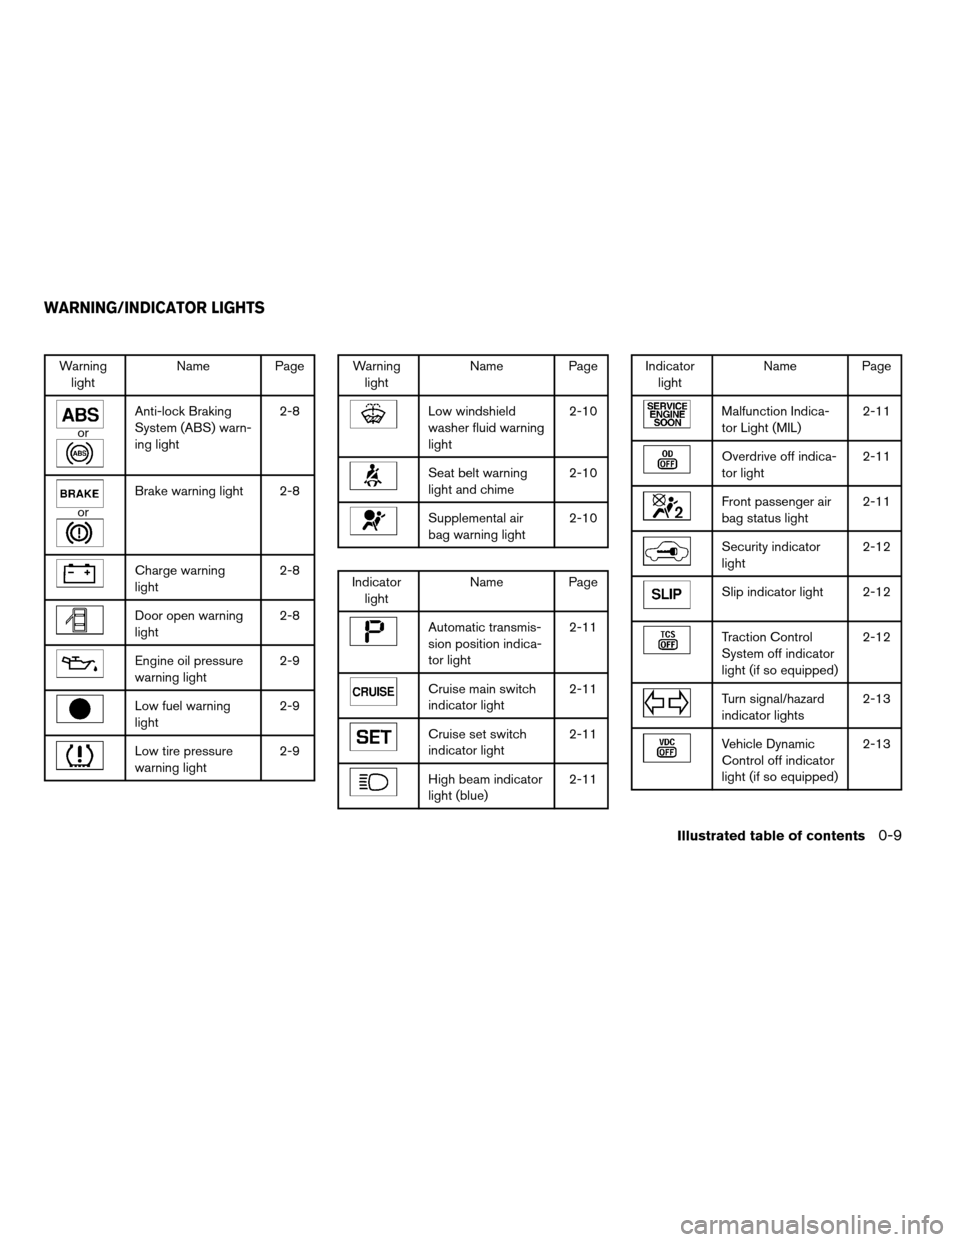
Warning
lightName Page
or
Anti-lock Braking
System (ABS) warn-
ing light2-8
or
Brake warning light 2-8
Charge warning
light2-8
Door open warning
light2-8
Engine oil pressure
warning light2-9
Low fuel warning
light2-9
Low tire pressure
warning light2-9
Warning
lightName Page
Low windshield
washer fluid warning
light2-10
Seat belt warning
light and chime2-10
Supplemental air
bag warning light2-10
Indicator
lightName Page
Automatic transmis-
sion position indica-
tor light2-11
Cruise main switch
indicator light2-11
Cruise set switch
indicator light2-11
High beam indicator
light (blue)2-11
Indicator
lightName Page
Malfunction Indica-
tor Light (MIL)2-11
Overdrive off indica-
tor light2-11
Front passenger air
bag status light2-11
Security indicator
light2-12
Slip indicator light 2-12
Traction Control
System off indicator
light (if so equipped)2-12
Turn signal/hazard
indicator lights2-13
Vehicle Dynamic
Control off indicator
light (if so equipped)2-13
WARNING/INDICATOR LIGHTS
Illustrated table of contents0-9
ZREVIEW COPYÐ2008 Quest(van)
Owners ManualÐUSA_English(nna)
06/29/07Ðdebbie
X
Page 91 of 376

orAnti-lock Braking System (ABS)
warning lightSeat belt warning light and chimeFront passenger air bag status light
orBrake warning lightSupplemental air bag warning lightSecurity indicator light
Charge warning lightAutomatic transmission position indicator lightSlip indicator light
Door open warning lightCruise main switch indicator lightTraction control system off indicator light (if so
equipped)
Engine oil pressure warning lightCruise set switch indicator lightTurn signal/hazard indicator lights
Low fuel warning lightHigh beam indicator light (Blue)Vehicle dynamic control off indicator light (if so
equipped)
Low tire pressure warning lightMalfunction indicator light (MIL)
Low windshield washer fluid warning lightOverdrive off indicator light
CHECKING BULBS
With all doors closed, apply the parking brake
and turn the ignition key to the ON position
without starting the engine. The following lights
will come on:
,or,,,
The following lights come on briefly and then go
off:
or,,,,,,
If any light fails to come on, it may indicate
a burned-out bulb or an open circuit in the
electrical system. Have the system repaired
promptly.
WARNING/INDICATOR LIGHTS AND
AUDIBLE REMINDERS
Instruments and controls2-7
ZREVIEW COPYÐ2008 Quest(van)
Owners ManualÐUSA_English(nna)
06/29/07Ðdebbie
X
Page 93 of 376

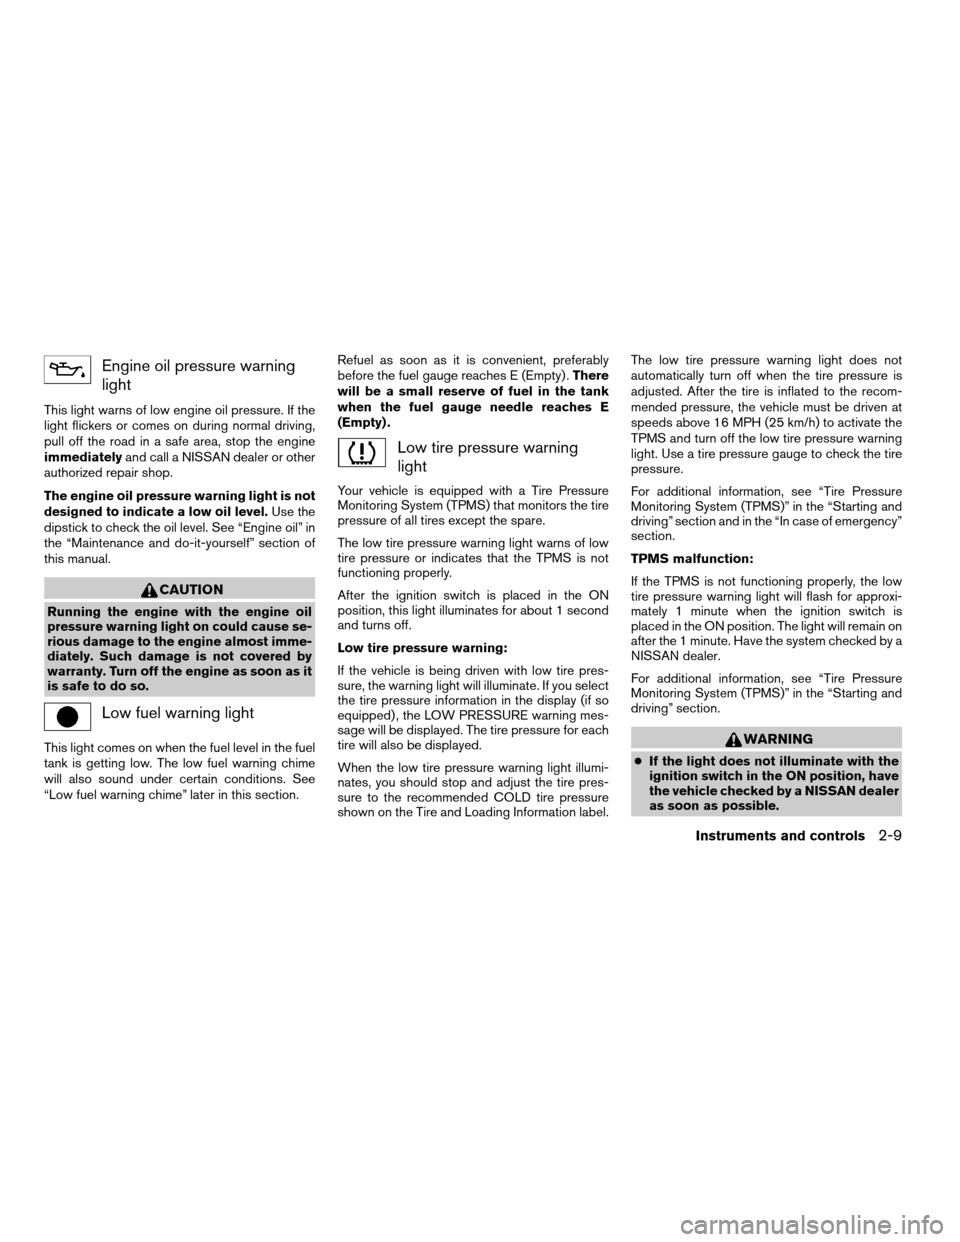
Engine oil pressure warning
light
This light warns of low engine oil pressure. If the
light flickers or comes on during normal driving,
pull off the road in a safe area, stop the engine
immediatelyand call a NISSAN dealer or other
authorized repair shop.
The engine oil pressure warning light is not
designed to indicate a low oil level.Use the
dipstick to check the oil level. See “Engine oil” in
the “Maintenance and do-it-yourself” section of
this manual.
CAUTION
Running the engine with the engine oil
pressure warning light on could cause se-
rious damage to the engine almost imme-
diately. Such damage is not covered by
warranty. Turn off the engine as soon as it
is safe to do so.
Low fuel warning light
This light comes on when the fuel level in the fuel
tank is getting low. The low fuel warning chime
will also sound under certain conditions. See
“Low fuel warning chime” later in this section.Refuel as soon as it is convenient, preferably
before the fuel gauge reaches E (Empty) .There
will be a small reserve of fuel in the tank
when the fuel gauge needle reaches E
(Empty) .
Low tire pressure warning
light
Your vehicle is equipped with a Tire Pressure
Monitoring System (TPMS) that monitors the tire
pressure of all tires except the spare.
The low tire pressure warning light warns of low
tire pressure or indicates that the TPMS is not
functioning properly.
After the ignition switch is placed in the ON
position, this light illuminates for about 1 second
and turns off.
Low tire pressure warning:
If the vehicle is being driven with low tire pres-
sure, the warning light will illuminate. If you select
the tire pressure information in the display (if so
equipped) , the LOW PRESSURE warning mes-
sage will be displayed. The tire pressure for each
tire will also be displayed.
When the low tire pressure warning light illumi-
nates, you should stop and adjust the tire pres-
sure to the recommended COLD tire pressure
shown on the Tire and Loading Information label.The low tire pressure warning light does not
automatically turn off when the tire pressure is
adjusted. After the tire is inflated to the recom-
mended pressure, the vehicle must be driven at
speeds above 16 MPH (25 km/h) to activate the
TPMS and turn off the low tire pressure warning
light. Use a tire pressure gauge to check the tire
pressure.
For additional information, see “Tire Pressure
Monitoring System (TPMS)” in the “Starting and
driving” section and in the “In case of emergency”
section.
TPMS malfunction:
If the TPMS is not functioning properly, the low
tire pressure warning light will flash for approxi-
mately 1 minute when the ignition switch is
placed in the ON position. The light will remain on
after the 1 minute. Have the system checked by a
NISSAN dealer.
For additional information, see “Tire Pressure
Monitoring System (TPMS)” in the “Starting and
driving” section.
WARNING
cIf the light does not illuminate with the
ignition switch in the ON position, have
the vehicle checked by a NISSAN dealer
as soon as possible.
Instruments and controls2-9
ZREVIEW COPYÐ2008 Quest(van)
Owners ManualÐUSA_English(nna)
06/29/07Ðcathy
X
Page 171 of 376

Resetting fuel economy
The average fuel economy calculation can be
reset to 0. Press the TRIP button repeatedly until
the FUEL ECONOMY menu is shown, then ei-
ther:
cSelect the “Reset” key on screen by press-
ing the ENTER button, or
cPress the TRIP button for more than approxi-
mately 1.5 seconds.
Distance to empty (MI or km)
The Distance To Empty (DTE) mode provides you
with an estimation of the distance that can be
driven before refueling. The DTE is constantly
calculated based on the amount of fuel in the fuel
tank and the actual fuel consumption. The display
is updated every 30 seconds. When the fuel level
is low, the DTE display will change to (*) .
NOTE:
cIf the amount of fuel added while the ignition
switch is OFF is small, the display just before
the ignition switch is turned OFF may con-
tinue to be displayed.
cWhen driving uphill or rounding curves, the
fuel in the tank shifts, which may momentarily
change the display.
Maintenance items
Press the TRIP button to display maintenance
information or set maintenance intervals for the
following:
cEngine Oil
cTire Rotation
cTire Pressure (if so equipped)
For setting the Tire Pressure display, refer to “Tire
pressure information” later in this section.Changing the maintenance interval
Select the “Engine Oil” or “Tire Rotation” key
using the joystick and press the ENTER button to
display the screen to change the maintenance
interval.
Select the “Maintenance Schedule” key using the
joystick and move the joystick to right or left to set
the maintenance interval.
LHA0554LHA0555
Display screen, heater, air conditioner, audio and phone systems4-9
ZREVIEW COPYÐ2008 Quest(van)
Owners ManualÐUSA_English(nna)
06/29/07Ðdebbie
X
Page 181 of 376

Fuel economy
Press the TRIP button to display Average Fuel
Economy and Distance To Empty.
Average fuel economy (MPG or L/100 km)
The Average Fuel Economy is calculated based
on fuel consumption since the last reset. The
display is updated every 30 seconds and 1/3
mile (500 m) . After a reset or connecting the
battery cables, the display will show (**.*) .Resetting fuel economy
The average fuel economy calculation can be
reset to 0. Press the TRIP button repeatedly until
the FUEL ECONOMY menu is shown, then ei-
ther:
cSelect the “Reset” key on screen by press-
ing the ENTER button, or
cPress the TRIP button for more than approxi-
mately 1.5 seconds.
Distance to empty (MI or km)
The Distance To Empty (DTE) mode provides you
with an estimation of the distance that can be
driven before refueling. The DTE is constantly
calculated based on the amount of fuel in the fuel
tank and the actual fuel consumption. The display
is updated every 30 seconds. When the fuel level
is low, the DTE display will change to (*) .
NOTE:
cIf the amount of fuel added while the ignition
switch is OFF is small, the display just before
the ignition switch is turned OFF may con-
tinue to be displayed.
cWhen driving uphill or rounding curves, the
fuel in the tank shifts, which may momentarily
change the display.
Maintenance items
Press the TRIP button to display maintenance
information or set maintenance intervals for the
following:
cEngine Oil
cTire Rotation
cTire Pressure (if so equipped)
For setting the Tire Pressure display, refer to “Tire
pressure information” later in this section.
LHA0553LHA0554
Display screen, heater, air conditioner, audio and phone systems4-19
ZREVIEW COPYÐ2008 Quest(van)
Owners ManualÐUSA_English(nna)
06/29/07Ðdebbie
X
Page 267 of 376

cAccelerate slowly and smoothly. Maintain
cruising speeds with a constant accelerator
position.
cDrive at moderate speeds on the highway.
Driving at high speed lowers fuel economy.
cAvoid unnecessary stopping and braking.
Maintain a safe distance behind other ve-
hicles.
cUse a proper gear range which suits road
conditions. On level roads, shift into high
gear as soon as possible.
cAvoid unnecessary engine idling.
cKeep your engine tuned up.
cFollow the recommended periodic mainte-
nance schedule.
cKeep the tires inflated to the correct pres-
sure. Low tire pressure increases tire wear
and lowers fuel economy.
cKeep the wheels in correct alignment. Im-
proper alignment increases tire wear and
lowers fuel economy.
cAir conditioner operation lowers fuel
economy. Use the air conditioner only when
necessary.cWhen cruising at highway speeds, it is more
economical to use the air conditioner and
leave the windows closed to reduce drag.
cUse the recommended viscosity engine oil.
See “Engine oil and oil filter recommenda-
tion” in “Technical and consumer informa-
tion” later in this manual.
INCREASING FUEL ECONOMY
Starting and driving5-15
ZREVIEW COPYÐ2008 Quest(van)
Owners ManualÐUSA_English(nna)
06/29/07Ðdebbie
X
Page 282 of 376

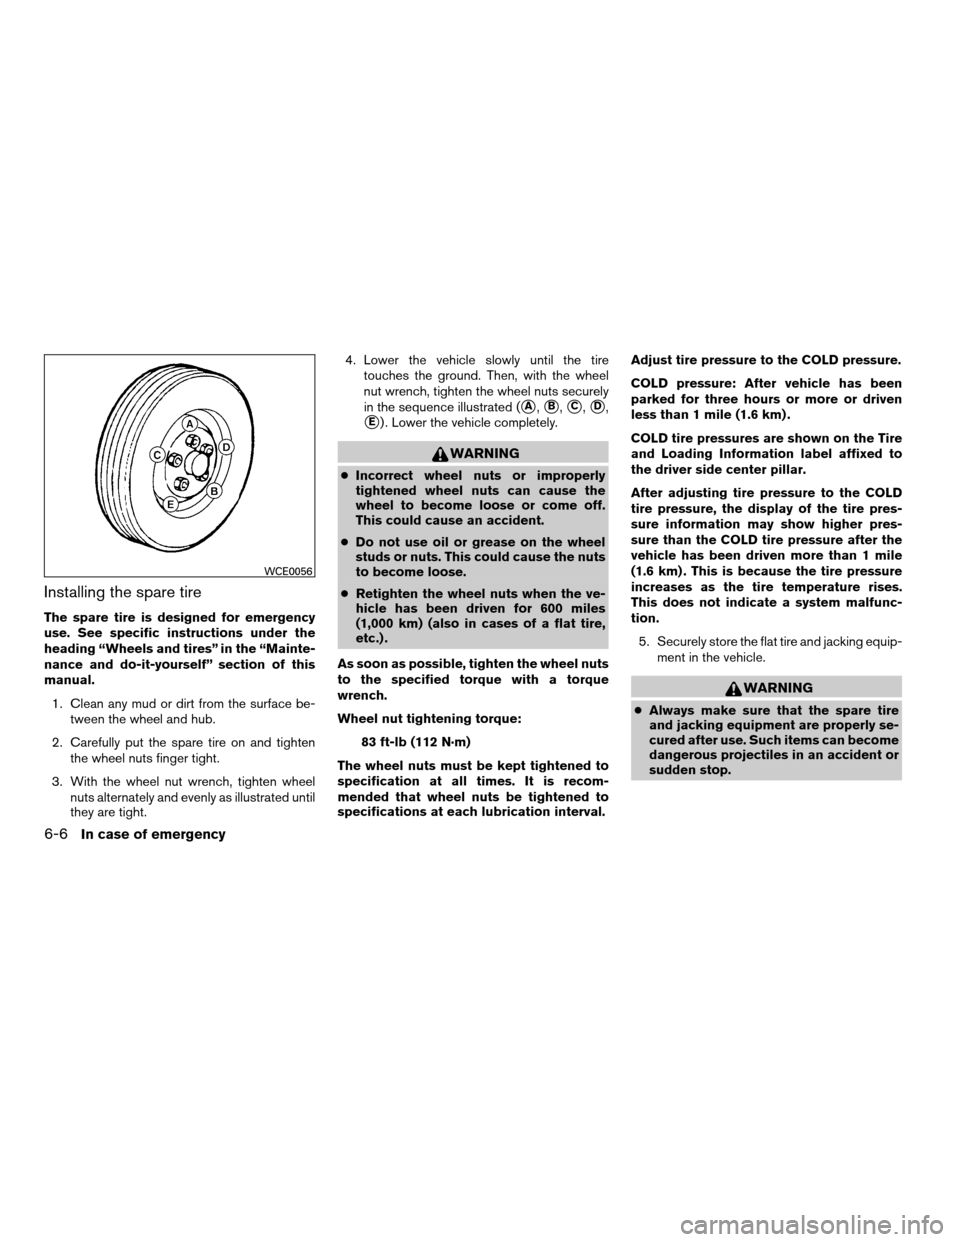
Installing the spare tire
The spare tire is designed for emergency
use. See specific instructions under the
heading “Wheels and tires” in the “Mainte-
nance and do-it-yourself” section of this
manual.
1. Clean any mud or dirt from the surface be-
tween the wheel and hub.
2. Carefully put the spare tire on and tighten
the wheel nuts finger tight.
3. With the wheel nut wrench, tighten wheel
nuts alternately and evenly as illustrated until
they are tight.4. Lower the vehicle slowly until the tire
touches the ground. Then, with the wheel
nut wrench, tighten the wheel nuts securely
in the sequence illustrated (
sA,sB,sC,sD,
sE) . Lower the vehicle completely.
WARNING
cIncorrect wheel nuts or improperly
tightened wheel nuts can cause the
wheel to become loose or come off.
This could cause an accident.
cDo not use oil or grease on the wheel
studs or nuts. This could cause the nuts
to become loose.
cRetighten the wheel nuts when the ve-
hicle has been driven for 600 miles
(1,000 km) (also in cases of a flat tire,
etc.) .
As soon as possible, tighten the wheel nuts
to the specified torque with a torque
wrench.
Wheel nut tightening torque:
83 ft-lb (112 N·m)
The wheel nuts must be kept tightened to
specification at all times. It is recom-
mended that wheel nuts be tightened to
specifications at each lubrication interval.Adjust tire pressure to the COLD pressure.
COLD pressure: After vehicle has been
parked for three hours or more or driven
less than 1 mile (1.6 km) .
COLD tire pressures are shown on the Tire
and Loading Information label affixed to
the driver side center pillar.
After adjusting tire pressure to the COLD
tire pressure, the display of the tire pres-
sure information may show higher pres-
sure than the COLD tire pressure after the
vehicle has been driven more than 1 mile
(1.6 km) . This is because the tire pressure
increases as the tire temperature rises.
This does not indicate a system malfunc-
tion.
5. Securely store the flat tire and jacking equip-
ment in the vehicle.
WARNING
cAlways make sure that the spare tire
and jacking equipment are properly se-
cured after use. Such items can become
dangerous projectiles in an accident or
sudden stop.
WCE0056
6-6In case of emergency
ZREVIEW COPYÐ2008 Quest(van)
Owners ManualÐUSA_English(nna)
06/29/07Ðdebbie
X
Page 295 of 376

8 Maintenance and do-it-yourself
Maintenance requirements..........................8-2
General maintenance..............................8-2
Explanation of general maintenance items.........8-2
Maintenance precautions...........................8-5
Engine compartment check locations................8-6
Engine cooling system.............................8-7
Checking engine coolant level...................8-7
Changing engine coolant........................8-8
Engine oil.........................................8-8
Checking engine oil level........................8-8
Changing engine oil............................8-9
Changing engine oil filter.......................8-10
5-speed automatic transmission fluid...............8-11
Power steering fluid...............................8-11
Brake fluid.......................................8-11
Brake fluid....................................8-12
Window washer fluid.............................8-12
Window washer fluid reservoir..................8-12
Battery..........................................8-13
Jump starting.................................8-14
Drive belt........................................8-14
Spark plugs......................................8-15
Replacing spark plugs.........................8-15Air cleaner.......................................8-16
In-cabin microfilter.............................8-16
Windshield wiper blades..........................8-17
Cleaning.....................................8-17
Replacing....................................8-17
Brakes..........................................8-20
Self-adjusting brakes..........................8-20
Brake pad wear indicators......................8-20
Fuses...........................................8-20
Engine compartment...........................8-20
Passenger compartment.......................8-21
Battery replacement..............................8-23
Keyfob.......................................8-23
Lights...........................................8-24
Headlights....................................8-24
Fog lights (if so equipped)......................8-25
Exterior and interior lights.......................8-26
Wheels and tires.................................8-30
Tire pressure..................................8-30
Tire labeling...................................8-33
Types of tires..................................8-36
Tire chains....................................8-37
Changing wheels and tires.....................8-37
ZREVIEW COPYÐ2008 Quest(van)
Owners ManualÐUSA_English(nna)
06/29/07Ðdebbie
X