2008 NISSAN QASHQAI High vent
[x] Cancel search: High ventPage 10 of 297

Downloaded from www.Manualslib.com manuals search engine LEFT (LHD) AND RIGHT-HAND DRIVE
(RHD) MODELS
1.Driver’s main power window switch (P. 2-35)
2. Vents (P. 4-12)
3. Headlight and turn signal switch (P. 2-24)
4. Horn (P. 2-29)
5. Meters, gauges, and warning/indicator lights
(P. 2-2, 2-3)
6. Wiper/washer switch (P. 2-21)
Headlight cleaner*
1(P. 2-28)
7. Hazard warning flasher switch (P. 2-28)
8. Passenger power window switch (P. 2-36)
9. ESP OFF switch*
1(P. 5-40)
Headlight aiming control*
1(P. 2-27)
Outside mirror folding switch*
1(P. 3-18)
Outside mirror remote control (P. 3-18)
Stop/Start System OFF switch* (P. 5-21)
10. Fuse box (P. 8-23)
11. Steering wheel switches*
1
Audio control*1(P. 4-43)
Cruise control*
1(P. 5-29)
Speed limiter*
1(P. 5-31)
Trip computer display control*
1(P. 2-16)
12. Bonnet lock release lever (P. 3-14) Fuel filler lid opener lever (P. 3-15)
13. Steering wheel lock lever (P. 4-16)
14. Ignition switch or Ignition knob (Intelligent Key
models) (P. 5-6, 5-8)
15. Climate controls (P. 4-12)
16. High level vent control*
1(P. 4-12)
Storage*
1(P. 4-31)
17. Gear selector lever (P. 5-12)
18. Handbrake (P. 3-16)
19. 4WD mode control*
1(P. 5-24)
Power door lock switch (P. 3-10)
Seat heater switches*
1(P. 2-29)
20. Power outlet (P. 2-30)
21. Audio system (P. 4-21, 4-23)
NISSAN Connect*
2
Rear–view monitor*1(P. 4-2)
Around view monitor*
1(P. 4-4)
22. Glove box (P. 2-31)
23. Front passenger air bag deactivate switch
(P. 1-17)
*
1where fitted
*2Refer to the separately provided NISSAN Con-
nect Owner’s Manual.
See the page number indicated in parentheses
for operating details.
Illustrated table of contents0-5
Page 21 of 297
Downloaded from www.Manualslib.com manuals search engine WARNING
Do not adjust the driver’s seat while driving.
The seat may move suddenly and could cause
loss of control of the vehicle.
After adjustment, gently rock in the seat to
make sure it is securely locked.
The seatback should not be reclined any more
than needed for comfort. Seat belts are most
effective when the passenger sits well back
and upright in the seat. If the seatback is re-
clined, the risk of sliding under the lap belt
and being injured is increased.
When returning the seatbacks to the upright
position, be certain that they are completely
secured in the latched position. If they are not
completely secured, passengers may be in-
jured in an accident or sudden stop. When
operating the seatback release always rock
the seatback afterward to check that it is
locked.
When the vehicle is being used to carry cargo,
properly secure all cargo to help prevent it
from sliding or shifting. Do not place cargo
higher than the seatbacks. In a sudden stop
or collision, unsecured cargo could cause per-
sonal injury.
Never allow anyone to ride in the luggage area
or on the rear seat when it is in the folded-
down position. Use of these areas by passen-
gers without proper restraints could result in
serious injury in an accident or sudden stop.
Closely supervise children when they are
around the vehicle to prevent them from play-
ing and being locked in the luggage compart-
ment where they could be seriously injured.
Keep the vehicle locked with the rear seat-
back securely latched when not in use, and
prevent children from having access to the
vehicle’s keys.FRONT SEATS
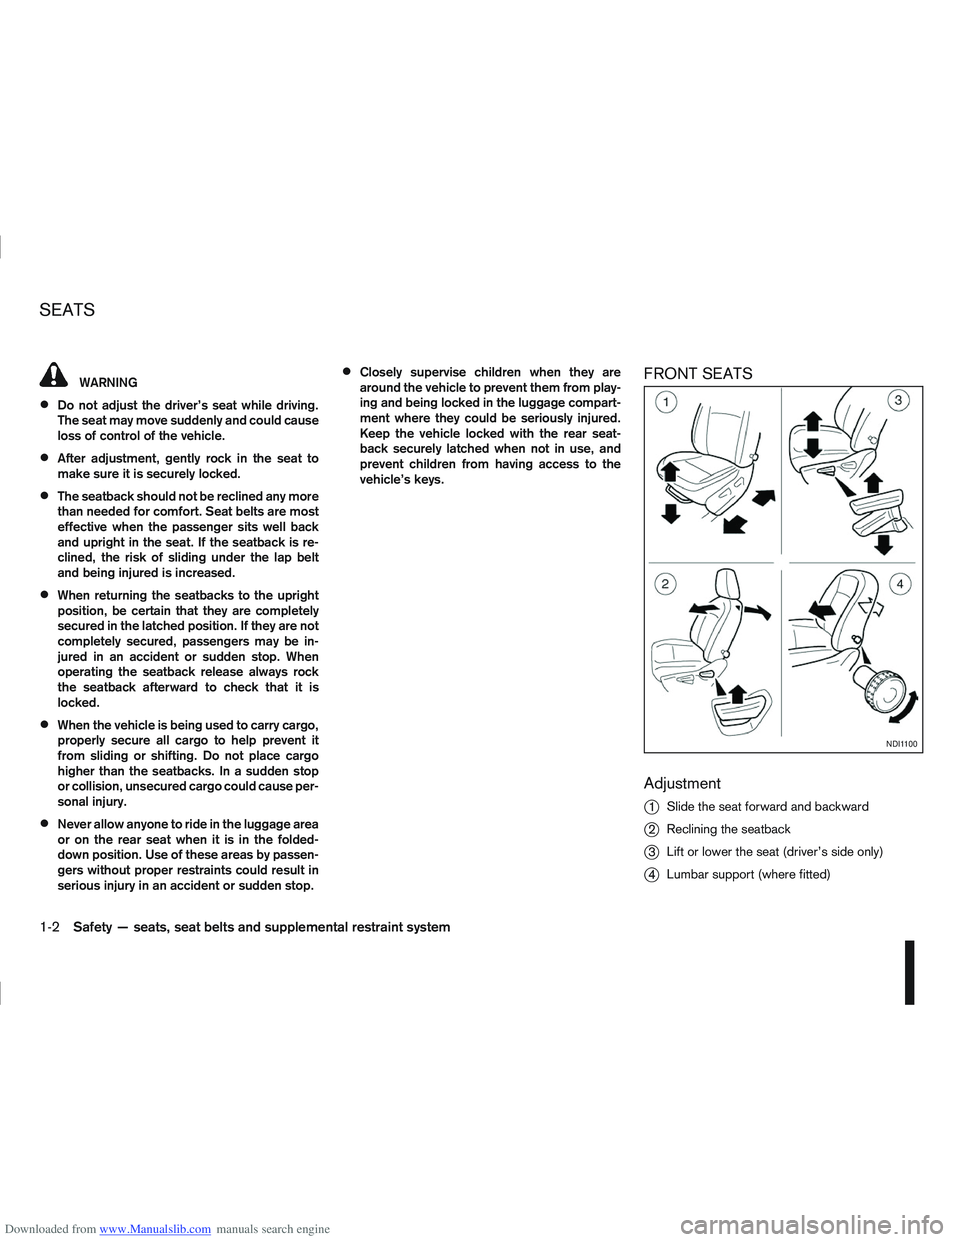
Adjustment
j
1Slide the seat forward and backward
j2Reclining the seatback
j3Lift or lower the seat (driver’s side only)
j4Lumbar support (where fitted)
NDI1100
SEATS
1-2Safety — seats, seat belts and supplemental restraint system
Page 24 of 297
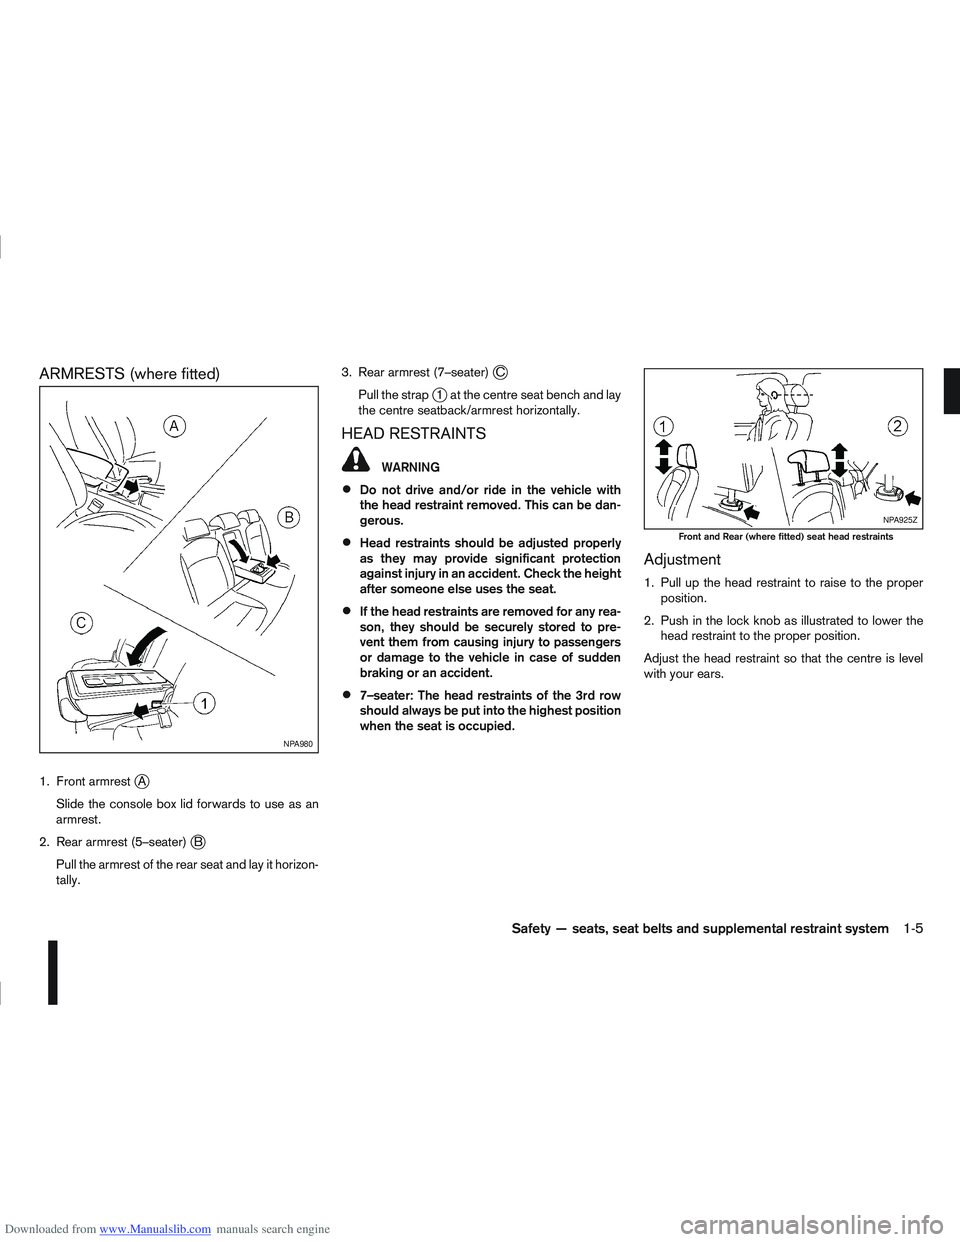
Downloaded from www.Manualslib.com manuals search engine ARMRESTS (where fitted)
1. Front armrestjA
Slide the console box lid forwards to use as an
armrest.
2. Rear armrest (5–seater)
jB
Pull the armrest of the rear seat and lay it horizon-
tally. 3. Rear armrest (7–seater)
jC
Pull the strap
j1 at the centre seat bench and lay
the centre seatback/armrest horizontally.
HEAD RESTRAINTS
WARNING
Do not drive and/or ride in the vehicle with
the head restraint removed. This can be dan-
gerous.
Head restraints should be adjusted properly
as they may provide significant protection
against injury in an accident. Check the height
after someone else uses the seat.
If the head restraints are removed for any rea-
son, they should be securely stored to pre-
vent them from causing injury to passengers
or damage to the vehicle in case of sudden
braking or an accident.
7–seater: The head restraints of the 3rd row
should always be put into the highest position
when the seat is occupied.
Adjustment
1. Pull up the head restraint to raise to the proper position.
2. Push in the lock knob as illustrated to lower the head restraint to the proper position.
Adjust the head restraint so that the centre is level
with your ears.
NPA980
NPA925Z
Front and Rear (where fitted) seat head restraints
Safety — seats, seat belts and supplemental restraint system1-5
Page 33 of 297
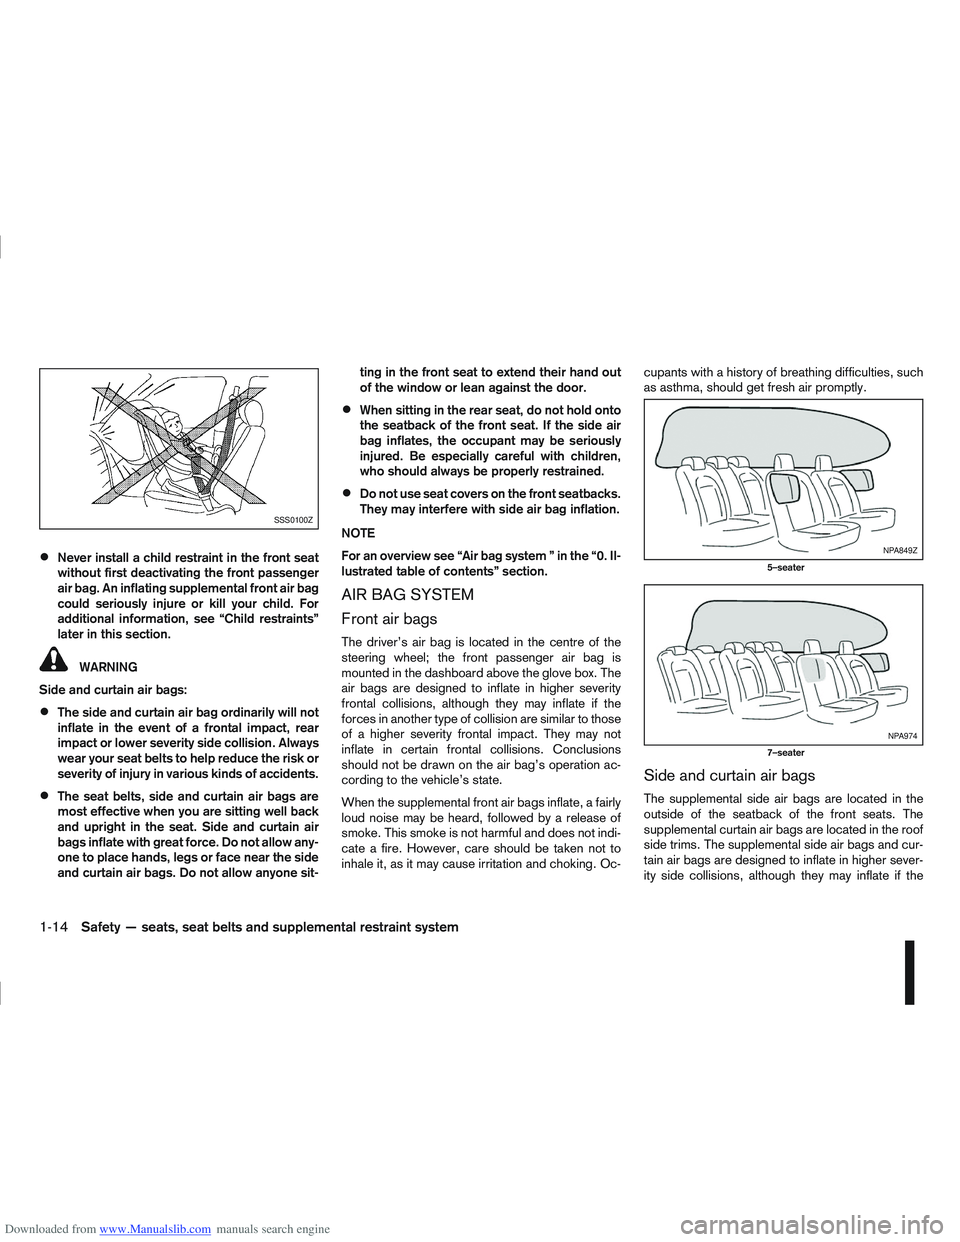
Downloaded from www.Manualslib.com manuals search engine Never install a child restraint in the front seat
without first deactivating the front passenger
air bag. An inflating supplemental front air bag
could seriously injure or kill your child. For
additional information, see “Child restraints”
later in this section.
WARNING
Side and curtain air bags:
The side and curtain air bag ordinarily will not
inflate in the event of a frontal impact, rear
impact or lower severity side collision. Always
wear your seat belts to help reduce the risk or
severity of injury in various kinds of accidents.
The seat belts, side and curtain air bags are
most effective when you are sitting well back
and upright in the seat. Side and curtain air
bags inflate with great force. Do not allow any-
one to place hands, legs or face near the side
and curtain air bags. Do not allow anyone sit- ting in the front seat to extend their hand out
of the window or lean against the door.
When sitting in the rear seat, do not hold onto
the seatback of the front seat. If the side air
bag inflates, the occupant may be seriously
injured. Be especially careful with children,
who should always be properly restrained.
Do not use seat covers on the front seatbacks.
They may interfere with side air bag inflation.
NOTE
For an overview see “Air bag system ” in the “0. Il-
lustrated table of contents” section.
AIR BAG SYSTEM
Front air bags
The driver’s air bag is located in the centre of the
steering wheel; the front passenger air bag is
mounted in the dashboard above the glove box. The
air bags are designed to inflate in higher severity
frontal collisions, although they may inflate if the
forces in another type of collision are similar to those
of a higher severity frontal impact. They may not
inflate in certain frontal collisions. Conclusions
should not be drawn on the air bag’s operation ac-
cording to the vehicle’s state.
When the supplemental front air bags inflate, a fairly
loud noise may be heard, followed by a release of
smoke. This smoke is not harmful and does not indi-
cate a fire. However, care should be taken not to
inhale it, as it may cause irritation and choking. Oc- cupants with a history of breathing difficulties, such
as asthma, should get fresh air promptly.
Side and curtain air bags
The supplemental side air bags are located in the
outside of the seatback of the front seats. The
supplemental curtain air bags are located in the roof
side trims. The supplemental side air bags and cur-
tain air bags are designed to inflate in higher sever-
ity side collisions, although they may inflate if the
SSS0100Z
NPA849Z
5–seater
NPA974
7–seater
1-14Safety — seats, seat belts and supplemental restraint system
Page 34 of 297
Downloaded from www.Manualslib.com manuals search engine forces in another type of collision are similar to those
of a higher severity side impact. They are designed
to inflate on the side where the vehicle is impacted.
They may not inflate in certain side collisions. Ve-
hicle damage (or lack of it) is not always an indica-
tion of proper supplemental side air bag operation.
When the supplemental side air bag and curtain air
bag inflate, a fairly loud noise may be heard, fol-
lowed by a release of smoke. This smoke is not
harmful and does not indicate a fire. However, care
should be taken not to inhale it, as it may cause irri-
tation and choking. Occupants with a history of
breathing difficulties, such as asthma, should get
fresh air promptly.
Supplemental side air bags, along with the use of
seat belts, help to cushion the impact force on the
chest of the front occupants. Curtain air bags help
to cushion the impact force to the head of occu-
pants in the front and rear outer seating positions.
They can help save lives and reduce serious inju-
ries. However, an inflating side air bag and curtain
air bag may cause abrasions or other injuries.
Supplemental side air bags and curtain air bags do
not provide restraint to the lower body.
The seat belts should be correctly worn and the
driver and passenger seated upright, and as far as
is practical, away from the side air bag. Rear seat
passengers should be seated as far away as practi-
cal from the door finishers and side roof rails. The
side air bags and curtain air bags inflate quickly in
order to help protect the front occupants. Because
of this, the force of the side air bag and curtain air
bag inflating can increase the risk of injury if theoccupant is too close to, or is against, these air bag
modules during inflation. The side air bag and cur-
tain air bag will deflate quickly after the collision is
over.
WARNING
Directly after inflation, several air bag system
components will be hot. Do not touch them;
you may severely burn yourself.
No unauthorised changes should be made to
any components or wiring of the air bag sys-
tem. This is to prevent accidental inflation of
the air bag or damage to the air bag system.
Tampering with the air bag system may result
in serious personal injury. Tampering includes
making changes to the steering wheel and
the instrument panel assembly by placing ma-
terial over the steering pad and above the
dashboard, or by installing additional trim ma-
terial around the air bag system.
Do not attach any objects to the steering
wheel pad or to the instrument panel. Objects
attached to the steering wheel pad and in-
strument panel may become dangerous pro-
jectiles and cause injury if the air bag inflates.
Work on and around the air bag system should
be done by a NISSAN dealer or qualified work-
shop. Installation of electrical equipment
should be done by a NISSAN dealer or quali-
fied workshop. The yellow SRS wiring har-
nesses* should not be modified or discon-
nected. Unauthorised electrical test equip-
ment and probing devices should not be used
on the air bag system.
* SRS wiring harnesses are covered with yellow insulation either just before the harness con-
nectors or on the complete harness, for easy
identification.
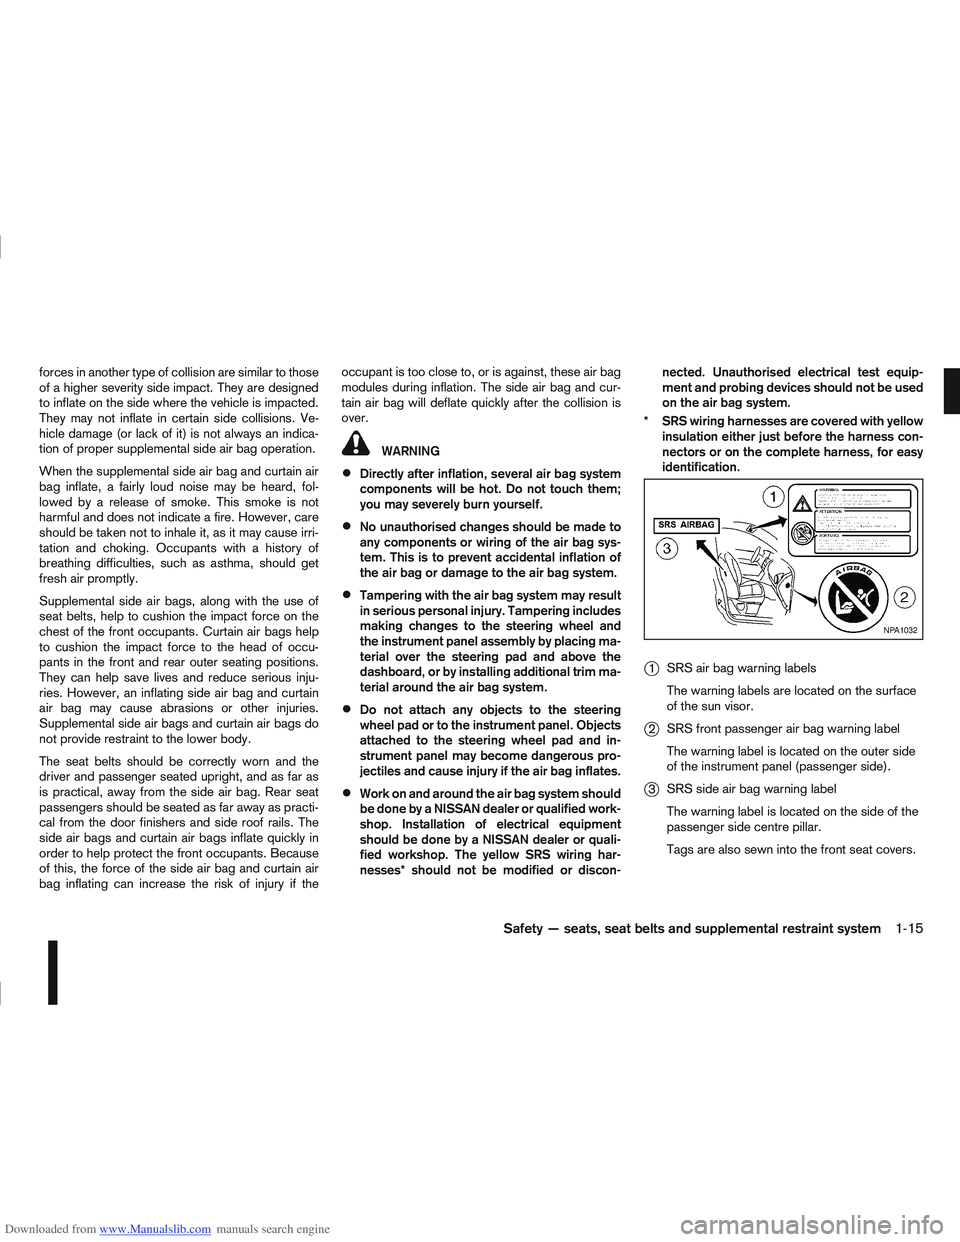
j1 SRS air bag warning labels
The warning labels are located on the surface
of the sun visor.
j2SRS front passenger air bag warning label
The warning label is located on the outer side
of the instrument panel (passenger side).
j3SRS side air bag warning label
The warning label is located on the side of the
passenger side centre pillar.
Tags are also sewn into the front seat covers.
NPA1032
Safety — seats, seat belts and supplemental restraint system1-15
Page 43 of 297
Downloaded from www.Manualslib.com manuals search engine Rear facing
If you must install a child restraint system in the front
seat, follow these steps:
1. Deactivate the front passenger air bag. See“Front passenger air bag deactivation system”
earlier in this section for further details.
2. Move the seat to the rearmost position.
3. Adjust the head restraint to its highest position. Remove it if it interferes with the child restraint
installation. In such situations, securely store the
head restraint in the luggage compartment so
that it does not become a dangerous projectile
during a sudden stop or in an accident.
4. Position the child restraint system in the front passenger seat.
Always follow the child restraint system manu-
facturer’s instructions for installation and use. 5. Route the seat belt tongue through the child re-
straint system and insert it into the buckle until
you hear and feel the latch engage.
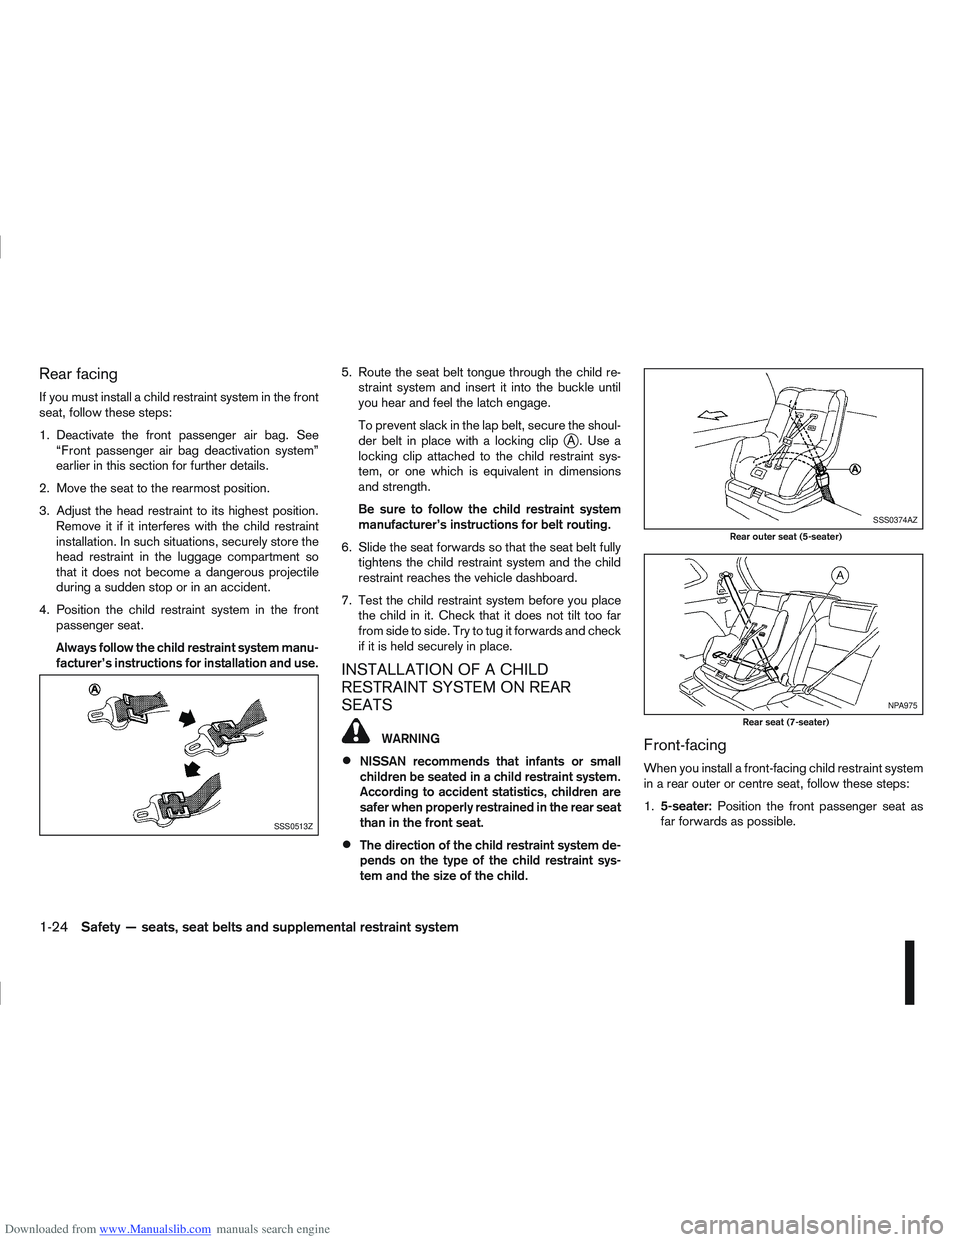
To prevent slack in the lap belt, secure the shoul-
der belt in place with a locking clip
jA. Use a
locking clip attached to the child restraint sys-
tem, or one which is equivalent in dimensions
and strength.
Be sure to follow the child restraint system
manufacturer’s instructions for belt routing.
6. Slide the seat forwards so that the seat belt fully tightens the child restraint system and the child
restraint reaches the vehicle dashboard.
7. Test the child restraint system before you place the child in it. Check that it does not tilt too far
from side to side. Try to tug it forwards and check
if it is held securely in place.
INSTALLATION OF A CHILD
RESTRAINT SYSTEM ON REAR
SEATS
WARNING
NISSAN recommends that infants or small
children be seated in a child restraint system.
According to accident statistics, children are
safer when properly restrained in the rear seat
than in the front seat.
The direction of the child restraint system de-
pends on the type of the child restraint sys-
tem and the size of the child.
Front-facing
When you install a front-facing child restraint system
in a rear outer or centre seat, follow these steps:
1.5-seater: Position the front passenger seat as
far forwards as possible.
SSS0513Z
SSS0374AZ
Rear outer seat (5-seater)
NPA975
Rear seat (7-seater)
1-24Safety — seats, seat belts and supplemental restraint system
Page 56 of 297
Downloaded from www.Manualslib.com manuals search engine Do not drive on dry, hard surfaced roads in
the LOCK position.
If the 4WD warning light blinks in the follow-
ing sequence while driving, proceed as in-
structed:
– Blinks rapidly (about twice a second)Pull off the road at a safe place and idle
the engine. The driving mode will change
to 2WD to prevent the 4WD system from
malfunctioning. The vehicle can be driven
again as soon as the warning light turns
off.
– Blinks slowly (about once every 2 seconds) Change the driving mode to 2WD and re-
duce the vehicle speed as soon as safely
possible.
If the warning light is still on after performing the
above operation, have the system checked by a
NISSAN dealer or qualified workshop as soon as
possible.
Water in fuel filter warning light
(where fitted)
If the warning light remains on or flashes irregularly
while the engine is running, there may be water in
the fuel filter. Should this happen, try to drain the
water from the fuel filter, see “Fuel filter (Diesel en-
gine models)” in the “8. Maintenance and
do-it-yourself” section. CAUTION
Failure to drain the water from the fuel filter can
cause serious damage to the engine. Contact a
NISSAN dealer or qualified workshop as soon as
possible.
INDICATOR LIGHTS
Automatic transmission check
indicator light (AT models)
This light indicates both the “Automatic transmis-
sion oil temperature warning” and the “Fail-safe op-
eration”.
Automatic transmission oil temperature
warning:
This light comes on when the automatic transmis-
sion oil temperature is too high. If the light comes on
while driving, reduce the vehicle speed as soon as
safely possible until the light turns off.
Fail-safe operation:
When the ignition switch is turned ON, the light
comes on for 2 seconds. If the light blinks, it may
indicate the automatic transmission is not function-
ing properly. Have your NISSAN dealer or qualified
workshop check and repair the transmission.
CAUTION
Continued vehicle operation when the automatic
transmission check warning light is on may dam-
age the automatic transmission.
Continuously Variable
Transmission (CVT) indicator
light (CVT models)
This light comes on briefly when the ignition is turned
to the ON position.
If the CVT light comes on during normal operation,
it may indicate that something is wrong with the
Continuously Variable Transmission (CVT). Have
your system checked by a NISSAN dealer or quali-
fied workshop.
NOTE
A CVT ELECTRONIC CONTROL SYSTEM WARN-
ING display (centre console — where fitted) will
come on when a malfunction may have occurred
to the transmission control system. The selected
Detailed Information key will then recommend
going to a NISSAN dealer for the system to be
checked.
Electronic Stability Program
(ESP) OFF indicator light
(where fitted)
The light comes on when the Electronic Stability
Programme (ESP) OFF switch is pushed to the OFF
position. This indicates that the ESP system is not
operating.
This light also comes on briefly when the ignition
switch is turned to the ON position. The light will
turn off after approximately 1 second if the ESP sys-
tem is operational.
Instruments and controls2-7
Page 73 of 297
Downloaded from www.Manualslib.com manuals search engine OUTSIDE MIRROR DEFOGGER
(where fitted)
The outside rear-view mirrors will be defogged when
the defogger switch is activated.
XENON HEADLIGHTS (where fitted)
WARNING
HIGH VOLTAGE
When xenon headlights are on, they produce
a high voltage. To prevent an electric shock,
never attempt to modify or disassemble. Al-
ways have your xenon headlights replaced at
an authorised NISSAN dealer or qualified
workshop.
Xenon headlights provide considerably more
light than conventional headlights. If they are
not correctly aimed, they might temporarily
blind an oncoming driver or the driver ahead
of you and cause a serious accident. If head-
lights are not aimed correctly, immediately
take your vehicle to a NISSAN dealer or quali-
fied workshop and have the headlights ad-
justed correctly.
When the xenon headlight is initially turned on, its
brightness or colour varies slightly. However, the
colour and brightness will soon stabilise.
The life of xenon headlights will be shortened by
frequent on-off operation. It is generally desir-
able not to turn off the headlights for short inter-
vals (for example, when the vehicle stops at a
traffic signal).
If the xenon headlight bulb is close to burning
out, the brightness will drastically decrease, the
light will start blinking, or the colour of the light will become reddish. If one or more of the above
signs occur, contact a NISSAN dealer or quali-
fied workshop.
NISSAN recommends you to consult the local regu-
lations concerning the use of lights.
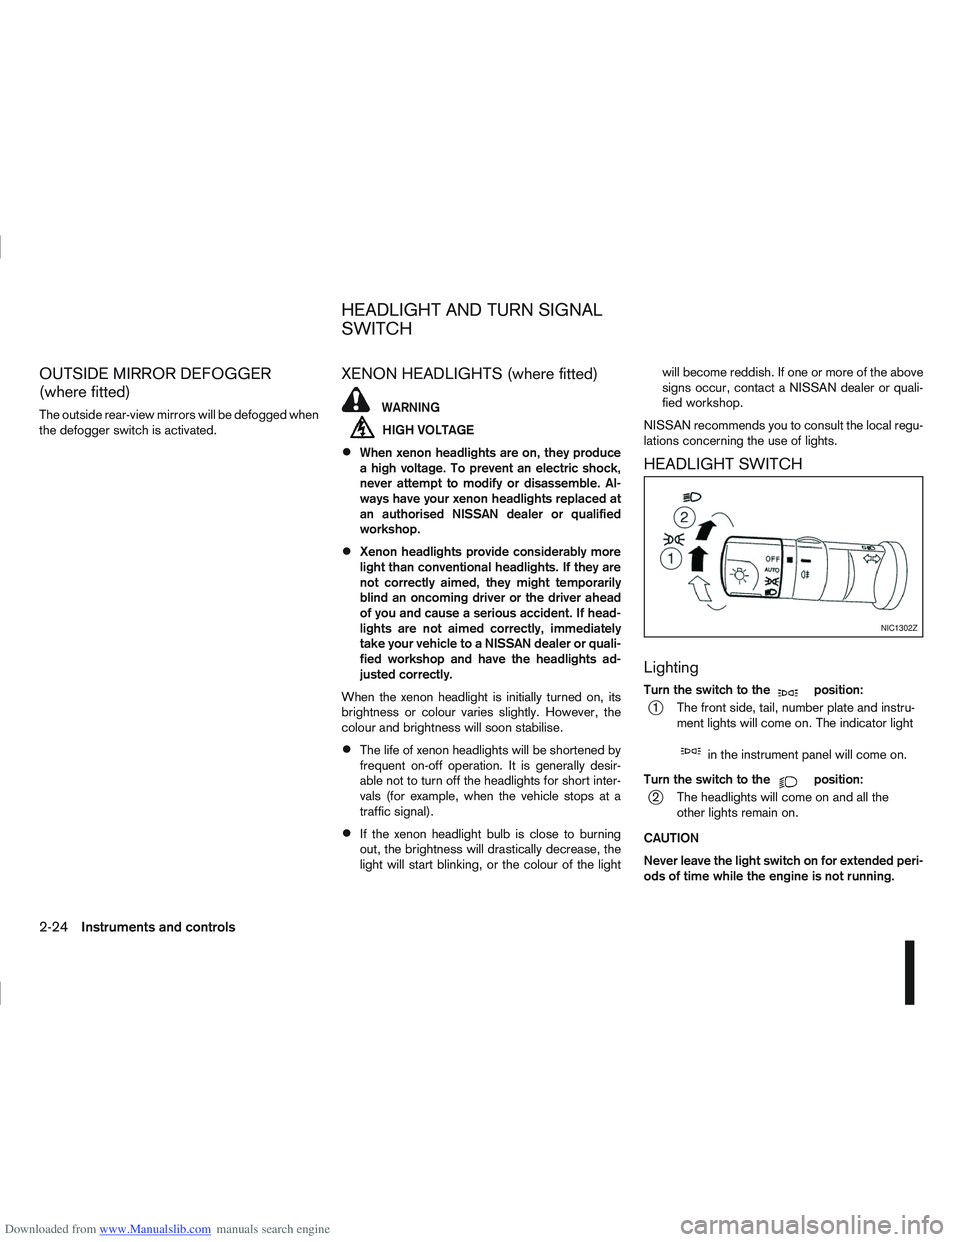
HEADLIGHT SWITCH
Lighting
Turn the switch to themposition:
j1 The front side, tail, number plate and instru- ment lights will come on. The indicator light
min the instrument panel will come on.
Turn the switch to the
mposition:
j2 The headlights will come on and all the other lights remain on.
CAUTION
Never leave the light switch on for extended peri-
ods of time while the engine is not running.
NIC1302Z
HEADLIGHT AND TURN SIGNAL
SWITCH
2-24Instruments and controls