2008 NISSAN LATIO engine
[x] Cancel search: enginePage 1722 of 2771
TIMING CHAIN
EM-45
< SERVICE INFORMATION >
C
D
E
F
G
H
I
J
K
L
MA
EM
N
P O
Be sure O-rings a aligned properly.
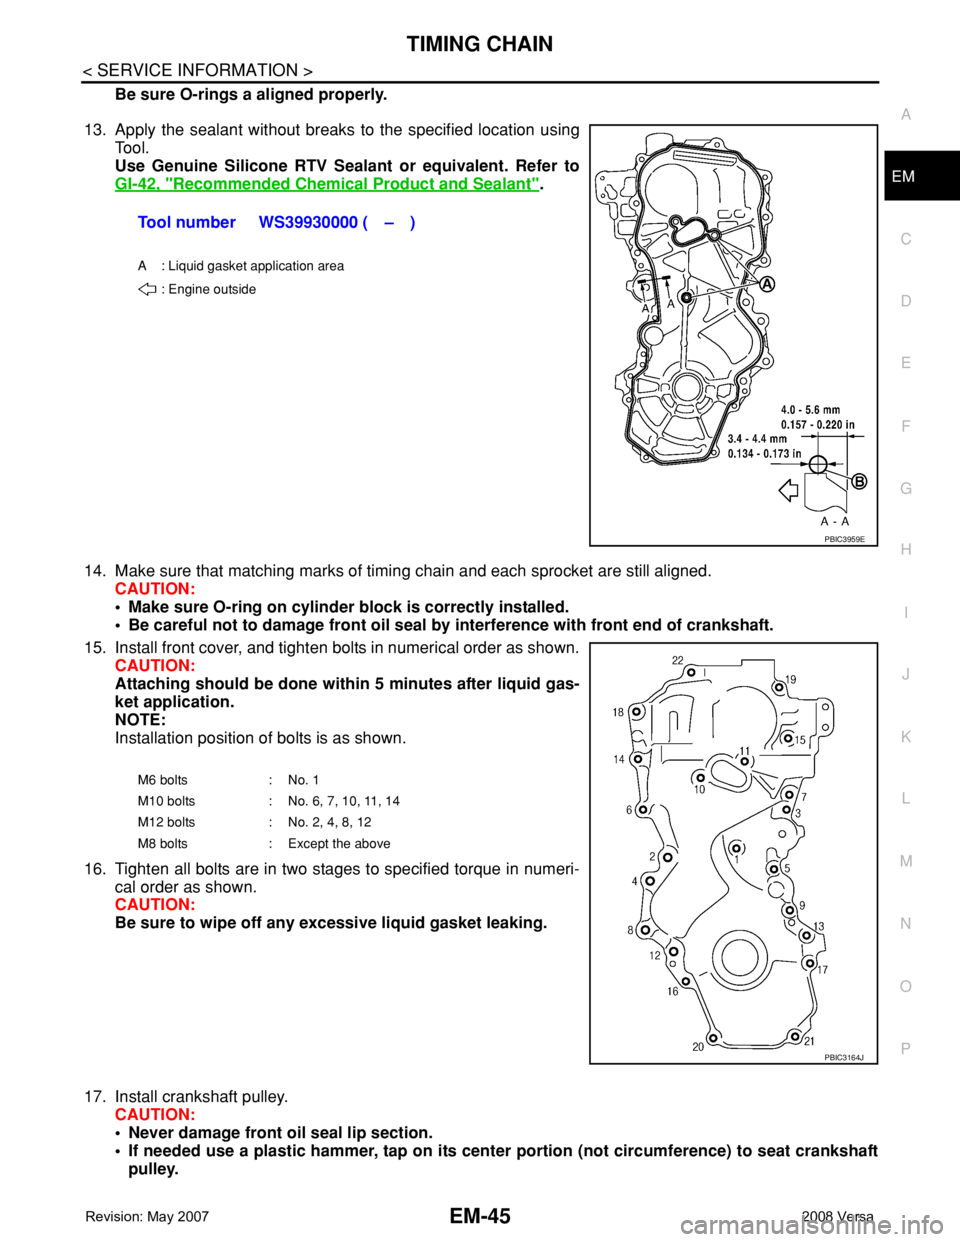
13. Apply the sealant without breaks to the specified location using
Tool.
Use Genuine Silicone RTV Sealant or equivalent. Refer to
GI-42, "
Recommended Chemical Product and Sealant".
14. Make sure that matching marks of timing chain and each sprocket are still aligned.
CAUTION:
• Make sure O-ring on cylinder block is correctly installed.
• Be careful not to damage front oil seal by interference with front end of crankshaft.
15. Install front cover, and tighten bolts in numerical order as shown.
CAUTION:
Attaching should be done within 5 minutes after liquid gas-
ket application.
NOTE:
Installation position of bolts is as shown.
16. Tighten all bolts are in two stages to specified torque in numeri-
cal order as shown.
CAUTION:
Be sure to wipe off any excessive liquid gasket leaking.
17. Install crankshaft pulley.
CAUTION:
• Never damage front oil seal lip section.
• If needed use a plastic hammer, tap on its center portion (not circumference) to seat crankshaft
pulley.Tool number WS39930000 ( – )
A : Liquid gasket application area
: Engine outside
PBIC3959E
M6 bolts : No. 1
M10 bolts : No. 6, 7, 10, 11, 14
M12 bolts : No. 2, 4, 8, 12
M8 bolts : Except the above
PBIC3164J
Page 1723 of 2771
EM-46
< SERVICE INFORMATION >
TIMING CHAIN
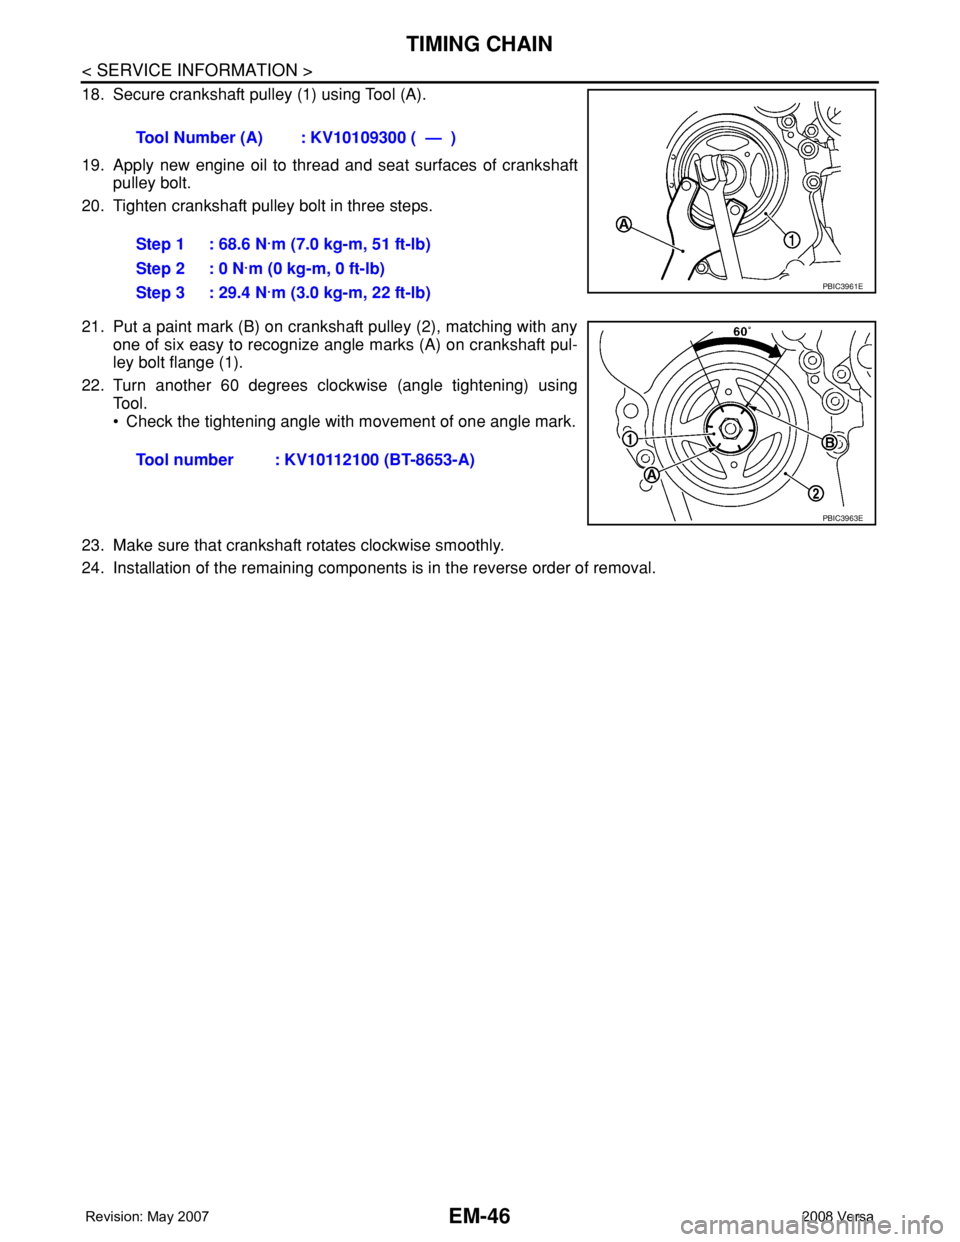
18. Secure crankshaft pulley (1) using Tool (A).
19. Apply new engine oil to thread and seat surfaces of crankshaft
pulley bolt.
20. Tighten crankshaft pulley bolt in three steps.
21. Put a paint mark (B) on crankshaft pulley (2), matching with any
one of six easy to recognize angle marks (A) on crankshaft pul-
ley bolt flange (1).
22. Turn another 60 degrees clockwise (angle tightening) using
Tool.
• Check the tightening angle with movement of one angle mark.
23. Make sure that crankshaft rotates clockwise smoothly.
24. Installation of the remaining components is in the reverse order of removal.Tool Number (A) : KV10109300 ( — )
Step 1 : 68.6 N·m (7.0 kg-m, 51 ft-lb)
Step 2 : 0 N·m (0 kg-m, 0 ft-lb)
Step 3 : 29.4 N·m (3.0 kg-m, 22 ft-lb)
PBIC3961E
Tool number : KV10112100 (BT-8653-A)
PBIC3963E
Page 1724 of 2771
CAMSHAFT
EM-47
< SERVICE INFORMATION >
C
D
E
F
G
H
I
J
K
L
MA
EM
N
P O
CAMSHAFT
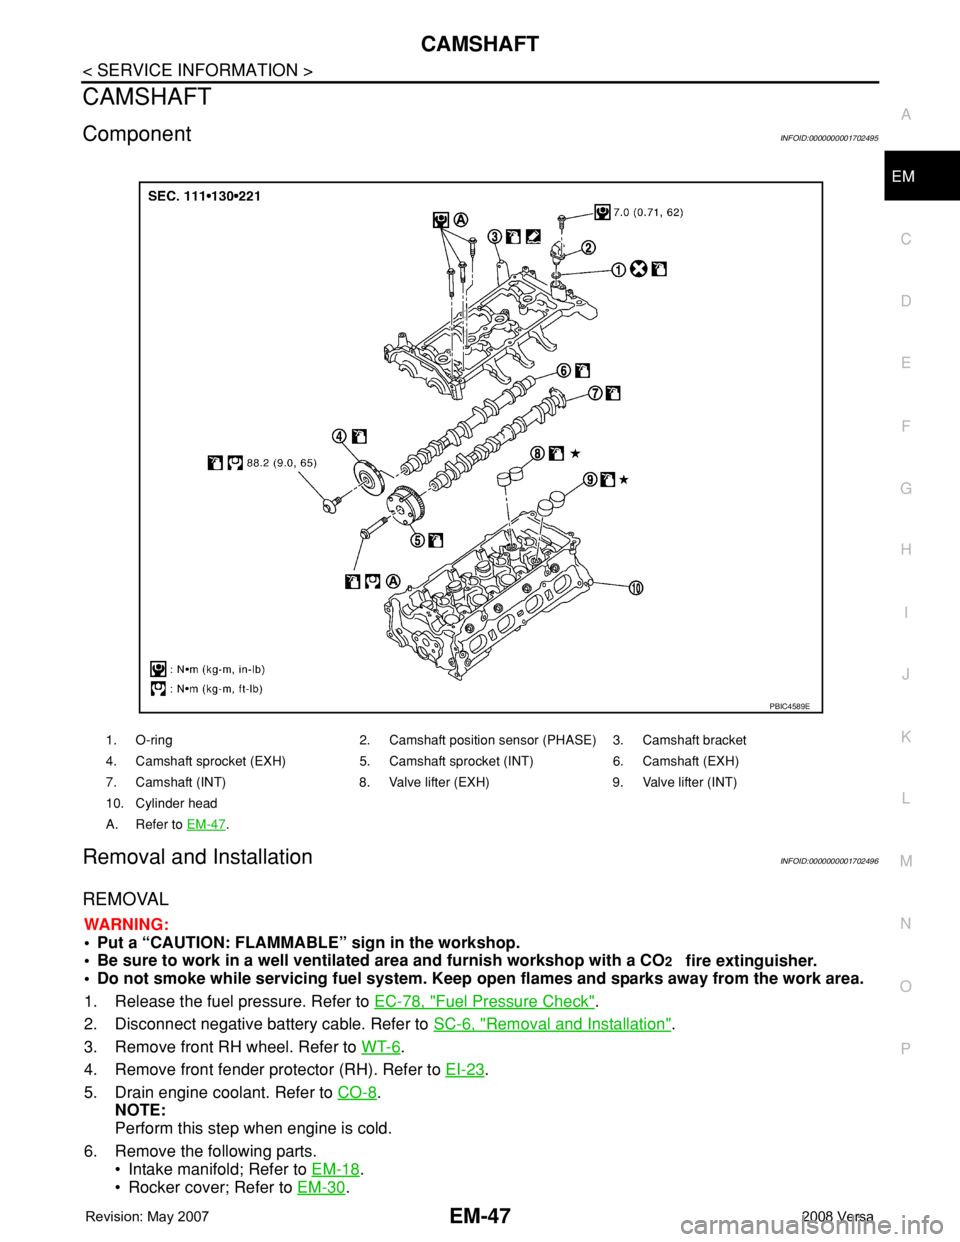
ComponentINFOID:0000000001702495
Removal and InstallationINFOID:0000000001702496
REMOVAL
WARNING:
• Put a “CAUTION: FLAMMABLE” sign in the workshop.
• Be sure to work in a well ventilated area and furnish workshop with a CO
2 fire extinguisher.
• Do not smoke while servicing fuel system. Keep open flames and sparks away from the work area.
1. Release the fuel pressure. Refer to EC-78, "
Fuel Pressure Check".
2. Disconnect negative battery cable. Refer to SC-6, "
Removal and Installation".
3. Remove front RH wheel. Refer to WT-6
.
4. Remove front fender protector (RH). Refer to EI-23
.
5. Drain engine coolant. Refer to CO-8
.
NOTE:
Perform this step when engine is cold.
6. Remove the following parts.
• Intake manifold; Refer to EM-18
.
• Rocker cover; Refer to EM-30
.
1. O-ring 2. Camshaft position sensor (PHASE) 3. Camshaft bracket
4. Camshaft sprocket (EXH) 5. Camshaft sprocket (INT) 6. Camshaft (EXH)
7. Camshaft (INT) 8. Valve lifter (EXH) 9. Valve lifter (INT)
10. Cylinder head
A. Refer to EM-47
.
PBIC4589E
Page 1725 of 2771
EM-48
< SERVICE INFORMATION >
CAMSHAFT
• Fuel tube and fuel injector assembly; Refer to EM-33.
• Front cover, timing chain and related parts; Refer to EM-37
.
7. Remove camshaft position sensor (PHASE) from camshaft bracket.
CAUTION:
• Handle carefully to avoid dropping and shocks.
• Never disassemble.
• Never allow metal powder to adhere to magnetic part at sensor tip.
• Never place sensor in a location where it is exposed to magnetism.
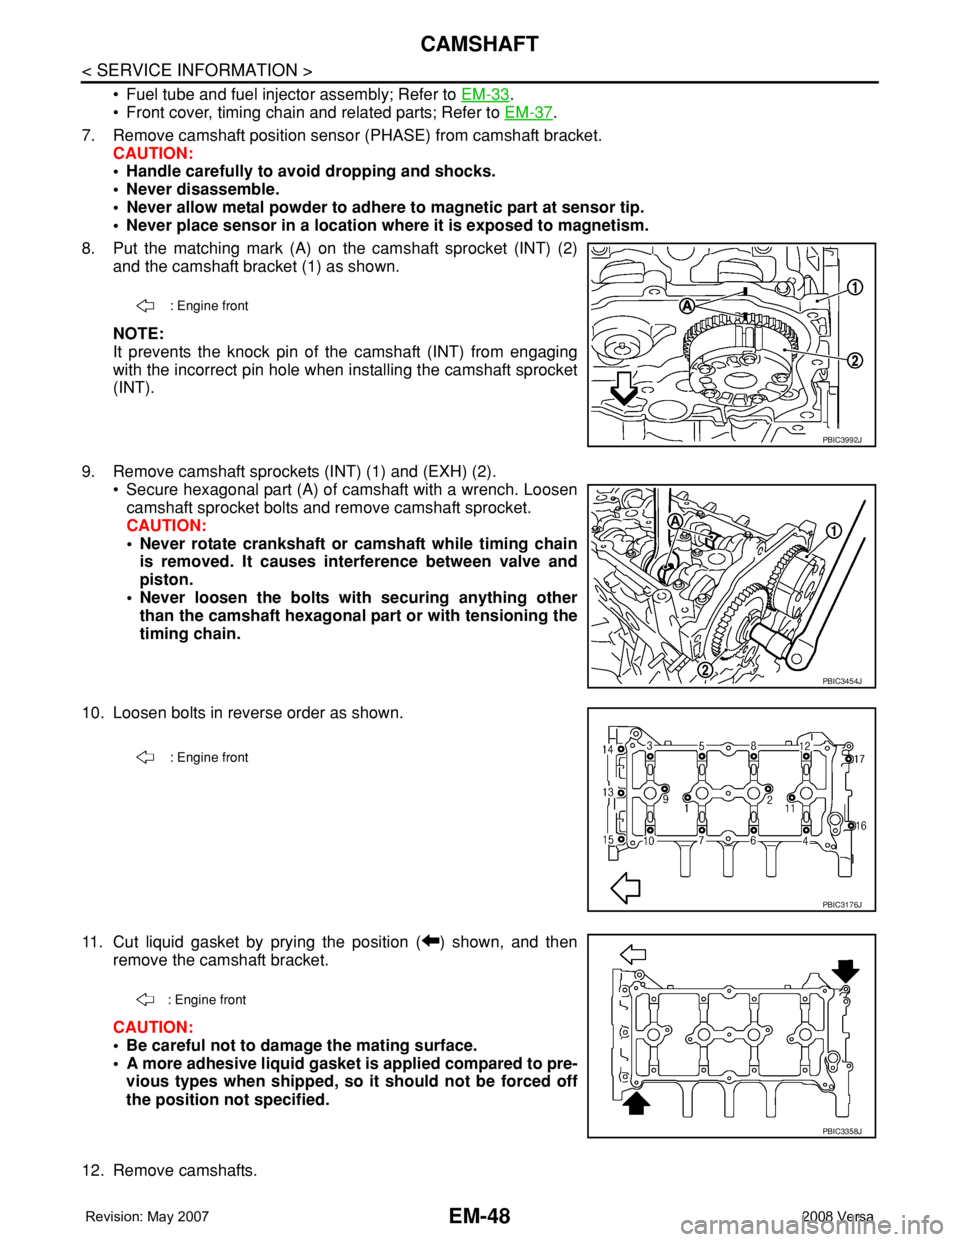
8. Put the matching mark (A) on the camshaft sprocket (INT) (2)
and the camshaft bracket (1) as shown.
NOTE:
It prevents the knock pin of the camshaft (INT) from engaging
with the incorrect pin hole when installing the camshaft sprocket
(INT).
9. Remove camshaft sprockets (INT) (1) and (EXH) (2).
• Secure hexagonal part (A) of camshaft with a wrench. Loosen
camshaft sprocket bolts and remove camshaft sprocket.
CAUTION:
• Never rotate crankshaft or camshaft while timing chain
is removed. It causes interference between valve and
piston.
• Never loosen the bolts with securing anything other
than the camshaft hexagonal part or with tensioning the
timing chain.
10. Loosen bolts in reverse order as shown.
11. Cut liquid gasket by prying the position ( ) shown, and then
remove the camshaft bracket.
CAUTION:
• Be careful not to damage the mating surface.
• A more adhesive liquid gasket is applied compared to pre-
vious types when shipped, so it should not be forced off
the position not specified.
12. Remove camshafts.
: Engine front
PBIC3992J
PBIC3454J
: Engine front
PBIC3176J
: Engine front
PBIC3358J
Page 1729 of 2771
EM-52
< SERVICE INFORMATION >
CAMSHAFT
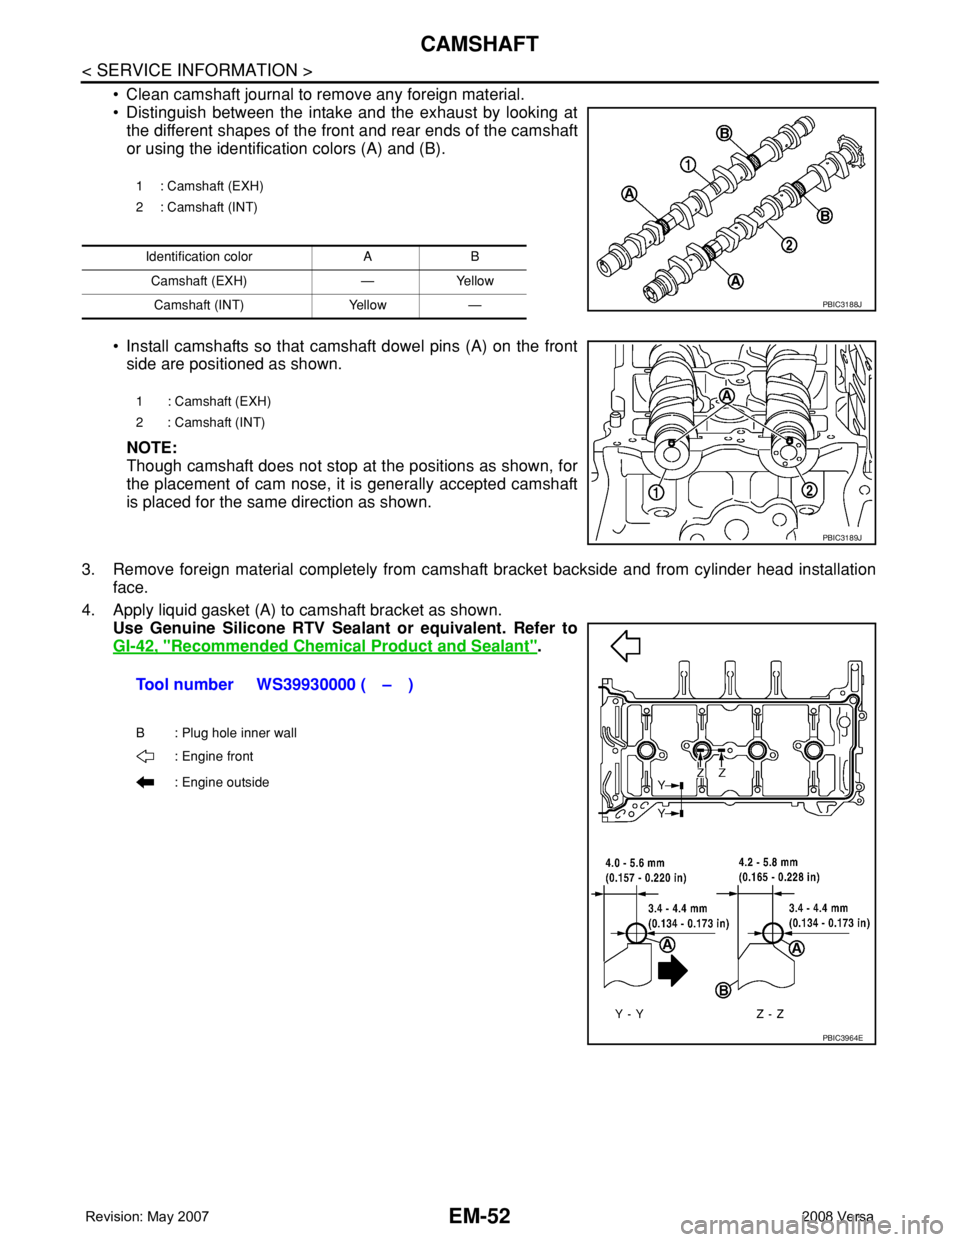
• Clean camshaft journal to remove any foreign material.
• Distinguish between the intake and the exhaust by looking at
the different shapes of the front and rear ends of the camshaft
or using the identification colors (A) and (B).
• Install camshafts so that camshaft dowel pins (A) on the front
side are positioned as shown.
NOTE:
Though camshaft does not stop at the positions as shown, for
the placement of cam nose, it is generally accepted camshaft
is placed for the same direction as shown.
3. Remove foreign material completely from camshaft bracket backside and from cylinder head installation
face.
4. Apply liquid gasket (A) to camshaft bracket as shown.
Use Genuine Silicone RTV Sealant or equivalent. Refer to
GI-42, "
Recommended Chemical Product and Sealant".
1 : Camshaft (EXH)
2 : Camshaft (INT)
Identification color A B
Camshaft (EXH) — Yellow
Camshaft (INT) Yellow —
PBIC3188J
1 : Camshaft (EXH)
2 : Camshaft (INT)
PBIC3189J
Tool number WS39930000 ( – )
B : Plug hole inner wall
: Engine front
: Engine outside
PBIC3964E
Page 1730 of 2771
CAMSHAFT
EM-53
< SERVICE INFORMATION >
C
D
E
F
G
H
I
J
K
L
MA
EM
N
P O
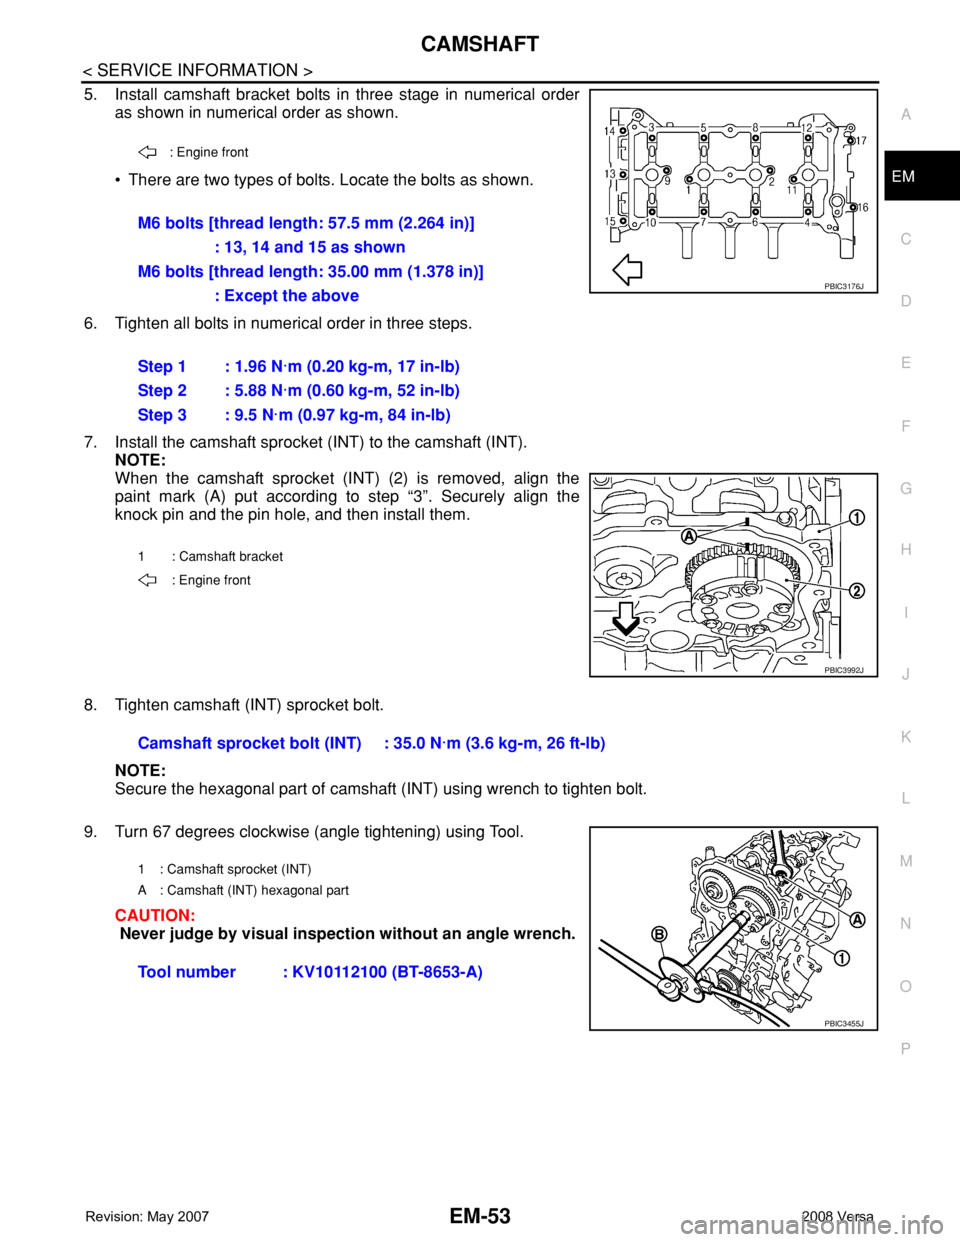
5. Install camshaft bracket bolts in three stage in numerical order
as shown in numerical order as shown.
• There are two types of bolts. Locate the bolts as shown.
6. Tighten all bolts in numerical order in three steps.
7. Install the camshaft sprocket (INT) to the camshaft (INT).
NOTE:
When the camshaft sprocket (INT) (2) is removed, align the
paint mark (A) put according to step “3”. Securely align the
knock pin and the pin hole, and then install them.
8. Tighten camshaft (INT) sprocket bolt.
NOTE:
Secure the hexagonal part of camshaft (INT) using wrench to tighten bolt.
9. Turn 67 degrees clockwise (angle tightening) using Tool.
CAUTION:
Never judge by visual inspection without an angle wrench.
: Engine front
M6 bolts [thread length: 57.5 mm (2.264 in)]
: 13, 14 and 15 as shown
M6 bolts [thread length: 35.00 mm (1.378 in)]
: Except the above
Step 1 : 1.96 N·m (0.20 kg-m, 17 in-lb)
Step 2 : 5.88 N·m (0.60 kg-m, 52 in-lb)
Step 3 : 9.5 N·m (0.97 kg-m, 84 in-lb)
1 : Camshaft bracket
: Engine front
PBIC3176J
PBIC3992J
Camshaft sprocket bolt (INT) : 35.0 N·m (3.6 kg-m, 26 ft-lb)
1 : Camshaft sprocket (INT)
A : Camshaft (INT) hexagonal part
Tool number : KV10112100 (BT-8653-A)
PBIC3455J
Page 1731 of 2771
EM-54
< SERVICE INFORMATION >
CAMSHAFT
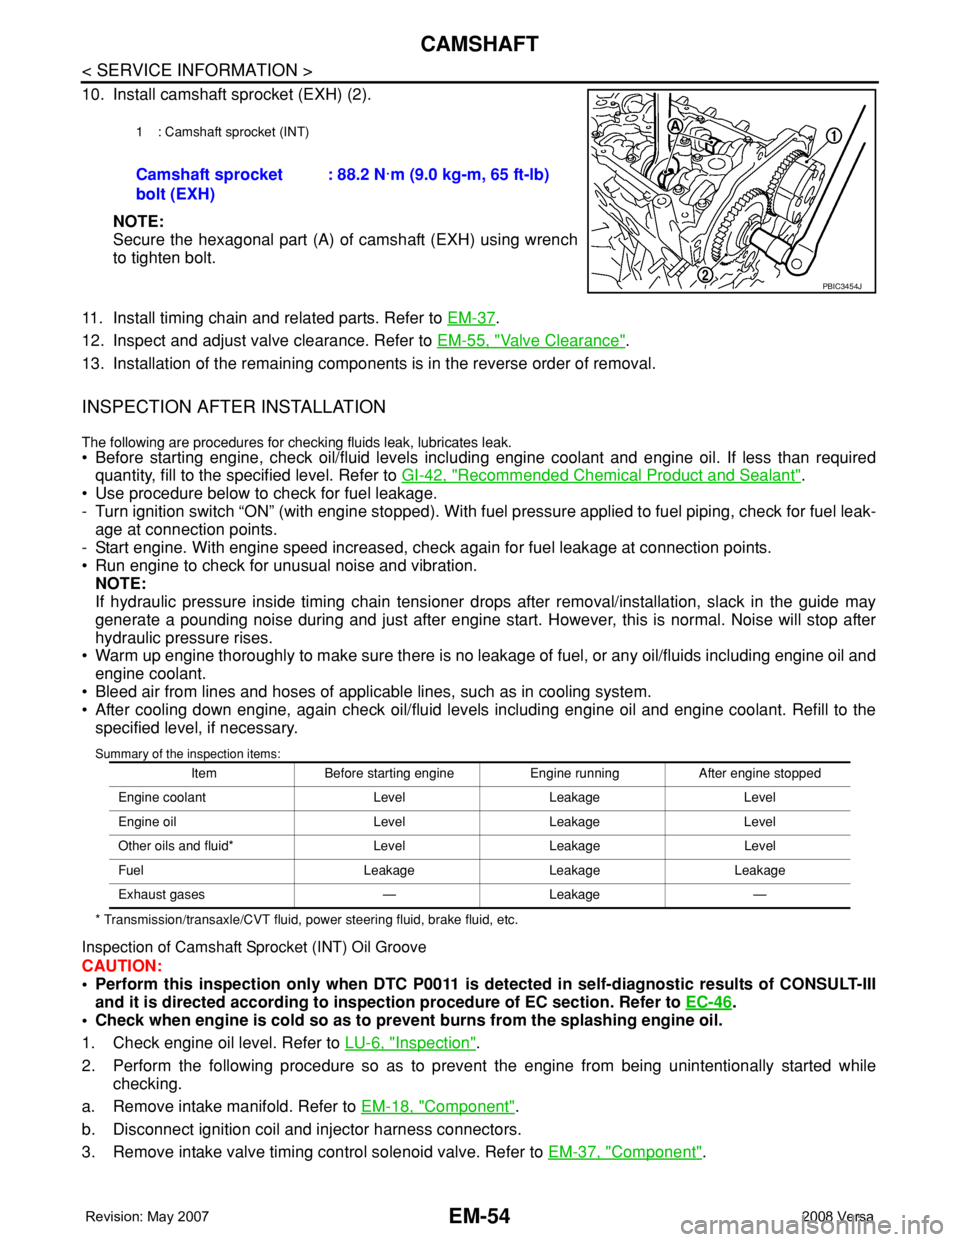
10. Install camshaft sprocket (EXH) (2).
NOTE:
Secure the hexagonal part (A) of camshaft (EXH) using wrench
to tighten bolt.
11. Install timing chain and related parts. Refer to EM-37
.
12. Inspect and adjust valve clearance. Refer to EM-55, "
Valve Clearance".
13. Installation of the remaining components is in the reverse order of removal.
INSPECTION AFTER INSTALLATION
The following are procedures for checking fluids leak, lubricates leak.
• Before starting engine, check oil/fluid levels including engine coolant and engine oil. If less than required
quantity, fill to the specified level. Refer to GI-42, "
Recommended Chemical Product and Sealant".
• Use procedure below to check for fuel leakage.
- Turn ignition switch “ON” (with engine stopped). With fuel pressure applied to fuel piping, check for fuel leak-
age at connection points.
- Start engine. With engine speed increased, check again for fuel leakage at connection points.
• Run engine to check for unusual noise and vibration.
NOTE:
If hydraulic pressure inside timing chain tensioner drops after removal/installation, slack in the guide may
generate a pounding noise during and just after engine start. However, this is normal. Noise will stop after
hydraulic pressure rises.
• Warm up engine thoroughly to make sure there is no leakage of fuel, or any oil/fluids including engine oil and
engine coolant.
• Bleed air from lines and hoses of applicable lines, such as in cooling system.
• After cooling down engine, again check oil/fluid levels including engine oil and engine coolant. Refill to the
specified level, if necessary.
Summary of the inspection items:
* Transmission/transaxle/CVT fluid, power steering fluid, brake fluid, etc.
Inspection of Camshaft Sprocket (INT) Oil Groove
CAUTION:
• Perform this inspection only when DTC P0011 is detected in self-diagnostic results of CONSULT-III
and it is directed according to inspection procedure of EC section. Refer to EC-46
.
• Check when engine is cold so as to prevent burns from the splashing engine oil.
1. Check engine oil level. Refer to LU-6, "
Inspection".
2. Perform the following procedure so as to prevent the engine from being unintentionally started while
checking.
a. Remove intake manifold. Refer to EM-18, "
Component".
b. Disconnect ignition coil and injector harness connectors.
3. Remove intake valve timing control solenoid valve. Refer to EM-37, "
Component".
1 : Camshaft sprocket (INT)
Camshaft sprocket
bolt (EXH): 88.2 N·m (9.0 kg-m, 65 ft-lb)
PBIC3454J
Item Before starting engine Engine running After engine stopped
Engine coolant Level Leakage Level
Engine oil Level Leakage Level
Other oils and fluid* Level Leakage Level
Fuel Leakage Leakage Leakage
Exhaust gases — Leakage —
Page 1732 of 2771
CAMSHAFT
EM-55
< SERVICE INFORMATION >
C
D
E
F
G
H
I
J
K
L
MA
EM
N
P O
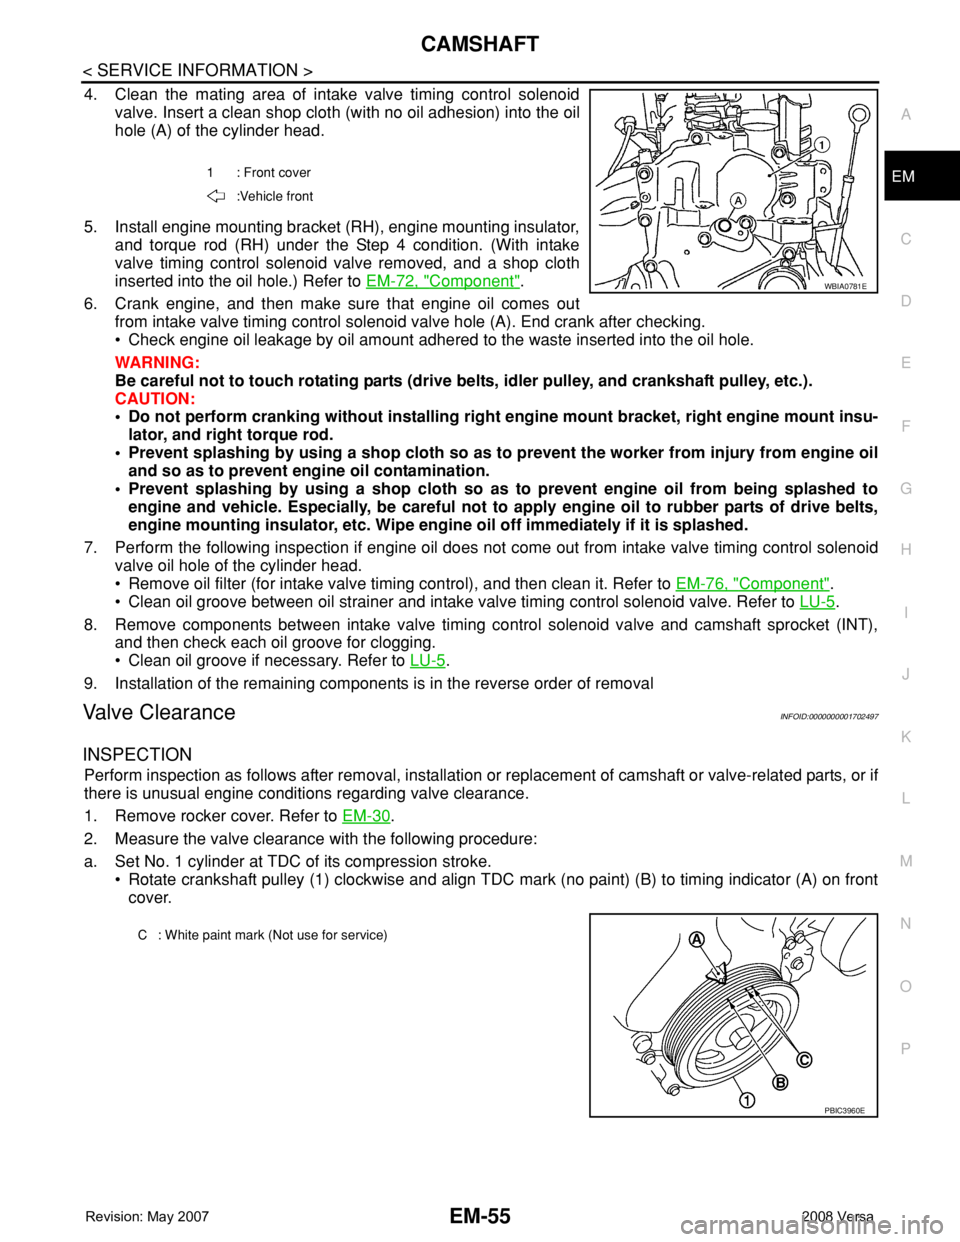
4. Clean the mating area of intake valve timing control solenoid
valve. Insert a clean shop cloth (with no oil adhesion) into the oil
hole (A) of the cylinder head.
5. Install engine mounting bracket (RH), engine mounting insulator,
and torque rod (RH) under the Step 4 condition. (With intake
valve timing control solenoid valve removed, and a shop cloth
inserted into the oil hole.) Refer to EM-72, "
Component".
6. Crank engine, and then make sure that engine oil comes out
from intake valve timing control solenoid valve hole (A). End crank after checking.
• Check engine oil leakage by oil amount adhered to the waste inserted into the oil hole.
WARNING:
Be careful not to touch rotating parts (drive belts, idler pulley, and crankshaft pulley, etc.).
CAUTION:
• Do not perform cranking without installing right engine mount bracket, right engine mount insu-
lator, and right torque rod.
• Prevent splashing by using a shop cloth so as to prevent the worker from injury from engine oil
and so as to prevent engine oil contamination.
• Prevent splashing by using a shop cloth so as to prevent engine oil from being splashed to
engine and vehicle. Especially, be careful not to apply engine oil to rubber parts of drive belts,
engine mounting insulator, etc. Wipe engine oil off immediately if it is splashed.
7. Perform the following inspection if engine oil does not come out from intake valve timing control solenoid
valve oil hole of the cylinder head.
• Remove oil filter (for intake valve timing control), and then clean it. Refer to EM-76, "
Component".
• Clean oil groove between oil strainer and intake valve timing control solenoid valve. Refer to LU-5
.
8. Remove components between intake valve timing control solenoid valve and camshaft sprocket (INT),
and then check each oil groove for clogging.
• Clean oil groove if necessary. Refer to LU-5
.
9. Installation of the remaining components is in the reverse order of removal
Valve ClearanceINFOID:0000000001702497
INSPECTION
Perform inspection as follows after removal, installation or replacement of camshaft or valve-related parts, or if
there is unusual engine conditions regarding valve clearance.
1. Remove rocker cover. Refer to EM-30
.
2. Measure the valve clearance with the following procedure:
a. Set No. 1 cylinder at TDC of its compression stroke.
• Rotate crankshaft pulley (1) clockwise and align TDC mark (no paint) (B) to timing indicator (A) on front
cover.
1 : Front cover
:Vehicle front
WBIA0781E
C : White paint mark (Not use for service)
PBIC3960E