DEFROSTING/DEFOGGING REAR WINDOW (if so equipped)
Press the rear window defroster button
on. Press the button again to manually turn
the defroster off. This function automatically turns off in approximately 15 minutes.
A/C ON/OFF BUTTON (if so equipped)
Press the A/Cbutton to manually turn the A/C on or off.
AIR RECIRCULATION BUTTON (if so equipped)
� Press the air recirculation button
to recirculate air inside the vehicle.
� Press the air recirculation button
again to turn air recirculation off.
� The airrecirculation modecannot beselected ifthe airflow control modeisin the
following positions:
,or.
FM/AM/XM �* RADIO WITH CD CHANGER (if so equipped)
PRESET A·B·C BUTTON
Press the PRESET A·B·Cbutton untilyoureach thedesired setting.Theradio is
equipped with three separate banks, each with six station presets. You may store any
combination of FM, AM or XM �radio presets on each bank.
SEEK/TRACK BUTTON
� To scan quickly through each broadcasting station, press the SEEK/TRACKbutton.
� To skip from one track to another on a CD, press the SEEK/TRACKbutton. Each
time the button is pressed, the CD will advance or skip back one track.
AUX BUTTON
Press the AUX button toplay acompatible devicesuchasan MP3 player whenitis
plugged into the auxiliary jack.
6
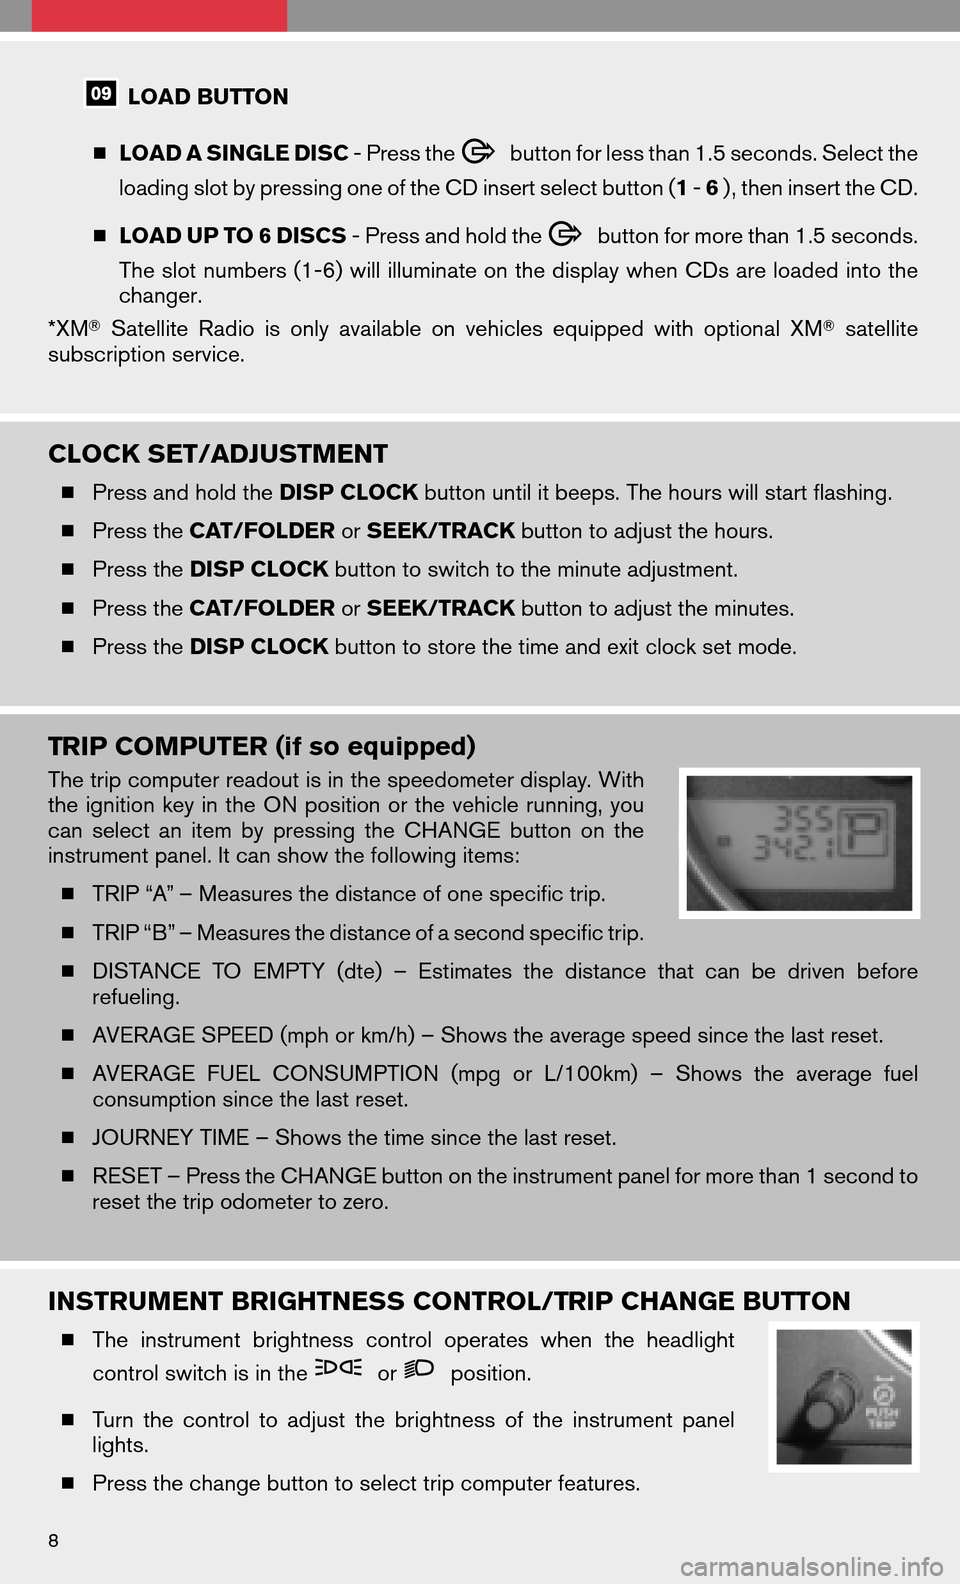
LOAD BUTTON
� LOAD A SINGLE DISC - Press the
button for less than 1.5 seconds. Select the
loading slot by pressing one of the CD insert select button ( 1-6 ) , then insert the CD.
� LOAD UP TO 6 DISCS - Press and hold the
button for more than 1.5 seconds.
The slot numbers (1-6) will illuminate on the display when CDs are loaded into the
changer.
*XM � Satellite Radioisonly available onvehicles equipped withoptional XM�satellite
subscription service.
CLOCK SET/ADJUSTMENT
� Press and hold the DISP CLOCKbutton until it beeps. The hours will start flashing.
� Press the CAT/FOLDER orSEEK/TRACK button to adjust the hours.
� Press the DISP CLOCK button to switch to the minute adjustment.
� Press the CAT/FOLDER orSEEK/TRACK button to adjust the minutes.
� Press the DISP CLOCK button to store the time and exit clock set mode.
TRIP COMPUTER (if so equipped)
The trip computer readout is in the speedometer display. With
theignition keyinthe ON position orthe vehicle running, you
can select anitem bypressing theCHANGE buttononthe
instrument panel. It can show the following items:
� TRIP “A” – Measures the distance of one specific trip.
� TRIP “B” – Measures the distance of a second specific trip.
� DISTANCE TOEMPTY (dte)–Estimates thedistance thatcanbedriven before
refueling.
� AVERAGE SPEED (mph or km/h) – Shows the average speed since the last reset.
� AVERAGE FUELCONSUMPTION (mpgorL/100km) –Shows theaverage fuel
consumption since the last reset.
� JOURNEY TIME – Shows the time since the last reset.
� RESET – Press the CHANGE button on the instrument panel for more than 1 second to
reset the trip odometer to zero.
INSTRUMENT BRIGHTNESS CONTROL/TRIP CHANGE BUTTON
� The instrument brightness controloperates whentheheadlight
control switch is in the
orposition.
� Turn thecontrol toadjust thebrightness ofthe instrument panel
lights.
� Press the change button to select trip computer features.
8
PAIRING PROCEDURE
NOTE:The vehicle must be stationary when pairing the phone.
1. Press the
button on the steering wheel and wait for the tone.
2. Say “Setup.”
3. Wait for the tone, then say “Pair phone.”
4. Wait for the tone, then say “New phone.”
5. Initiate pairing from the phone.
� The pairing procedure variesaccording toeach cellular phonemodel. Fordetailed
pairing instructions and compatible phones, please visit
www.nissanusa.com/bluetooth .
� When prompted for a PASSKEY code, enter “1234” from the handset. (The PASS-
KEY code is assigned by NISSAN and cannot be changed.)
6. Say a name for the phone when the system asks you to provide one. You can give the
phone a name of your choice.
7. Say anumber between 1and 5when thesystem asksyouforapriority level.The
priority leveldetermines whichphone interacts withthesystem whentwoormore
paired phones are active in the vehicle at the same time. Choose 1 if this is the only
phone or the primary phone.
8. Say “Yes” or “No” when the system asks if you would like to select a custom ring tone.
Follow the instructions provided by the system to choose a ring tone.
SETTING UP YOUR PHONEBOOK – ADDING NEW ENTRIES
Each paired phone has its own dedicated phone book. Each phone book can store up to 40
names. Each name can have up to 4 locations/numbers: Home, Office, Mobile, and Other.
NOTE: The vehicle must be stationary when adding new entries.
1. Press the
button and wait for the tone.
2. Say “Phone book.”
3. Wait for the tone, then say “New entry.”
4. When prompted, say the name for the new entry. For example, say “Michelle.” If the
name istoo short ortoo long, orifit sounds toomuch likeaname thatisalready
stored in the phone book, the system tells you and prompts you to say a name again.
Choose a new name.
5. Say “Yes” or “No” when the system asks you to confirm the name is correct.
6. Say a location (“Home,” “Office,” “Mobile” or “Other”) when the system asks you to
provide one. The system acknowledges the location.
� By Voice command -When prompted, sayaphone number forthe location. For
example, say“five fivefiveone twoone two.” The systemrepeats thenumber and
prompts you for the next command.
� By Bluetooth �transfer -Say “Transfer entry.” The systemacknowledges thecom-
mand and asks you to initiate the transfer from the phone handset. The new contact
phone number will be transferred from the cellular phone via the Bluetooth �commu-
nication link. The transfer procedure varies according to each cellular phone. See the
cellular phone owner’s manual for details.
16

Press the rear window defroster button
on. Press the button again to manually turn
the defroster off. This function automatically turns off in appro")