Page 2 of 32
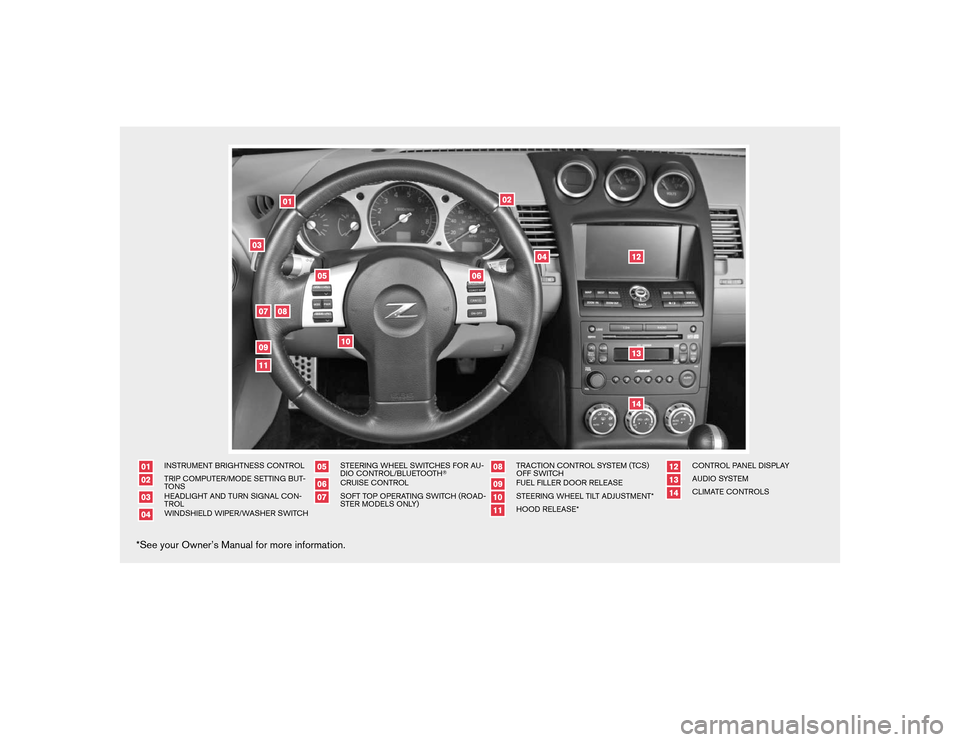
INSTRUMENT BRIGHTNESS CONTROLTRIP COMPUTER/MODE SETTING BUT-
TONSHEADLIGHT AND TURN SIGNAL CON-
TROLWINDSHIELD WIPER/WASHER SWITCH
STEERING WHEEL SWITCHES FOR AU-
DIO CONTROL/BLUETOOTH�CRUISE CONTROLSOFT TOP OPERATING SWITCH (ROAD-
STER MODELS ONLY)
TRACTION CONTROL SYSTEM (TCS)
OFF SWITCHFUEL FILLER DOOR RELEASESTEERING WHEEL TILT ADJUSTMENT*HOOD RELEASE*
CONTROL PANEL DISPLAYAUDIO SYSTEMCLIMATE CONTROLS
*See your Owner’s Manual for more information.
Page 3 of 32

TABLE OF CONTENTS
Remote Keyless Entry System..........................2
Windshield Wiper/Washer Switch.......................2
Headlight and Turn Signal Control.......................3
RPM Shift Indicator (manual transmission only)................4
Steering Wheel Switches for Audio Control/Bluetooth�
(if so equipped)..................................4
Cruise Control (if so equipped).........................5
Screw-in Recovery Hook.............................5
Auto Climate Control...............................6
Rear Floor Box...................................7
FM/AM/XM�* Radio with CD Changer (if so equipped)...........8
Clock Set/Adjustment...............................9
Trip Computer..................................10
Automatic Transmission (if so equipped)...................10
6-Speed Manual Transmission (if so equipped)...............11
Control Panel Display with Navigation System (if so equipped)......11
Traction Control System (TCS) Off Switch (if so equipped)........12
Front-Passenger Air Bag Status Light....................12
Tire Pressure Monitoring System (TPMS)..................12
Seat Belt Warning Light and Chime......................13
Front Seat Adjustments.............................13
Seatback Tilt Cancel Switch (Roadster only)................13
Power Windows.................................14
Secondary Rear Hatch Release........................14
Mirror Adjustment................................14
Soft Top Operation...............................15
Homelink�Universal Transceiver (if so equipped)..............16
Bluetooth�Hands-Free Phone System (if so equipped)..........17
Navigation System (if so equipped)......................19
This easy-to-use Quick Reference Guide is intended to help you more fully
appreciate some of the unique features and functions of your new vehicle.
However, it is not intended to replace your Owner’s Manual. The Owner’s
Manual contains more detailed information to help you better understand the
important safety warnings, features, operation, and maintenance of your
vehicle.
Page 5 of 32
– Lift the lever up for one sweep of the front wipers.
Rear Wipers(REAR)– Twist the end section to operate the first(INT)or second
(ON)speed settings for the rear wipers.
�The washer fun")
Mist(MIST)– Lift the lever up for one sweep of the front wipers.
Rear Wipers(REAR)– Twist the end section to operate the first(INT)or second
(ON)speed settings for the rear wipers.
�The washer function activates the washer fluid and several sweeps of the wipers:
●For FRONT WASHER, pull lever toward you.
●For REAR WIPER, push lever away from you.
HEADLIGHT AND TURN SIGNAL CONTROL
HEADLIGHT CONTROL SWITCH
�Turn the headlight control switchto the
position to turn on the front parking, tail, license plate
and instrument panel lights.
�Turn the headlight control switch
to thepo-
sition to turn on the headlights. All other lights remain
on.
FOG LIGHT OPERATION
NOTE: The headlights must be on and the low beams selected for the fog lights to operate.
�Turn the switch (inside collar)
to theposition to turn on the fog lights.
�Turn the switch (inside collar)
to theOFFposition to turn off the fog lights.
TURN SIGNAL SWITCH
�Move the headlight control switch up or downto
signal a turning direction. When the turn is completed,
the turn signals cancel automatically.
�To signal a lane change, move the headlight control
switch up or down
to the point where the indica-
tor light begins to flash, but the headlight control switch
does not latch.
HIGH BEAM
�Push the headlight control switch forwardto
select the high beam function. The blue
indicator
light illuminates. Pull the headlight switch back to the
original position to select the low beam. The blue
indicator light goes off.
�Pull and release the headlight control switch
to flash the headlight high beams on
and off.
3
Page 18 of 32

SYSTEM OPERATING TIPS
�Garage doors, electrical gates, entry doors, etc. will be activated during programming.
To avoid injury, make sure that people an")
HOMELINK�UNIVERSAL TRANSCEIVER (if so equipped)
SYSTEM OPERATING TIPS
�Garage doors, electrical gates, entry doors, etc. will be activated during programming.
To avoid injury, make sure that people and objects are clear of all doors or gates during
programming. Your vehicle’s engine should be turned off while programming the
HomeLink�Transceiver.
�To program your HomeLink�Transceiver to operate a garage door, gate, or entry door
opener, home or office lighting, you need to be at the same location as the device.
NOTE: Garage door openers (manufactured after 1996) have “rolling code protec-
tion”. To program a garage door opener equipped with “rolling code protection”,
you will need to use a ladder to get up to the garage door opener motor to be able
to access the “smart or learn” program button.
PROGRAMMING YOUR HOMELINK�UNIVERSAL TRANSCEIVER (Mirror,
Sun Visor or Overhead Console)
1. To begin, press and hold the two
outer HomeLink�buttons (to
clear the memory) until the indi-
cator light blinks slowly (after 20
seconds) . Release both buttons.
2. Position the end of the hand-
held transmitter 1-3 inches
(26-76 mm) away from the
HomeLink�surface
3. Using both hands, simultaneously press and hold both the HomeLink�button you
want to program and the hand-held transmitter button.DO NOT release the
buttons until step 4 has been completed.
4. Hold down both buttons until the indicator light on the HomeLink�flashes, changing
from a “slow blink” to a “rapidly flashing blink”. This could take up to 90 seconds.
When the indicator light flashes rapidly, both buttons may be released. The rapidly
flashing light indicates successful programming. To activate the garage door or other
programmed device, press and hold the programmed HomeLink�button - releasing
when the device begins to activate.
5. If the indicator light on the HomeLink�blinks rapidly for two seconds and then turns
solid, HomeLink�has picked up a “rolling code” garage door opener signal. You will
need to proceed with the next steps to train the HomeLink�to complete the
programming which may require a ladder and another person for convenience.
6. Press and release the “smart” or “learn” program button located on the garage door
opener’s motor to activate the “training mode”. This button is usually located near the
antenna wire that hangs down from the motor. If the wire originates from under a light
lens, you will need to remove the lens to access the program button.
NOTE: Once you have pressed and released the program button on the garage
door opener’s motor and the “training light” is lit, you have 30 seconds in which to
perform step 7. Use the help of a second person for convenience to assist when
performing this step.
16