Page 267 of 450

For pleasant driving5-51
5
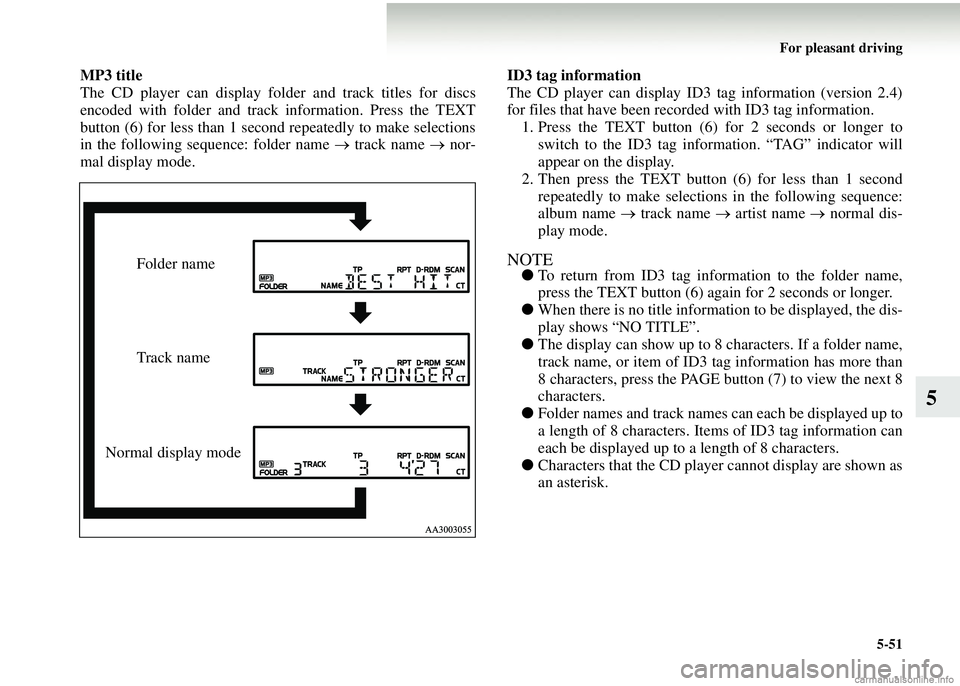
MP3 title
The CD player can display fold er and track titles for discs
encoded with folder and track information. Press the TEXT
button (6) for less than 1 second repeatedly to make selections
in the following sequence: folder name → track name → nor-
mal display mode. ID3 tag information
The CD player can display ID3 tag information (version 2.4)
for files that have been record
ed with ID3 tag information.
1. Press the TEXT button (6) for 2 seconds or longer to switch to the ID3 tag information. “TAG” indicator will
appear on the display.
2. Then press the TEXT button (6) for less than 1 second
repeatedly to make selections in the following sequence:
album name → track name → artist name → normal dis-
play mode.
NOTE● To return from ID3 tag information to the folder name,
press the TEXT button (6) again for 2 seconds or longer.
● When there is no title information to be displayed, the dis-
play shows “NO TITLE”.
● The display can show up to 8 characters. If a folder name,
track name, or item of ID3 tag information has more than
8 characters, press the PAGE bu tton (7) to view the next 8
characters.
● Folder names and track names can each be displayed up to
a length of 8 characters. Item s of ID3 tag information can
each be displayed up to a length of 8 characters.
● Characters that the CD player cannot display are shown as
an asterisk.Folder name
Track name
Normal display mode
Page 269 of 450

For pleasant driving5-53
5
To turn on the power
PWR ON button — 4
When the power is off, press this button to turn the power on.
To adjust the volume
Volume up button — 2
The volume will increase when this button is pressed.
Volume down button — 6
The volume will decrease when this button is pressed.
To listen to the audio system
Select the desired mode by lightly pressing the mode change
button (4).
The mode switches between the radio and CD with each push
of the button.
To listen to the radio
To select AM/FM mode
Mode change button — 4
Select the desired band by pressing this button.
The order is: FM1 → FM2 → FM3 → MW → LW → CD →
FM1.
Automatic radio tuning
Seek up button — 1/S eek down button — 5
After pressing these buttons, th e reception of the selected sta-
tion will begin.
To select the preset memory
Preset change button — 3
When the radio is on and this bu tton is pressed, the preset sta-
tion frequencies are sequentiall y selected each time the button
is pressed: 1, 2, 3, 4, 5, 6, 1, 2, etc.
To listen to a CD
To select a desired track
Track up button — 1
Press the button repeatedly until the desired track number
appears on the display. If you press the button for 1 second or
longer, the track number will keep rising as long as you keep
the button pressed. The currentl y playing track will continue
playing normally while you keep the button pressed; only the
indicated track number will change. When you release the but-
ton, the player will jump to the indicated track.
Track down button — 5
Press the button repeatedly until the desired track number
appears on the display.
To select a desired folder (MP3 CDs only)
Folder up button — 3
Press this button until the desired folder is reached.
Page 270 of 450
5-54 For pleasant driving
5Error codes
E00710100422
If an error code (1) appears in th
e frequency display window, take actio n in accordance with the table below.
Error codeCauseSolution
LORD No disc inside Insert disc.
CDP E 01
Faulty disc (CD player)
(most likely) Insert several other discs.
If the error code appears only with certain disc(s
), the problem may be due to scratch(es) and/or
dirt on the disc(s). Refrain from using any damaged disc(s).
If the error code appears with all discs, the problem may be due to condensation or dirt inside the
equipment. Wait several hours and try again. If the error code still appears with all discs, please
have the equipment inspected.
CDP E 02
CDC E 01
Faulty disc (CD
changer) (most likely)
CDC E 02
Page 293 of 450

For emergencies6-3
6
2. You could be injured if the vehicles move. Set the parkingbrake firmly on each vehicle. Put an automatic transmis-
sion in “P” (PARK) or a manua l transmission and an auto-
mated manual transmission in “N” (Neutral). With an
automated manual transmission vehicle, confirm that “N”
is shown by the allshift indicator display. Turn off the
ignition switch.
NOTE● Turn off all lamps, the heater and other electrical loads.
This will avoid sparks and help save both batteries.
3. Make sure battery electrolyte is at the proper level. Refer to “Battery” on page 8-15. 4. Connect one end of one jump lead to the positive (+) ter-
minal of the discharged battery (A), and the other end to
the positive (+) terminal of the booster battery (B).
Petrol-powered vehicles
WARNING!
● Turn off the ignition on both vehicles beforehand.
Take care to ensure that the cables or your clothes
cannot be caught by the fan or drive belt. Personal
injury could result.
WARNING!
● If electrolyte fluid is not vi sible, or appears to be fro-
zen, Do Not Attempt Jump Starting!
A battery might rupture or explode if the tempera-
ture is below freezing point or if it is not filled to the
proper level.
Except for vehicles with turbocharger
Page 303 of 450

For emergencies6-13
6
• The tyre is punctured in the side wall (A), not in thetread (B).
• The vehicle has been driven with the tyre almost com-
pletely flat.
• The tyre has completely sl ipped over the wheel rim and
come off the wheel.
• The wheel is damaged.
● Only use the tyre sealant at ambient temperatures of -
20 °C to + 60 °C.
● Effect an emergency repair without pulling out the object
(nail, screw, etc.) that is stuck in the tyre.
● Do not use the tyre sealant if the tyre has been damaged
by being driven when insufficiently inflated (e.g. bumps,
cuts, cracks, etc. on the tyre).
● Wipe tyre sealant off paintwork immediately with a damp
cloth. ●
Immediately wash out any clot hes contaminated with the
tyre sealant.
Before repairing a tyre, first stop your vehicle in a safe, flat
location. 1. Park the vehicle on level and stable ground.
2. Set the parking brake firmly.
3. On vehicles with manual transmission, turn the ignition key to the “LOCK” position, move the gearshift lever to
the “R” (Reverse) position.
On vehicles with automated manual transmission, move
the allshift lever to the “R” (Reverse) position, turn the
ignition key to the “LOCK” position.
With an automated manual transmission vehicle, confirm
that there is an “R” in th e allshift indicator display.
4. Turn on the hazard flashers and set up a warning triangle, flashing signal lamp, etc., at an adequate distance from the
vehicle, and have all your passengers leave the vehicle.
Page 307 of 450
For emergencies6-17
6
12. Securely attach the bottle hose (G) to the tyre valve (N).Remove the “max. 80 km/h (50 mph)” or “max. 50 mph”
label from the bottle, that must be displayed on the instru-
ment panel within the driver’s field of view.
13. Insert the plug on the co mpressor’s power cord (O) into
the accessory socket (P), then turn the ignition switch to
the “ACC” or “ON” position.
Page 309 of 450

For emergencies6-19
6
16. When you have inflated the ty re to the specified pressure,
stow the compressor and bottle in the vehicle and
promptly start driving the vehi cle so that the tire sealant
can spread evenly in the ty re. Drive with great care. Do
not exceed a speed of 80 km /h (50 mph). Observe local
speed limits.
Remove the “max. 80 km/h (50 mph)” or “max. 50 mph”
label from the bottle, that must be displayed on the instru-
ment panel within the driver’s field of view.
NOTE● Driving faster than 80 km/h (50 mph) can make the vehi-
cle vibrate. 17. After driving for 10 minutes,
check the tyre pressure using
the air pressure gauge on the compressor.
If the tyre pressure is not sufficient, inflate the tyre to the
specified pressure again an d drive the vehicle carefully
without exceeding a speed of 80 km/h (50 mph).
CAUTION!
●If you sense any abnormalit y while driving, stop the
vehicle and contact a MITSUBISHI MOTORS
Authorized Service Point or another specialist. Oth-
erwise the tyre pressure may drop before the emer-
gency repair procedure is completed, rendering the
vehicle unsafe.
CAUTION!
● If the tyre pressure is lower than the minimum per-
mitted pressure (1.3 bar {130 kPa}), the tyre cannot
successfully be repaired with the tyre sealant. Do not
drive the vehicle any further. Contact a
MITSUBISHI MOTORS Auth orized Service Point
or another specialist.
Page 313 of 450

For emergencies6-23
6
Jacking up the vehicle
E00801001016
1. Park the vehicle on level and stable ground.
2. Set the parking brake firmly.
3. On vehicles with manual transmission, turn the ignition
key to the “LOCK” position, move the gearshift lever to
the “R” (Reverse) position.
On vehicles with automated manual transmission, move
the allshift lever to the “R” (Reverse) position, turn the
ignition key to the “LOCK” position.
With an automated manual tr ansmission vehicle, confirm
that there is an “A” or “1” in the allshift indicator display.
4. Turn on the hazard flashers and set up a warning triangle,
flashing signal lamp, etc., at an adequate distance from the
vehicle, and have all your passengers leave the vehicle. 5. To prevent the vehicle from roll
ing when it is raised on the
jack, place a chock or block (A) at the tyre that is diago-
nally opposite from the tyre (B) you are changing.
NOTE● The chock shown in the illustration does not come with
your vehicle. It is recommended that you keep one in the
vehicle for use if needed.
● If a chock is not available, use a stone or any other object
that is large enough to hold the wheel in position.
WARNING!
●Be sure to apply a chock to the correct tyre when
jacking up the vehi cle. If the vehicle moves while
jacked up, the jack could slip out of position and
cause an accident.