2008 MINI COOPER CONVERTIBLE change wheel
[x] Cancel search: change wheelPage 60 of 176

58
AUTOMATIC TRANSMISSION WITH STEPTRONIC
*
Switching from M/S + – Manual mode into
the selector lever positions P, R and N is
only possible via D.Shifting with the selector lever>Briefly press the selector lever in the +
direction:
Transmission shifts up
>Briefly press the selector lever in the –
direction:
Transmission shifts down.
M1 to M6 appear in the gear indicator.
Shifting on the steering wheel*The shift paddles allow the gears to be
changed rapidly and, above all, safely, since
both hands can remain on the steering
wheel.
To shift up or down with one of the two
shift paddles:
>Pull the shift paddle:
Transmission shifts up
>Press the shift paddle:
Transmission shifts down.
M1 to M6 appear in the gear indicator.
The transmission will execute only gear
changes that result in a plausible combina-
tion of vehicle speed and engine rpm, e.g. it
will not shift down if that would result in
excessive engine speed.
In the MINI COOPER S, with the selec-
tor lever in position D, automatic
mode, you can shift gears using the shift
paddles on the steering wheel. The trans-
mission automatically switches to manual
mode. If you do not shift gears with the
shift paddles or accelerate for a certain
amount of time, the transmission auto-
matically returns to automatic mode.<
MalfunctionEP appears on the display. The transmission
system is malfunctioning. Avoid high loads.
All selector lever positions can still be
engaged; in the forward driving positions,
however, the vehicle can only be driven
with a limited gear selection.
Have the system checked immediately.
Jump-starting and towing, refer to
page146 ff.
Page 74 of 176

72
DRIVING STABILITY CONTROL SYSTEMSYour MINI or MINI Convertible is equipped
with a series of systems that help maintain
driving stability even in adverse driving sit-
uations.Antilock Brake System (ABS)ABS keeps the wheels from locking during
braking. Steering stability is maintained
even during full brake applications. In this
way, active safety is enhanced.
ABS is operational each time the engine is
started. Braking safely, refer to page103.Cornering Brake Control CBCDriving stability and steering characteris-
tics are further enhanced while braking in
turns or during a lane change.Electronic Brake Force Distribution
(EBD)The system controls brake-force applica-
tion at the rear wheels in order to obtain
increased stability in the vehicle's braking
response.All Season traction Control (ASC)*ASC prevents slip at the drive wheels while
starting off and accelerating the vehicle.
ASC also recognizes unstable vehicle condi-tions, such as fishtailing or nose-diving. In
these cases, and subject to physical limits,
ASC helps to keep the vehicle on a steady
course by reducing engine speed and by
applying brakes at individual wheels. This
system optimizes driving stability and trac-
tion, especially when just starting off,
when accelerating or when cornering.
The ASC is operational each time you start
the engine. It integrates the Antilock Brake
System (ABS) and Electronic Brake Force
Distribution (EBD).
The laws of physics cannot be
repealed, even with ASC. An appropri-
ate driving style always remains the
responsibility of the driver. Avoid using the
additional safety margin provided by the
system as an excuse for taking unnecessary
risks.
Do not make any modifications to the ASC
system. Allow only authorized technicians
to perform service procedures on the
ASC.<
Dynamic Stability Control (DSC)*DSC prevents slip at the drive wheels while
starting off and accelerating the vehicle.
DSC also recognizes unstable vehicle condi-
tions, such as fishtailing or nose-diving. In
these cases, and subject to physical limits,
DSC helps to keep the vehicle on a steady
course by reducing engine speed and by
applying brakes at individual wheels.
The DSC is operational every time you start
the engine. It integrates All Season traction
Control (ASC).
The laws of physics cannot be
repealed, even with DSC. An appro-
priate driving style always remains the
responsibility of the driver. Avoid using the
additional safety margin provided by the
system as an excuse for taking unnecessary
risks.
Do not make any modifications to the DSC
system. Allow only authorized technicians
to perform service procedures on the
DSC.<
Page 76 of 176

74
FLAT TIRE MONITOR The conceptAs you drive, the Flat Tire Monitor keeps
track of the tire inflation pressure in all four
tires. The system alerts you when there is a
substantial pressure loss in one of the tires
relative to another.
In the event of tire pressure loss, the rolling
radius of the tire changes, thereby affect-
ing the rotational speed of the wheels. This
change is detected, and a flat tire warning
is issued to the driver.System requirementsTo ensure the reliability of flat tire warn-
ings, the system must be initialized with
the correct tire inflation pressures.
Each time you correct the pressure in
a tire, or change a wheel or tire, the
system must be reinitialized.<
System limitations
The Flat Tire Monitor cannot alert you
to severe and sudden tire damage
caused by external factors, nor does it
detect the gradual and minor loss of pres-
sure in all four tires.<
The system could issue a false warning or
function in a delayed manner in the follow-
ing situations:
>System was not initialized
>You are driving on a snow-covered or
slippery road surface
>Sporty driving style: slip at the drive
wheels, high lateral acceleration
>You are driving with snow chains.
When driving with a space-saver spare tire,
the Flat Tire Monitor cannot function.
Initializing the system
Initialization is completed while you
are driving, but you can stop the car
at any time. Initialization is automatically
continued when you continue driving. Do
not initialize the system if you are driving
with snow chains or a space-saver spare
tire.<
1. Before a journey, start the engine, but do
not start driving.
2. Press the button until the indicator lamp
in the display elements lights up in yel-
low for several seconds.
3. Drive off.
Initialization is completed during the
drive, without any feedback issued.
Page 78 of 176

76
TIRE PRESSURE MONITOR
*
The concept
TPM checks the inflation pressures of the
four mounted tires. The system notifies you
if there is a significant loss of pressure in
one or more tires.System requirementsIn order to assure the reliable reporting of a
flat tire, the system must be reset while all
tire inflation pressures are correct.
Always use wheels with TPM electronics
and a metal valve. Otherwise, the system
may malfunction.
Each time a tire inflation pressure has
been corrected or a wheel or tire has
been changed, reset the system.<
System limitations
TPM cannot warn you in advance of
sudden severe tire damage caused by
outside influences.<
The system does not work correctly if it has
not been reset; for example, a flat tire may
be indicated even though the tire inflation
pressures are correct.
The system is inactive and cannot indicate
a flat tire if a wheel without TPM electron-
ics, such as a compact spare wheel, has
been mounted, or if TPM is temporarily
malfunctioning due to other systems or de-
vices using the same radio frequency.
Resetting the system
Each time a tire inflation pressure has
been corrected or a wheel or tire has
been changed, reset the system.<
1. Start the engine, but do not start driving.
2. Press the button until the yellow warn-
ing lamp in the display elements lights
up yellow for several seconds.
3. Drive off.
After driving a few minutes, the set
inflation pressures in the tires are
accepted as the target values to be mon-
itored. The system reset is completed
without notification during your drive,
which can be interrupted at any time.
When driving resumes, the reset is con-
tinued automatically.
Page 79 of 176

77
OVERVIEW REPAIRS OPERATIONCONTROLS DATA INDEX
TIRE PRESSURE MONITOR
*
Message for low tire inflation pressure
The warning lamp lights up in yel-
low. An acoustic signal also sounds.
A flat tire or a severe loss in pres-
sure has occurred in one or more tires.
1. Reduce speed and stop the vehicle with
caution. Avoid hard brake applications
and steering maneuvers.
2. Identify the damaged wheel or wheels.
If this cannot be determined, con-
tact your MINI Dealer.<
3. Replace the damaged wheel, refer to
Wheel change on page139.
4. Check the tire inflation pressure and cor-
rect it if necessary.
The compact wheel is not equipped with
the necessary TPM electronics and is not
monitored after it is mounted. When driv-
ing with a compact wheel, the system indi-
cates that a malfunction is occurring.
Vehicles with Run Flat tires:
1. Reduce vehicle speed carefully to under
50 mph / 80 km/h. Avoid hard brake
applications and steering maneuvers.
Do not exceed a speed of 50 mph /
80 km/h.
Do not continue driving if the vehi-
cle is not equipped with Run Flat
tires, refer to page115. If you continue
to drive with a flat tire, a serious acci-
dent could result.<
2. Check the tire inflation pressure in all
four tires at the earliest opportunity.
If the tire inflation pressure is cor-
rect in all four tires, it is possible
that the Tire Pressure Monitor was not
initialized. In this case, initialize the sys-
tem.<
3. If there is a total loss of tire inflation
pressure, 0 psi/0 kPa, or obvious tire
damage, you can gauge the mileage for
continued driving on the basis of the fol-
lowing indications:
>With a light load:
1 to 2 persons without luggage:
approx. 155 miles/250 km
>With a medium load:
2 persons, luggage compartment full, or
4 persons without luggage:
approx. 90 miles/150 km
>With a full load:
4 or more persons, luggage compart-
ment full:
ca. 30 miles/50 km.
Drive cautiously. Do not exceed a
speed of 50 mph / 80 km/h. In case of
tire pressure loss you must expect changes
in vehicle handling such as lower track sta-
bility during braking, longer braking dis-
tances and changes in self-steering proper-
ties when close to the handling limit.
For safety reasons, the manufacturer of
your MINI recommends not having dam-
aged Run Flat tires repaired, but to consult
a MINI Dealer in such cases.
and then lights up permanently.
No punctures can be detected.
This type of message is shown in the fol-
lowing situations:
>If there is a malfunction
Have the system checked.
>If a wheel without TPM electronics is
mounted, e.g. a compact wheel.
Page 88 of 176

86
AUTOMATIC CLIMATE CONTROL
*
Automatic air distribution and volume
The LED is lit when the AUTO pro-
gram is on.
Automatic adjustment of the air distribu-
tion and volume, and adaptation of the
specified temperatures to external influ-
ences, e.g. outside temperature and insola-
tion.
In the automatic program (AUTO), the air
conditioning is activated automatically. To
create a pleasant air climate, the air tem-
perature coming from the vents in the
upper body area is lower than the air tem-
perature in the footwell.
Air volume/Blower
Switching automatic climate control
off/on
Press the left or right half of the
button to vary the air volume.
Automatic adjustment of the air volume is
deactivated.
Switching air conditioner on/off.
Press the left half of the button while the
blower is at the lowest setting. The blower,
heating and air conditioning are switched
off. All displays go out.
Switch the automatic climate control back
on by pressing any button.
Cooling function
The LED is lit when the cooling
function is on.
The air is cooled and dehumidified and,
depending on the temperature setting,
rewarmed.
The cooling function is automatically acti-
vated in the AUTO program.
Depending on the weather, the windshield
can fog up temporarily after the engine is
started.
When the air conditioning is on, con-
densation is formed which then exits
under the vehicle. Traces of condensed
water on the ground are therefore nor-
mal.<
Recirculated air mode
The LED is lit when the recirculated
ai r mode is on. Su ppl y of outside ai r
into the vehicle is blocked.
The air within the vehicle is recirculated.
In the automatic program (AUTO) in hot
weather conditions, the recirculated air
mode is activated temporarily to enable
faster cooling.
The LED for the recirculated air button is
not lit.
The recirculated air mode should not
be used constantly over a longer
period of time; otherwise the air quality in
the vehicle's interior will gradually deterio-
rate. If the windows fog up in the recircu-
lated air mode, turn the recirculated air
mode off and, if necessary, increase the air
supply.<
Rear window defroster and windshield
heating*
The LED comes on when the rear
window/windshield heating is on.
The heater switches off automatically after
a short time.
Temperature
Tap or turn the wheel in the
appropriate direction to change
the temperature step by step.
The figures in the display provide
a general indication of interior tempera-
ture. When you start the vehicle, the sys-
tem ensures that the selected temperature
is achieved as quickly as possible and then
maintained.
Permanent heating with maximum
power output at temperature selec-
tion HI. Permanent cooling at LO. With the
Page 117 of 176

115
OVERVIEW REPAIRSOPERATIONCONTROLS DATA INDEX
RUN-FLAT TIRES
*
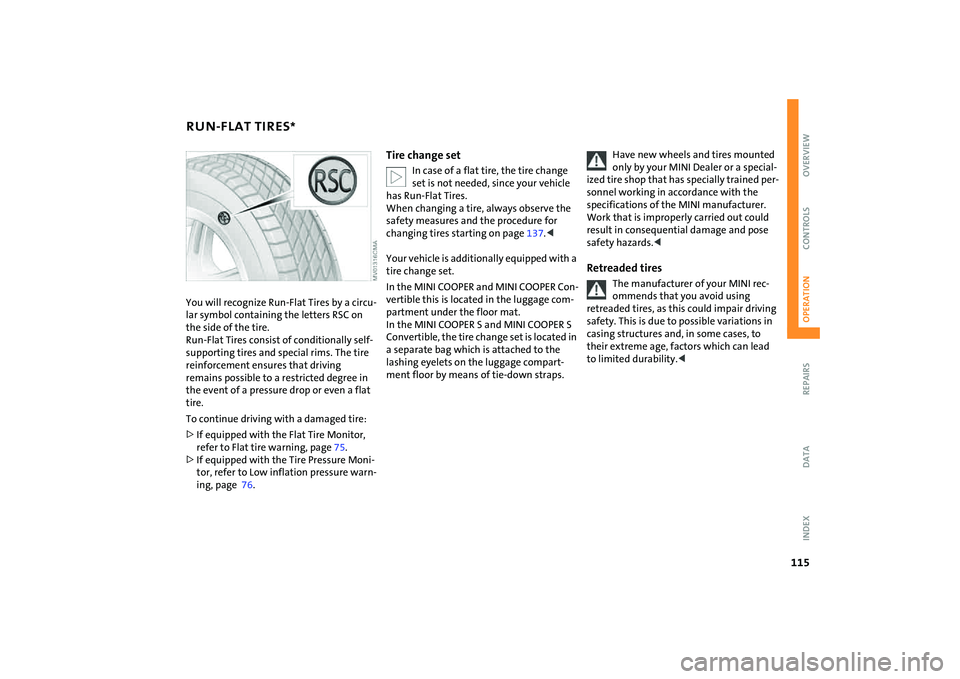
You will recognize Run-Flat Tires by a circu-
lar symbol containing the letters RSC on
the side of the tire.
Run-Flat Tires consist of conditionally self-
supporting tires and special rims. The tire
reinforcement ensures that driving
remains possible to a restricted degree in
the event of a pressure drop or even a flat
tire.
To continue driving with a damaged tire:
>If equipped with the Flat Tire Monitor,
refer to Flat tire warning, page75.
>If equipped with the Tire Pressure Moni-
tor, refer to Low inflation pressure warn-
ing, page 76.
Tire change set
In case of a flat tire, the tire change
set is not needed, since your vehicle
has Run-Flat Tires.
When changing a tire, always observe the
safety measures and the procedure for
changing tires starting on page137.<
Your vehicle is additionally equipped with a
tire change set.
In the MINI COOPER and MINI COOPER Con-
vertible this is located in the luggage com-
partment under the floor mat.
In the MINI COOPER S and MINI COOPER S
Convertible, the tire change set is located in
a separate bag which is attached to the
lashing eyelets on the luggage compart-
ment floor by means of tie-down straps.
Have new wheels and tires mounted
only by your MINI Dealer or a special-
ized tire shop that has specially trained per-
sonnel working in accordance with the
specifications of the MINI manufacturer.
Work that is improperly carried out could
result in consequential damage and pose
safety hazards.<
Retreaded tires
The manufacturer of your MINI rec-
ommends that you avoid using
retreaded tires, as this could impair driving
safety. This is due to possible variations in
casing structures and, in some cases, to
their extreme age, factors which can lead
to limited durability.<
Page 139 of 176

137
OVERVIEW REPAIRSOPERATION CONTROLS DATA INDEX
REPAIRING A FLAT TIRE SPACE-SAVER SPARE TIRE
*
Safety measures in the event of a
flat:
Park the vehicle as far away from flowing
traffic as possible, and switch on the haz-
ard warning flashers.
Turn the steering wheel to the straight-
ahead wheel position and engage the
steering lock. Engage the parking brake and
shift into 1st or reverse gear – selector lever
in P.
All passengers should be outside the vehi-
cle and well away from your immediate
working area – behind a guardrail, for
instance.
If a portable hazard warning lamp is avail-
able, set it up on the roadside at an appro-
priate distance from the rear of the vehicle.
Comply with all safety guidelines and regu-
lations.<
In the event of a flat tire, different proce-
dures should be followed depending on the
equipment included in your vehicle:
>Vehicles with Run-Flat Tires, refer to
page115
>Vehicles with a space-saver spare tire,
refer to the following section
>Vehicles with MINI Mobility System,
refer to page141.
To change a space-saver spare tire, proceed
as follows:
>Remove space-saver spare tire, refer to
the section after the next one
>Prepare for tire change, refer to page139
>Jack up the vehicle, refer to page140
>Mount the space-saver spare tire, refer
to page140
>Tighten the lug bolts, refer to page140
>Drive with space-saver spare tire, refer to
page139.
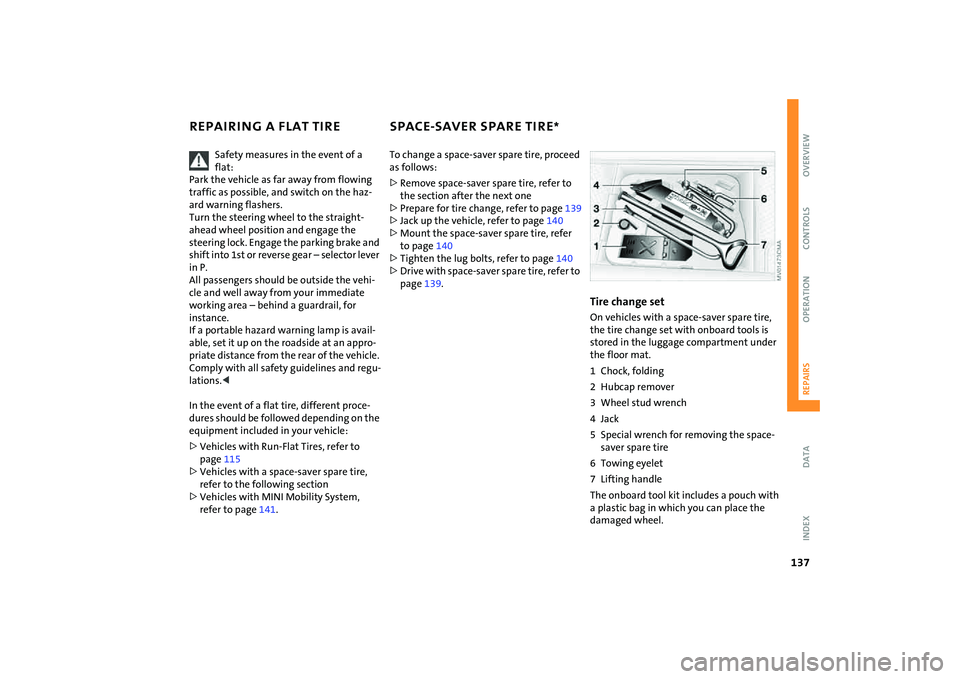
Tire change setOn vehicles with a space-saver spare tire,
the tire change set with onboard tools is
stored in the luggage compartment under
the floor mat.
1 Chock, folding
2 Hubcap remover
3 Wheel stud wrench
4Jack
5 Special wrench for removing the space-
saver spare tire
6 Towing eyelet
7 Lifting handle
The onboard tool kit includes a pouch with
a plastic bag in which you can place the
damaged wheel.