423 Practical hints
Battery
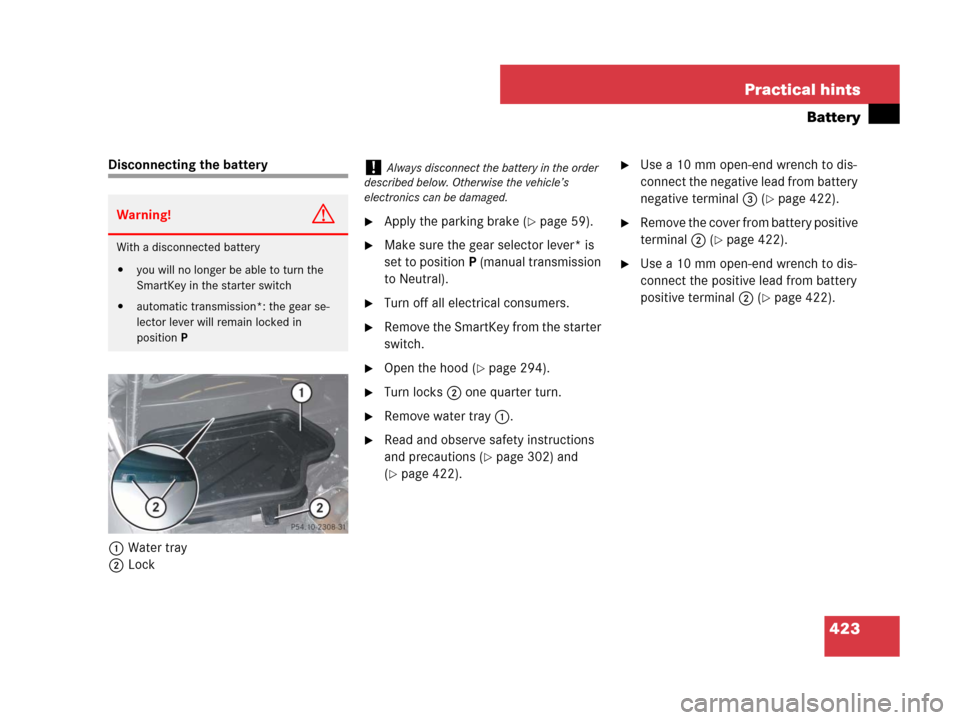
Disconnecting the battery
1Water tray
2Lock
�Apply the parking brake (�page 59).
�Make sure the gear selector lever* is
set to positionP (manual transmission
to Neutral).
�Turn off all electrical consumers.
�Remove the SmartKey from the starter
switch.
�Open the hood (�page 294).
�Turn locks2 one quarter turn.
�Remove water tray1.
�Read and observe safety instructions
and precautions (
�page 302) and
(
�page 422).
�Use a 10 mm open-end wrench to dis-
connect the negative lead from battery
negative terminal3 (
�page 422).
�Remove the cover from battery positive
terminal 2 (
�page 422).
�Use a 10 mm open-end wrench to dis-
connect the positive lead from battery
positive terminal2 (
�page 422).
Warning!G
With a disconnected battery
�you will no longer be able to turn the
SmartKey in the starter switch
�automatic transmission*: the gear se-
lector lever will remain locked in
positionP
!Always disconnect the battery in the order
described below. Otherwise the vehicle’s
electronics can be damaged.
427 Practical hints
Jump starting
�Make sure the two vehicles do not
touch.
�Turn off all electrical consumers.
�Apply the parking brake (�page 59).
�Make sure the gear selector lever* is
set to positionP (manual transmission
to Neutral).
�Open the hood (�page 294).
�Flip up cover from positive under hood
terminal2 in front of water tray1
(
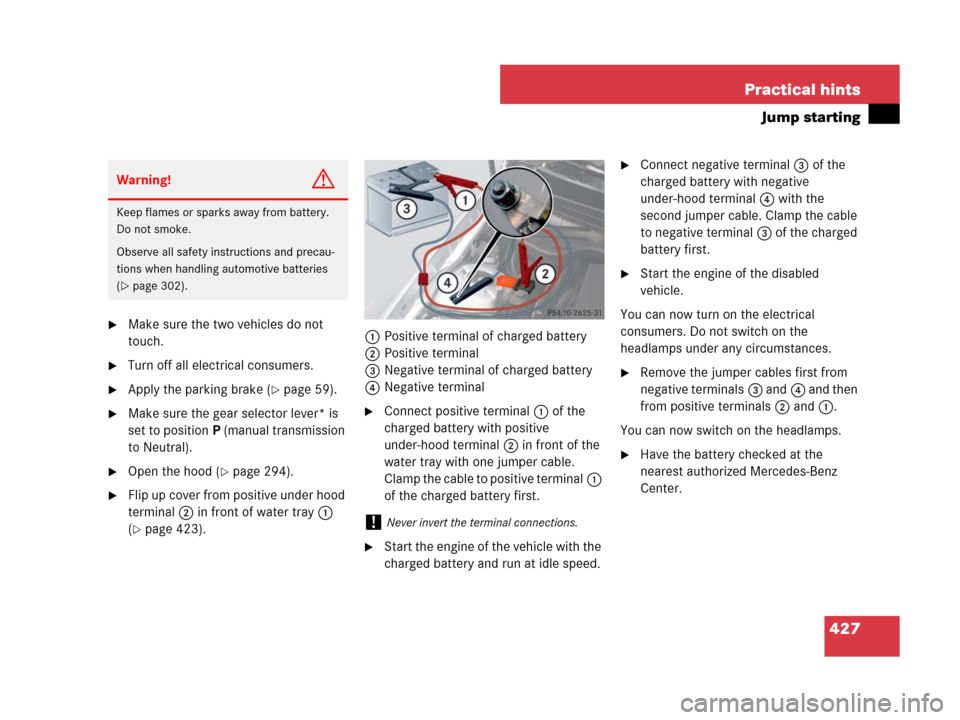
�page 423).1Positive terminal of charged battery
2Positive terminal
3Negative terminal of charged battery
4Negative terminal
�Connect positive terminal1 of the
charged battery with positive
under-hood terminal2 in front of the
water tray with one jumper cable.
Clamp the cable to positive terminal1
of the charged battery first.
�Start the engine of the vehicle with the
charged battery and run at idle speed.
�Connect negative terminal3 of the
charged battery with negative
under-hood terminal4 with the
second jumper cable. Clamp the cable
to negative terminal3 of the charged
battery first.
�Start the engine of the disabled
vehicle.
You can now turn on the electrical
consumers. Do not switch on the
headlamps under any circumstances.
�Remove the jumper cables first from
negative terminals3 and4 and then
from positive terminals2 and1.
You can now switch on the headlamps.
�Have the battery checked at the
nearest authorized Mercedes-Benz
Center.
Warning!G
Keep flames or sparks away from battery.
Do not smoke.
Observe all safety instructions and precau-
tions when handling automotive batteries
(
�page 302).
!Never invert the terminal connections.
433 Practical hints
Fuses
Fuse box in passenger compartment
1Fuse box cover
Opening
�Open the driver’s door.
�Insert flat, blunt object as a lever into
recess on the edge of cover1 at the
position indicated by the arrow.
�Loosen cover1 from dashboard using
the lever.
�Pull cover1 out and remove.Closing
�Attach cover1 in the front.
�Fold cover1 in until it engages.
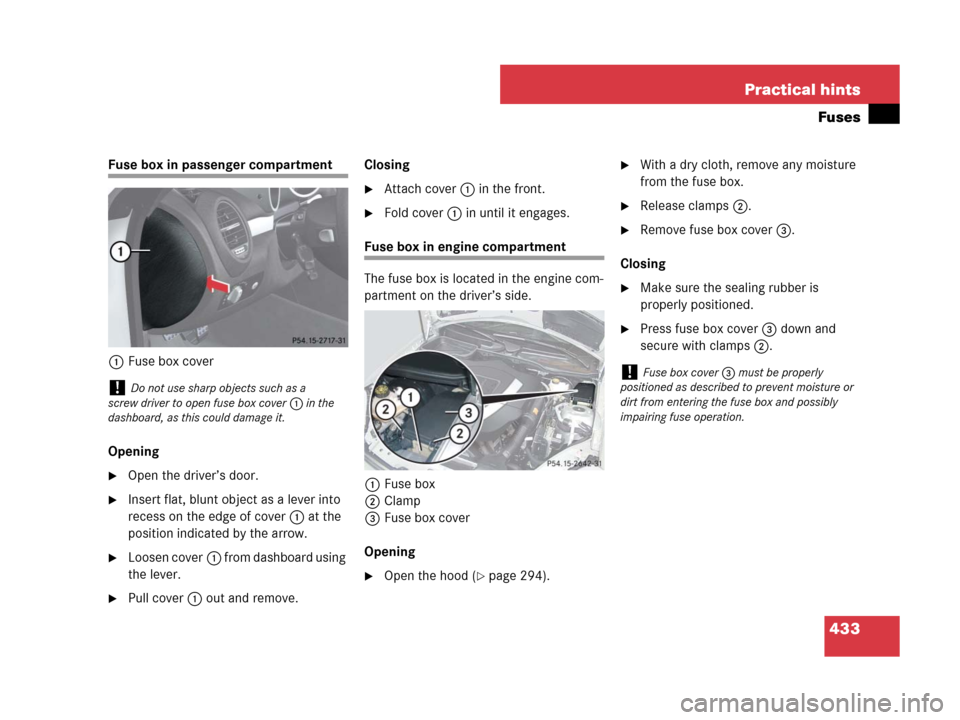
Fuse box in engine compartment
The fuse box is located in the engine com-
partment on the driver’s side.
1Fuse box
2Clamp
3Fuse box cover
Opening
�Open the hood (�page 294).
�With a dry cloth, remove any moisture
from the fuse box.
�Release clamps2.
�Remove fuse box cover3.
Closing
�Make sure the sealing rubber is
properly positioned.
�Press fuse box cover3 down and
secure with clamps2.
!Do not use sharp objects such as a
screw driver to open fuse box cover1 in the
dashboard, as this could damage it.
!Fuse box cover3 must be properly
positioned as described to prevent moisture or
dirt from entering the fuse box and possibly
impairing fuse operation.
464 Index
G
Garage door opener* 270
Gasoline see Fuel
GAWR 331
Gear range
Automatic transmission 160
Limiting 160
Shifting into optimal 163, 165
Gear selector lever 155
Gearshift pattern 155
Position 156, 157
Shifting procedure 156
Gear selector lever one-touch gearshifting
Automatic transmission 162
Global locking/unlocking see SmartKey
Glove box 253
Good visibility 168
GPS 90, 91
Tele Aid system* 262
Gross Axle Weight Rating see GAWR
Gross Vehicle Weight Rating see GVWR
Gross Vehicle Weight see GVW
GSM network phones (Telephone*) 219
GVW 331
GVWR 332H
Hard plastic trim items, cleaning 345
Hazard warning flasher 115, 116
Head restraint height (Seats) 42
Headlamps
Bi-Xenon* 401
Cleaning system* 168, 301, 458
Night security illumination
(Control system) 144
Switching off 61
Switching on 55
Headliner, cleaning 345
Head-thorax air bag 70
Heating
Seats* 104
Steering wheel* 276
High beam
Flasher 113
Headlamps 55, 113
Headlamps, bulbs 401
High beam headlamps 109
High mounted brake lamp 402
High-performance brake system 281
Hood 294
Horn 25
Hydroplaning 284I
Identification labels see Labels
Ignition (Position in starter switch) 37
Immobilizer see Anti-theft systems
Infant and child restraint systems see
Children in the vehicle
Instrument cluster 27, 118
Clock 120
Lamps, indicator and warning 348
Overview 26
Instruments and controls see Cockpit
Interior rear view mirror see Mirrors
Intermittent/interval wiping see
Windshield wipers
J
Jack (Vehicle tool kit) 389
Lifting vehicle 414
Lowering vehicle 420
Jump starting 426
K
Key, Mechanical
Valet locking 101
Kickdown 159
Kilopascal 332
Knee bag see Air bags