Page 292 of 474

291 Operation
At the gas station
�At the gas station
Refueling
The fuel filler flap is located on the
right-hand side of the vehicle towards the
rear.
Locking and unlocking the vehicle with the
SmartKey automatically locks and unlocks
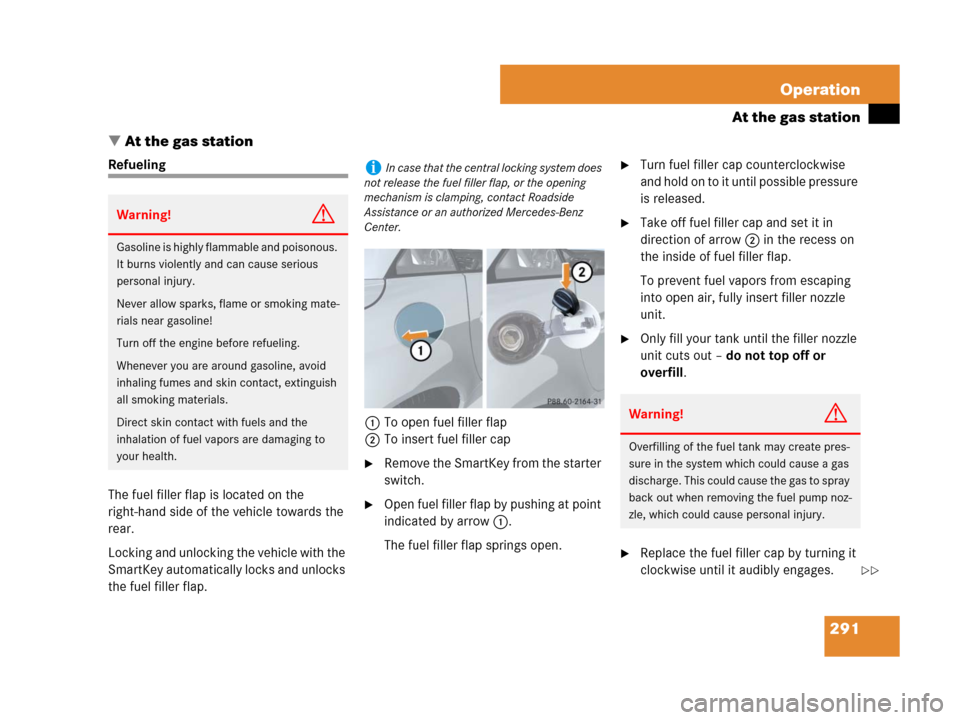
the fuel filler flap.1To open fuel filler flap
2To insert fuel filler cap
�Remove the SmartKey from the starter
switch.
�Open fuel filler flap by pushing at point
indicated by arrow1.
The fuel filler flap springs open.
�Turn fuel filler cap counterclockwise
and hold on to it until possible pressure
is released.
�Take off fuel filler cap and set it in
direction of arrow2 in the recess on
the inside of fuel filler flap.
To prevent fuel vapors from escaping
into open air, fully insert filler nozzle
unit.
�Only fill your tank until the filler nozzle
unit cuts out – do not top off or
overfill.
�Replace the fuel filler cap by turning it
clockwise until it audibly engages.
Warning!G
Gasoline is highly flammable and poisonous.
It burns violently and can cause serious
personal injury.
Never allow sparks, flame or smoking mate-
rials near gasoline!
Turn off the engine before refueling.
Whenever you are around gasoline, avoid
inhaling fumes and skin contact, extinguish
all smoking materials.
Direct skin contact with fuels and the
inhalation of fuel vapors are damaging to
your health.
iIn case that the central locking system does
not release the fuel filler flap, or the opening
mechanism is clamping, contact Roadside
Assistance or an authorized Mercedes-Benz
Center.
Warning!G
Overfilling of the fuel tank may create pres-
sure in the system which could cause a gas
discharge. This could cause the gas to spray
back out when removing the fuel pump noz-
zle, which could cause personal injury.
��
Page 315 of 474

314 Operation
Tires and wheels
Checking tire inflation pressure
manually
Follow the steps below to achieve correct
tire inflation pressure:
�Remove the cap from the valve on one
tire.
�Firmly press a tire gauge onto the
valve.
�Read tire inflation pressure on tire
gauge and check against the recom-
mended tire inflation pressure on the
Tire and Loading Information placard
on the driver’s door B-pillar
(
�page 307) or, if available, the tire in-
flation pressure label on the inside of
the fuel filler flap. If necessary, add air
to achieve the recommended tire infla-
tion pressure.
�Install the valve cap.
�Repeat this procedure for each tire.
Warning!G
Follow recommend tire inflation pressures.
Do not underinflate tires. Underinflated tires
wear excessively and/or unevenly,
adversely affect handling and fuel economy,
and are more likely to fail from being over-
heated.
Do not overinflate tires. Overinflated tires
can adversely affect handling and ride
comfort, wear unevenly, increase stopping
distance, and result in sudden deflation
(blowout) because they are more likely to
become punctured or damaged by road
debris, potholes etc.
Do not overload the tires by exceeding the
specified load limit as indicated on the Tire
and Loading Information placard on the
driver’s door B-pillar. Overloading the tires
can overheat them, possibly causing a
blowout. Overloading the tires can also
result in handling or steering problems, or
brake failure.
iIf you have overfilled the tire, release tire in-
flation pressure by pushing the metal stem of the
valve with e.g. a tip of a pen. Then recheck the
tire inflation pressure with the tire gauge.
Page 420 of 474

419 Practical hints
Flat tire
�PressI on electric air pump switch2.
The electric air pump switches on and
inflates the collapsible tire.
�Inflate the collapsible tire to approxi-
mately 51 psi (3.5 bar).
This takes about 5 minutes. Air
hose4 and union nut5 can become
hot during inflation. Exercise proper
caution to avoid burning yourself when
using the equipment.
�Press0 on electric air pump switch2.
�Turn the SmartKey in the starter switch
to position0.
The electric air pump is switched off.
�If the tire inflation pressure is above
51 psi (3.5 bar), release excess tire
inflation pressure using the vent screw
on air hose4.
�Detach the electric air pump.
�Reinstall tire valve cap.
�Store electrical plug3 and air
hose4 behind flap 1 and place the
electric air pump back in the trunk.
�Lower the vehicle (�page 420).
!Compare the recommended tire inflation
pressure for your vehicle with the tire inflation
pressure on the yellow label located on the spare
wheel rim.
If the tire inflation pressure on the yellow label
on the spare wheel rim differs from the values
given in this Operator’s Manual, inflate the
collapsible tire to the recommended tire inflation
pressure given on the yellow label on the spare
wheel rim.
!Do not operate the electric air pump longer
than 6 minutes without interruption. Otherwise it
may overheat.
You may operate the electric air pump again
after it has cooled off.Warning!G
Follow recommended tire inflation
pressures.
Do not underinflate tires. Underinflated tires
wear excessively and/or unevenly,
adversely affect handling and fuel economy,
and are more likely to fail from being over-
heated.
Do not overinflate tires. Overinflated tires
can adversely affect handling and ride
comfort, wear unevenly, increase stopping
distance, and result in sudden deflation
(blowout) because they are more likely to
become punctured or damaged by road
debris, potholes etc.
Page 469 of 474

468 Index
R
RACETIMER see Control system menus,
AMG
Radio
Operation (Audio system) 199
Operation (Control system) 133
Satellite* 134
Radio transmitters, control and
operation 287
Reading lamps 117
Rear view mirrors see Mirrors
Rear window defroster 170
Recommended inflation pressure 332
Recovery services for stolen vehicle (Tele
Aid*) 269
Refrigerant (Air conditioning) 453
Refueling 291
Regular checks 292
Remote control see SmartKey
Remote door unlock with Tele Aid* 269
Reporting, safety defects 18
Research Octane Number see RON
Reset button (Instrument cluster) 27
Residual engine heat utilization see RESTREST
Automatic climate control* 192
Climate control 181
Restraint systems
Emergency Tensioning Device
(ETD) 79
Seat belts 64, 76
Retractable hardtop 240
Locking after raising/lowering 242
Opening and closing 240
Operating manually 397
Problems when operating 242, 246
Summer opening/convenience
closing* 244
Wind screen* 246
Reverse gear position
Automatic transmission* 155, 157
Manual transmission 154
Rims 332, 442
Roadside Assistance 12, 266
RON 292, 455
Roof rack 252
Rubber parts, cleaning 345
Run Flat Indicator* 315S
Safety belts see Seat belts
Safety defects, reporting 18
Safety, occupant 64
Satellite radio* 134
Seat belt force limiter 79
Seat belts 64, 76
Cleaning 346
Fastening 48
Proper use of 50
Release button 49
Safety guidelines 68
Warning lamp 353–354
Seating capacity 308
Seats 104
Adjusting 39
Easy-entry/exit feature* 44
Head restraint height 42
Heating* 104
Power seats* 41