2008 MERCEDES-BENZ SLK ROADSTER light
[x] Cancel search: lightPage 79 of 273
Light
s 76 Hazard warning lamps
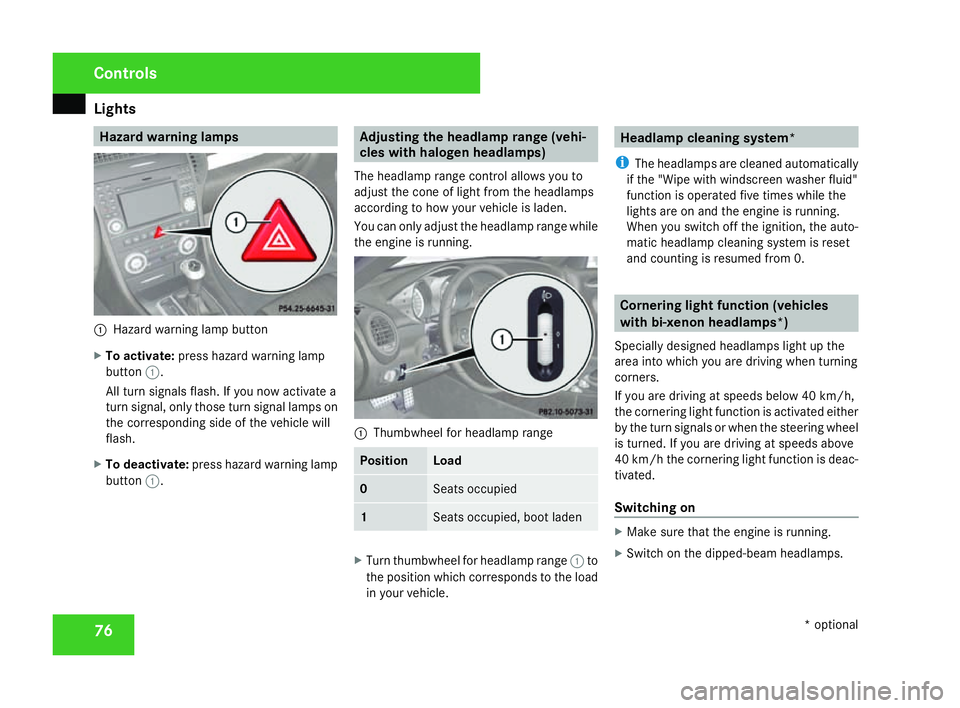
1
Hazard warning lamp button
X To activate :press hazard warning lamp
button 1.
All turn signals flash. If you now activate a
turn signal, only those turn signal lamps on
the corresponding side of the vehicle will
flash.
X To deactivate :press hazard warning lamp
button 1. Adjusting the headlamp range (vehi-
cles with halogen headlamps)
The headlamp range control allows you to
adjust the cone of light from the headlamps
according to how your vehicle is laden.
You can only adjust the headlamp range while
the engine is running. 1
Thumbwheel for headlamp range Position Load
0 Seats occupied
1 Seats occupied, boot lade
n X
Turn thumbwheel for headlamp range 1to
the position which corresponds to the load
in your vehicle. Headlamp cleaning system*
i The headlamps are cleaned automatically
if the "Wipe with windscreen washer fluid"
function is operated five times while the
lights are on and the engine is running.
When you switch off the ignition, the auto-
matic headlamp cleaning system is reset
and counting is resumed from 0. Cornering light function (vehicles
with bi-xenon headlamps*)
Specially designed headlamps light up the
area into which you are driving when turning
corners.
If you are driving at speeds below 40 km/h,
the cornering light function is activated either
by the turn signals or when the steering wheel
is turned. If you are driving at speeds above
40 km/h the cornering light function is deac-
tivated.
Switching on X
Make sure that the engine is running.
X Switch on the dipped-beam headlamps. Control
s
* optional
171_AKB; 3; 4, en-GB
vpfaff7,
2007-11-13T10:50:25+01:00 - Seite 76
Page 80 of 273
Light
s 77
X
Switch off the fog lights .
X Switch on the turn signal .
The cornering light on the same side as the
turn signal comes on, even if you turn the
steering wheel in the opposite direction
after indicating.
or
X Turn the steering wheel in the desired
direction .
When in a forwards gear: the cornering
lamp on the inside of the bend comes on.
When in reverse gear: the cornering light on
the outside of the bend comes on.
Switching off X
Switch off the turn signal .
i The cornering light is activated until you
turn the steering wheel back to the straight -
ahead position and the turn signal switches
off. The cornering light may remain lit for a
short time, but no more than three minutes.
It then goes out, even if the turn signal is
still switched on. Interior lighting
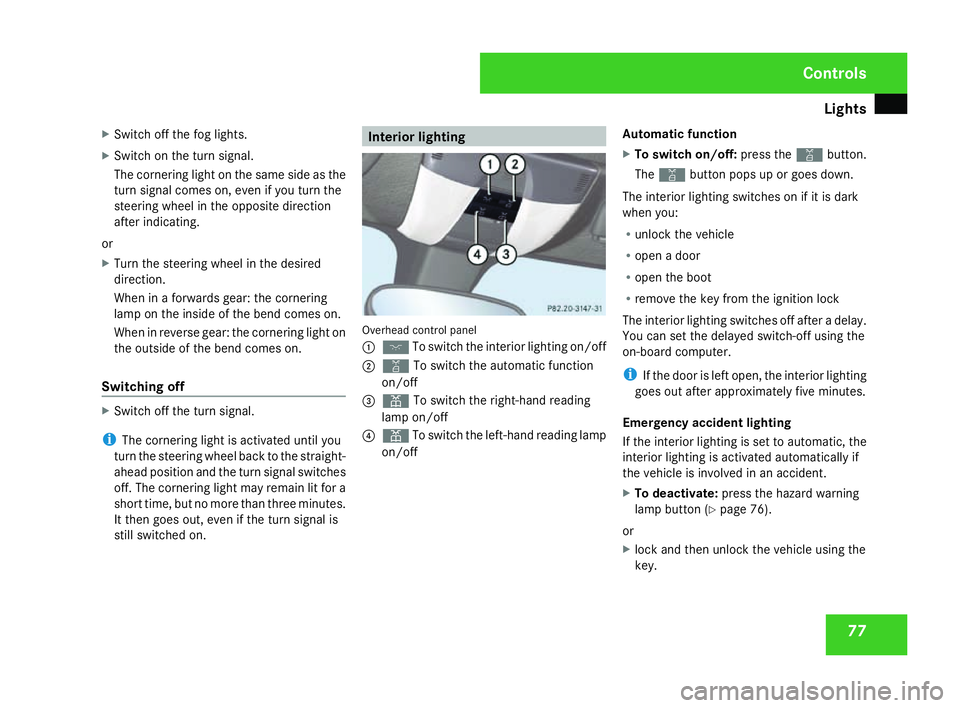
Overhead control panel
1
ð To switch the interior lighting on/of f
2 ¡ To switch the automatic function
on/of f
3 X To switch the right-hand reading
lamp on/of f
4 X To switch the left-hand reading lamp
on/of f Automatic function
X
To switch on/off: press the¡button.
The ¡ button pops up or goes down.
The interior lighting switches on if it is dark
when you:
R unlock the vehicl e
R open a door
R open the boot
R remove the key from the ignition lock
The interior lighting switches off after a delay.
You can set the delayed switch-off using the
on-board computer .
i If the door is left open, the interior lighting
goes out after approximately five minutes.
Emergency accident lighting
If the interior lighting is set to automatic, the
interior lighting is activated automatically if
the vehicle is involved in an accident.
X To deactivate: press the hazard warning
lamp button (Y page 76).
or
X lock and then unlock the vehicle using the
key. Controls
171_AKB; 3; 4, en-GB
vpfaff7,
2007-11-13T10:50:25+01:00 - Seite 77
Page 81 of 273
Windscreen wipers
78
Manual control
Interior lighting
X
To switch on/off: press theðbutton.
Reading lamps
X To switch on/off: press theXbutton.
Depending on the equipment, the reading
lamps are in the overhead control panel or,
for vehicles equipped with the light pack-
age*, at the bottom of the rear-view mirror . Windscreen wipers
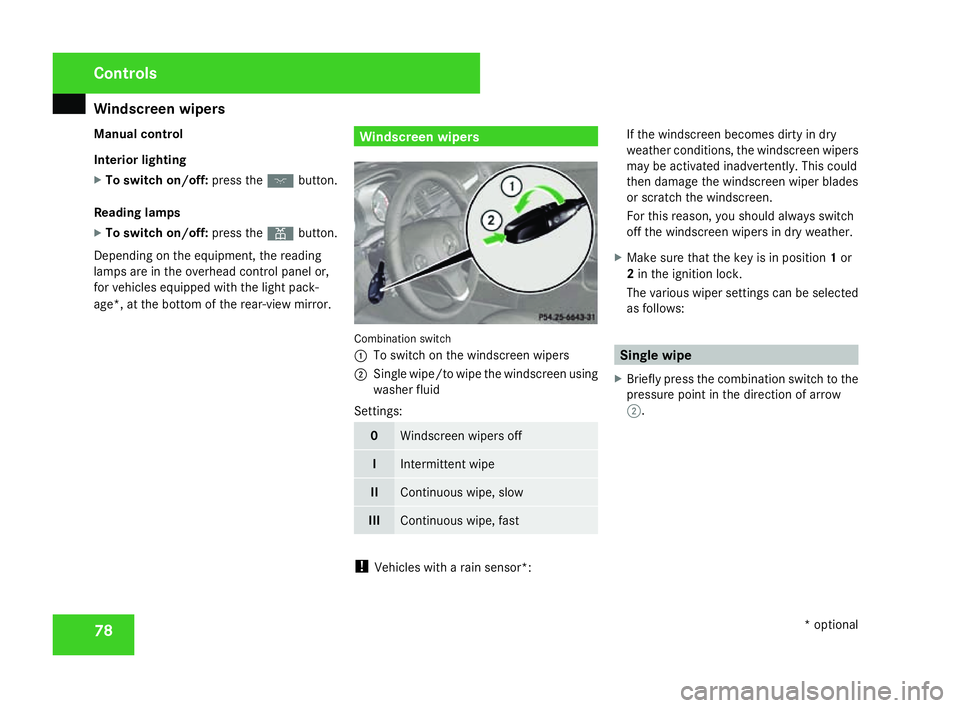
Combination switch
1
To switch on the windscreen wipers
2 Single wipe/to wipe the windscreen using
washer fluid
Settings: 0 Windscreen wipers off
I Intermittent wipe
II Continuous wipe, slow
III Continuous wipe, fast
!
Vehicles with a rain sensor*: If the windscreen becomes dirty in dry
weather conditions, the windscreen wiper
s
may be activated inadvertently. This could
then damage the windscreen wiper blades
or scratch the windscreen.
For this reason, you should always switch
off the windscreen wipers in dry weather.
X Make sure that the key is in position 1or
2 in the ignition lock .
The various wiper settings can be selected
as follows: Single wipe
X Briefly press the combination switch to the
pressure point in the direction of arrow
2 . Cont
rols
* optional
171_AKB; 3; 4, en-GB
vpfaff7,
2007-11-13T10:50:25+01:00 - Seite 78
Page 83 of 273
Side windows
80
the front-passenger side window on the front-
passenger door.
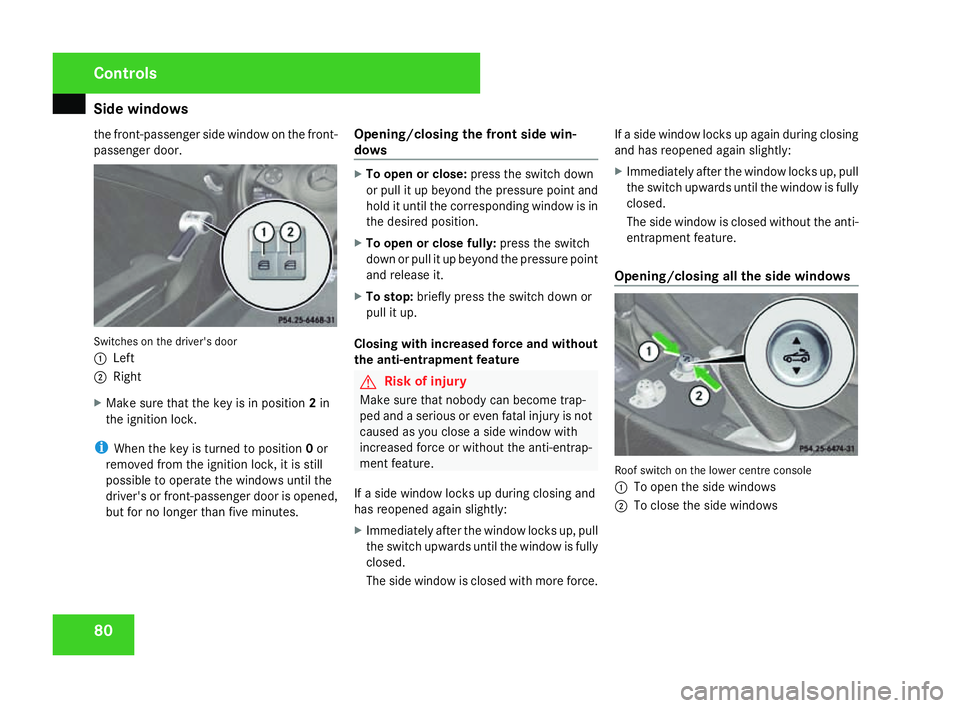
Switches on the driver's door
1
Left
2 Right
X Make sure that the key is in position 2in
the ignition lock .
i When the key is turned to position 0or
removed from the ignition lock, it is still
possible to operate the windows until the
driver's or front-passenger door is opened,
but for no longer than five minutes. Opening/closing the front side win-
dow
s X
To open or close: press the switch down
or pull it up beyond the pressure point an d
hold it until the corresponding window is in
the desired position.
X To open or close fully: press the switch
down or pull it up beyond the pressure point
and release it.
X To stop: briefly press the switch down or
pull it up .
Closing with increased force and withou t
the anti-entrapment feature G
Risk of injury
Make sure that nobody can become trap-
ped and a serious or even fatal injury is not
caused as you close a side window with
increased force or without the anti-entrap-
ment feature.
If a side window locks up during closing and
has reopened again slightly:
X Immediately after the window locks up, pull
the switch upwards until the window is fully
closed.
The side window is closed with more force. If a side window locks up again during closing
and has reopened again slightly
:
X Immediately after the window locks up, pull
the switch upwards until the window is fully
closed.
The side window is closed without the anti-
entrapment feature.
Opening/closing all the side window s Roof switch on the lower centre console
1
To open the side windows
2 To close the side windows Controls
171_AKB; 3; 4, en-GB
vpfaff7,
2007-11-13T10:50:25+01:00 - Seite 80
Page 84 of 273
Driving and pa
rking 81
X
To open side windows :Pull back the roof
switch twice in rapid succession in the
direction of the arrow 1.
All side windows open.
i If you then close a side window using the
power window switch on the door, the tri-
angular rear window remains open. To
close the triangular rear window, you must
close the side window using the roof
switch.
X To close side windows :Push the roof
switch forward twice in rapid succession in
the direction of arrow 2and hold it.
The front side windows close first. Afte r
about a second, the rear triangular win-
dows close.
i If the roof is open, only the two front side
windows close.
i If the window is obstructed during clos-
ing, the closing procedure is interrupted
and it opens again slightly. Resetting the side windows
Each side window must be reset if the battery
was disconnected or discharged.
X Make sure that the key is in position 2in
the ignition lock .
X Pull the switch upwards until the window is
closed, and hold it in this position for
another second. Driving and parking
Starting the engine
G
Risk of accident
Do not keep any objects in the driver's foot-
well. If you use a floormat or carpet in the
driver's footwell, make sure that they are
correctly secured and that there is suffi-
cient clearance for the pedals.
Objects could otherwise get between the
pedals in the event of sudden braking or
acceleration. You may then no longer be
able to brake, change gear or accelerate as
intended. This may result in an accident and
injury . G
Risk of poisoning
Never leave the engine running in enclose d
spaces. The exhaust gases contain carbon
monoxide. Inhaling exhaust fumes consti-
tutes a health hazard and could lead to loss
of consciousness or even death.
! Do not depress the accelerator pedal
when starting the engine.
i If you depress the brake when starting the
engine, pedal travel will be unusually long
and there will be less pedal resistance. Controls
171_AKB; 3; 4, en-GB
vpfaff7,
2007-11-13T10:50:25+01:00 - Seite 81
Page 86 of 273
Driving and pa
rking 83
You can open the doors from the inside at
any time.
You can also deactivate the automatic lock-
ing feature
(Y page 105).
Manual transmission X
Depress the clutch pedal.
X Shift to either first or reverse gear.
X Slowly release the clutch pedal and
depress the accelerator pedal.
! Change gear in good time and avoid spin-
ning the wheels. You could otherwise dam-
age the vehicle.
Automatic transmission *i
It is only possible to move the selector
lever to the desired position if you depres s
the brake pedal. Only then is the selector
lever lock released.
X Depress the brake pedal and hold it down.
X Release the handbrake .
X Move the selector lever to position Dor R.
i Wait for the shift process to complet e
before pulling away. X
Release the brake pedal .
X Carefully depress the accelerator pedal.
i Upshifts take place at higher engine
speeds after a cold start. This helps the
catalytic converter to reach its operating
temperature more quickly. Parking
G
Risk of fire
Make sure that the exhaust system doe s
not under any circumstances come into
contact with easily ignitable material such
as dry grass or petrol. The material could
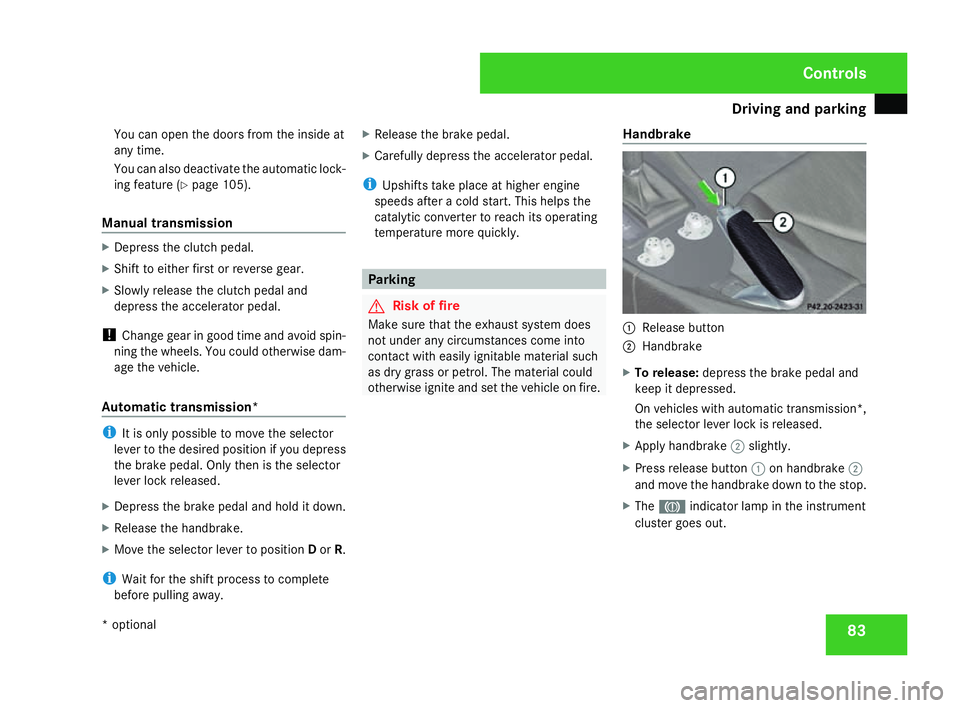
otherwise ignite and set the vehicle on fire. Handbrake 1
Release butto n
2 Handbrake
X To release: depress the brake pedal and
keep it depressed.
On vehicles with automatic transmission* ,
the selector lever lock is released.
X Apply handbrake 2slightly.
X Press release button 1on handbrake 2
and move the handbrake down to the stop.
X The 3 indicator lamp in the instrumen t
cluster goes out. Control
s
* optional
171_AKB; 3; 4, en-GB
vpfaff7,
2007-11-13T10:50:25+01:00 - Seite 83
Page 87 of 273
Transmission
84
X
To apply :pull handbrake 2up firmly.
The 3 indicator lamp in the instrumen t
cluster lights up if the engine is running.
i On steep slopes, turn the front wheels
towards the kerb. Stopping the engine
G
Risk of accident
If the engine is not running, there is no
power assistance for the steering and
brakes. Steering and braking then take s
much more effort.
As a result, you might lose control of the
vehicle, cause an accident and injure your-
self and others.
Do not switch off the engine while driving.
Vehicles with manual transmissio nX
Shift to either first or reverse gear.
X Turn the key to position 0(Y page 59) in
the ignition lock and remove it.
The immobiliser is activated. Vehicles with automatic transmission* X
Move the selector lever to P.
X Turn the key to position 0(Y page 59) in
the ignition lock and remove it.
The immobiliser is activated. Transmission
Introduction to the transmission
G
Risk of accident
The movement of the pedals must not be
impaired in any way. Do not keep any
objects in the driver's footwell. Make sure
that floormats or carpets are correctly
secured and that there is sufficient clear-
ance for the pedals. G
Risk of accident
Do not change down for additional engine
braking on a slippery road surface. Thi s
could cause the drive wheels to lose thei r
grip and the vehicle could skid. This could
cause you to lose control of your vehicle
and cause an accident .Cont
rols
* optional
171_AKB; 3; 4, en-GB
vpfaff7,
2007-11-13T10:50:25+01:00 - Seite 84
Page 93 of 273
Instrument cluste
r90 Instrument cluster
Points to remember
You will find an illustration of the instrumen t
cluster in the "At a glance" section
( Y page 24). G
Risk of accident
No further messages can be displayed if
there is a malfunction in the instrument
cluster and/or the multi-function display .
This means that you will not see information
about the driving situation, such as the
speed, outside temperature, warning/indi-
cator lamps, display messages or system
failures. The vehicle's handling character-
istics may be affected. Adjust your driving
style and speed accordingly.
Immediately consult a qualified specialist
workshop which has the necessary special-
ist knowledge and tools to carry out the
work required. Mercedes-Benz recom-
mends that you use a Mercedes-Benz
Service Centre for this purpose. In particu-
lar, work relevant to safety or on safety-
related systems must be carried out at a
qualified specialist workshop. Activating the multi-function displa
y
X Switch on the ignition.
The multi-function display is also activate d
when you:
R switch on the lights
R press the Jreset button on the left-hand
side of the instrument cluster
R open the driver's door
The multi-function display lights up for about
30 seconds when you open a door and then
do nothing else. Adjusting the instrument cluster
lighting
You can only brighten or dim the instrument
cluster lighting when it is dark.
X Brighter or dimmer: briefly press the,
or . adjusting knob on the left-hand side
of the instrument cluster (Y page 24).
The brightness of the instrument cluster
lighting changes by one level. There are
several possible levels. Resetting the trip meter
X Select the standard display menu
( Y page 95).
X Press and hold reset button 4on the left-
hand side of the instrument cluster until the
trip meter is reset. Rev counter
The red band in the rev counter indicates the
engine's overrevving range. The fuel supply is
interrupted to protect the engine when the
red band is reached.
! Do not drive in the overrevving range.
Doing so will damage the engine. H
Environmental not
e
Avoid driving at high engine speeds, as thi s
increases your vehicle's consumption
unnecessarily and pollutes the environ -
ment through increased emissions. Controls
171_AKB; 3; 4, en-GB
vpfaff7,
2007-11-13T10:50:25+01:00 - Seite 90