2008 MERCEDES-BENZ SLK ROADSTER light
[x] Cancel search: lightPage 143 of 273
Features
140 Features
Sun visors
G
Risk of accident
Keep the mirrors in the sun visors covered
while driving. You could otherwise be daz-
zled by bright lights, impairing your view of
traffic conditions. As a result you could
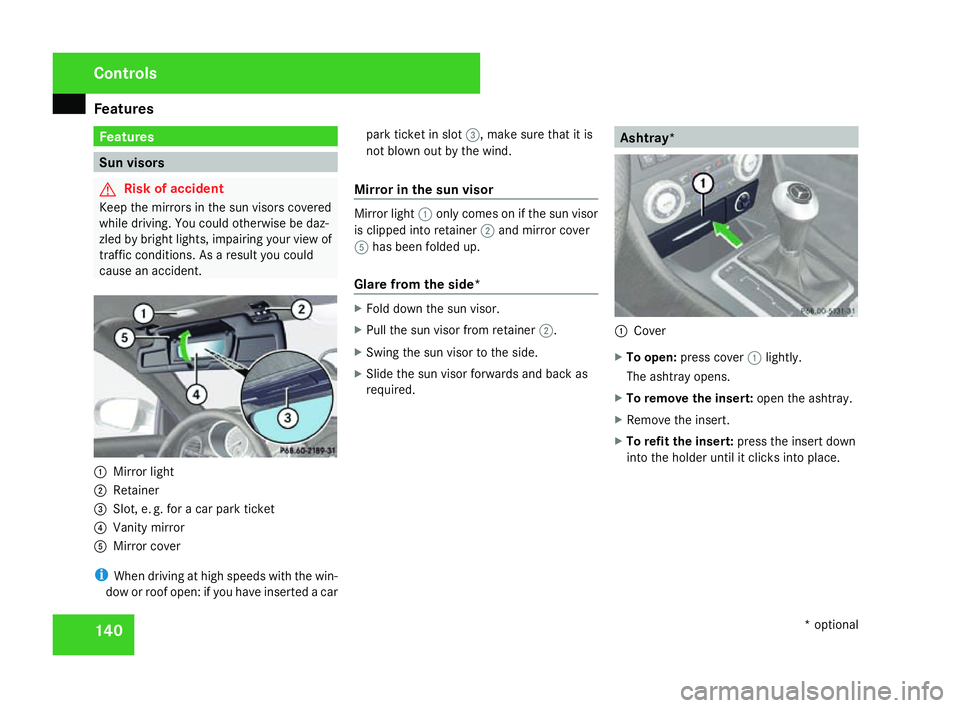
cause an accident. 1
Mirror light
2 Retainer
3 Slot, e. g. for a car park ticke t
4 Vanity mirror
5 Mirror cover
i When driving at high speeds with the win-
dow or roof open: if you have inserted a car park ticket in slot
3, make sure that it is
not blown out by the wind.
Mirror in the sun visor Mirror light
1only comes on if the sun visor
is clipped into retainer 2and mirror cover
5 has been folded up.
Glare from the side* X
Fold down the sun visor.
X Pull the sun visor from retainer 2.
X Swing the sun visor to the side .
X Slide the sun visor forwards and back as
required . Ashtray*
1
Cover
X To open :press cover 1lightly.
The ashtray opens.
X To remove the insert: open the ashtray.
X Remove the insert .
X To refit the insert: press the insert down
into the holder until it clicks into place. Controls
* optional
171_AKB; 3; 4, en-GB
vpfaff7,
2007-11-13T10:50:25+01:00 - Seite 140
Page 144 of 273
Features
141Cigarette lighter
* G
Risk of injury and fire
Only hold the hot cigarette lighter by its
knob. Otherwise, you might burn yourself.
Make sure that children travelling in the
vehicle are not able to injure themselves on
the hot cigarette lighter or cause a fire with
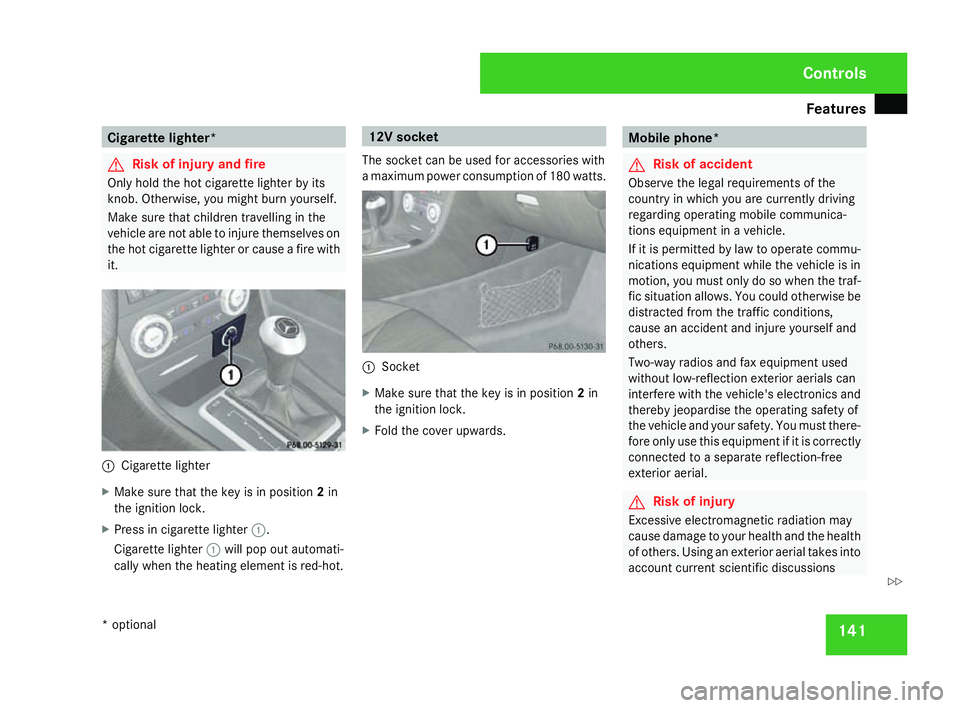
it. 1
Cigarette lighter
X Make sure that the key is in position 2in
the ignition lock .
X Press in cigarette lighter 1.
Cigarette lighter 1will pop out automati-
cally when the heating element is red-hot. 12V socket
The socket can be used for accessories with
a maximum power consumption of 180 watts. 1
Socke t
X Make sure that the key is in position 2in
the ignition lock .
X Fold the cover upwards . Mobile phone*
G
Risk of acciden
t
Observe the legal requirements of the
country in which you are currently driving
regarding operating mobile communica -
tions equipment in a vehicle.
If it is permitted by law to operate commu -
nications equipment while the vehicle is in
motion, you must only do so when the traf-
fic situation allows. You could otherwise be
distracted from the traffic conditions ,
cause an accident and injure yourself and
others.
Two-way radios and fax equipment used
without low-reflection exterior aerials can
interfere with the vehicle's electronics and
thereby jeopardise the operating safety of
the vehicle and your safety. You must there-
fore only use this equipment if it is correctl y
connected to a separate reflection-fre e
exterior aerial. G
Risk of injury
Excessive electromagnetic radiation ma y
cause damage to your health and the health
of others. Using an exterior aerial takes into
account current scientific discussions Controls
* optional
171_AKB; 3; 4, en-G
B
vpfaff7, 2007-11-13T10:50:25+01:00 - Seite 141 Z
Page 148 of 273
Features
145
X
Erase the memory of the integrated remote
control (Y page 146)before programming
it for the first time.
X Turn the key to position 2in the ignition
lock .
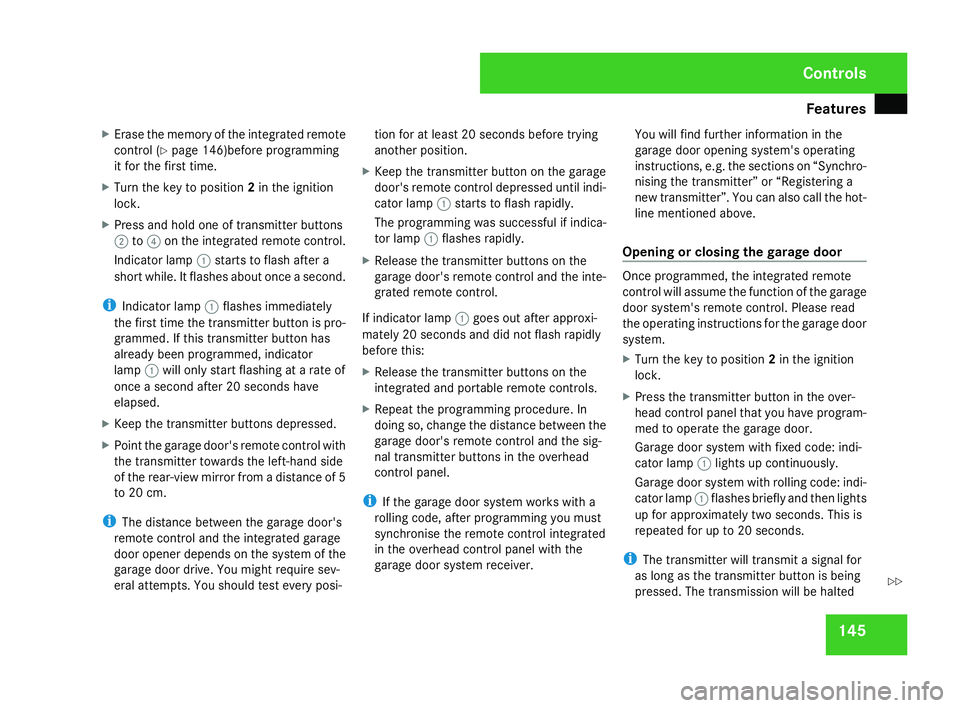
X Press and hold one of transmitter button s
2 to4 on the integrated remote control.
Indicator lamp 1starts to flash after a
short while. It flashes about once a second.
i Indicator lamp 1flashes immediately
the first time the transmitter button is pro-
grammed. If this transmitter button has
already been programmed, indicator
lamp 1will only start flashing at a rate of
once a second after 20 seconds have
elapsed .
X Keep the transmitter buttons depressed.
X Point the garage door's remote control with
the transmitter towards the left-hand side
of the rear-view mirror from a distance of 5
to 20 cm.
i The distance between the garage door's
remote control and the integrated garage
door opener depends on the system of the
garage door drive. You might require sev-
eral attempts. You should test every posi- tion for at least 20 seconds before trying
another position.
X Keep the transmitter button on the garage
door's remote control depressed until indi-
cator lamp 1starts to flash rapidly.
The programming was successful if indica-
tor lamp 1flashes rapidly .
X Release the transmitter buttons on th e
garage door's remote control and the inte-
grated remote control.
If indicator lamp 1goes out after approxi-
mately 20 seconds and did not flash rapidly
before this:
X Release the transmitter buttons on th e
integrated and portable remote controls.
X Repeat the programming procedure. In
doing so, change the distance between th e
garage door's remote control and the sig-
nal transmitter buttons in the overhead
control panel.
i If the garage door system works with a
rolling code, after programming you must
synchronise the remote control integrated
in the overhead control panel with the
garage door system receiver. You will find further information in the
garage door opening system's operating
instructions, e.g. the sections on “Synchro-
nising the transmitter” or “Registering
a
new transmitter”. You can also call the hot-
line mentioned above .
Opening or closing the garage door Once programmed, the integrated remot
e
control will assume the function of the garag e
door system's remote control. Please read
the operating instructions for the garage door
system.
X Turn the key to position 2in the ignition
lock .
X Press the transmitter button in the over-
head control panel that you have program-
med to operate the garage door.
Garage door system with fixed code: indi-
cator lamp 1lights up continuously.
Garage door system with rolling code: indi-
cator lamp 1flashes briefly and then lights
up for approximately two seconds. This is
repeated for up to 20 seconds.
i The transmitter will transmit a signal for
as long as the transmitter button is being
pressed. The transmission will be halted Controls
171_AKB; 3; 4, en-GB
vpfaff7,
2007-11-13T10:50:25+01:00 - Seite 145 Z
Page 152 of 273
Refuelling
14
9
When you open or close the vehicle with the
key, the fuel filler flap is automatically
unlocked or locked.
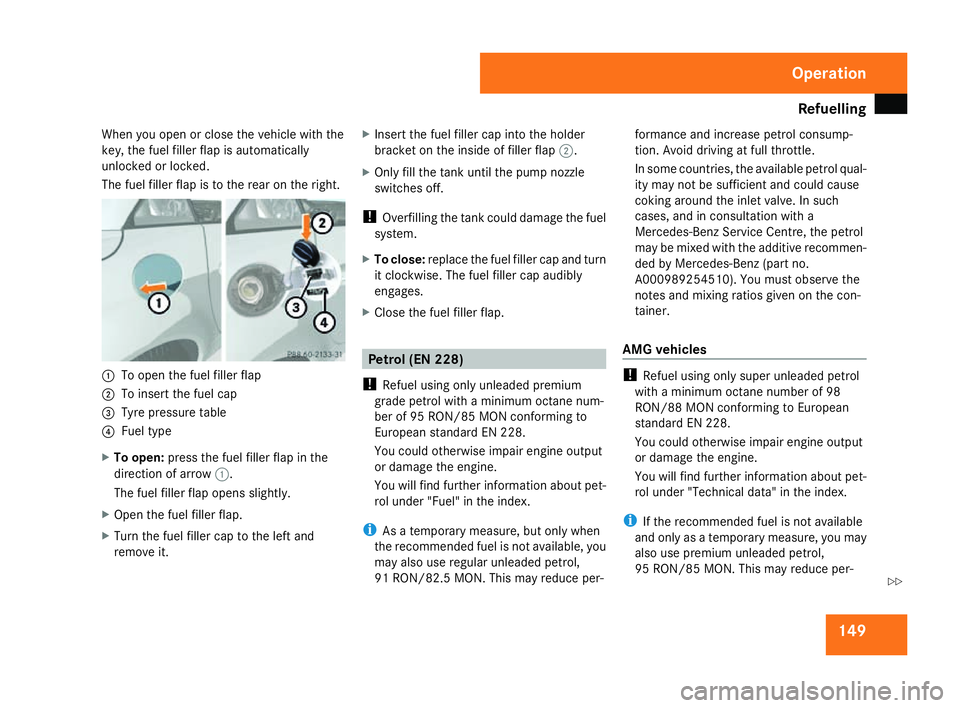
The fuel filler flap is to the rear on the right. 1
To open the fuel filler flap
2 To insert the fuel cap
3 Tyre pressure table
4 Fuel typ e
X To open: press the fuel filler flap in the
direction of arrow 1.
The fuel filler flap opens slightly.
X Open the fuel filler flap.
X Turn the fuel filler cap to the left and
remove it. X
Insert the fuel filler cap into the holder
bracket on the inside of filler flap 2.
X Only fill the tank until the pump nozzle
switches off.
! Overfilling the tank could damage the fuel
system.
X To close: replace the fuel filler cap and tur n
it clockwise. The fuel filler cap audibly
engages.
X Close the fuel filler flap. Petrol (EN 228)
! Refuel using only unleaded premium
grade petrol with a minimum octane num -
ber of 95 RON/85 MON conforming to
European standard EN 228 .
You could otherwise impair engine output
or damage the engine.
You will find further information about pet-
rol under "Fuel" in the index .
i As a temporary measure, but only when
the recommended fuel is not available, yo u
may also use regular unleaded petrol,
91 RON/82.5 MON. This may reduce per- formance and increase petrol consump-
tion. Avoid driving at full throttle.
In some countries, the available petrol qual-
ity may not be sufficient and could caus
e
coking around the inlet valve. In such
cases, and in consultation with a
Mercedes-Benz Service Centre, the petrol
may be mixed with the additive recommen-
ded by Mercedes-Benz (part no.
A000989254510). You must observe the
notes and mixing ratios given on the con -
tainer.
AMG vehicle s !
Refuel using only super unleaded petrol
with a minimum octane number of 98
RON/88 MON conforming to European
standard EN 228.
You could otherwise impair engine output
or damage the engine.
You will find further information about pet-
rol under "Technical data" in the index.
i If the recommended fuel is not available
and only as a temporary measure, you may
also use premium unleaded petrol,
95 RON/85 MON. This may reduce per- Operation
171_AKB; 3; 4, en-GB
vpfaff7,
2007-11-13T10:50:25+01:00 - Seite 149 Z
Page 165 of 273
Driving
tips 16
2
X
Vehicles with manual transmission: engage
neutral.
X Vehicles with automatic transmission*:
shift the selector lever to N.
X Try to bring the vehicle under control using
corrective steering. Driving tips
Rolling with the engine switched off
G
Risk of accident
Never switch the engine off while the vehi-
cle is in motion.
There is no power assistance for the steer-
ing and the service brake when the engine
is not running.
You will require considerably more effort to
steer and brake and you could therefore
lose control of the vehicle and cause an
accident. Brakin
g G
Risk of accident
Do not change down for additional engine
braking on a slippery road surface. Thi s
could cause the drive wheels to lose thei r
grip and the vehicle could skid. G
Risk of accident
Make sure that other road users are not
endangered by your braking. Downhill gradients On long and steep downhill gradients, espe-
cially if the vehicle is laden, you must shift to
a lower gear in good time or, on vehicles with
automatic transmission*, select shift rang e
1 ,2 or 3.
i This also applies if you have activated
cruise control or Speedtronic.
This uses the braking effect of the engine and
you will not have to brake to such an exten t
to maintain the same speed. This relieves the
load on the brake system and prevents the
brakes from overheating and wearing too
quickly. If you need additional braking ,
depress the brake pedal repeatedly rather
than continuously.
Heavy and light loads If the brakes have been subjected to a heavy
load, do not stop the vehicle immediately, but
drive on for a short while. This allows the air-
flow to cool the brakes more quickly. G
Risk of accident
Never depress the brake pedal continu -
ously while the vehicle is in motion, e.g.
never cause the brakes to rub by applying Operation
* optional
171_AKB; 3; 4, en-GB
vpfaff7,
2007-11-13T10:50:25+01:00 - Seite 162
Page 166 of 273
Driving
tips 16
3 constant slight pedal pressure. This causes
the brake system to overheat, increases
the braking distance and can lead to the
brakes failing completely .
If the brakes have been used only moderately,
you should occasionally test their effective-
ness. To do this, brake more firmly from a
higher speed. This improves the grip of the
brakes.
Wet roads If driving in heavy rain for a prolonged period
of time without braking, there may be a
delayed reaction from the brakes, when brak-
ing for the first time. You must brake harder.
You must therefore maintain a greater dis-
tance from the vehicle in front.
Brake firmly after driving on a wet road. This
way the brake discs will become warm, drying
more quickly, which will protect them against
corrosion. Limited braking performance on salted
road s G
Risk of accident
The layer of salt on the brake discs and the
brake pads/linings may cause a delay in
the braking effect, resulting in a signifi -
cantly longer braking distance, which could
lead to an accident.
To avoid this danger, you should:
R occasionally brake carefully, without put-
ting other road users at risk, when you
are driving on salted roads. This helps to
remove any salt that may have started to
build up on the brake discs and the brake
pads/linings.
R maintain a greater distance to the vehicl e
ahead and drive with particular care.
R carefully apply the brakes at the end of a
trip and immediately after commencing a
new trip, so that salt residues ar e
removed from the brake disc.
New brake pads/lining s For safety reasons, Mercedes-Benz recom
-
mends that you only have brake pads/linings
fitted to your vehicle that have been approved for Mercedes-Benz vehicles or which corre-
spond to an equivalent quality standard
.
Brake pads/linings which have not bee n
approved for Mercedes-Benz or which are no t
of an equivalent quality could affect your vehi-
cle's operating safety. G
Risk of accident
New brake pads/linings only reach thei r
optimum braking effect after several hun-
dred kilometres of driving. Before this opti-
mum braking effect is reached, you should
compensate for the reduced braking effect
by applying greater pressure when braking.
This also applies after the brake discs or the
brake pads/linings have been replaced.
High-performance brake system for
AMG vehicles The high-performance brake system is
designed for heavy loads. Braking can there-
fore cause noises. This will depend on:
R speed
R braking forc e
R environmental conditions, such as temper -
ature and humidity
The wear of individual components of th e
brake system, such as the brake pads/linings Operation
171_AKB; 3; 4, en-GB
vpfaff7,
2007-11-13T10:50:25+01:00 - Seite 163 Z
Page 167 of 273
Driving ab
road 164
or brake discs, depends on the individual driv-
ing style and operating conditions.
Because of this, it is impossible to state
a
mileage that will be valid under all circum-
stances. An aggressive driving style will lead
to high wear . Tyre gri
p G
Risk of accident
Whereas the vehicle can be fully controlle d
at a certain speed on dry roads, you must
reduce your speed on wet or icy roads to
achieve the same road safety. Otherwise
you could cause an accident.
Pay particular attention to the road condi-
tions at temperatures around freezing
point.
If ice has formed on the road surface (e.g.
from fog), a light film of water rapidly forms
on the ice when you brake, considerably
reducing tyre grip. Drive with particular
care in such weather conditions. Driving on wet roads
If water has accumulated to a certain dept h
on the road surface, there is a danger of aqua-
planing occurring, even if:
R you drive at low speeds
R the tyres have adequate tread depth
For this reason, do not drive in tyre ruts, and
brake carefully. Driving on flooded roads
If you have to drive on stretches of road on
which water has collected, please bear in
mind that:
R the maximum permitted still water depth is
12 cm.
R you should drive no faster than at walkin g
pace.
! Bear in mind that vehicles travelling in
front or in the opposite direction creat e
waves. This may cause the maximum per-
missible water depth to be exceeded.
You must observe these notes, otherwise
damage may occur to the engine, electrics
and transmission . Driving abroad
Points to remember
An extensive Mercedes-Benz Service networ k
is also available in other countries. You can
obtain the relevant workshop directories
from any Mercedes-Benz Service Centre.
Only low-octane fuel is available in certain
countries.
You can find further information about fuel
grades on (Y page 148). Symmetrical dipped beam
If your journey takes you to countries where
vehicles are driven on the opposite side of the
road to the country in which the vehicle is
registered, your headlamps must be switched
to symmetrical dipped beam. Oncoming traf -
fic will be dazzled less .
X Have the headlamps switched over at a
qualified specialist workshop, e. g. a
Mercedes-Benz Service Centre. G
Risk of accident
Have your headlamps switched back to
asymmetrical dipped beam if you visit a
country in which traffic drives on the same Operation
171_AKB; 3; 4, en-G
B
vpfaff7, 2007-11-13T10:50:25+01:00 - Seite 164
Page 169 of 273
Car
e 166 Calling up the service due dat
e
Use the buttons on the multi-function steer-
ing wheel.
X Switch on the ignition.
X Press èorÿ to select the Basic
display menu(Y page 95).
X Press the jork button to select the
service information .
The 9 service symbol and the service
due date are displayed. Care
Notes on care
Regular and proper care maintains the value
of your vehicle.
i It is advisable to use Mercedes-Benz care
products.
Scratches, corrosive deposits, areas affected
by corrosion and damage caused by inade-
quate care cannot always be completely
repaired. In such cases, visit a qualified spe-
cialist workshop immediately, e.g. a
Mercedes-Benz Service Centre.
Repair damage caused by loose chippings
and remove the following substances imme-
diately, whilst avoiding rubbing too hard:
R Soak insect remains with insect remover
and rinse off afterwards .
R Soak bird droppings with water and rins e
off afterwards.
R Remove tree resin, oils, fuels and greases
by rubbing gently with a cloth soaked in
petroleum ether or lighter fluid .
R Use silicone remover to remove wax.
R Use tar remover to remove tar stains. H
Environmental not
e
Dispose of empty packaging, cleaning
cloths and polishing wads in an environ-
mentally responsible manner.
! Do not affix :
R stickers
R films
R magnetic plates or similar items
to painted surfaces, otherwise you could
damage the paintwork. Vehicle care
! Do not park the vehicle for a long perio d
of time directly after cleaning, especially if
the wheels have just been cleaned with a
wheel cleaner. Wheel cleaners could cause
rapid corrosion of the brake discs and
brake pads/linings. After cleaning, park
the vehicle when it is at normal operatin g
temperature.
Automatic car wash You can wash the vehicle in an automatic car
wash from the very start.Operatio
n
171_AKB; 3; 4, en-GB
vpfaff7,
2007-11-13T10:50:25+01:00 - Seite 166