2008 MERCEDES-BENZ SLK ROADSTER light
[x] Cancel search: lightPage 47 of 273
Occupant safet
y44tion system detects that the front-
passenger seat is occupied Children in the vehicle
If a child is riding in your vehicle, secure the
child using a child restraint system appropri-
ate to the size and age of the child and
approved for Mercedes-Benz vehicles. Pref-
erably, you should fit the restraint system on
a suitable rear seat. Make sure that the child
is strapped in throughout the trip.
You can obtain information about the correct
child restraint system from any Mercedes-
Benz Service Centre.
i It is advisable to use Mercedes-Benz care
products to clean child restraint systems.
You can obtain information about this from
any Mercedes-Benz Service Centre. G
Risk of injury
Do not leave children unsupervised in the
vehicle, even if they are secured in a child
restraint system. The children could injure
themselves on parts of the vehicle. The y
could also be seriously or even fatall y
injured by prolonged exposure to extreme
heat or cold. Do not expose the child restraint system to
direct sunlight. The metallic parts of the
child restraint system could heat up and the
child could be burned by them.
If the children open the door other persons
could be injured. They could get out and
injure themselves or be injured by a passin g
vehicle. G
Risk of injury
An unsecured or incorrectly positioned load
increases the risk of injury to the child in
the event of:
R an acciden t
R a braking manoeuvre
R a sudden change of direction
Do not carry heavy or hard objects inside
the vehicle unless they are secured. You
will find further information in the index
under "Features".
Child restraint systems Mercedes-Benz recommends that you only
use the child restraint systems listed on
(
Y page 48). G
Risk of injury
To reduce the risk of serious or even fata l
injury to the child in the event of a sudden
change in direction, braking or an accident :
R Children less than 1.50 m tall and under
twelve years of age must always be
secured in special child restraint systems
on a suitable vehicle seat. This is neces -
sary because the seat belts are not
designed for children of this size.
R If you fit a child restraint system to the
front-passenger seat, you must move the
front-passenger seat as far back as pos-
sible.
R Children must never travel sitting on th e
lap of another occupant. Due to the
forces occurring in the event of a sudden
change of direction, heavy braking or an
accident, it would not be possible to
restrain the child. The child would be
thrown against parts of the vehicle inte-
rior and be seriously or even fatally
injured. G
Risk of injury
If the child restraint system is not fitte d
correctly to a suitable vehicle seat, it can- Safety
171_AKB; 3; 4, en-G
B
vpfaff7, 2007-11-13T10:50:25+01:00 - Seite 44
Page 49 of 273
Occupant safet
y46 board as well as on both sides of the sun
visor on the front-passenger side.
Information about recommended child
restraint systems is available at any
Mercedes-Benz Service Centre.
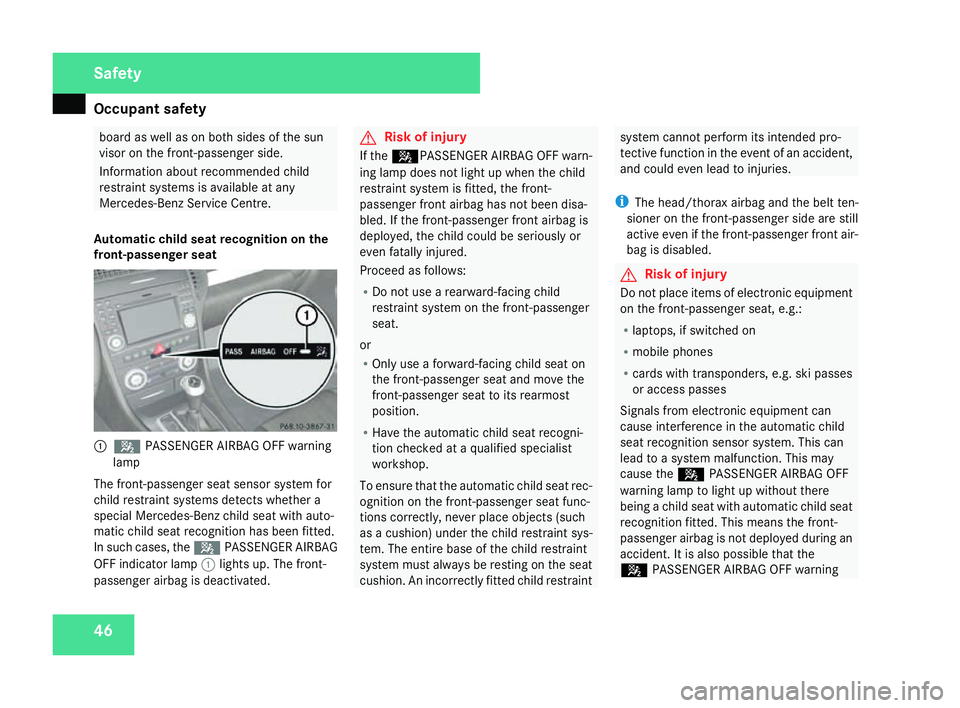
Automatic child seat recognition on the
front-passenger seat 1
5 PASSENGER AIRBAG OFF warning
lamp
The front-passenger seat sensor system for
child restraint systems detects whether a
special Mercedes-Benz child seat with auto-
matic child seat recognition has been fitted.
In such cases, the 5PASSENGER AIRBA G
OFF indicator lamp 1lights up. The front -
passenger airbag is deactivated. G
Risk of injury
If the 5PASSENGER AIRBAG OFF warn-
ing lamp does not light up when the child
restraint system is fitted, the front-
passenger front airbag has not been disa-
bled. If the front-passenger front airbag is
deployed, the child could be seriously or
even fatally injured.
Proceed as follows:
R Do not use a rearward-facing child
restraint system on the front-passenge r
seat.
or
R Only use a forward-facing child seat on
the front-passenger seat and move the
front-passenger seat to its rearmost
position.
R Have the automatic child seat recogni-
tion checked at a qualified specialist
workshop .
To ensure that the automatic child seat rec-
ognition on the front-passenger seat func-
tions correctly, never place objects (such
as a cushion) under the child restraint sys-
tem. The entire base of the child restraint
system must always be resting on the seat
cushion. An incorrectly fitted child restraint system cannot perform its intended pro-
tective function in the event of an accident
,
and could even lead to injuries .
i The head/thorax airbag and the belt ten-
sioner on the front-passenger side are still
active even if the front-passenger front air-
bag is disabled. G
Risk of injury
Do not place items of electronic equipment
on the front-passenger seat, e.g.:
R laptops, if switched on
R mobile phones
R cards with transponders, e.g. ski passe s
or access passes
Signals from electronic equipment can
cause interference in the automatic child
seat recognition sensor system. This can
lead to a system malfunction. This may
cause the 5PASSENGER AIRBAG OFF
warning lamp to light up without there
being a child seat with automatic child seat
recognition fitted. This means the front-
passenger airbag is not deployed during an
accident. It is also possible that the
5 PASSENGER AIRBAG OFF warning Safety
171_AKB; 3; 4, en-GB
vpfaff7
, 2007-11-13T10:50:25+01:00 - Seite 46
Page 50 of 273
Occupant safet
y 47lamp will not light up if you turn the key in
the ignition lock to position 2.
Suitable positioning of the child restraint system Weight categories and ages Child restraint system on the front-passenger seat
Group 0: up to 10 kg;
Up to approximately 9 months
as recommended
3,
4 Group 0+: up to 13 kg
;
Up to approximately 18 months as recommended
3,
4 Group I: 9 to 18 kg
;
Between approximately 8 months and 4 years Universa
l4
or as recommended 3,
4 Category II/III: 15 to 36 kg
Between approximately 3½ and 12 years
Universal
4
or as recommended 3
Only use child restraint systems featuring automatic child seat recognition.
4 Move the front-passenger seat to the highest and rearmost position. Safety
171_AKB; 3; 4, en-GB
vpfaff7,
2007-11-13T10:50:25+01:00 - Seite 47
Page 55 of 273
Anti-theft syste
ms52
i
If ESP ®
is deactivated and one or mor e
wheels start to spin, the vwarning lamp
in the instrument cluster flashes. ES P®
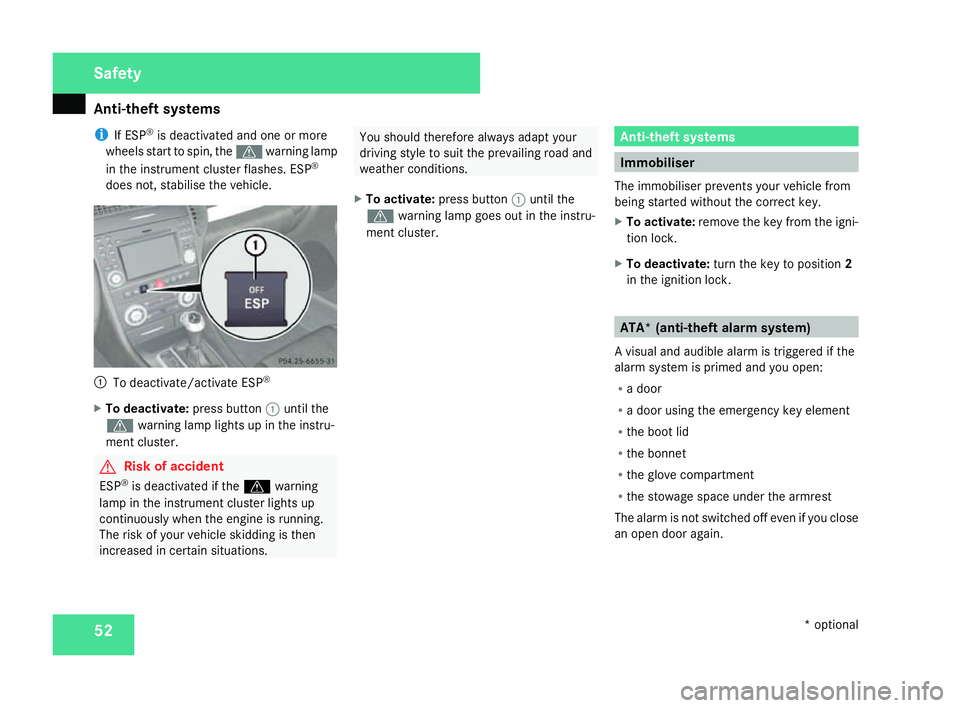
does not, stabilise the vehicle. 1
To deactivate/activate ESP ®
X To deactivate :press button 1until th e
v warning lamp lights up in the instru-
ment cluster. G
Risk of acciden
t
ESP ®
is deactivated if the vwarnin g
lamp in the instrument cluster lights up
continuously when the engine is running.
The risk of your vehicle skidding is then
increased in certain situations. You should therefore always adapt your
driving style to suit the prevailing road and
weather conditions.
X To activate :press button 1until th e
v warning lamp goes out in the instru-
ment cluster. Anti-theft systems
Immobiliser
The immobiliser prevents your vehicle from
being started without the correct key.
X To activate :remove the key from the igni -
tion lock.
X To deactivate :turn the key to position 2
in the ignition lock . ATA* (anti-theft alarm system)
A visual and audible alarm is triggered if th e
alarm system is primed and you open :
R a door
R a door using the emergency key elemen t
R the boot li d
R the bonne t
R the glove compartment
R the stowage space under the armrest
The alarm is not switched off even if you clos e
an open door again. Safety
* optional
171_AKB; 3; 4, en-GB
vpfaff7
, 2007-11-13T10:50:25+01:00 - Seite 52
Page 56 of 273
Anti-theft syste
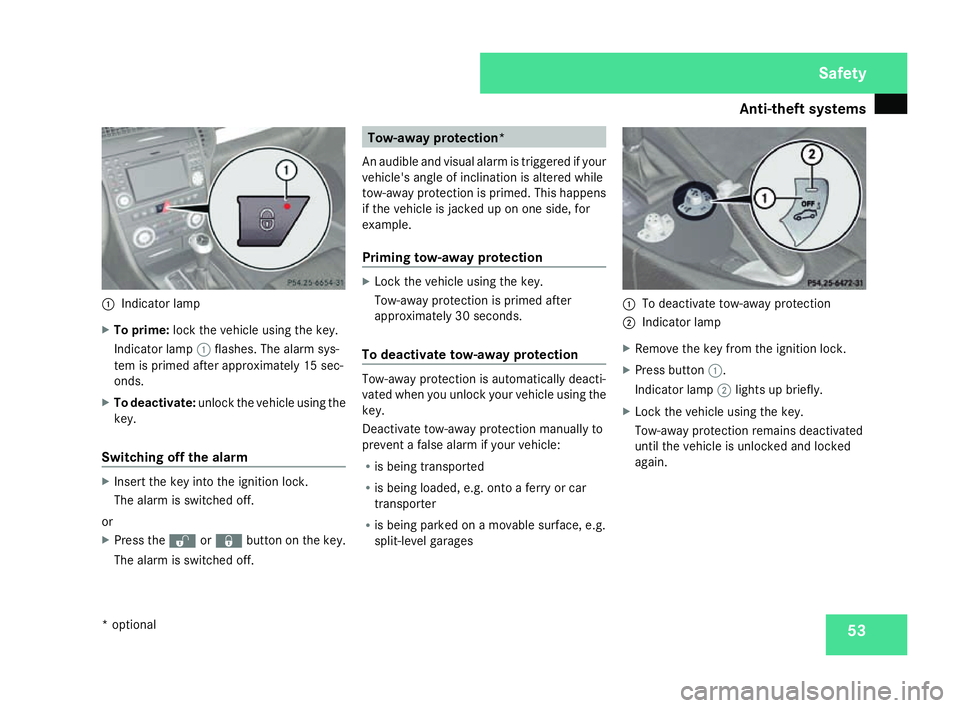
ms 531
Indicator lamp
X To prime: lock the vehicle using the key .
Indicator lamp 1flashes. The alarm sys-
tem is primed after approximately 15 sec-
onds .
X To deactivate :unlock the vehicle using th e
key .
Switching off the alarm X
Insert the key into the ignition lock.
The alarm is switched off.
or
X Press the Œor‹ button on the key.
The alarm is switched off. Tow-away protection*
An audible and visual alarm is triggered if your
vehicle's angle of inclination is altered while
tow-away protection is primed. This happens
if the vehicle is jacked up on one side, for
example.
Priming tow-away protection X
Lock the vehicle using the key.
Tow-away protection is primed after
approximately 30 seconds.
To deactivate tow-away protection Tow-away protection is automatically deacti-
vated when you unlock your vehicle using the
key.
Deactivate tow-away protection manually to
prevent a false alarm if your vehicle:
R is being transported
R is being loaded, e.g. onto a ferry or car
transporter
R is being parked on a movable surface, e.g.
split-level garages 1
To deactivate tow-away protection
2 Indicator lamp
X Remove the key from the ignition lock .
X Press button 1.
Indicator lamp 2lights up briefly.
X Lock the vehicle using the key.
Tow-away protection remains deactivated
until the vehicle is unlocked and locked
again. Safety
* optional
171_AKB; 3; 4, en-GB
vpfaff7,
2007-11-13T10:50:25+01:00 - Seite 53
Page 58 of 273
55
Opening and closing
...........................56
Key positions ...................................... .59
Seats .................................................... 59
Steering wheel .................................... 63
Mirrors ................................................. 65
Memory functions* .............................68
Seat belts ............................................ .69
Lights ................................................... 73
Windscreen wipers .............................78
Side windows ...................................... 79Driving and parking
............................81
Transmission ....................................... 84
Instrument cluster ..............................90
On-board computer .............................91
Driving systems ................................ 109
Air conditioning ................................. 118
Opening/closing the roof .................132
Loading and stowing ........................136
Features ............................................. 140 Controls
171_AKB; 3; 4, en-GB
vpfaff7,
2007-11-13T10:50:25+01:00 - Seite 55
Page 60 of 273
Opening and closing
57
The key now functions as follows:
X
To unlock the driver's door: press the
k button once.
X To unlock centrally :press the kbut-
ton twice.
X To lock centrally :press the jbutton.
Restoring the factory settings X
Press the kandj buttons simulta-
neously for approximately six seconds until
the battery check lamp flashes twice. Opening the doors from the inside
You can open a door from the inside at any
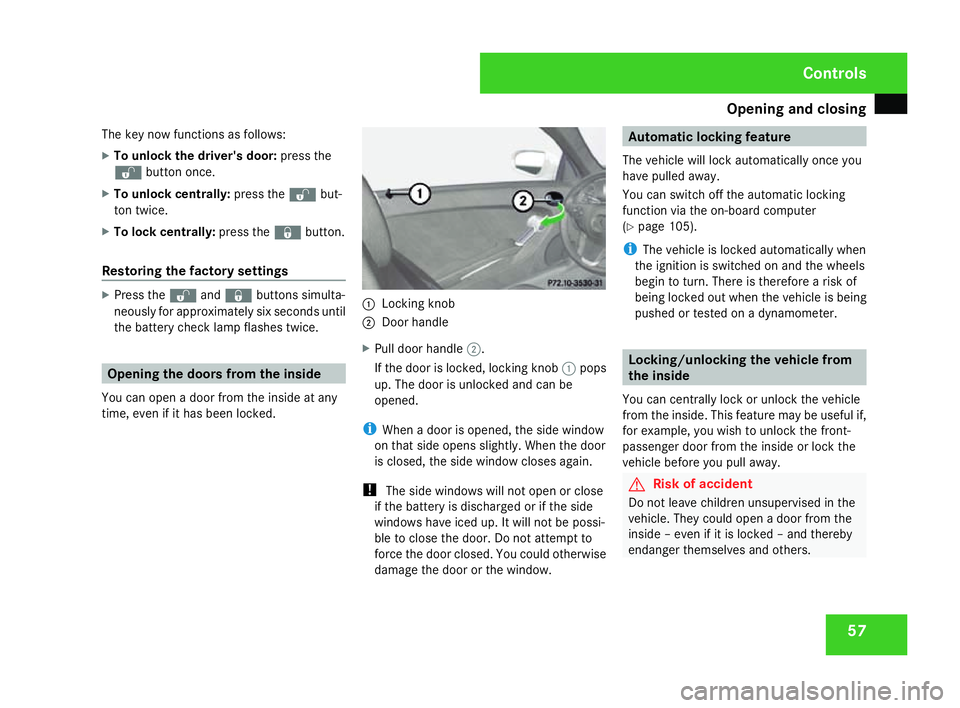
time, even if it has been locked. 1
Locking knob
2 Door handl e
X Pull door handle 2.
If the door is locked, locking knob 1pops
up. The door is unlocked and can be
opened.
i When a door is opened, the side window
on that side opens slightly. When the door
is closed, the side window closes again.
! The side windows will not open or close
if the battery is discharged or if the side
windows have iced up. It will not be possi-
ble to close the door. Do not attempt to
force the door closed. You could otherwise
damage the door or the window. Automatic locking feature
The vehicle will lock automatically once you
have pulled away .
You can switch off the automatic locking
function via the on-board computer
( Y page 105).
i The vehicle is locked automatically when
the ignition is switched on and the wheels
begin to turn. There is therefore a risk of
being locked out when the vehicle is being
pushed or tested on a dynamometer. Locking/unlocking the vehicle from
the inside
You can centrally lock or unlock the vehicle
from the inside. This feature may be useful if,
for example, you wish to unlock the front-
passenger door from the inside or lock the
vehicle before you pull away. G
Risk of accident
Do not leave children unsupervised in the
vehicle. They could open a door from the
inside – even if it is locked – and thereby
endanger themselves and others. Control
s
171_AKB; 3; 4, en-GB
vpfaff7,
2007-11-13T10:50:25+01:00 - Seite 57
Page 65 of 273
Seats
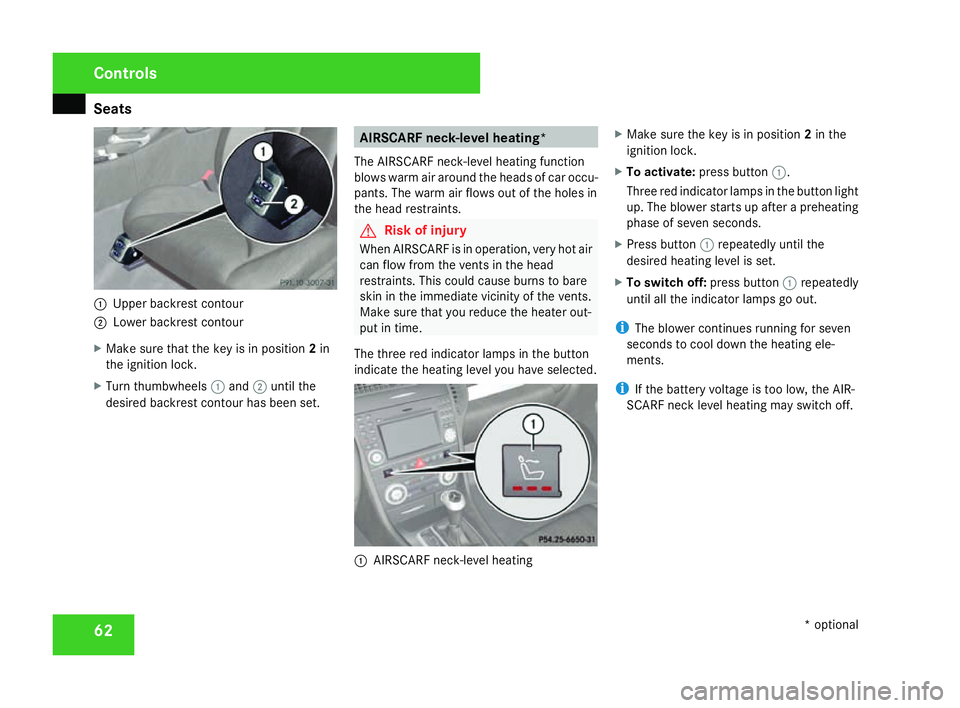
621
Upper backrest contour
2 Lower backrest contour
X Make sure that the key is in position 2in
the ignition lock .
X Turn thumbwheels 1and 2until th e
desired backrest contour has been set. AIRSCARF neck-level heating*
The AIRSCARF neck-level heating function
blows warm air around the heads of car occu-
pants. The warm air flows out of the holes in
the head restraints. G
Risk of injury
When AIRSCARF is in operation, very hot ai r
can flow from the vents in the head
restraints. This could cause burns to bare
skin in the immediate vicinity of the vents .
Make sure that you reduce the heater out-
put in time.
The three red indicator lamps in the button
indicate the heating level you have selected. 1
AIRSCARF neck-level heating X
Make sure the key is in position 2in the
ignition lock .
X To activate :press button 1.
Three red indicator lamps in the button light
up. The blower starts up after a preheating
phase of seven seconds.
X Press button 1repeatedly until the
desired heating level is set.
X To switch off: press button1repeatedly
until all the indicator lamps go out.
i The blower continues running for seven
seconds to cool down the heating ele-
ments.
i If the battery voltage is too low, the AIR-
SCARF neck level heating may switch off. Controls
* optional
171_AKB; 3; 4, en-GB
vpfaff7,
2007-11-13T10:50:25+01:00 - Seite 62