2008 MERCEDES-BENZ SL ROADSTER warning
[x] Cancel search: warningPage 146 of 317
Driving sys
tems 143
Front sensors Centre Approximatel
y100 cm Corners Approximatel
y60cm Rea
rsenso rs Centre Approximatel
y120 cm Corners Approximatel
y80cm !
Payp articula rattentio ntoobjects above
or belo wthe sensors when parking, such
as flower pots or trailer towbars. Parktronic
does not detect such objects when the yare
in the immediate vicinity of the vehicle. You
could damage the vehicl eorthe objects.
Ultrasonic sources such as an automatic
ca rw ash, alorry's compressed-air brakes
or ap neumati cdrill could caus eParktronic
to malfunction.
Minimum distance Centre Approximatel
y20cm Corners Approximatel
y15cm If there is an obstacle withi
nthisr ange,all
warning displays ligh tupa nd atone sounds.
If the distance fall sbelow the minimum clear-
ance, it ma ynolongerbes hown.
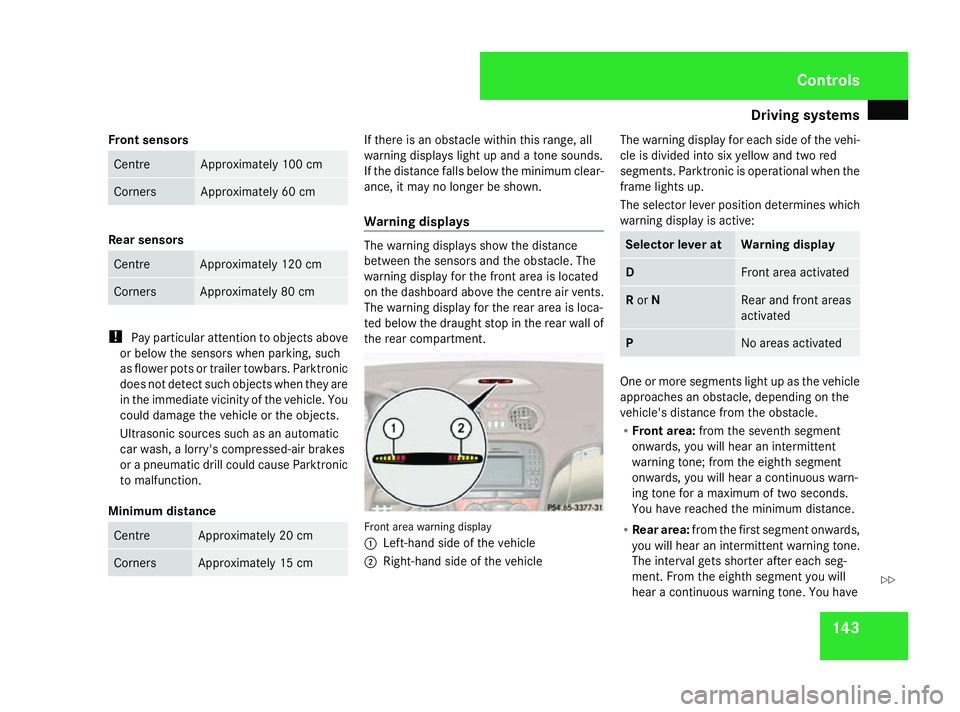
Warnin gdisplays Th
ew arning displays sho wthe distance
between the sensors and the obstacle .The
warning displa yfor the front area is located
on the dashboard above the centr eairvents.
Th ew arning displa yfor the rea rareaisl oca-
ted belo wthe draught sto pinthe rea rwallof
the rea rcompartment. Front area warning display
1
Left-hand side of the vehicle
2 Right-hand side of the vehicle Th
ew arning displa yfor each side of the vehi-
cle is divide dinto si xyello wand two red
segments. Parktronic is operational when the
frame lights up.
Th es elect or lever positio ndetermine swhich
warning displa yisactive: Selecto
rlever at Warnin
gdisplay D Front area activated
R
or N Rear and front areas
activated
P No area
sactivated One or mor
esegments ligh tupast he vehicle
approache sanobstacle ,depen ding on the
vehicle' sdistance fro mthe obstacle.
R Front area: fromt he seventh segment
onwards ,you will hear an intermittent
warning tone ;fro mt he eighth segment
onwards ,you will hear acontinuous warn-
ing tone for amaximum of two seconds.
Yo uh aver eache dthe minimum distance.
R Rea rarea: fromt he first segment onwards,
yo uw illh earani ntermittent warning tone.
Th einterva lgetss horter after each seg-
ment. Fro mthe eighth segment yo uwill
hear acontinuous warning tone .You have Controls
230_AKB; 5; 4, en-GB
bjanott,
Version: 2.9.6 2008-04-08T15:09:54+02:00-Seite 143 ZDateiname: 6515_3089_02_buchblock.pdf; preflight
Page 159 of 317
Opening/closing the roof
156 Locking the roof again
The roof is unlocked when:
R the K Vario-roof in operation
message appears in the multi-function dis-
play
R you hear awarning ton eorthe indicator
lamp flashes for up to ten seconds when
pulling away or while driving
You can lock the roof again if it is not locked
fully.
Befor edriving on X
Make sure that the key is in position 2in
the ignition lock.
X Push the roof switch forwards
(Y page 154).
While driving X
Stop the vehicle immediately, paying atten-
tion to road and traffic conditions.
X Push the roof switch forwards
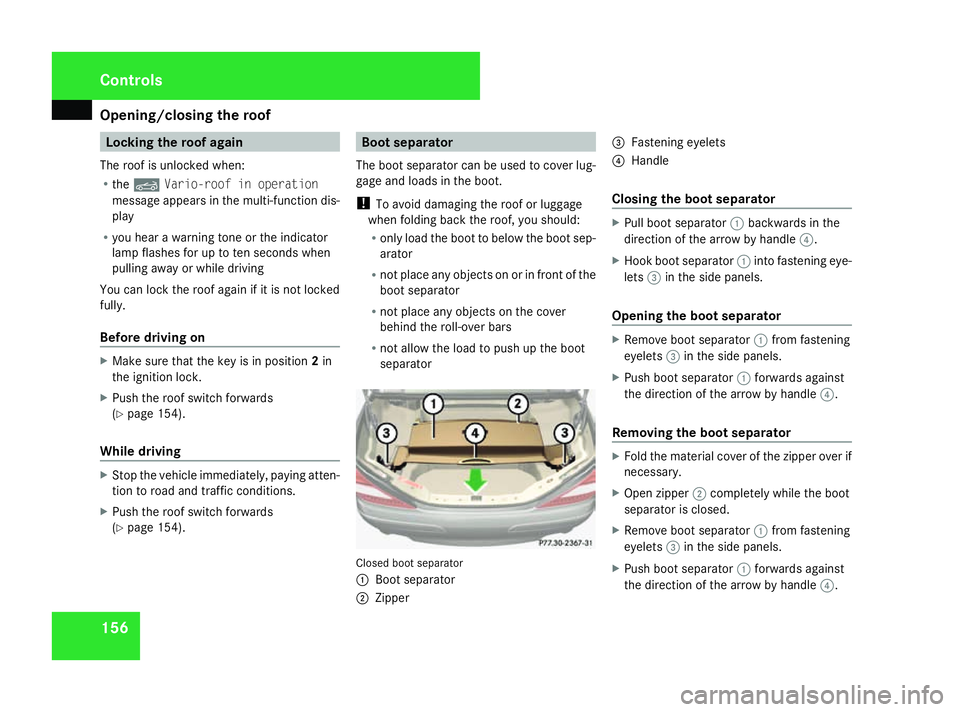
(Y page 154). Boot separator
The boot separator can be used to cover lug-
gage and loads in the boot.
! To avoid damaging the roof or luggage
when folding back the roof, you should:
R only load the boot to below the boot sep-
arator
R not place any objects on or in fron tofthe
boot separator
R not place any objects on the cover
behind the roll-over bars
R not allow the load to push up the boot
separator Closed boot separator
1
Boot separator
2 Zipper 3
Fastenin geyelets
4 Handle
Closing the boot separator X
Pull boot separator 1backwards in the
direction of the arrow by handle 4.
X Hook boot separator 1intofastening eye-
lets 3in the side panels.
Opening the boot separator X
Remove boot separator 1from fastening
eyelets 3in the side panels.
X Push boot separator 1forwards against
the direction of the arrow by handle 4.
Removing the boot separator X
Fold the material cover of the zipper over if
necessary.
X Open zipper 2completely while the boot
separator is closed.
X Remove boot separator 1from fastening
eyelets 3in the side panels.
X Push boot separator 1forwards against
the direction of the arrow by handle 4.Controls
230_AKB
;5;4,en-GB
bjanott, Version:2.9.6
2008-04-08T15:09:54+02:0
0-Seite 156 Dateiname: 6515_3089_02_buchblock.pdf; preflight
Page 186 of 317
Tyre
sand wheels 183
Note
sonr egularly inspecting wheels
and tyres R
Regularl ycheck the wheels and tyres of
your vehicl efor damage (e.g. cuts, punctu-
res ,tears, bumps on tyres and deforma-
tion, cracks or sever ecorrosio nonwheels),
at leas tevery 14 days ,aswellasa fter driv-
ing off-roa doronrough roads .Damaged
wheels could cause alos soft yrep ressure.
R Regularl ycheck the tyr etrea ddepth and
the condition of the trea dacros sthe whole
width of the tyr e(Ypage 184) .Ifneces-
sary ,tur nt he front wheels to full lock in
order to inspect the inne rsideoft he tyre
surface.
R All wheels must have avalve cap to protect
the valv eagain st dirt and moisture.
R Regularl ycheck the pressure of al lyour
tyres including the spar etyre* ,particularly
prior to long trips ,and correc tthe pressure
as necessary (Y page 184).
Note sond riving R
Whil edriving, pa yattentio ntovibrations,
noise sand unusual handling characteris-
tics ,e.g.p ulli ng to one side .Thism ayindi- cate tha
tthe wheels or tyres ar edamaged.
If yo ususpe ct tha tatyreisd efective,
reduc eyours peed and sto pthe vehicl eas
soon as possibl etocheck the wheels and
tyres for damage .Hidde ntyred amage
could also be causing the unusual handling
characteristics .Ifyoufind no signs of dam-
age, have the wheels and tyres examined
at as pecialis tworkshop ,for exampl eata
Mercedes-Benz Service Centre.
R When parking your vehicle, make sure that
the tyres do not ge tdeformed by the kerb
or other obstacles. If it is necessary to drive
ove rkerbs, spee dhum ps or similar, try to
do so slowly and at an obtus eangle .Oth-
erwise, the tyres ,particularl ythe sidewalls,
could ge tdamaged. Directio
nofrotation
Directio nofrotation Tyres with
aspecified directio nofrotation
have additional benefits, e.g .ifthere is arisk
of aquaplaning. Yo uwillo nlyg aint hese ben-
efits if the correc tdirectio nofr otatio nis
observed.
An arrow on the sidewall of the tyr eindicates
its correc tdirectio nofr otation.
i Youm ayfitas pare tyre* against the
directio nofrotation. MOExtende
drun-flat system*
Th eM OExtended run-flat syste mallow syou
to continue driving the vehicl eevenw heno ne
or mor etyres lose al lairpressure.
Th eM OExtended run-flat syste mmayonl ybe
used in conjunctio nwitht he tyr epressure
loss warning syste morthe tyrepressure
monitor* and on wheels specifically tested by
Mercedes-Benz.
i Vehicle swithM OExtended run-flat sys-
tem ar enot equipped with the TIREFIT
kit* 19
.
19 Onl yfor certai ncountries Operation
*o ptional
230_AKB; 5; 4, en-GB
bjanott,
Version: 2.9.6 2008-04-08T15:09:54+02:00-Seite 183 ZDateiname: 6515_3089_02_buchblock.pdf; preflight
Page 188 of 317
Tyre
sand wheels 185
Th
ep ressure of warm tyres shoul donlybe
corrected if it is too lo wfor the current oper-
ating conditions.
Driving with tyr epressure tha tist oo high or
too lo wcan:
R shorten the service life of the tyres
R increase the likelihoo doftyred amage
R have anegative effect on handling charac-
teristics (e.g. by causing aquaplaning)
i Thet yrep ressure values given for low
load sareminimum values which offer you
good ride comfor tcharacteristics.
Yo uc an,however, also usethe values given
for higher loads. Thes earepermissibl eand
will not adversely affec tthe running of the
vehicle. H
Environmental note
Check the tyr epressure regularly ,atleast
every 14 days. Tyre pressure loss warning system
G
Ris
kofa ccident
Th etyrep ressure loss warning syste mdoes
not warn yo uofanincorrectly se ttyrep res-
sure. Th etable on the insid eofthe fuel filler
flap will help yo udecidew hether the tyre
pressures shoul dbecorrected.
Th etyrep ressure loss warning syste mdoes
not replace the nee dtoregularly check
your vehicle' styrep ressures ,since an even
loss of pressure on several tyres at the
same tim ecann ot be detecte dbythe tyre
pressure loss warning system.
Th et yrep ressure loss warning syste mis
not able to warn yo uofasuddenlossof
pressure, e.g .ifthe tyr eispenetrate dbya
foreign object.
In the event of asudde nlossofp ressure,
bring the vehicl etoahaltbyb raking care-
fully. Do not make any sudden steering
movements when doing so.
Whil ethe vehicl eisinmotion, the tyr epres-
sure loss warning syste mmonitors the set
tyr ep ressure using the rotational spee dof
the wheels .Thise nables the syste mtodetect
significant pressure loss in atyre. If the speed
of rotatio nofawheelchange sasa resultof
al ossofp ressure, acorresponding warning message will appear in the multi-functio
ndis-
play.
Th efun ctio noft he tyr epressure loss warning
syste misl imited or delaye dif:
R sno wchains ar efitted to your vehicle's
tyres
R roa dconditions ar ewintry
R yo ua redriving on sand or gravel
R yo ua dopt averys porty driving style (cor-
nering at high speeds or driving with high
rates of acceleration)
R yo ua redriving with aheavy load (i nthe
vehicl eoront he roof)
Restarting the tyre pressure loss warn-
in gs ystem Restart the tyr
epressure loss warning system
if yo uhave:
R change dthe tyr epressure
R change dthe wheels or tyres
R fitted new wheels or tyres
X Before restarting ,consul tthe table of tyre
pressures on the insid eofthe fuel filler flap
to ensur ethatthe tyr epressure in al lfour Operation
230_AKB; 5; 4, en-GB
bjanott,
Version: 2.9.6
2008-04-08T15:09:54+02:0
0-Seite 185 ZDateiname: 6515_3089_02_buchblock.pdf; preflight
Page 189 of 317
Tyre
sand wheels 186tyres is se
tcorrectly for the operating con-
ditions concerned.
X Als oo bser ve the note sinthe sectio non
tyr ep ressures (Y page 184). G
Ris
kofa ccident
Th et yrep ressure loss warning syste mcan
onl ygiver eliabl ewarnings if yo uhaves et
the correc ttyrep ressure.
If an incorrect tyr epressure is set, these
incorrect values will be monitored.
At yrew ithi nsufficient pressure results in
vehicl einstability when driving, thus
increasing the risk of an accident.
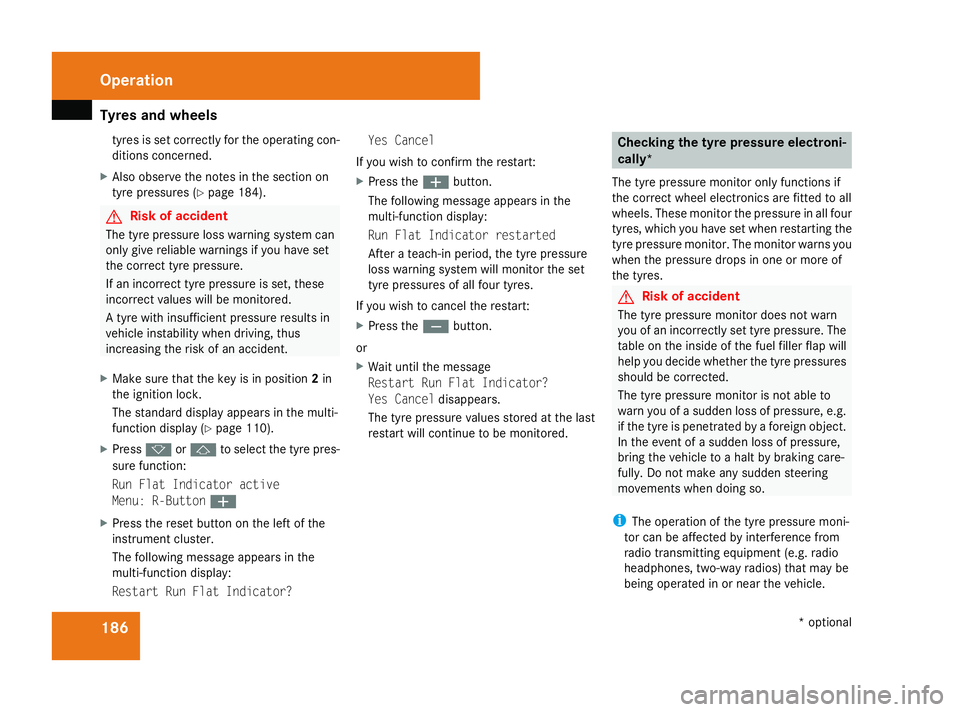
X Make sure tha tthe key is in position 2in
the ignition lock.
Th es tandard displa yappears in the multi-
functio ndisplay ( Ypage 110).
X Press korj to select the tyr epres-
sure function:
Run Fla tIndicator active
Menu: R-Button æ
X Press the reset button on the left of the
instrumen tcluster.
Th ef ollowing message appear sinthe
multi-functio ndisplay:
Restar tRun Fla tIndicator? Yes Cancel
If yo uwishtoc onfirmthe restart:
X Press the æbutton.
Th ef ollowing message appear sinthe
multi-functio ndisplay:
Run Fla tIndicator restarted
After ateach-i nperiod, the tyr epressure
loss warning syste mwillm onitor the set
tyr ep ressures of al lfou rtyres.
If yo uwishtoc ancel the restart:
X Press the çbutton.
or
X Wait unti lthe message
Restar tRun Fla tIndicator?
Yes Cancel disappears.
Th et yrep ressure values stored at the last
restar twillc ontinue to be monitored. Checking the tyre pressure electroni-
cally*
Th et yrep ressure monitor onl yfun ctions if
the correc twheel electronics ar efitted to all
wheels .These monitor the pressure in al lfour
tyres ,which yo uhaves etwhen restarting the
tyr ep ressure monitor. Th emonitor warns you
when the pressure drops in one or mor eof
the tyres. G
Ris
kofa ccident
Th et yrep ressure monitor does not warn
yo uofani ncorrectly se ttyrep ressure. The
table on the insid eofthe fuel filler flap will
help yo udecidew hether the tyr epressures
shoul dbec orrected.
Th et yrep ressure monitor is not able to
warn yo uofasuddenlossofp ressure, e.g.
if the tyr eispenetrate dbyaforeign object.
In the event of asudde nlossofp ressure,
bring the vehicl etoahaltbyb raking care-
fully. Do not make any sudden steering
movements when doing so.
i Theo peratio noft he tyr epressure moni-
tor ca nbeaffected by interferenc efrom
radi otransmitting equipment (e.g. radio
headphones, two-wa yradios )tha tm aybe
being operated in or nea rthe vehicle. Operation
*optional
230_AKB; 5; 4, en-GB
bjanott,
Version: 2.9.6 2008-04-08T15:09:54+02:00-Seite 186 Dateiname: 6515_3089_02_buchblock.pdf; preflight
Page 191 of 317
Tyre
sand wheels 188
If yo
uwishtoc ancel the restart:
X Press the çbutton.
If the following message appear sinthe multi-
functio ndisplay:
R Reactivat etyrep ressure monitor
after correctin gtyrep ressure
R Please correc tthe tyr epressure
X Check the tyr epressure on al lfou rw heels
and correc tasn ecessary.
X Star tthe tyr epressure monitor again. Interchanging the wheels
G
Ris
kofa ccident
Interchange the front and rea rwheel sonly
if the yhavet he same dimensions :for exam-
pl es ize, offset, etc.
After every whee linterchange/change,
have the tightening torque checked at a
qualifie dspecialis tworkshop tha thas the
necessary specialis tknowledg eand tools
to carry ou tthe work required .Mercedes-
Benz recommend sthaty ou usea
Mercedes-Benz Service Centre for thi spur-
pose .Inp articular, work relevant to safety or on safety-related systems must be car-
ried ou
tataqualifie dspecialis tworkshop.
Th ew heel scould work loos eiftheya renot
tightened to atorque of 130Nm .
For safety reasons, Mercedes-Benz recom-
mends tha tyou onlyusewhee lbolts of the
correc tsizew hich have been approved for
Mercedes-Benz vehicles.
Th ew earp attern sont he front and rea rtyres
diffe rdepen ding on the operating conditions.
Interchange the wheels befor eaclear wear
pattern ha sformed on the tyres .Front tyres
typicall ywearm oreont he shoulders and the
rea rtyres in the centre.
Interchange the wheels every 5,000 km to
10,000 km depending on the degre eoftyre
wear ,provide dthatthe vehicl ehasthe same
size front and rea rtyres .Don ot revers ethe
directio noftyrer otation.
Clea nthe contact surfaces of the whee land
the brake disc thoroughly every tim eawheel
is interchanged. Check the tyr epressure and,
if necessary ,restar tthe tyr epressure loss
warning syste morthe tyrepressure moni-
tor*. !
On vehicles fitted with atyrep ressure
monitor* ,electroni ccomponents ar eloc a-
ted in the wheel.
Tyre fitting tools shoul dnot be applie din
the area of the valve, as thi scould damage
the electroni ccomponents.
Alway shavet he wheels interchanged/
change dataqualified specialis tworkshop,
e.g .aM ercedes-Benz Service Centre. Operation
*optional
230_AKB; 5; 4, en-GB
bjanott,
Version: 2.9.6 2008-04-08T15:09:54+02:00-Seite 188 Dateiname: 6515_3089_02_buchblock.pdf; preflight
Page 192 of 317
Winte
rdriving 189Winte
rdriving Points to remember
Have you rvehicle winterproofed at aqualified
specialist workshop, e.g. at aMercedes-Benz
Service Centre, at the onset of winter.
! Take care not to damage the sealing strip
and the moulding on the sid eofthe rear
window whe nscraping ice off the rear win-
dow. Winte
rtyres
Use winter tyres at temperatures below
+7 °C and on snow or ice-covere droads. Only
then can the effect of the ABS and ESP ®
driv-
ing systems be ensure dinwinter too.
Use winter tyres of the same make and tread
on allw heels to maintain safe handling char-
acteristics. G
Risk of accident
Winter tyres with atread depth of less than
4mmm ust be replaced immediately .They
are no longe rsuitabl efor winter use ,can
no longe rprovide sufficient grip .This could
cause you to lose control of you rvehicle
and cause an accident. Always observe the maximu
mpermitted
spee dspecified for the winter tyres you have
fitted. If you fit winter tyres which have a
lower maximu mpermitted spee dthan that of
the vehicle, affi xanappropriate warning sign
in the driver's fiel dofvision. This can be
obtained at aqualified specialist workshop,
e.g. from aMercedes-Benz Service Centre.
Under these circumstances, you should also
restrict the maximu mspee doft he vehicle
using permanent Speedtronic 20
to the maxi-
mum permissible spee dfor the winter tyres
(Y pag e136).
Once you have fitted the winter tyres:
X Check the tyre pressures (Y page184).
X Restart the tyre pressure moni-
tor* (Y page186). G
Risk of accident
If you fit the spare wheel* whe ndriving with
winter tyres, bea rinmind that driving sta-
bility wil lbeimpaired owing to unstable
cornering characteristics caused by the dif-
ferent tyres. You should therefore adapt
you rdriving styl eand drive carefully.
Have the spare wheel* replaced at the
nearest qualified specialist workshop which has the necessary specialist knowl-
edge and tools to carry out the work
required
.Mercedes-Benz recommends
that you use aMercedes-Benz Service
Centre for this purpose. In particular, work
relevant to safety or on safety-related sys-
tems must be carrie dout at aqualified
specialist workshop. Sno
wchains
For safety reasons, Mercedes-Benz recom-
mends that you only use snow chains which
have bee nspecially approved for you rvehicle
by Mercedes-Benz, or are of acorresponding
standard of quality.
! Information about the use of snow chain-
compatibl eAMG winter tyres is applicable
for AMG tyres. Use of snow chains is only
permissible with these tyres.
If you intend to fit snow chains, please bear
the following points in mind:
20 Only available for certai ncountries. Operation
*o ptional
230_AKB; 5; 4, en-GB
bjanott,
Version: 2.9.6 2008-04-08T15:09:54+02:00-Seite 189 ZDateiname: 6515_3089_02_buchblock.pdf; preflight
Page 197 of 317
Care
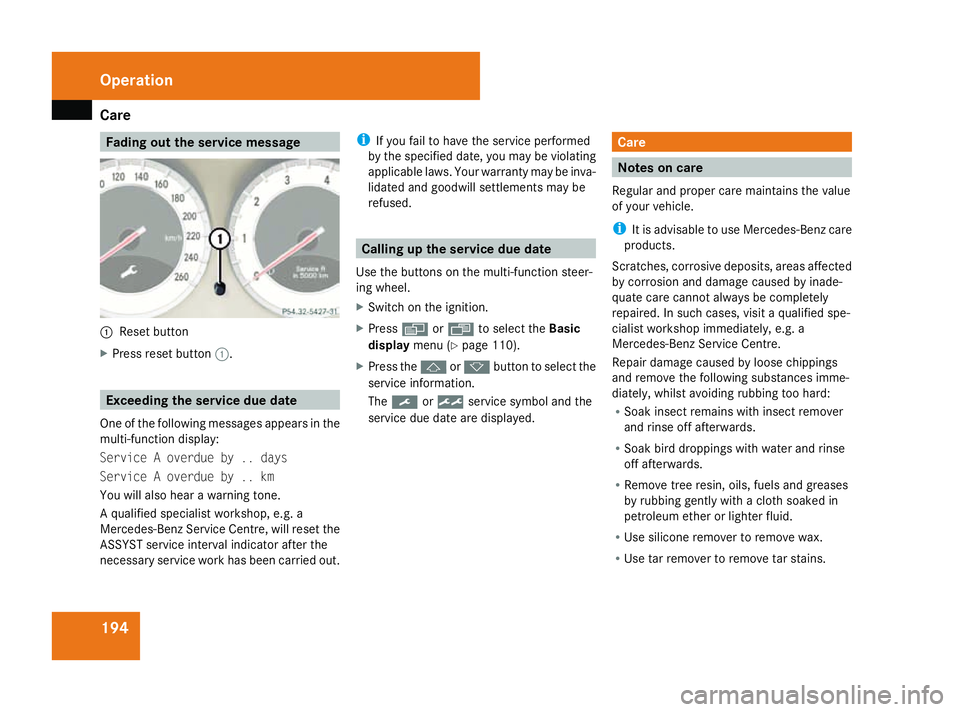
194 Fading out th
eservice message 1
Reset button
X Pres srese tbutton 1. Exceeding th
eservice du edate
One of th efollowing messages appears in the
multi-functio ndisplay:
Service Aoverdue by .. days
Service Aoverdue by .. km
You will also hear awarning tone.
Aq ualified specialist workshop, e.g .a
Mercedes-Ben zServic eCentre, will rese tthe
ASSYS Tservice interval indicator after the
necessar yservice work has been carried out. i
If you fail to have th eservice performed
by th especified date, you may be violating
applicabl elaws. Your warranty may be inva-
lidated and goodwill settlements may be
refused. Calling up th
eservice du edate
Use th ebuttons on th emulti-functio nsteer-
ing wheel.
X Switch on th eignition.
X Press èorÿ to selec tthe Basic
display menu(Ypage 110).
X Pres sthe j ork button to selec tthe
service information.
The 9 or½ service symbol and the
service due date are displayed. Care
Notes on care
Regular and prope rcarem aintain sthe value
of your vehicle.
i It is advisabl etouse Mercedes-Ben zcare
products.
Scratches, corrosive deposits, areas affected
by corrosion and damage caused by inade-
quate car ecannot always be completely
repaired. In such cases ,visit aqualified spe-
cialis tworkshop immediately, e.g .a
Mercedes-Ben zServic eCentre.
Repair damage caused by loose chippings
and remove th efollowing substances imme-
diately, whilst avoidin grubbin gtoo hard:
R Soak insect remain swith insect remover
and rinse off afterwards.
R Soak bird droppings with water and rinse
off afterwards.
R Remov etreer esin, oils, fuels and greases
by rubbin ggently with acloths oaked in
petroleum ether or lighter fluid.
R Use silicone remover to remove wax.
R Use tar remover to remove tar stains. Operation
230_AKB; 5; 4, en-GB
bjanott
,V ersion: 2.9.6
2008-04-08T15:09:54+02:00
-Seite 194 Dateiname: 6515_3089_02_buchblock.pdf; preflight