Page 26 of 569
25 At a glance
Cockpit
ItemPage
1Cruise control lever258
2Instrument cluster26
3Multifunction steering
wheel30
4Horn
5Steering wheel gearshift
buttons201
6Gear selector lever for
automatic transmission53
7Front Parktronic* warning
indicators283
8Overhead control panel33
9Glove box release
Glove box lock304
305
ItemPage
aGlove box
CD changer*
AUX-socket304
304
304
bCenter console31
cPower outlet314
dStarter switch39
eSteering wheel adjustment,
manual46
fSteering wheel adjustment,
electrical*47
Heated steering wheel*318
gHood lock release356
hParking brake release56
ItemPage
jParking brake pedal65
kDoor control panel36
lExterior lamp switch143
mCombination switch
�High beam58
�Turn signals59
�Windshield wipers59
�Rear window wiper61
Page 36 of 569
35 At a glance
Storage compartments
ItemPage
1Parcel net in front
passenger footwell307
2Glove box304
3Door pocket
4Parcel net on front
passenger seat backrest307
5Door pocket
6Cup holder308
7Third-row storage
compartment304
8First aid kit, vehicle tool kit,
spare wheel467
9Third-row storage
compartment304
aCup holder308
bDoor pocket
ItemPage
cParcel net on driver’s seat
backrest307
dDoor pocket
eStorage compartment in
center console304
fAshtray311
gCupholders308
hFront armrest storage
compartment/telephone
tray304
jCup holders
Rear storage compartment
Rear seat ashtray308
304
311
kCup holders*308
lRear armrest storage
compartment*304
Page 301 of 569
.
�Remove the covers from the mounts in
side trim.
�Press on cove")
300 Controls in detail
Loading
Installing blind
�For installation behind second-row
seats, install the blind extensions
(
�page 300).
�Remove the covers from the mounts in
side trim.
�Press on cover at its lower edge as
indicated by arrow.
The mount cover’s upper edge flips
up.
�Remove mount cover by pulling
its upper edge out of side trim in
direction of arrow.
�Place left side of blind 2 (�page 299)
in left mount.
�Position right side of blind 2
(
�page 299) over right mount.
�Press release button1 (�page 299)
and guide blind 2 (
�page 299) into
mount.
Extending blind1Blind
2Extension
3Guidings
4Guide pins
�Position extension 2 over blind 1.
Guide pins 4 must point directly at
guidings 3.
�Turn extension2 and blind 1 in op-
posite directions as indicated by the ar-
rows.
Guide pins 4 must engage in
guidings3.
!For installation behind third-row seats,
the blind extensions must not be installed.
Otherwise, the blind could be damaged.
iTo avoid loss of the mount covers, keep
them in a safe place while not in use, e.g. the
glove box.
iThe cargo compartment cover blind has two
extensions which are connected to the cargo
compartment cover blind by cords.
The cargo compartment cover blind must be
extended for installation behind the second-row
seats.
Page 305 of 569

304 Controls in detail
Useful features
Storage compartments Glove box/CD changer*
1Glove box lid release
2Glove box lid
Opening the glove box
�Pull lid release1 in direction of arrow.
Glove box lid2 opens downward.Closing the glove box
�Push glove box lid 2 up to close.
Releasing CD changer*
1Release button
2CD changer
3AUX-socket
�Open the glove box.
�Press release button 1.
CD changer 2 is released and swings
down automatically.
For information on CD changer operation,
see separate COMAND system operating
instructions.
Warning!G
To help avoid personal injury during a
collision or sudden maneuver, exercise care
when storing objects in the vehicle. Put
luggage or cargo in the cargo compartment
if possible. Do not pile luggage or cargo
higher than the seat backs.
Always use cargo net* when transporting
cargo. Cargo net* cannot secure hard or
heavy objects.
Parcel nets cannot secure hard or heavy
objects.
Keep compartment lids closed. This will help
to prevent stored objects from being thrown
about and injuring vehicle occupants during
�braking
�vehicle maneuvers
�an accident
iDepending on vehicle equipment, a
CD changer* and an AUX-socket are located in
the glove box.
Page 306 of 569
305 Controls in detail
Useful features
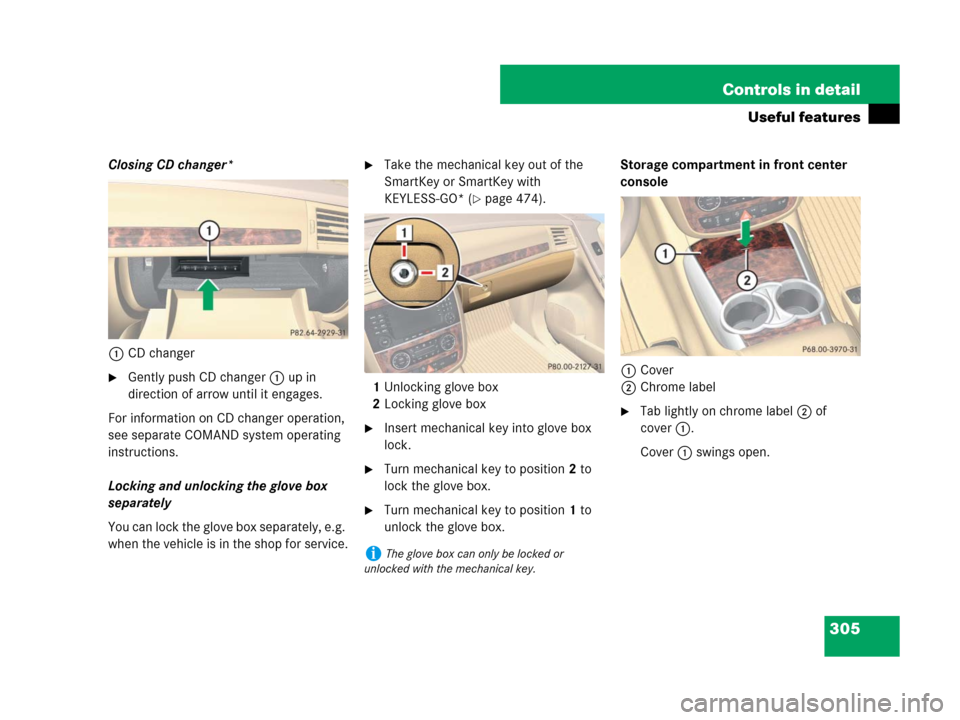
Closing CD changer*
1CD changer
�Gently push CD changer 1 up in
direction of arrow until it engages.
For information on CD changer operation,
see separate COMAND system operating
instructions.
Locking and unlocking the glove box
separately
You can lock the glove box separately, e.g.
when the vehicle is in the shop for service.
�Take the mechanical key out of the
SmartKey or SmartKey with
KEYLESS-GO* (
�page 474).
1Unlocking glove box
2Locking glove box
�Insert mechanical key into glove box
lock.
�Turn mechanical key to position 2 to
lock the glove box.
�Turn mechanical key to position 1 to
unlock the glove box.Storage compartment in front center
console
1Cover
2Chrome label
�Tab lightly on chrome label 2 of
cover1.
Cover 1 swings open.
iThe glove box can only be locked or
unlocked with the mechanical key.
Page 553 of 569

552 Index
Fuel 352, 537, 539
Additives 540
Capacities, Fuel tank 537
Consumption statistics 185
Filling the tank 352
Fuel filler flap and cap 352
Fuel gauge 29
Fuel reserve warning lamp 29, 424
Premium unleaded
gasoline 352, 539, 540
Requirements, Octane rating 540
Fuel cap
Messages in the multifunction
display 452
Fuel filler flap 352
Locking/unlocking 352
Opening 352
Opening in an emergency 475
Fuels, coolants, lubricants etc. 536Fuses 518
Fuse box, Cargo compartment 519
Fuse box, Engine compartment 519
Fuse box, Passenger
compartment 520
Fuse chart 467, 518
Fuse extractor 467, 518
Replacing 518
Spare fuses 467, 518
G
Garage door opener 329
Gasoline see Fuel
GAWR 394
Gear range
Automatic transmission 199
Limiting 199
Shifting into optimal 202Gear selector lever 25, 53, 190
Gearshift pattern 53, 190
Message in the display 437
Messages in the multifunction
display 437
Position 193
Shifting procedure 193
Transmission position 194
Global locking/unlocking see
Key, SmartKey
Glove box 304
Good visibility 203
Gross Axle Weight Rating see GAWR
Gross Trailer Weight see GTW
Gross Vehicle Weight Rating see GVWR
Gross Vehicle Weight see GVW
GTW 394
GVW 394
GVWR 394
Page 563 of 569

562 Index
SRS 84
Indicator lamp 424
Messages in the multifunction
display 437
Standing lamps
Replacing bulbs 480, 481
Standing water, Driving through 347
Starter switch 24, 39
Positions 39
Starting difficulties, Engine 55
Starting, Engine 53
Steering column 46, 47
Steering wheel
Adjusting, Electrically* 47
Adjusting, Manually 46
Buttons 158
Cleaning 411
Heating* 318
Steering wheel gearshift control
Automatic transmission 201
Stolen Vehicle Recovery services 329Storage compartments 34, 304
Armrest, Front 306
Armrest, Rear* 306
Cup holders 308
Door pockets 34
Front center console 305
Glove box 304
Parcel nets 307
Second-row seats, In front of 307
Third-row 307
Storing tires 365
Stranded vehicle 517
Submenus see Control system submenus
Sun visors 205
Sunroof see Power tilt/sliding
sunroof* 248
Sunshades*
Rear door windows 207
Symbols used in this Operator’s
Manual 15T
Tachometer 29, 155
Overspeed range 155
Tail lamps 487
Cleaning lenses 407
Messages in the multifunction
display 455–460
Replacing bulbs 481
Tailgate
Closing 119
Closing from the outside (vehicles
without KEYLESS-GO*) 124
Opening 119, 120
Opening from the inside,
Electrically* 121, 123
Opening from the inside,
Manually 120
Opening from the outside 120
Unlocking and opening with
KEYLESS-GO* 121
Unlocking with SmartKey 121
Tar stains 404