Page 364 of 569

363 Operation
Tires and wheels
�Tires and wheels
Contact an authorized Mercedes-Benz
Light Truck Center for information on
tested and recommended rims and tires
for summer and winter operation. They can
also offer advice concerning tire service
and purchase.Important guidelines
�Only use sets of tires and rims of the
same type and make.
�Tires must be of the correct size for the
rim.
�Break in new tires for approximately
60 miles (100 km) at moderate
speeds.
�Regularly check the tires and rims for
damage. Dented or bent rims can
cause tire inflation pressure loss and
damage to the tire beads.
�If vehicle is heavily loaded, check tire
inflation pressure and correct as
required.
�Do not allow your tires to wear down
too far. Adhesion properties on wet
roads are sharply reduced at tread
depths of less than
1/8in (3 mm).
�When replacing individual tires, you
should mount new tires on the front
wheels first (on vehicles with
same-sized wheels all around).
Warning!G
Replace rims or tires with the same designa-
tion, manufacturer and type as shown on the
original part. See an authorized
Mercedes-Benz Light Truck Center for
further information. If incorrectly sized rims
and tires are mounted:
�The wheel brakes or suspension
components can be damaged.
�The operating clearance of the wheels
and the tires may no longer be correct.
Warning!G
Worn, old tires can cause accidents. If the
tire tread is badly worn, or if the tires have
sustained damage, replace them.
When replacing rims, only use genuine
Mercedes-Benz wheel bolts specified for the
particular rim type. Failure to do so can
result in the bolts loosening and possibly an
accident.
Retreaded tires are not tested or recom-
mended by Mercedes-Benz, since previous
damage cannot always be recognized on
retreads. The operating safety of the vehicle
cannot be assured when such tires are used.
Page 398 of 569

397 Operation
Tires and wheels
If applicable to your vehicle’s tire configu-
ration, tires can be rotated according to
the tire manufacturer’s recommended in-
tervals in the tire manufacturer’s warranty
pamphlet located in your vehicle literature
portfolio. If none is available, tires should
be rotated every 3 000 to 6 000 miles
(5 000 to 10 000 km), or sooner if neces-
sary, according to the degree of tire wear.
The same rotation (spinning) direction
must be maintained (
�page 365).
Rotate tires before the characteristic tire
wear pattern becomes visible (shoulder
wear on front tires and tread center wear
on rear tires).
Thoroughly clean the mounting face of
wheels and brake disks, i.e. the inner side
of the wheels/tires, during each rotation.
Check for and ensure proper tire inflation
pressure.For information on wheel change, see “Flat
tire” (
�page 492).
Warning!G
Have the tightening torque checked after
changing a wheel. Wheels could become
loose if not tightened with a torque of
110 lb-ft (150 Nm).
Only use genuine Mercedes-Benz wheel
bolts specified for your vehicle’s rims.
Page 468 of 569
467 Practical hints
Where will I find ...?
�Where will I find ...?
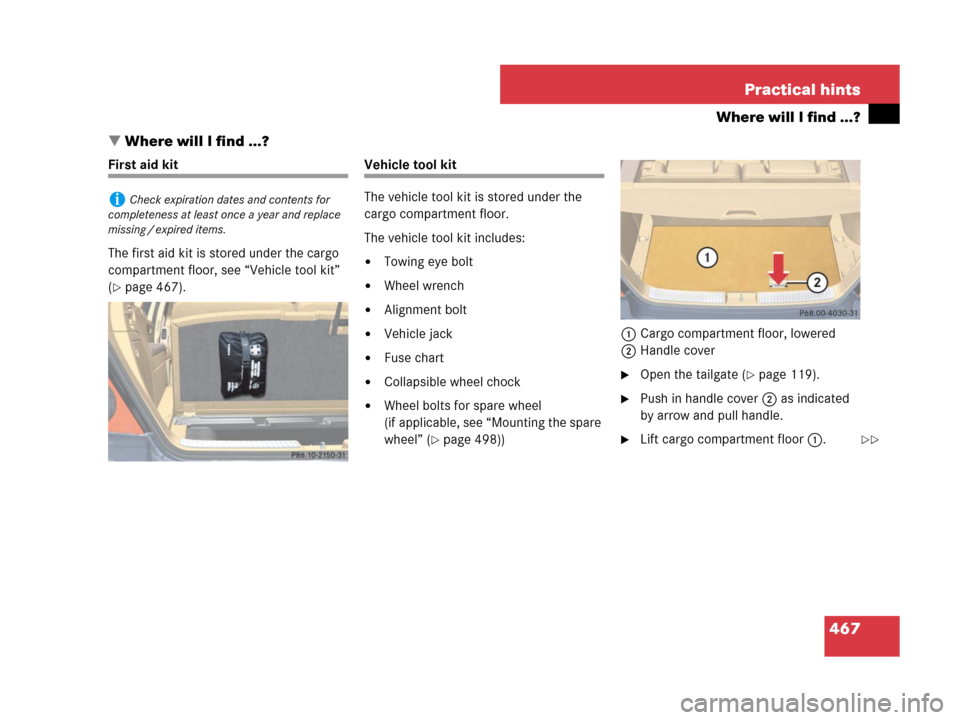
First aid kit
The first aid kit is stored under the cargo
compartment floor, see “Vehicle tool kit”
(
�page 467).
Vehicle tool kit
The vehicle tool kit is stored under the
cargo compartment floor.
The vehicle tool kit includes:
�Towing eye bolt
�Wheel wrench
�Alignment bolt
�Vehicle jack
�Fuse chart
�Collapsible wheel chock
�Wheel bolts for spare wheel
(if applicable, see “Mounting the spare
wheel” (
�page 498))1Cargo compartment floor, lowered
2Handle cover
�Open the tailgate (�page 119).
�Push in handle cover2 as indicated
by arrow and pull handle.
�Lift cargo compartment floor 1.
iCheck expiration dates and contents for
completeness at least once a year and replace
missing / expired items.
��
Page 470 of 569

1Wheel wrench
2Electric air pump
3Mounting direction indicator")
469 Practical hints
Where will I find ...?
Vehicle tool kit storage well casing
Example illustration1
(vehicles with scissors-type jack)
1Wheel wrench
2Electric air pump
3Mounting direction indicator
4Fuse chart
5Hook and loop fastener
6Alignment bolt
7Collapsible wheel chock
8Towing eye bolt
9Spare wheel (collapsible tire)
aSpare wheel bolts
bVehicle tool kit storage well casing
cReversible ratchet
(comes with scissors-type jack only)
dJack
�To remove jackd, loosen hook and
loop fastener 5.
�To remove the vehicle tool kit storage
well casing, proceed as described
on (
�page 472).Vehicle jack
The vehicle jack is located underneath the
storage compartment floor.�Remove vehicle jack from its storage
compartment (
�page 467).
1Appearance and alignment of the items may vary.
Warning!G
Only use the jack supplied with your vehicle
to lift the vehicle briefly for wheel changes.
If you use the jack for any other purpose,
you or others could be inju re d, as the j ac k is
designed only for the purpose of changing a
wheel.
When using the jack, observe the safety
notes in the “Mounting the spare wheel”
section (
�page 493) and the notes on the
jack.
Page 496 of 569

495 Practical hints
Flat tire
Changing wheel on a slight decline
Always try lifting the vehicle using the jack
on a level surface. However, should
circumstances require you to do so on a
slight decline, place the wheel chock and
another sizeable object as follows:
Changing wheel on passenger side
(Example illustration)
�Place wheel chock (or another sizeable
object) in front of both wheels on the
side opposite to the side on which the
wheel is to be changed.Changing wheel on a slight incline
Always try lifting the vehicle using the jack
on a level surface. However, should
circumstances require you to do so on a
slight incline, place the wheel chock and
another sizeable object as follows:
Changing wheel on passenger side
(Example illustration)
�Place wheel chock (or another sizeable
object) behind both wheels on the side
opposite to the side on which the wheel
is to be changed.1Wheel wrench
�On wheel to be changed, loosen but do
not yet remove the wheel bolts
(approximately one full turn with wheel
wrench 1).
Page 498 of 569
497 Practical hints
Flat tire
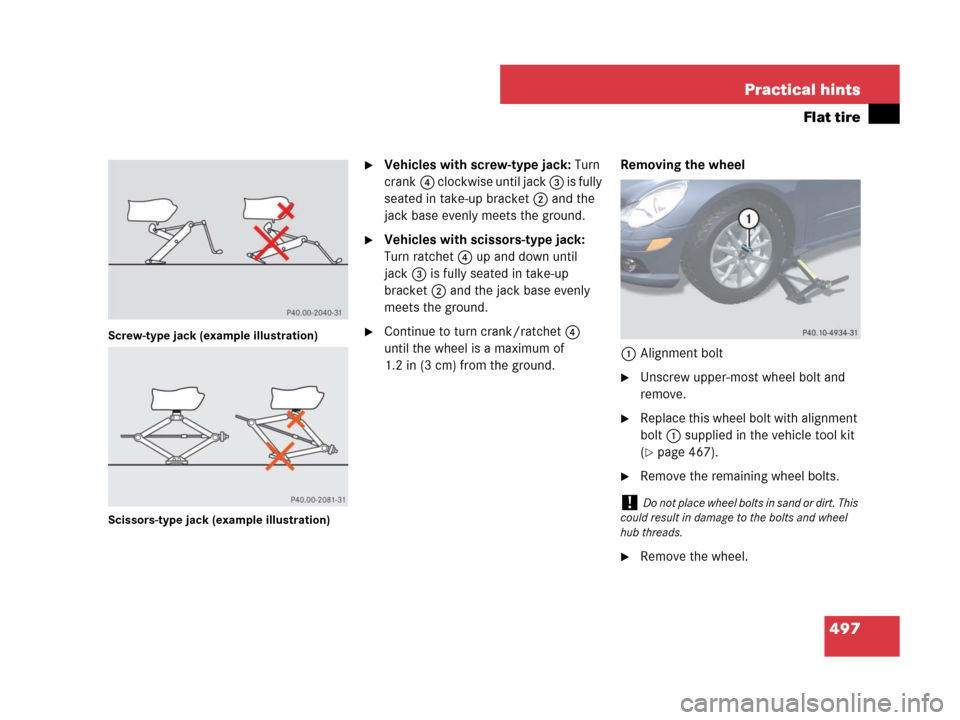
Screw-type jack (example illustration)
Scissors-type jack (example illustration)
�Vehicles with screw-type jack: Turn
crank4 clockwise until jack 3 is fully
seated in take-up bracket2 and the
jack base evenly meets the ground.
�Vehicles with scissors-type jack:
Turn ratchet 4 up and down until
jack3 is fully seated in take-up
bracket2 and the jack base evenly
meets the ground.
�Continue to turn crank/ratchet 4
until the wheel is a maximum of
1.2 in (3 cm) from the ground.Removing the wheel
1Alignment bolt
�Unscrew upper-most wheel bolt and
remove.
�Replace this wheel bolt with alignment
bolt1 supplied in the vehicle tool kit
(
�page 467).
�Remove the remaining wheel bolts.
�Remove the wheel.
!Do not place wheel bolts in sand or dirt. This
could result in damage to the bolts and wheel
hub threads.
Page 499 of 569

�Clean contac")
498 Practical hints
Flat tire
Mounting the spare wheel
1Wheel bolt for 18", 19", and 20" light al-
loy wheels
2Wheel bolt for spare wheel (located in
cargo compartment with spare wheel)
�Clean contact surfaces of wheel and
wheel hub.
�Guide spare wheel onto the alignment
bolt and push it on.
�Insert wheel bolts and tighten them
slightly.
�Unscrew the alignment bolt, install last
wheel bolt and tighten slightly.
!Wheel bolts2 must be used when mount-
ing the spare wheel with collapsible tire.
The use of any wheel bolts other than wheel
bolts2 for the spare wheel with collapsible tire
will physically damage the vehicle’s brakes.
!To avoid paint damage, place wheel flat
against hub and hold it there while installing first
wheel bolt.
Warning!G
Always replace wheel bolts that are
damaged or rusted.
Never apply oil or grease to wheel bolts.
Damaged wheel hub threads should be
repaired immediately. Do not continue to
drive under these circumstances! Contact
an authorized Mercedes-Benz Light Truck
Center or call Roadside Assistance.
Incorrect wheel bolts or improperly tight-
ened wheel bolts can cause the wheel to
come off. This could cause an accident.
Make sure to use the correct wheel bolts.
Warning!G
Only use genuine Mercedes-Benz wheel
bolts. Other wheel bolts may come loose.
Do not tighten the wheel bolts when the
vehicle is raised. Otherwise the vehicle
could fall off the jack.
Page 502 of 569

501 Practical hints
Flat tire
Lowering the vehicle
�Vehicles with scissors-type jack:
Attach ratchet to vehicle jack in such a
way that the wordDOWN can be seen.
�Lower the vehicle until it is resting fully
on its own weight:
�Vehicles with screw-type jack:
Turn crank counterclockwise.
�Vehicles with scissors-type jack:
Turn ratchet in directionDOWN.
�Remove the jack.1-5Wheel bolts
6Wheel wrench
�Tighten the five wheel bolts evenly,
following the diagonal sequence
illustrated (1to5), until all bolts
are tight. Observe a tightening torque
of 110 lb-ft (150 Nm).
�Store jack and all other vehicle tool kit
items back into the storage well.
Warning!G
Inflate collapsible tire only after the wheel is
properly mounted.
Inflate the collapsible tire using the electric
air pump (
�page 499) before lowering the
vehicle.
Warning!G
Have the tightening torque checked after
changing a wheel. The wheels could come
loose if they are not tightened to a torque of
110 lb-ft (150 Nm).
iThe removed road wheel cannot be stored in
the spare wheel well under the cargo compart-
ment floor, but should be transported in the
cargo compartment wrapped in a protective
wrap.
Vehicles with TPMS or Advanced TPMS*:
Do not activate the tire inflation pressure moni-
tor until a full size wheel/tire with functioning
sensor has been placed back into service on the
vehicle.