Page 485 of 569
484 Practical hints
Replacing bulbs
High beam headlamp bulbs
�Turn cover 1 counterclockwise.
�Remove cover 1.
�Turn bulb socket 4 counterclockwise.
�Pull bulb socket 4 out of the head-
lamp housing.
�Pull the high beam bulb out of bulb
socket 4.
�Insert the new high beam bulb into bulb
socket 4.
�Insert bulb socket 4 into the head-
lamp housing.
�Turn bulb socket 4 clockwise until it
engages.
�Place cover 1 on the opening in the
headlamp housing.
�Turn cover 1 clockwise until it
engages.Front turn signal lamp bulbs
�Pull bulb socket 2 out of the head-
lamp housing.
�Pull the turn signal bulb out of bulb
socket 2.
�Insert the new turn signal bulb into bulb
socket 2.
�Insert bulb socket 2 into the head-
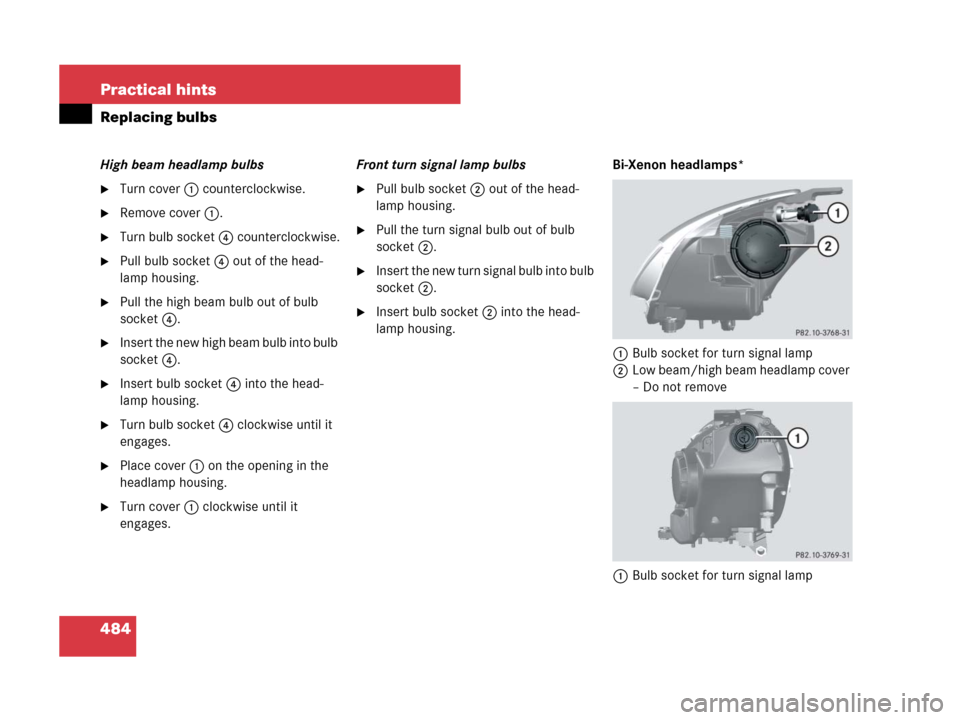
lamp housing.Bi-Xenon headlamps*
1Bulb socket for turn signal lamp
2Low beam/high beam headlamp cover
– Do not remove
1Bulb socket for turn signal lamp
Page 486 of 569

485 Practical hints
Replacing bulbs
Low beam and high beam flasher spot
bulbs
Front turn signal lamp bulbs
�Pull bulb socket 1 out of the head-
lamp housing.
�Pull the turn signal bulb out of bulb
socket 1.
�Insert the new turn signal bulb into bulb
socket 1.
�Insert bulb socket 1 into the head-
lamp housing.Parking and standing lamp bulbs
1Bulb socket for parking and standing
lamp
�Turn bulb socket 1 counterclockwise.
�Pull bulb socket 1 out of the housing.
�Pull the bulb out of bulb socket 1.
�Insert the new parking and standing
lamp bulb into bulb socket 1.
�Insert bulb socket 1 into the housing.
�Turn bulb socket 1 clockwise until it
engages.Front fog lamp bulbs
1Front fog lamp
2Cover
3Retaining screws
�Remove retaining screws3.
�Take off cover 2.
Warning!G
Do not remove the low beam/high beam
cover for the Bi-Xenon* headlamp. Because
of high voltage in Bi-Xenon* lamps, it is dan-
gerous to replace the bulb or repair the lamp
and its components. We recommend that
you have such work done by a qualified
technician.
iThe following procedure also applies to
corner-illuminating front fog lamps*.
��
Page 488 of 569

487 Practical hints
Replacing bulbs
Additional turn signal lamps bulbs
The additional turn signal lamps in the
exterior rear view mirrors have LEDs.
If a malfunction occurs or LEDs fail to
function, the entire turn signal unit must
be replaced. Have the turn signal unit re-
placed by an authorized Mercedes-Benz
Light Truck Center.
Front side marker lamp bulbs
Since replacing the side marker lamp bulbs
is a technically highly demanding process,
we recommend you have the side marker
lamp bulbs replaced by an authorized
Mercedes-Benz Light Truck Center.Replacing bulbs for rear lamps
Before you start to replace a bulb for a rear
lamp, do the following first:
�Turn the combination switch to
positionM (
�page 143).
Tail lamp unit
�Open the tailgate (�page 119).Opening the side trim panels
1Lock
2Cover in left side trim panel
1Lock
2Cover in right side trim panel
iTo access the tail lamp units, you have to
remove the cover in the corresponding side trim
panel of the cargo compartment.
��
Page 489 of 569
 or counterclockwise (right side
trim panel) by 90°")
488 Practical hints
Replacing bulbs
�Insert a suitable object such as a coin
into the slot of lock1.
�Turn lock1 clockwise (left side trim
panel) or counterclockwise (right side
trim panel) by 90° in direction of arrow.
�Remove cover2.
Replacing bulbs
1Tail, side marker, standing, and parking
lamp bulb socket
2Turn signal lamp bulb socket
3Fog lamp bulb socket
(driver’s side only)
4Backup lamp bulb socket
�Depending on which bulb needs to be
replaced, turn the respective bulb
socket 1 - 4 counterclockwise.
�Pull the bulb socket out of the housing.
�Similarly turn the bulb counterclock-
wise carefully and pull the bulb out of
bulb socket.
�Insert the new bulb into the bulb
socket.
�Turn the bulb in the bulb socket clock-
wise carefully.
�Insert the bulb socket into the housing.
�Turn the bulb socket clockwise until it
engages.License plate lamps
1License plate lamp cover
2Screw
�Loosen screws2.
�Remove license plate lamp cover1.
�Replace the license plate lamp bulb.
�Reinstall license plate lamp cover1.
�Retighten screws2.
��
Page 516 of 569
.
�Insert the SmartKey with
KEYLESS-GO* into the starter switch.
�Switch on the i")
515 Practical hints
Towing the vehicle
�Remove the KEYLESS-GO* start/stop
button from the starter switch
(
�page 41).
�Insert the SmartKey with
KEYLESS-GO* into the starter switch.
�Switch on the ignition.
�Depress the brake pedal.
�Shift the automatic transmission to
neutral positionN.
�Release the brake pedal.
�If engaged, release the parking brake
(
�page 56).
�Switch off the ignition and leave the
SmartKey with KEYLESS-GO* in the
starter switch.
Installing towing eye bolt
Depending on whether you are towing a
vehicle or you are being towed, the towing
eye bolt can be screwed into threaded
holes which are located behind covers on
the right-hand side of each bumper.
Example illustration R 550 4MATIC
1Towing eye cover
!Towing of the vehicle should only be done
using the properly installed towing eye bolt.
Never attach a tow cable, tow rope or tow rod to
the vehicle chassis, frame or suspension parts.
iTo signal turns while being towed with
hazard warning flasher in use, set the starter
switch to position2 and activate combination
switch for left or right turn signal in usual manner
– only the selected turn signal will operate.
Upon canceling the turn signal, the hazard warn-
ing flasher will operate again.
Page 556 of 569
 244
Opening the tilt/sliding panel*
(Summer opening feature) 244
Opening the tilt/sliding")
555 Index
Messages in the multifunction
display 453–454
Opening the power windows
(Summer opening feature) 244
Opening the tilt/sliding panel*
(Summer opening feature) 244
Opening the tilt/sliding sunroof*
(Summer opening feature) 244
Remote control 113
Replacing batteries 479
Selective settings 117
Start/stop button 41
Starter switch positions 39, 41
Starting the engine 54
Turning off engine 66
Unlocking and opening, Power
tailgate* 121
Kickdown 197
Kilopascal 394L
Labels 524
Certification label 524
Emission control information 525
Engine number 525
Paint code 524
Vehicle Identification Number
(VIN) 525
Lamps, exterior 481
Front 481
Light sensor, Messages in the multi-
function display 455
Messages in the multifunction
display 455–460
Rear 481
Lamps, Indicator and warning
ABS 27, 414, 415
Brakes 27, 415
Center console 31, 425
CHECK ENGINE 29, 417, 418
Distance warning lamp* 266
Engine diagnostics 29, 417, 418
ESP
®27, 419
Front passenger front
air bag off 76, 77, 81, 82, 425Fuel reserve 29, 424
High beam headlamps 29
Instrument cluster 26, 414
Parktronic* 283, 284
Preglow indicator, Diesel engine 29
Seat belt telltale 29, 82, 420
Seat heating* 139
Seat ventilation* 140
SRS 29, 70, 85, 424
Turn signals 27
Language, Setting 174
LATCH-type child seat anchors see
Children in the vehicle
Leather upholstery, Cleaning and
care of 412
License plate lamps 481
Messages in the multifunction
display 457
Replacing bulbs 481, 488
Light alloy wheels, Cleaning 410
Light sensor
Messages in the multifunction
display 455
Lighter see Cigarette lighter
Page 561 of 569

560 Index
Replacing bulbs 480
Backup lamps 480, 481, 487
Brake lamps 480, 481, 487
Fog lamps, Front 480, 481, 483, 485
Fog lamp, Rear 480, 481, 487, 488
Headlamps 480, 481, 483
License plate lamps 480, 481, 487,
488
Low beam headlamps 480, 481, 483
Parking lamps 480, 481, 483, 485,
487, 488
Side marker lamps, Front 480, 487
Side marker lamps, Rear 480, 481,
487, 488
Standing lamps 480, 481, 483, 485,
487, 488
Tail lamps 480, 481, 487
Turn signal lamps 480, 481, 483,
485, 487
Reporting safety defects 18
Reset button, In instrument cluster 154Reset tool
Active head restraints,
Depository 478
Residual heat utilization 235
Restraint system
See Children in the vehicle
See SRS
See Infant and child restraint systems
Reverse gear position, Automatic
transmission 190, 194
Rims 395, 529
Roadside Assistance 12
Roadside Assistance button see Tele Aid*
Roller sunblinds, Panorama roof* 252
RON 540
Roof rack* 288
Rubber parts, Cleaning 410
Run Flat Indicator (Canada only) 374S
Safety
Driving safety systems 99
Occupant safety 70
Reporting safety defects 18
Safety belts see Seat belts
Satellite radio* 166
Scissors-type vehicle jack 470
Seat belt force limiter 85
Seat belt height adjustment 52
Seat belts 82
Children in the vehicle 87
Cleaning 411
Fastening 50
Height adjustment 52
Proper use of 52, 84
Safety guidelines 74
Telltale 29, 82, 420
Seat heating* see Seats 140
Seat ventilation* see Seats
Seating capacity 367
Page 566 of 569

565 Index
Turn signal lamps
Cleaning lenses 407
Messages in the multifunction
display 460
Replacing bulbs 480
Turn signals 59
Additional in mirrors 481
Bulbs 481
Cleaning lenses 407
Indicator lamps 26
Turning off the engine 66
TWR 396
U
Uniform Tire Quality Grading
Standards 396
Units, Settings
Speedometer 174
Unlocking the vehicle see Key
Upholstery
Cleaning and care of 411
Useful features 304V
Vehicle
Battery 503
Break-in period 338
Care 403
Control systems, Settings menu 170
Dimensions 534
Locking/unlocking 38, 67, 110
Locking/unlocking in an
emergency 474
Modifications and alterations,
Operation safety 16
Proper use of 16
Towing 513
Washing 405
Weights 535
Vehicle care 403
Vehicle Identification Number see VIN
Vehicle jack 469, 470
Vehicle lighting 355Vehicle loading 288
Cargo compartment cover blind 299
Cargo net* 301
Cargo tie-down rings 290
Hooks 291
Loading instructions 289
Loading terminology 393
Parcel nets 307
Roof rack* 288
Vehicle maximum load on the tire 396
Vehicle Recovery services,
Stolen (Tele Aid*) 329
Vehicle status message memory
menu 169
Vehicle tool kit 467
Vehicle washing 405
VIN 525
Voice Control System*
Buttons 30
Operation, see separate
operating instructions