Page 333 of 569

332 Controls in detail
Useful features
Step 9:
�Press the “training” button on the
garage door opener motor head unit.
The “training light” is activated.
You have 30 seconds to initiate the
following step.
Step 10:
�Return to the vehicle and firmly
press, hold for 2 seconds and release
the programmed signal transmitter
button (2, 3 or4).
Step 11:
�Press, hold for 2 seconds and release
same signal transmitter button a
second time to complete the training
process.Step 12:
�Confirm the garage door operation by
pressing the programmed signal trans-
mitter button (2, 3 or4).
Step 13:
�To program the remaining two signal
transmitter buttons, repeat the steps
above starting with step 3.
Gate operator/Canadian programming
Canadian radio-frequency laws require
transmitter signals to “time-out” (or quit)
after several seconds of transmission
which may not be long enough for the
integrated signal transmitter to pick up the
signal during programming. Similar to this
Canadian law, some U.S. gate operators
are designed to “time-out” in the same
manner.
If you live in Canada or if you are having
difficulties programming a gate operator
(regardless of where you live) by using the
programming procedures, replace step 4
with the following:Step 4:
�Press and hold the signal transmitter
button (2, 3 or4). Do not release
this button until it has been success-
fully trained.
�While still holding down the signal
transmitter button (2, 3 or4),
“cycle” your hand-held remote control
button6 as follows: Press and hold
button6 for 2 seconds, then release
it for 2 seconds, and again press and
hold it for 2 seconds. Repeat this
sequence on the hand-held remote
control until the frequency signal has
been learned. Upon successful train-
ing, indicator lamp1 will flash slowly
and then rapidly after several seconds.
�Proceed with programming step 5 and
step 6 to complete.
iSome garage door openers (or other rolling
code equipped devices) may require you to
press, hold for 2 seconds and release the same
signal transmitter button a third time to com-
plete the training process.
��
Page 408 of 569

407 Operation
Vehicle care
Ornamental moldings
For regular cleaning and care of ornamen-
tal moldings, use a use damp cloth.Headlamps, brake lamps, tail lamps,
side markers, turn signal lenses
�Use a mild car wash detergent, such
as Mercedes-Benz approved Car
Shampoo, with plenty of water.Cleaning the Distronic* system sensor
cover
1Distronic system sensor cover
�Switch off the ignition (�page 39).
�Use a mild car wash detergent, such as
Mercedes-Benz approved Car
Shampoo, with plenty of water and a
non-scratching cloth to clean sensor
cover1.
!Do not use chrome cleaner on ornamental
moldings. Although ornamental moldings may
have chrome appearance, they could be made of
anodized aluminum that will be damaged when
cleaned with chrome cleaner. Instead, use damp
cloth to clean those ornamental moldings.
Very dirty ornamental moldings of which you are
sure are chrome-plated, use a chrome cleaner.
If in doubt whether an ornamental molding is
chrome-plated, contact an authorized
Mercedes-Benz Light Truck Center.
!Only use window cleaning solutions that are
suitable for plastic lamp lenses. Window clean-
ing solutions which are not suitable may damage
the plastic lamp lenses of the headlamps. There-
fore, do not use abrasives, solvents or cleaners
that contain solvents.
Never apply strong force and only use a soft,
non-scratching cloth when cleaning the lenses.
Do not attempt to wipe dirty lenses with a dry
cloth or sponge.
Otherwise you may scratch or damage the lens
surface.
Page 429 of 569

428 Practical hints
What to do if …
On the pages that follow, you will find a
compilation of the most important warning
and malfunction messages that may
appear in the multifunction display.
For your convenience the messages are
divided into two sections:
�Text messages (�page 429)
�Symbol messages (�page 444)
Warning!G
No messages will be displayed if either the
instrument cluster or the multifunction
display is inoperative.
As a result, you will not be able to see infor-
mation about your driving conditions, such
as speed or outside temperature, warn-
ing/indicator lamps, malfunction/warning
messages or the failure of any systems.
Driving characteristics may be impaired.
If you must continue to drive, do so with
added caution. Contact an authorized
Mercedes-Benz Light Truck Center as soon
as possible.
iSwitching on the ignition causes all
instrument cluster lamps (except high beam
headlamp indicator lamp, and turn signal indica-
tor lamps unless activated) as well as the multi-
function display to come on. Make sure the
lamps and multifunction display are in working
order before starting your journey.
Page 461 of 569

460 Practical hints
What to do if …
Display symbolDisplay messagePossible cause/consequencePossible solution
. Turn Signal
Rear LeftThe left rear turn signal lamp is
malfunctioning. A substitute
bulb is being used.�Replace the bulb as soon as possible
(
�page 480).
Turn Signal
Rear RightThe right rear turn signal lamp is
malfunctioning. A substitute
bulb is being used.�Replace the bulb as soon as possible
(
�page 480).
Turn Signal
Front LeftThe left front turn signal lamp is
malfunctioning. A substitute
bulb is being used.�Replace the bulb as soon as possible
(
�page 480).
Turn Signal
Front RightThe right front turn signal lamp is
malfunctioning. A substitute
bulb is being used.�Replace the bulb as soon as possible
(
�page 480).
Turn Signal
Left MirrorThe turn signal in the left exte-
rior rear view mirror is malfunc-
tioning. This message will only
appear if a critical number of
LEDs have stopped working.�Contact an authorized Mercedes-Benz
Light Truck Center as soon as possible.
Turn Signal
Right MirrorThe turn signal in the right exte-
rior rear view mirror is malfunc-
tioning. This message will only
appear if a critical number of
LEDs have stopped working.�Contact an authorized Mercedes-Benz
Light Truck Center as soon as possible.
Page 481 of 569
480 Practical hints
Replacing bulbs
Bulbs
Safe vehicle operation depends on proper
exterior lighting and signaling. It is there-
fore essential that all bulbs and lamp
assemblies are in good working order at
all times.
Correct headlamp adjustment is extremely
important. Have headlamps checked and
readjusted at regular intervals and when a
bulb has been replaced. Contact an autho-
rized Mercedes-Benz Light Truck Center
for headlamp adjustment.iIf the headlamps or front fog lamps are
fogged up on the inside as a result of high humid-
ity, driving the vehicle a distance with the lights
on should clear up the fogging.iSubstitute bulbs will be brought into use
when the following lamps malfunction:
�Turn signal lamps
�Brake lamps
�Parking lamps
�Tail lamps
Read and observe messages in the multifunction
display (
�page 455).
Page 482 of 569
481 Practical hints
Replacing bulbs
Front lampsRear lamps
LampType
1Parking/standing lampW 5 W
2Turn signal lampPY 21 W
3Additional turn signal
lamp
LED
4Headlamps:
Low beam
H7 (55 W)
Bi-Xenon headlamps*:
Low beam1D2S-35 W
5Headlamps:
High beam/high beam
flasher
H7 (55 W)
Bi-Xenon headlamps*:
High beam/high beam
flasher spot lamp
H7 (55 W)
6Side marker lampWY 5 W
7Front fog lampH7 (55 W)
Corner-illuminating
front fog lamp*
H7 (55 W)
1Vehicles with Bi-Xenon* headlamps: Do not
replace the Bi-Xenon bulbs yourself. Contact an
authorized Mercedes-Benz Light Truck Center.
LampType
LampType
8High-mounted brake
lamp
LED
9Tail, brake, and side
marker lamp
P 21 W
aTurn signal lampPY 21 W
bBackup lampP 21 W
cRear fog lamp (driver’s
side only)
P 21 W
dLicense plate lampsC 5 W
Page 483 of 569

482 Practical hints
Replacing bulbs
Notes on bulb replacement
�Only use 12-volt bulbs of the same type
and with the specified watt rating.
�Switch the lights off before changing a
bulb to prevent short circuits.
�Always use a clean lint-free cloth when
handling bulbs.
�Your hands should be dry and free of oil
and grease.
�If the newly installed bulb does not
come on, contact an authorized
Mercedes-Benz Light Truck Center.Have the LEDs and bulbs for the following
lamps replaced by an authorized
Mercedes-Benz Light Truck Center:
�the additional turn signal lamps in the
exterior rear view mirrors
�the high mounted brake lamp
�the Bi-Xenon* low beam lamps
�the Bi-Xenon* high beam flasher spot-
light
�the front side marker lamps
Warning!G
Bulbs and bulb sockets can be very hot.
Allow the lamp to cool down before chang-
ing a bulb.
Keep bulbs out of reach of children.
Halogen lamps contain pressurized gas.
A bulb can explode if you:
�touch or move it when hot
�drop the bulb
�scratch the bulb
Wear eye and hand protection.
Because of high voltage in Xenon lamps, it is
dangerous to replace the bulb or repair the
lamp and its components. We recommend
that you have such work done by a qualified
technician.!Do not replace the bulbs yourself. You could
otherwise damage the LEDs or parts of the
vehicle. Only have the LEDs replaced by an
authorized Mercedes-Benz Light Truck Center.
Page 484 of 569
483 Practical hints
Replacing bulbs
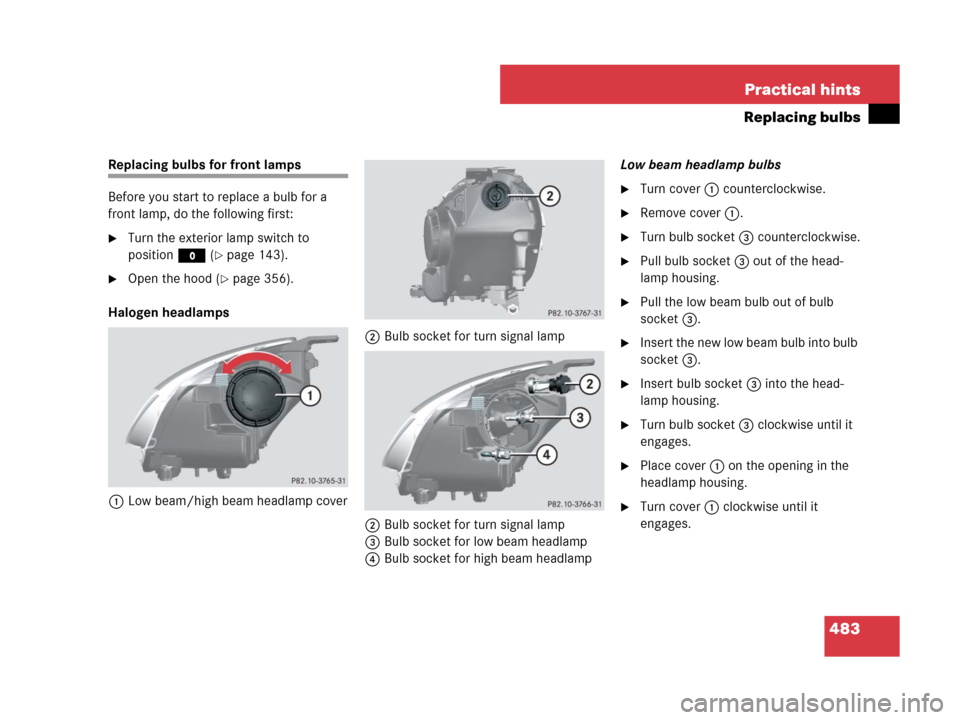
Replacing bulbs for front lamps
Before you start to replace a bulb for a
front lamp, do the following first:
�Turn the exterior lamp switch to
positionM (
�page 143).
�Open the hood (�page 356).
Halogen headlamps
1Low beam/high beam headlamp cover2Bulb socket for turn signal lamp
2Bulb socket for turn signal lamp
3Bulb socket for low beam headlamp
4Bulb socket for high beam headlampLow beam headlamp bulbs
�Turn cover 1 counterclockwise.
�Remove cover 1.
�Turn bulb socket 3 counterclockwise.
�Pull bulb socket 3 out of the head-
lamp housing.
�Pull the low beam bulb out of bulb
socket 3.
�Insert the new low beam bulb into bulb
socket 3.
�Insert bulb socket 3 into the head-
lamp housing.
�Turn bulb socket 3 clockwise until it
engages.
�Place cover 1 on the opening in the
headlamp housing.
�Turn cover 1 clockwise until it
engages.


Bi-Xenon headla")