Page 458 of 569
457 Practical hints
What to do if …
Display symbolDisplay messagePossible cause/consequencePossible solution
.License Plate Lamp
LeftThe left license plate lamp is
malfunctioning.�Replace the bulb as soon as possible
(
�page 480).
License Plate Lamp
RightThe right license plate lamp is
malfunctioning.�Replace the bulb as soon as possible
(
�page 480).
Low Beam
LeftThe left low beam lamp is
malfunctioning.Halogen headlamp:
�Replace the bulb as soon as possible
(
�page 480).
Bi-Xenon* headlamp:
�Contact an authorized Mercedes-Benz
Light Truck Center as soon as possible.
Low Beam
RightThe right low beam lamp is
malfunctioning.Halogen headlamp:
�Replace the bulb as soon as possible
(
�page 480).
Bi-Xenon* headlamp:
�Contact an authorized Mercedes-Benz
Light Truck Center as soon as possible.
Page 481 of 569
480 Practical hints
Replacing bulbs
Bulbs
Safe vehicle operation depends on proper
exterior lighting and signaling. It is there-
fore essential that all bulbs and lamp
assemblies are in good working order at
all times.
Correct headlamp adjustment is extremely
important. Have headlamps checked and
readjusted at regular intervals and when a
bulb has been replaced. Contact an autho-
rized Mercedes-Benz Light Truck Center
for headlamp adjustment.iIf the headlamps or front fog lamps are
fogged up on the inside as a result of high humid-
ity, driving the vehicle a distance with the lights
on should clear up the fogging.iSubstitute bulbs will be brought into use
when the following lamps malfunction:
�Turn signal lamps
�Brake lamps
�Parking lamps
�Tail lamps
Read and observe messages in the multifunction
display (
�page 455).
Page 482 of 569
481 Practical hints
Replacing bulbs
Front lampsRear lamps
LampType
1Parking/standing lampW 5 W
2Turn signal lampPY 21 W
3Additional turn signal
lamp
LED
4Headlamps:
Low beam
H7 (55 W)
Bi-Xenon headlamps*:
Low beam1D2S-35 W
5Headlamps:
High beam/high beam
flasher
H7 (55 W)
Bi-Xenon headlamps*:
High beam/high beam
flasher spot lamp
H7 (55 W)
6Side marker lampWY 5 W
7Front fog lampH7 (55 W)
Corner-illuminating
front fog lamp*
H7 (55 W)
1Vehicles with Bi-Xenon* headlamps: Do not
replace the Bi-Xenon bulbs yourself. Contact an
authorized Mercedes-Benz Light Truck Center.
LampType
LampType
8High-mounted brake
lamp
LED
9Tail, brake, and side
marker lamp
P 21 W
aTurn signal lampPY 21 W
bBackup lampP 21 W
cRear fog lamp (driver’s
side only)
P 21 W
dLicense plate lampsC 5 W
Page 484 of 569
483 Practical hints
Replacing bulbs
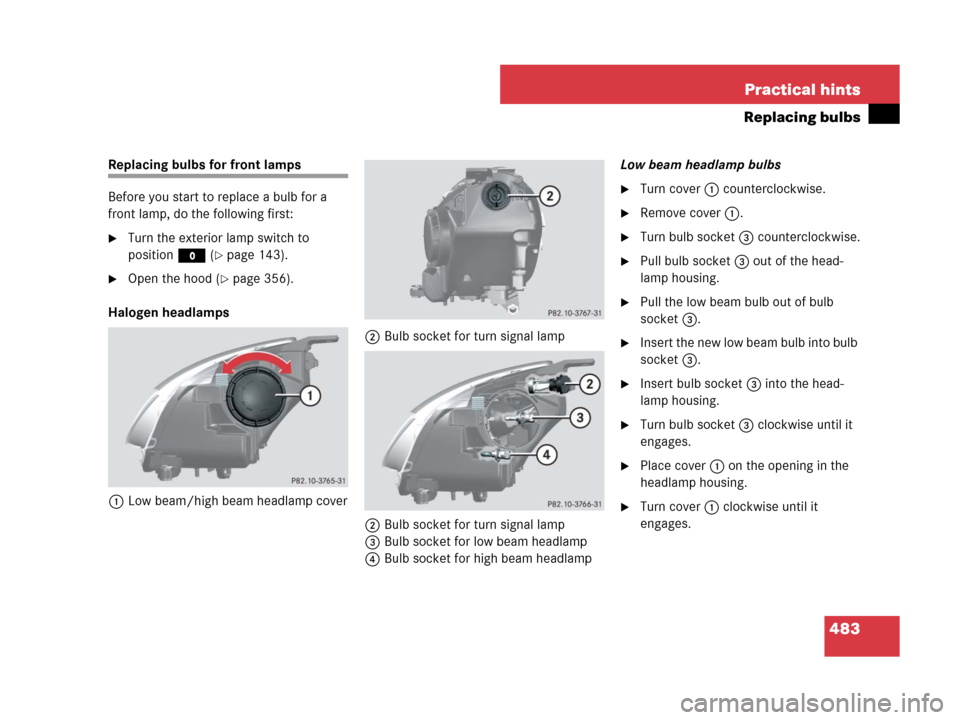
Replacing bulbs for front lamps
Before you start to replace a bulb for a
front lamp, do the following first:
�Turn the exterior lamp switch to
positionM (
�page 143).
�Open the hood (�page 356).
Halogen headlamps
1Low beam/high beam headlamp cover2Bulb socket for turn signal lamp
2Bulb socket for turn signal lamp
3Bulb socket for low beam headlamp
4Bulb socket for high beam headlampLow beam headlamp bulbs
�Turn cover 1 counterclockwise.
�Remove cover 1.
�Turn bulb socket 3 counterclockwise.
�Pull bulb socket 3 out of the head-
lamp housing.
�Pull the low beam bulb out of bulb
socket 3.
�Insert the new low beam bulb into bulb
socket 3.
�Insert bulb socket 3 into the head-
lamp housing.
�Turn bulb socket 3 clockwise until it
engages.
�Place cover 1 on the opening in the
headlamp housing.
�Turn cover 1 clockwise until it
engages.
Page 485 of 569
484 Practical hints
Replacing bulbs
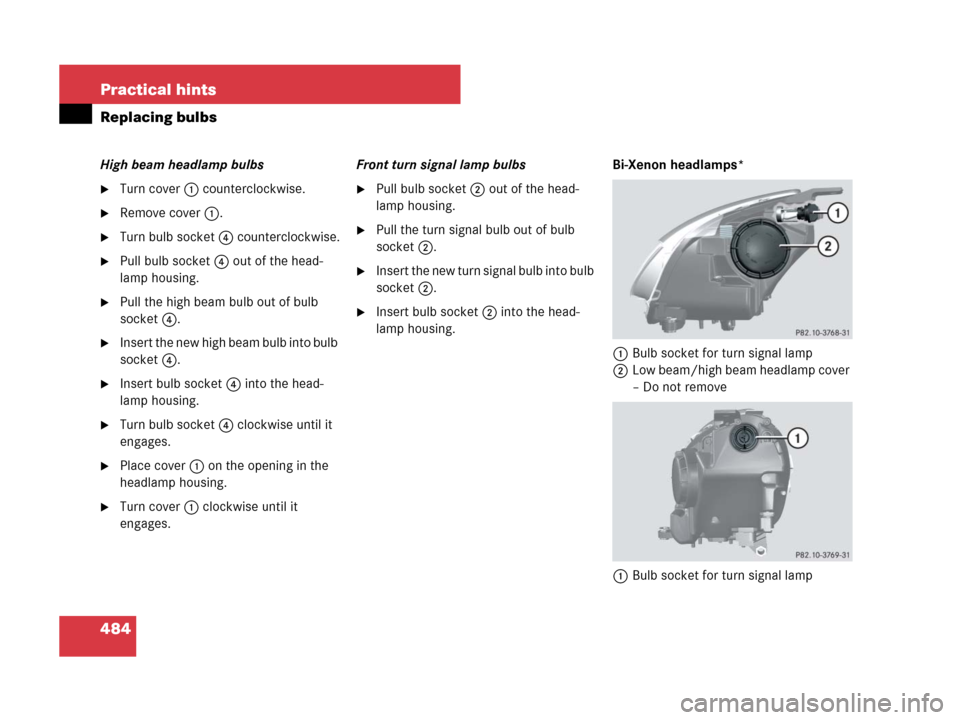
High beam headlamp bulbs
�Turn cover 1 counterclockwise.
�Remove cover 1.
�Turn bulb socket 4 counterclockwise.
�Pull bulb socket 4 out of the head-
lamp housing.
�Pull the high beam bulb out of bulb
socket 4.
�Insert the new high beam bulb into bulb
socket 4.
�Insert bulb socket 4 into the head-
lamp housing.
�Turn bulb socket 4 clockwise until it
engages.
�Place cover 1 on the opening in the
headlamp housing.
�Turn cover 1 clockwise until it
engages.Front turn signal lamp bulbs
�Pull bulb socket 2 out of the head-
lamp housing.
�Pull the turn signal bulb out of bulb
socket 2.
�Insert the new turn signal bulb into bulb
socket 2.
�Insert bulb socket 2 into the head-
lamp housing.Bi-Xenon headlamps*
1Bulb socket for turn signal lamp
2Low beam/high beam headlamp cover
– Do not remove
1Bulb socket for turn signal lamp
Page 486 of 569

485 Practical hints
Replacing bulbs
Low beam and high beam flasher spot
bulbs
Front turn signal lamp bulbs
�Pull bulb socket 1 out of the head-
lamp housing.
�Pull the turn signal bulb out of bulb
socket 1.
�Insert the new turn signal bulb into bulb
socket 1.
�Insert bulb socket 1 into the head-
lamp housing.Parking and standing lamp bulbs
1Bulb socket for parking and standing
lamp
�Turn bulb socket 1 counterclockwise.
�Pull bulb socket 1 out of the housing.
�Pull the bulb out of bulb socket 1.
�Insert the new parking and standing
lamp bulb into bulb socket 1.
�Insert bulb socket 1 into the housing.
�Turn bulb socket 1 clockwise until it
engages.Front fog lamp bulbs
1Front fog lamp
2Cover
3Retaining screws
�Remove retaining screws3.
�Take off cover 2.
Warning!G
Do not remove the low beam/high beam
cover for the Bi-Xenon* headlamp. Because
of high voltage in Bi-Xenon* lamps, it is dan-
gerous to replace the bulb or repair the lamp
and its components. We recommend that
you have such work done by a qualified
technician.
iThe following procedure also applies to
corner-illuminating front fog lamps*.
��
Page 513 of 569
 terminal
2Positive (+) terminal
3Positive terminal cover
�Make sure the two vehicles do")
512 Practical hints
Jump starting
The jump-start contacts are located in the
engine compartment.
1Negative (-) terminal
2Positive (+) terminal
3Positive terminal cover
�Make sure the two vehicles do not
touch.
�Turn off all electrical consumers.
�Apply the parking brake (�page 65).
�Set automatic transmission to
positionP (
�page 192).
�Open the hood (�page 356).
�Remove cover from negative
terminal1.
�Flip up cover 3 of positive terminal 2
in direction of arrow.
1Negative terminal of discharged
battery
2Positive terminal of discharged battery
4Positive terminal of charged battery
5Negative terminal of charged battery
�Connect positive terminals2 and 4
with the jumper cable. Clamp cable to
charged battery 4 first.
�Start engine of the vehicle with the
charged battery and run at idle speed.
�Connect negative terminals1 and 5
of the batteries with the jumper cable.
Clamp cable to charged battery 5
first.
�Start the engine of the disabled vehi-
cle.
You can now turn on the electrical con-
sumers. Do not switch on the headlamps
under any circumstances.
�Remove the jumper cables first from
negative terminals1 and 5 and then
from positive terminals2 and 4.
You can now switch on the headlamps.
�Have the battery checked at the
nearest authorized Mercedes-Benz
Light Truck Center.
Warning!G
Keep flames or sparks away from battery.
Do not smoke.
Observe all safety instructions and precau-
tions when handling automotive batteries.
!Never invert the terminal connections!
Page 539 of 569

538 Technical data
Fuels, coolants, lubricants, etc.
Engine oils
Engine oils are specifically tested for their
suitability in our engines and durability for
our service intervals. Therefore, only use
approved engine oils and oil filters
required for vehicles with Maintenance
System. For a listing of approved engine
oils and oil filters, refer to the Factory
Approved Service Products pamphlet (USA
only), or contact an authorized
Mercedes-Benz Light Truck Center.Engine oil additives
Air conditioning refrigerant
R-134a (HFC) refrigerant and special PAG
lubricating oil are used in the air condition-
ing system.
ModelCapacityFuels, coolants, lubricants, etc.
Air conditioning systemR-134a refrigerant and special PAG lubricant
oil (never R-12)
Windshield washer
system and headlamp
cleaning system*8.0 US qt (7.6 l)MB Windshield Washer Concentrate1
1Use MB Windshield Washer Concentrate “MB SummerFit” and water for temperatures above freezing point or MB Windshield Washer Concentrate “MB SummerFit”
and commercially available premixed windshield washer solvent/antifreeze for temperatures below freezing point. Follow suggested mixing ratios (�page 544).
!Using engine oils and oil filters of
specification other than those expressly
required for the Maintenance System, or chang-
ing of oil and oil filter at change intervals longer
than those called for by the Maintenance System
will result in engine or emission control system
damage not covered by the Mercedes-Benz
Limited Warranty.
Please follow Maintenance System recommen-
dations for scheduled oil changes. Failure to do
so will result in engine or emission control
system damage not covered by the
Mercedes-Benz Limited Warranty.
!Do not blend oil additives with engine oil.
They may damage the engine.
Damage or malfunctions resulting from blending
oil additives are not covered by the
Mercedes-Benz Limited Warranty.
!Never use R-12 (CFC) or mineral-based
lubricating oil. Otherwise damage to the system
will occur.


Bi-Xenon headla")