Page 111 of 561

110 Controls in detail
In the “Controls in detail” section you will
find detailed information on how to oper-
ate the equipment installed in your vehicle.
If you are already familiar with the basic
functions of your vehicle, this section will
be of particular interest to you.
To quickly familiarize yourself with the ba-
sic functions of the vehicle, refer to the
“Getting started” section of this manual.
The corresponding page numbers are
given at the beginning of each segment.
Locking and unlocking
For more information on locking and un-
locking, see the “Getting started” section
(
�page 38) and (�page 68).
SmartKey
Your vehicle comes supplied with two
SmartKeys, each with remote control and a
removable mechanical key.
The SmartKey provides an extended oper-
ating range. To prevent theft, however, it is
advisable to only unlock the vehicle when
you are in close proximity to it.
The SmartKey centrally locks and unlocks:
�the doors
�the tailgate
�the fuel filler flap
SmartKey with remote control
1‹ Lock button
2Š Unlock button* for tailgate
3Locking tab for mechanical key
4ΠUnlock button
5Battery check lamp
6Â Panic button (
�page 97)
Page 114 of 561

113 Controls in detail
Locking and unlocking
Global locking
�Press button‹.
With the tailgate and all doors closed,
the turn signal lamps flash three times.
The locking knobs in the doors move
down. The anti-theft alarm system is
armed.
Restoring to factory setting
�Press and hold buttonsŒ and‹
simultaneously for about 5 seconds
until battery check lamp5
(
�page 110) flashes twice.
SmartKey with KEYLESS-GO*
Vehicles equipped with KEYLESS-GO come
with two SmartKeys with KEYLESS-GO,
each with remote control and a removable
mechanical key.
The KEYLESS-GO function is integrated
into the SmartKey. On these vehicles, the
validity of the SmartKey with KEYLESS-GO
is checked when you grasp an outside door
handle.
If the SmartKey with KEYLESS-GO is valid,
your vehicle unlocks
�the doors
�the tailgate
�the fuel filler flap
SmartKey with KEYLESS-GO*
1‹ Lock button
2Š Unlock button* for tailgate
3Locking tab for mechanical key
4ΠUnlock button
5Battery check lamp
6Â Panic button (
�page 97)
Page 118 of 561
.
With the tailgate and all doors closed,
the turn signal lamps flash three ti")
117 Controls in detail
Locking and unlocking
Global locking
�Press the lock button on an outside
door handle (
�page 69).
With the tailgate and all doors closed,
the turn signal lamps flash three times.
The locking knobs in the doors move
down. The anti-theft alarm system is
armed.
Selective setting
If you frequently travel alone, you may wish
to reprogram the SmartKey with
KEYLESS-GO so when you grasp the
driver’s door handle only the driver’s door
and the fuel filler flap unlocks.
�Press and hold buttonsŒ and‹
simultaneously for about 5 seconds
until battery check lamp5
(
�page 113) flashes twice.
The SmartKey with KEYLESS-GO will
then function as follows:Unlocking driver’s door and fuel filler
flap
�Grasp the driver’s outside door handle.
All turn signal lamps flash once. The
locking knob in the driver’s door moves
up. The anti-theft alarm system is dis-
armed.
Global unlocking
�Grasp any outside door handle other
than the driver’s outside door handle.
All turn signal lamps flash once. The
locking knobs in the doors move up.
The anti-theft alarm system is dis-
armed.Global locking
�Press the lock button on an outside
door handle (
�page 69).
All turn signal lamps flash three times.
The locking knobs in the doors move
down. The anti-theft alarm system is
armed.
Restoring to factory setting
�Press and hold buttonsŒ and‹
simultaneously for about 5 seconds
until battery check lamp5
(
�page 113) flashes twice.
Page 128 of 561
.
For more information on seats, see “Load-
ing” (
�page 266).
Front seat")
127 Controls in detail
Seats
�Seats
For information on seat adjustment, see
the “Getting started” section (
�page 43).
For more information on seats, see “Load-
ing” (
�page 266).
Front seat active head restraintsYou cannot remove the active head
restraints on the driver’s and front
passenger’s seat.
For removal of the active head restraints
we recommend that you contact an
authorized Mercedes-Benz Light Truck
Center.
For information on head restraint adjust-
ment, see “Seats” (
�page 43).
For information on active head restraints,
see “Active head restraint” (
�page 88).
Rear seat head restraints
Warning!G
For your protection, drive only with properly
positioned head restraints.
Adjust the head restraint so that it is close
to the head as possible and the center of the
head restraint supports the back of the head
at eye level. This will reduce the potential for
injury to the head and neck in the event of
an accident or similar situation.
Warning!G
Do not drive the vehicle without the seat
head restraints installed when the rear seats
are occupied. Head restraints are intended
to help reduce injuries during an accident.
With a rear seat occupied, make sure to
move the respective head restraint up from
the lowest non-use position and have the oc-
cupant adjust the head restraint properly.
For your protection, drive only with properly
positioned head restraints.
Adjust the head restraint in such a way that
it is as close to the head as possible and the
center of the head restraint supports the
back of the head at eye level. This will re-
duce the potential for injury to the head and
neck in the event of an accident or similar
situation.
Page 129 of 561
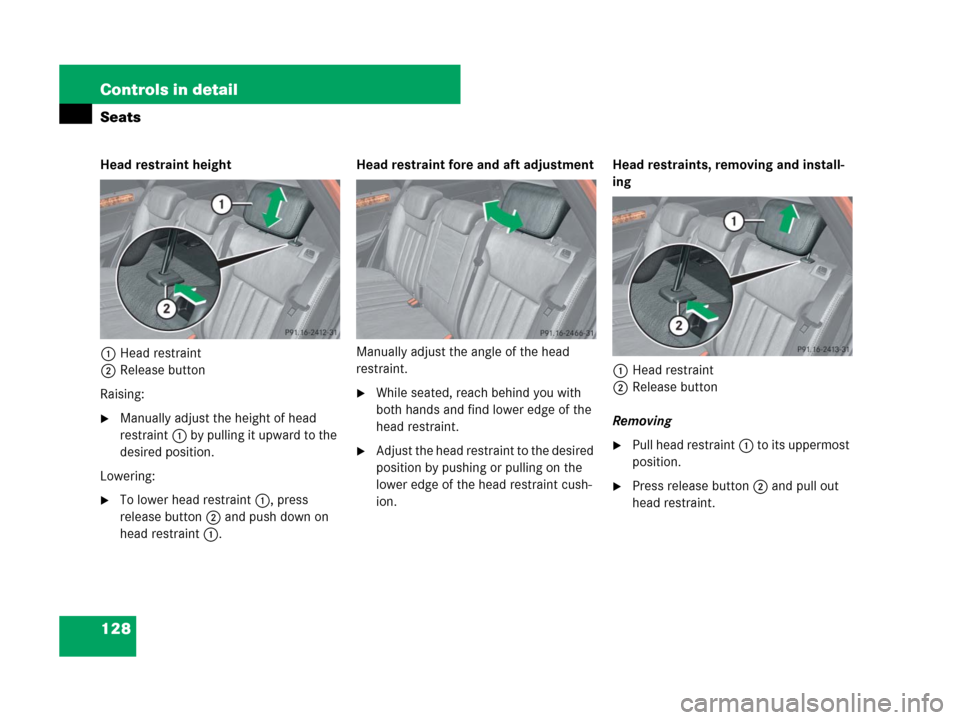
128 Controls in detail
Seats
Head restraint height
1Head restraint
2Release button
Raising:
�Manually adjust the height of head
restraint1 by pulling it upward to the
desired position.
Lowering:
�To lower head restraint1, press
release button2 and push down on
head restraint1.Head restraint fore and aft adjustment
Manually adjust the angle of the head
restraint.
�While seated, reach behind you with
both hands and find lower edge of the
head restraint.
�Adjust the head restraint to the desired
position by pushing or pulling on the
lower edge of the head restraint cush-
ion.Head restraints, removing and install-
ing
1Head restraint
2Release button
Removing�Pull head restraint1 to its uppermost
position.
�Press release button2 and pull out
head restraint.
Page 130 of 561

129 Controls in detail
Seats
Installing
�Insert head restraint1 into openings
on the seat backrest.
�Push head restraint1 down until it au-
dibly engages.
�Press release button2 and adjust
head restraint1 to the desired posi-
tion (
�page 128).
For more information on seats, see the
“Getting started” section (
�page 43).
Lumbar support
The curvature of the driver’s seat can be
adjusted to help enhance lower back sup-
port and seating comfort.
The lever for lumbar support adjustment is
located on the right hand side of the
driver’s seat backrest.
1Adjustment lever
�Move adjustment lever1 in direction
of arrows until you have reached a
comfortable seating position.
Multicontour seat*
The multicontour seat has an extendable
seat cushion and inflatable air chambers
built into the backrest to provide additional
lumbar and side support.
The seat cushion depth, seat backrest
cushion-height and curvature can be con-
tinuously varied with switches on the in-
side of each front seat base after the
ignition is switched on (
�page 39).
1Seat cushion depth
2Backrest side bolsters
3Backrest center
4Backrest bottom
Page 131 of 561
130 Controls in detail
Seats
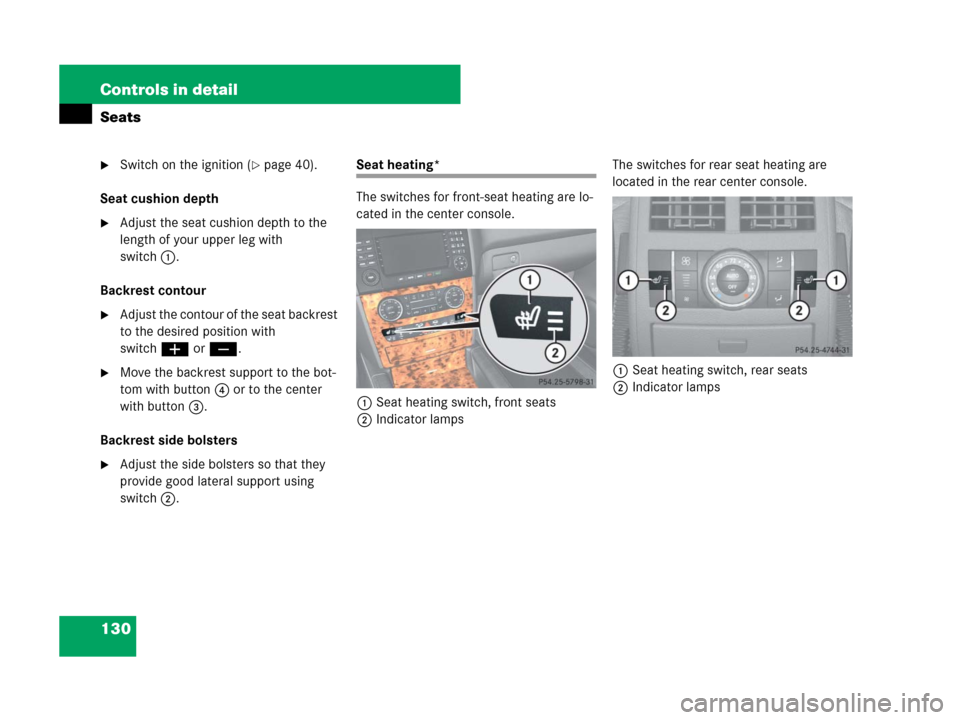
�Switch on the ignition (�page 40).
Seat cushion depth
�Adjust the seat cushion depth to the
length of your upper leg with
switch1.
Backrest contour
�Adjust the contour of the seat backrest
to the desired position with
switchæ orç.
�Move the backrest support to the bot-
tom with button4 or to the center
with button3.
Backrest side bolsters
�Adjust the side bolsters so that they
provide good lateral support using
switch2.
Seat heating*
The switches for front-seat heating are lo-
cated in the center console.
1Seat heating switch, front seats
2Indicator lampsThe switches for rear seat heating are
located in the rear center console.
1Seat heating switch, rear seats
2Indicator lamps
Page 134 of 561

133 Controls in detail
Memory function*
�Memory function*
Prior to operating the vehicle, the driver
should check and adjust the seat height,
seat position fore and aft, and seat back-
rest angle if necessary, to ensure adequate
control, reach and comfort. The head
restraint should also be adjusted for
proper height. See also the section on
air bags (
�page 74) for proper seat posi-
tioning.
In addition, adjust the steering wheel to
ensure adequate control, reach, operation
and comfort. Both the interior and exterior
rear view mirrors should be adjusted for
adequate rear vision.
Fasten seat belts. Infants and small chil-
dren should be seated in a properly se-
cured restraint system that complies with
U.S. Federal Motor Vehicle Safety Stan-
dards 213 and 225 and Canadian Motor
Vehicle Safety Standards 213 and 210.2.With the memory function you can store up
to three different configurations.
Each stored position on the driver’s side
includes the following settings:
�Seat position
�Multicontour seat*: previously saved
setting
�Steering wheel position
�Exterior rear view mirrors’ position
Each stored position on the passenger side
includes the following settings:
�Seat position
�Multicontour seat*: previously saved
settingThe memory button and stored position
buttons are located on the entry side of
each front seat base.
MMemory button
1, 2, 3Stored position buttons
Warning!G
Do not activate the memory function while
driving. Activating the memory function
while driving could cause the driver to lose
control of the vehicle.