Page 257 of 561

256 Controls in detail
Driving systems
The parked vehicle begins adjusting to the
set vehicle level as soon the doors and tail-
gate are
�unlocked
or
�opened or closed with the vehicle
unlocked
In order to operate the vehicle level control
switch (
�page 257), however, the engine
must be running.
For information on off-road driving, see
“Off-road driving” (
�page 319).
Warning!G
Make sure that no one is near the wheel
housing or under the vehicle when you lower
the vehicle while it is standing still. Limbs
could become wedged into or under the ve-
hicle.
For safety reasons, the vehicle can only be
lowered with all doors and the tailgate
closed. Lowering is interrupted if a door or
the tailgate is opened and will continue after
the door is closed again.
Warning!G
Please be aware that by raising the vehicle
level, the center of gravity also rises. There-
fore, always ensure that the vehicle level is
as low as possible. With higher ride height
the ESP
® may activate earlier in certain
situations.
Adapt your speed and driving to possible
changed driving behavior of the vehicle after
changing the vehicle level. The ESP
® cannot
prevent accidents, including those resulting
from excessive speed. The ESP
® cannot pre-
vent the natural laws of physics from acting
on the vehicle.
!Keep in mind that in rough or uneven ter-
rain, adjusting the vehicle to a lower level may
cause the vehicle underbody to come in contact
with the ground and result in damage to the vehi-
cle underbody. Always make sure the vehicle has
sufficient ground clearance before adjusting it to
a lower level.
!Before jacking up the vehicle with equip-
ment that lifts one or more of the wheels com-
pletely off of the ground, remove the SmartKey
from the starter switch.
!Please also note the information in the
section on towing (
�page 499).
Page 258 of 561

257 Controls in detail
Driving systems
Setting the vehicle level
The switch is located on the upper part of
the center console.
1Vehicle level switch
2Indicator lampBasic settings (all models, except
ML 63 AMG)
The following vehicle chassis ride heights
can be selected using the vehicle level
switch in the center console:The following is the approximate change in
ride height for each of the level settings:
LevelDriving situation
RaisedFor off-road driving or driv-
ing in rough terrain. The in-
dicator lamp is on.
HighwayFor driving on paved roads
in fair or better condition.
The indicator lamp is off.
iThe third available level is the high-speed
level that is set automatically.
LevelRide height
Raised+ 3.1 in (80 mm)
Highway+/- 0 in (0 mm)
High-speed- 0.6 in (-15 mm)
iVehicles with ADS*:
Depending on the ADS setting (
�page 255), the
vehicle will be lowered to the high-speed level
when traveling at higher speeds. At speeds be-
low 40 mph (64 km/h) at the latest, it will be re-
turned to the highway level.
iThe high-speed level is not available if tow-
ing a trailer. For more information on towing a
trailer, see “Trailer towing” (
�page 328).
Page 259 of 561

258 Controls in detail
Driving systems
Basic settings (ML 63 AMG only)
The following vehicle chassis ride heights
can be selected using the vehicle level
switch in the center console:
How much the vehicle is lowered or raised
depends on the ADS setting selected. At
the raised level, the vehicle is 2.9 in
(73 mm) higher than at the Highway level
with ADS AUTO.Raised level
Only select the raised level if appropriate
for the driving situation encountered.
Otherwise:
�Fuel consumption may increase.
�Handling characteristics of the vehicle
may be unfavorable.
�Start the engine (�page 40).
If indicator lamp2 (
�page 257) is off.
�Press switch1 (�page 257).
Indicator lamp2 flashes. The vehicle
adjusts to the raised level.The following message appears in the mul-
tifunction display while the level is being
set:
When the raised level is reached, indicator
lamp2 (
�page 257) comes on continu-
ously and the following message appears
in the multifunction display for 5 seconds:
LevelDriving situation
RaisedFor off-road driving or driv-
ing in rough terrain. The in-
dicator lamp is on.
HighwayFor driving on paved roads
in fair or better condition.
The indicator lamp is off.
iThe third available level is the high-speed
level that is set automatically.
iYou can select the raised level at speeds up
to 40 mph (64 km/h). At higher speeds, the
messagen
Level Selection Not
Permitted
appears in the multifunction dis-
play.
iThe message can be cleared by pressing
theèÿk or buttonj on the
multifunction steering wheel.
Page 262 of 561

261 Controls in detail
Driving systems
Range of the sensors
To function properly, the sensors must be
free of dirt, ice, snow and slush. Clean the
sensors regularly, being careful not to
scratch or damaging the sensors, see
“Cleaning the Parktronic* system sensors”
(
�page 394).Front sensors
Rear sensors
Minimum distance
If the system detects an obstacle in this
range, all the distance warning segments
illuminate and you hear a warning signal. If
the obstacle is closer than the minimum
distance, the actual distance may no
longer be indicated by the system.
!During parking maneuvers, pay special
attention to objects located above or below the
height of the sensors (e.g. planters or trailer
hitches). The Parktronic system will not detect
such objects at close range and damage to your
vehicle or the object may result.
Ultrasonic signals from outside sources (e.g.
working jackhammers, car wash or the air brakes
of trucks) may impair the operation of the
Parktronic system.
Centerapprox. 40 in (100 cm)
Cornersapprox. 24 in (60 cm)
Centerapprox. 48 in (120 cm)
Cornersapprox. 32 in (80 cm)
Centerapprox. 8in (20cm)
Cornersapprox. 6in (15cm)
Page 285 of 561

284 Controls in detail
Useful features
Cup holders
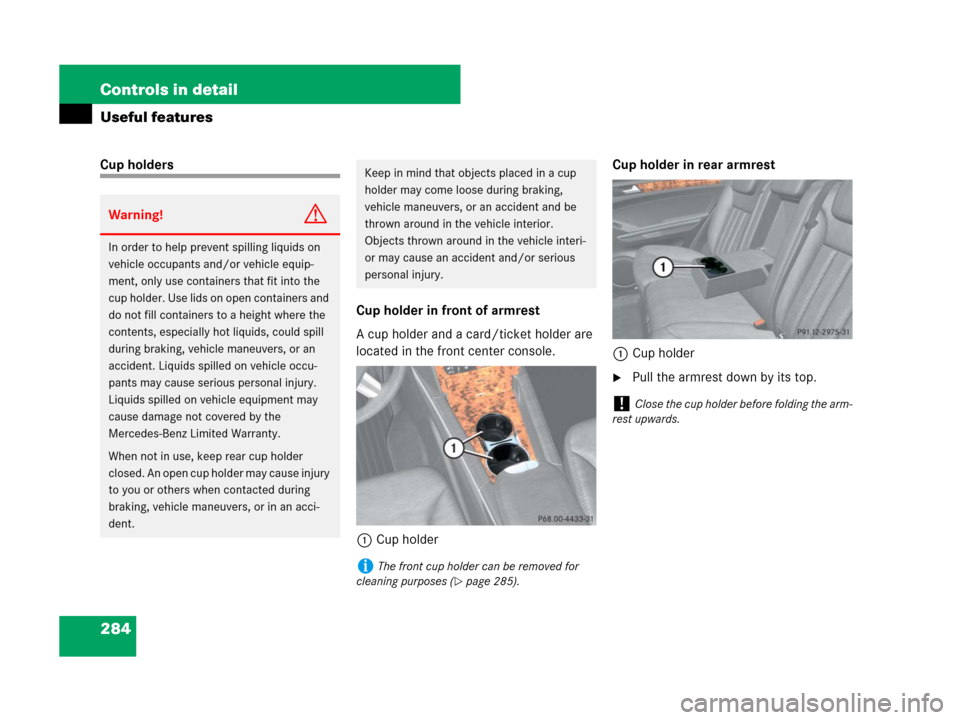
Cup holder in front of armrest
A cup holder and a card/ticket holder are
located in the front center console.
1Cup holderCup holder in rear armrest
1Cup holder
�Pull the armrest down by its top.
Warning!G
In order to help prevent spilling liquids on
vehicle occupants and/or vehicle equip-
ment, only use containers that fit into the
cup holder. Use lids on open containers and
do not fill containers to a height where the
contents, especially hot liquids, could spill
during braking, vehicle maneuvers, or an
accident. Liquids spilled on vehicle occu-
pants may cause serious personal injury.
Liquids spilled on vehicle equipment may
cause damage not covered by the
Mercedes-Benz Limited Warranty.
When not in use, keep rear cup holder
closed. An open cup holder may cause injury
to you or others when contacted during
braking, vehicle maneuvers, or in an acci-
dent.
Keep in mind that objects placed in a cup
holder may come loose during braking,
vehicle maneuvers, or an accident and be
thrown around in the vehicle interior.
Objects thrown around in the vehicle interi-
or may cause an accident and/or serious
personal injury.
iThe front cup holder can be removed for
cleaning purposes (
�page 285).
!Close the cup holder before folding the arm-
rest upwards.
Page 321 of 561

320 Operation
Driving instructions
Read this chapter carefully before you be-
gin off-road travel.
Familiarize yourself with the vehicle char-
acteristics and gear changing before you
attempt any difficult terrain off-road driv-
ing. We recommend that you start out with
easy off-road travel.Special driving features for off-road
driving
The following driving features are available
for specific kind of operation:
�Off-road – ABS (�page 99)
�Off-road – ESP® (�page 103)
�Off-road – 4-ETS (�page 105)
�Hill start assist system (�page 191)
�Downhill Speed Regulation (DSR)
(
�page 249)
�Off-road driving program (�page 253)
�Air suspension* (�page 254)
Never let the vehicle roll backwards in idle.
You may lose control of the vehicle if you
use only the service brake. For information
on driving downhill, see “Driving downhill”
(
�page 324).
Warning!G
Sand, dirt, mud and other material having
friction property can cause exceptional wear
and tear as well as brake failure.
Have the brakes checked for dirt build-up
and cleaned. There is otherwise a risk that
full braking power may not be available in an
emergency.
Warning!G
Vehicles with air suspension program*:
Please be aware that by raising the vehicle
level, the center of gravity also rises. There-
fore, always ensure that the vehicle level is
as low as possible. With higher ride height
the ESP
® may activate earlier in certain
situations.
��
Page 343 of 561
342 Operation
Engine compartment
The hood lock release lever is located in
the driver’s footwell.
1Release lever
�Pull release lever1 downwards.
The hood is unlocked. Handle2 pro-
trudes slightly from the radiator grille.
If not, lift the hood slightly.2Handle for opening the hood
�Press and hold handle2.
The hood is unlocked.
�Pull up on the hood in direction of ar-
row and then release it.
The hood will be automatically held
open at shoulder height by gas-filled
struts.
Warning!G
Vehicles with diesel engine:
The engine is equipped with a high-voltage
electronic control unit for the injection
system. Because of the high voltage it is
dangerous to touch any components of the
injection system (injectors, electrical wires)
�with the engine running
�while starting the engine
�when the ignition is switched on
!To avoid damage to the windshield wipers or
hood, never open the hood if the wiper arms are
folded forward away from the windshield.
Page 344 of 561

343 Operation
Engine compartment
Closing
�Let the hood drop from a height of
approximately 1 ft (30 cm).
The hood will lock audibly.
�Check to make sure the hood is fully
closed.
If you can raise the hood at a point
above the headlamps, then it is not
properly closed. Open it again and let it
drop with somewhat greater force.
Engine oil
The amount of oil your engine needs will
depend on a number of factors, including
driving style. Increased oil consumption
can occur when
�the vehicle is new
�the vehicle is driven frequently at
higher engine speeds
Engine oil consumption checks should only
be made after the vehicle break-in period.Checking engine oil level
When checking the oil level
�the vehicle must be parked on level
ground
�the vehicle must have been stationary
for at least 5 minutes with the engine
turned off
Example illustration ML 350 (ML 320 CDI,
ML 550, ML 63 AMG similar)
1Oil dipstick
2Upper mark
3Lower mark
Warning!G
When closing the hood, use extreme caution
not to catch hands or fingers. Be careful that
you do not close the hood on anyone.
Make sure that the hood is securely en-
gaged before driving off. Do not continue
driving if the hood can no longer engage af-
ter an accident, for example. The hood could
otherwise come loose while the vehicle is in
motion and injure you and/or others.
!Do not use any special lubricant additives,
as these may damage the drive assemblies.
Using special additives not approved by
Mercedes-Benz may cause damage not covered
by the Mercedes-Benz Limited Warranty.
More information on this subject is available at
any Mercedes-Benz Light Truck Center.
��