Page 129 of 561
128 Controls in detail
Seats
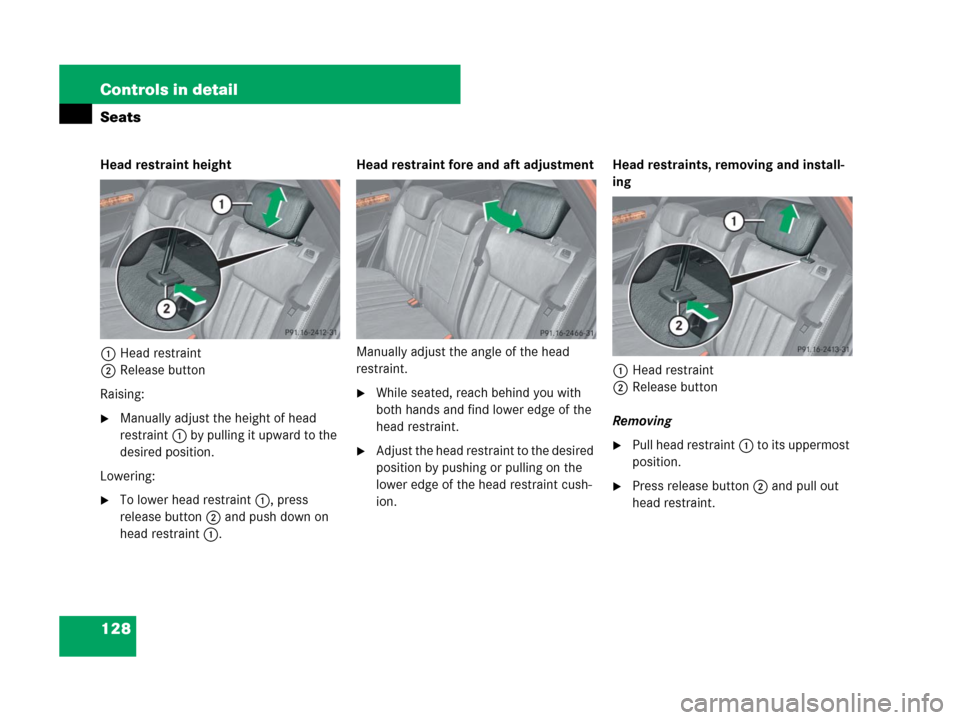
Head restraint height
1Head restraint
2Release button
Raising:
�Manually adjust the height of head
restraint1 by pulling it upward to the
desired position.
Lowering:
�To lower head restraint1, press
release button2 and push down on
head restraint1.Head restraint fore and aft adjustment
Manually adjust the angle of the head
restraint.
�While seated, reach behind you with
both hands and find lower edge of the
head restraint.
�Adjust the head restraint to the desired
position by pushing or pulling on the
lower edge of the head restraint cush-
ion.Head restraints, removing and install-
ing
1Head restraint
2Release button
Removing�Pull head restraint1 to its uppermost
position.
�Press release button2 and pull out
head restraint.
Page 130 of 561

129 Controls in detail
Seats
Installing
�Insert head restraint1 into openings
on the seat backrest.
�Push head restraint1 down until it au-
dibly engages.
�Press release button2 and adjust
head restraint1 to the desired posi-
tion (
�page 128).
For more information on seats, see the
“Getting started” section (
�page 43).
Lumbar support
The curvature of the driver’s seat can be
adjusted to help enhance lower back sup-
port and seating comfort.
The lever for lumbar support adjustment is
located on the right hand side of the
driver’s seat backrest.
1Adjustment lever
�Move adjustment lever1 in direction
of arrows until you have reached a
comfortable seating position.
Multicontour seat*
The multicontour seat has an extendable
seat cushion and inflatable air chambers
built into the backrest to provide additional
lumbar and side support.
The seat cushion depth, seat backrest
cushion-height and curvature can be con-
tinuously varied with switches on the in-
side of each front seat base after the
ignition is switched on (
�page 39).
1Seat cushion depth
2Backrest side bolsters
3Backrest center
4Backrest bottom
Page 134 of 561

133 Controls in detail
Memory function*
�Memory function*
Prior to operating the vehicle, the driver
should check and adjust the seat height,
seat position fore and aft, and seat back-
rest angle if necessary, to ensure adequate
control, reach and comfort. The head
restraint should also be adjusted for
proper height. See also the section on
air bags (
�page 74) for proper seat posi-
tioning.
In addition, adjust the steering wheel to
ensure adequate control, reach, operation
and comfort. Both the interior and exterior
rear view mirrors should be adjusted for
adequate rear vision.
Fasten seat belts. Infants and small chil-
dren should be seated in a properly se-
cured restraint system that complies with
U.S. Federal Motor Vehicle Safety Stan-
dards 213 and 225 and Canadian Motor
Vehicle Safety Standards 213 and 210.2.With the memory function you can store up
to three different configurations.
Each stored position on the driver’s side
includes the following settings:
�Seat position
�Multicontour seat*: previously saved
setting
�Steering wheel position
�Exterior rear view mirrors’ position
Each stored position on the passenger side
includes the following settings:
�Seat position
�Multicontour seat*: previously saved
settingThe memory button and stored position
buttons are located on the entry side of
each front seat base.
MMemory button
1, 2, 3Stored position buttons
Warning!G
Do not activate the memory function while
driving. Activating the memory function
while driving could cause the driver to lose
control of the vehicle.
Page 167 of 561
166 Controls in detail
Control system
The table below shows what settings can
be changed within the various menus.
Detailed instructions on making individual
settings can be found on the following
pages.
Instrument clusterTime/DateLightingVehicleComfort*
(�page 167)(�page 169)(�page 170)(�page 173)(�page 176)
Selecting speedometer
display modeSetting the timeSetting daytime running
lamp mode (USA only)Compass adjustmentActivating
easy-entry/exit
feature*
Selecting languageSetting the dateSetting locator lightingCompass calibrationSetting fold-in func-
tion* for exterior rear
view mirrors
Selecting display (digital
speedometer or outside
temperature) for status in-
dicatorSetting night security
illuminationAudio search function
Setting interior lighting
delayed shut-offSetting automatic cen-
tral locking
Limiting opening
height of tailgate*
Page 174 of 561
173 Controls in detail
Control system
Vehicle submenu
Access the
Vehicle submenu via the
Settings menu. Use the Vehicle submenu
to make general vehicle settings.
The following functions are available:Compass adjustment
This function is not available if your vehicle
is equipped with the COMAND system and
navigation module*.
Determine your location on the basis of the
following zone maps.
Zone map North AmericaZone map South America
�Press buttonæ orç to move
the selection marker to the
Vehicle
submenu.
FunctionPage
Compass adjustment173
Compass calibration174
Audio search function175
Setting automatic central
locking175
Limiting opening height of
tailgate*176
��
Page 177 of 561

176 Controls in detail
Control system
Limiting opening height of tailgate*
Use this function to activate or deactivate
the limiting opening height of the tailgate.
�Move the selection marker with
buttonæ orç to the
Vehicle
submenu.
�Press buttonj ork repeatedly
until the message
Opening Limiter
Tailgate
appears in the multifunction
display.
The selection marker is on the current
setting.
�Press buttonæ orç to switch
the limiting opening height of the
tailgate
On or Off.Comfort submenu*
Access the
Comfort submenu via the
Settings menu. Use the Comfort submenu
to change the settings for a number of con-
venience features.
The following functions are available:Activating easy-entry/exit feature*
Use this function to activate and
deactivate the easy-entry/exit feature
(
�page 46).
FunctionPage
Activating easy-entry/exit
feature*176
Setting fold-in function* for
exterior rear view mirrors177
Warning!G
You must make sure no one can become
trapped or injured by the moving steering
wheel when the easy-entry/exit feature is
activated.
To stop steering wheel movement, do one of
the following:
�Move steering wheel adjustment stalk*
(
�page 48).
�Press one of the stored position
buttons* or the memory buttonM*
(
�page 133).
Do not leave children unattended in the ve-
hicle, or with access to an unlocked vehicle.
Children could open the driver’s door and
unintentionally activate the easy-entry/exit
feature, which could result in an accident
and/or serious personal injury.
Page 255 of 561
.
Indicator lamp2 comes on. The
symboly appears in the lower
multifunction display.
Switching O")
254 Controls in detail
Driving systems
Switching Off-road driving program on
�Press switch1 (�page 253).
Indicator lamp2 comes on. The
symboly appears in the lower
multifunction display.
Switching Off-road driving program off
�Press switch1 again.
Indicator lamp2 goes out. The
symboly disappears.
Air suspension program*
The system consists of two components.
The vehicle level control* regulates the
ride height of the vehicle. The Adaptive
Damping System (ADS)* optimizes your
vehicle’s suspension tuning.
�Suspension tuning: Adaptive Damping
System (ADS)* (
�page 255)
�Vehicle level control* (�page 255)
ML 63 AMG
iThe Air suspension program is part of the
standard equipment range. Due to the vehicle’s
sportier suspension tuning, in comparison with
standard vehicles, the level positions in the ADS
settings as well as the speed thresholds for rais-
ing and lowering the vehicle have been modified.
iFrom the Highway/High-speed level, the
vehicle is lowered to the ADS Sport level approx-
imately 20 seconds after it is locked.
From the raised level, the vehicle is not lowered
after it is locked.
When the engine is started, the previously se-
lected setting, e.g. ADS COMF, is selected again.
!Be sure to observe this vehicle’s differing
values for ground clearance and vehicle height in
comparison to standard vehicles. You could oth-
erwise damage the vehicle. The values for
�opening the tailgate (�page 119)
�driving off-road (�page 319)
�the vehicle’s main dimensions can be found
in the “Technical data” section (
�page 520)
Page 256 of 561
*
The fine tuning of the damping and suspen-
sion is dependent on:
�your driving style
�road surface conditions
�your personal ADS s")
255 Controls in detail
Driving systems
Adaptive Damping System (ADS)*
The fine tuning of the damping and suspen-
sion is dependent on:
�your driving style
�road surface conditions
�your personal ADS settings
�your personal vehicle level settings
The ADS switch is located on the upper
part of the center console.
1ADS switch
2Indicator lamp for SPORT setting
3Indicator lamp for COMF settingThe following settings are available:
�AUTO (for normal driving situations)
Indicator lamps2 and3 are off.
�SPORT (for sporty driving)
Indicator lamp2 comes on.
With the ADS SPORT setting, the vehi-
cle is lowered approximately 0.6 in
(15 mm).
ML 63 AMG:
The vehicle is lowered approximately
0.3 in (8 mm).
�COMF (for comfort driving)
Indicator lamp3 comes on.
ML 63 AMG:
The vehicle is raised approximately
0.28 in (7 mm).
�Start the engine (�page 39).
�Press ADS switch1 repeatedly until
the desired suspension tuning is
reached.
Vehicle level control*
The vehicle level control automatically
regulates the ride height to
�reduce fuel consumption
�improve driving stability by lowering
the center of gravity
The vehicle automatically regulates its ride
height based on the set vehicle height and
the current speed:
�As your driving speed increases, the ve-
hicle is lowered by increments until it
reaches high-speed level.
Vehicles with ADS*:
�If you are driving with the ADS set-
ting COMF or AUTO, the vehicle is
raised back to highway level as your
driving speed decreases.
�You can select the high-speed level
via the ADS setting SPORT. In ADS
Sport, the vehicle is lowered direct-
ly to high-speed level as your driv-
ing speed increases.
iThe setting is stored when you turn off the
engine.