Page 354 of 457
353
Practical hints
What to do if …
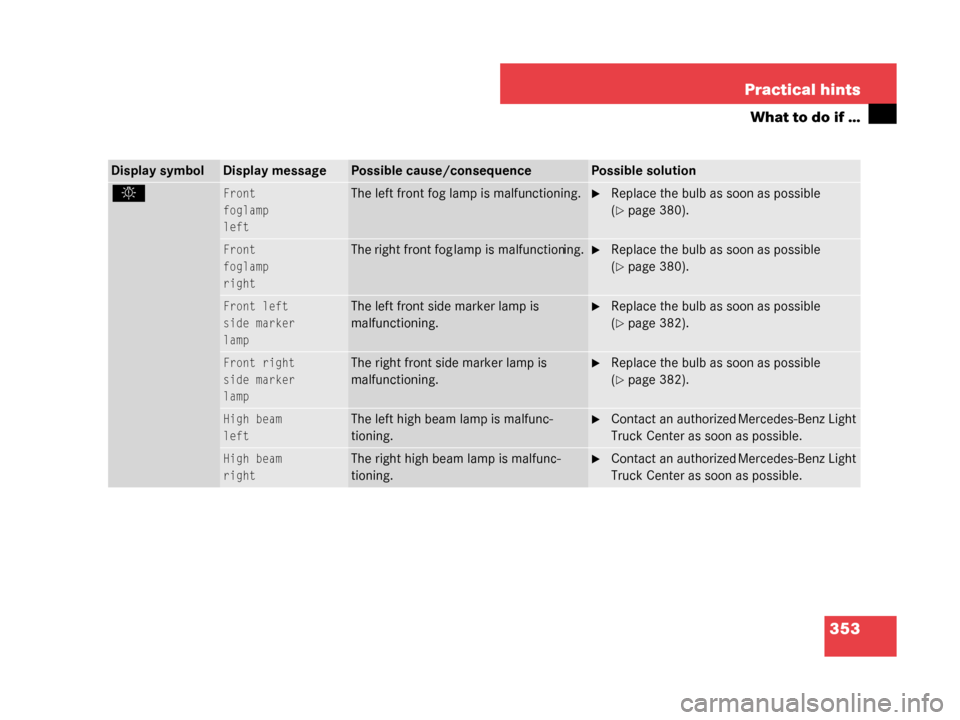
Display symbolDisplay messagePossible cause/consequencePossible solution
.Front
foglamp
leftThe left front fog lamp is malfunctioning.�Replace the bulb as soon as possible
(
�page 380).
Front
foglamp
rightThe right front fog lamp is malfunctioning.�Replace the bulb as soon as possible
(
�page 380).
Front left
side marker
lampThe left front side marker lamp is
malfunctioning.�Replace the bulb as soon as possible
(
�page 382).
Front right
side marker
lampThe right front side marker lamp is
malfunctioning.�Replace the bulb as soon as possible
(
�page 382).
High beam
leftThe left high beam lamp is malfunc-
tioning.�Contact an authorized
Mercedes-Benz Light
Truck Center as soon as possible.
High beam
rightThe right high beam lamp is malfunc-
tioning.�Contact an authorized Mercedes-Benz Light
Truck Center as soon as possible.
W463.boo Seite 353 Montag, 19 . November 2007 8:41 08
Page 356 of 457

355
Practical hints
What to do if …
Display symbolDisplay messagePossible cause/consequencePossible solution
.Rear
fog lampThe rear fog lamp is malfunctioning. �Replace the bulb as soon as possible
(
�page 384).
Rear
fog lamp
Auxiliary bulb
onA lamp is malfunctioning. A substitute
bulb has been brought into use.�Switch off the rear fog lamp (�page 121).
Reverse
lamp
right
The right backup lamp is malfunction-
ing.�Replace the bulb as soon as possible
(
�page 384).
Switch off
lightsYou have removed the SmartKey from
the starter switch, opened the driver’s
door and left the headlamps on.�Switch off the headlamps using the exterior lamp
switch (
�page 117).
Tail lamp
left
Auxiliary bulb
onThe left tail lamp is malfunctioning.
A substitute bulb has been brought into
use.�Replace the bulb as soon as possible
(
�page 383).
Tail lamp
right
Auxiliary bulb
onThe right tail lamp is malfunctioning.
A substitute bulb has been brought into
use.�Replace the bulb as soon as possible
(
�page 383).
W463.boo Seite 355 Montag, 19
. November 2007 8:41 08
Page 376 of 457
375
Practical hints
Replacing bulbs
� Replacing bulbs
Bulbs
Safe vehicle operation depends on proper
exterior lighting and signaling. It is there-
fore essential that all bulbs and lamp
assemblies are in good working order at all
times.
Correct headlamp adju stment is extremely
important. Have headlamps checked and
readjusted at regular intervals and when a
bulb has been replaced. See an authorized
Mercedes-Benz Light Truck Center for
headlamp adjustment.iIf the headlamps or front fog lamps are
fogged up on the inside as a result of high
humidity, driving the vehicle a distance with the
lights on should clear up the fogging.iSubstitute bulbs will be brought into use
when the following lamps malfunction:
�Turn signal lamps
�Tail lamps
�Parking lamps
�Rear fog lamp
Read and observe the messages in the
multifunction display (
�page 352).
W463.boo Seite 375 Montag, 19 . November 2007 8:41 08
Page 377 of 457
376 Practical hints
Replacing bulbs
Front lampsRear lamps
LampType
1Additional turn signal
lampLED
2Locator lighting lampW6W
3Turn signal lamp1156 NA
4Side marker lampT4W
5Bi-Xenon headlamp:
Low and high beam1
1Bi-Xenon headlamp: Low beam and high beam use
the same D1S-35 W lamp. Do not replace the
Bi-Xenon bulbs yourself. Contact an authorized
Mercedes-Benz Light Truck Center.
D1S-35 W
Parking and standing
lampW5W
Blue vision
6Front fog lampH11 (55 W)
LampType
7High mounted brake
lampLED
8Turn signal lampPY 21 W
Brake and tail lampP21/5W
Tail, parking and
standing lampW5W
9Backup lampP21W
aLicense plate lampsC5W
bRear fog lampP21W
cSide marker lampT4W
W463.boo Seite 376 Montag, 19 . November 2007 8:41 08
Page 381 of 457
380 Practical hints
Replacing bulbs
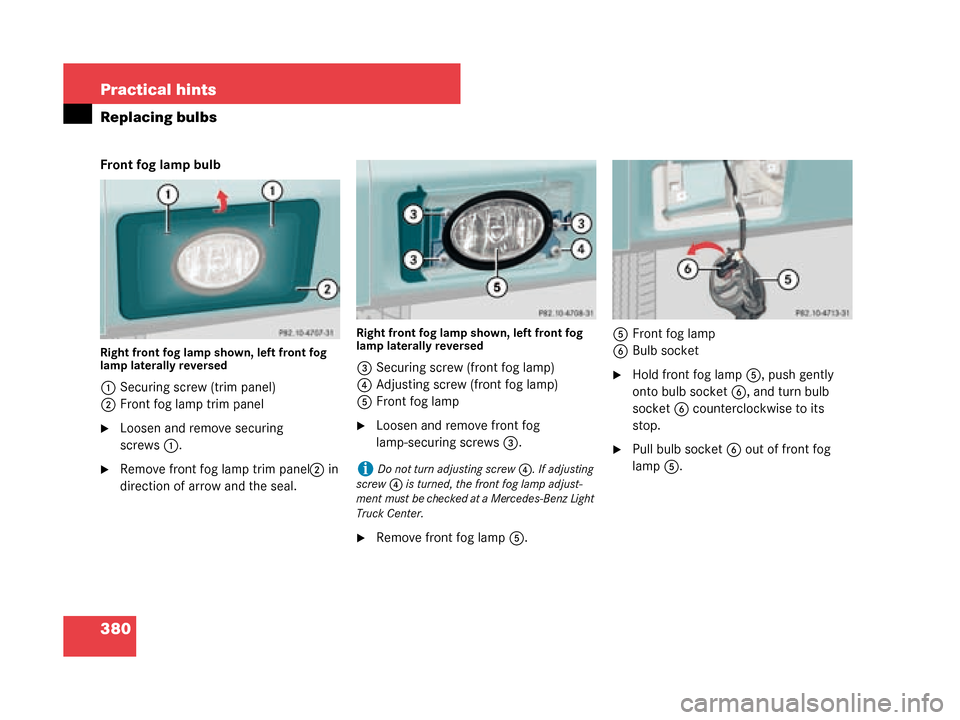
Front fog lamp bulb
Right front fog lamp shown, left front fog
lamp laterally reversed
1Securing screw (trim panel)
2 Front fog lamp trim panel
�Loosen and remove securing
screws 1.
�Remove front fog lamp trim panel 2 in
direction of arrow and the seal.
Right front fog lamp shown, left front fog
lamp laterally reversed
3 Securing screw (front fog lamp)
4 Adjusting screw (front fog lamp)
5 Front fog lamp
�Loosen and remove front fog
lamp-securing screws 3.
�Remove front fog lamp 5. 5
Front fog lamp
6 Bulb socket
�Hold front fog lamp 5, push gently
onto bulb socket 6, and turn bulb
socket 6 counterclockwise to its
stop.
�Pull bulb socket 6 out of front fog
lamp 5.
iDo not turn adjusting screw 4. If adjusting
screw 4 is turned, the front fog lamp adjust-
ment must be checked at a Mercedes-Benz Light
Truck Center.
W463.boo Seite 380 Montag, 19 . November 2007 8:41 08
Page 432 of 457
 374
Batteries, SmartKey Check lamp 103
Checking 103
Battery box Fuse box in 406
Battery discharged Jump starting 397
Battery, vehicle 394 Charging 396
Disconne")
431
Index
Batteries
SmartKey (replacing) 374
Batteries, SmartKey Check lamp 103
Checking 103
Battery box Fuse box in 406
Battery discharged Jump starting 397
Battery, vehicle 394 Charging 396
Disconnecting 396
Messages in display 342–343
Reconnecting 396
Reinstalling 396
Removing 396
Bead 304
Block heater (Canada only) 310
Blocking rear door window operation 85
B-pillar 410
Brake fluid 266, 423 Message in display 344
Brake lamp bulbs, left and right 376
Brake lamp, high mounted 376
Brake lamps Messages in display 352 Brake pads
Message in display 345
Brakes 246 Warning lamp 326–327
Break-in period 244
Brush guard 373 Lowering 373
Raising and securing 373
Bulbs, replacing Additional turn signals 376
Backup lamps 376, 384
Brake lamps 376, 384
Front fog lamps 376, 380
Front lamps 376
Front turn signal lamps 376, 381
High beam lamps 376
High mounted brake lamp 376
License plate lamps 376, 385
Locator lighting lamps 376
Low beam lamps 376
Parking lamps 376, 378 Rear fog lamp 376, 384
Rear lamps 376
Rear turn signal lamps 376
Side marker lamps 376, 382
Standing lamps 376, 378
Tail lamp assemblies 376
Tail lamp unit 383
C
Call priority, Tele Aid 235
Calling up Maintenance service indicator display 313
Range (distance to empty) 158
Capacities Fuels, coolants, lubricants, etc. 420
Cargo area see Cargo compartment
Cargo compartment Expanding 206
Tailgate 105
Tie-down rings 209
Cargo compartment cover blind 214 Installing 214
Removing 214
Rolling out 214
Rolling up 214
Cargo compartment lamps 127
W463.boo Seite 431 Montag, 19 . November 2007 8:41 08
Page 440 of 457

439
Index
Lamps in instrument cluster 324
Lamps, exterior
Front 376
Messages in display 352–357
Rear 376
Replacing bulbs for front 378
Replacing bulbs for rear 383
Lamps, indicator and warning ABS 324–325, 327
Battery (SmartKey) 102
Brakes 326–327
check engine 328–329
Engine diagnostics 328–329
ESP
®330–331
Fuel reserve 331
Instrument cluster 324–332
SRS 69, 332
Turn signals 27
Language Setting 149
LATCH child seat anchors 82
Layout of poly-V-belt drive 412
Leather upholstery Cleaning 322 License plate lamps
Messages in display 354
Replacing bulbs 376, 385
Lifting Vehicle 389
Light alloy wheels Cleaning 320
Technical data 415, 416
Light sensor Message in display 352
Lighter see Cigarette lighter
Lighting 117 Automatic headlamp mode 118
Combination switch 122
Daytime running lamp mode 119
Exterior lamp switch 117
Front fog lamps 121
High beam flasher 122
High beams 122
Instrument cluster illumination 130
Interior, front 125
Interior, rear 126
Locator lighting 120
Low beams 117
Manual headlamp mode 118
Night security illumination 120 Parking lamps 117
Rear fog lamp 121
Settings (control system) 151
Limiting gear range 168
Limp Home Mode 169
Loading 206 Cargo compartment cover blind 214
Cargo tie-down rings 209
Instructions 208
Partition net* 210
Roof rack 206
Loading terminology 304
Loading the vehicle 280
Locator lighting 120 Setting 152
Locator lighting lamps Replacing bulbs 376
Locking 62, 100 Fuel filler flap 264
Global, SmartKey 102
Vehicle in an emergency 369
Loss of keys 103
Loss of Service and Warranty Information Booklet 409
W463.boo Seite 439 Montag, 19 . November 2007 8:41 08