Page 379 of 457
378 Practical hints
Replacing bulbs
Replacing bulbs for front lamps
Before you start to replace a bulb for a
front lamp, do the following first:
�Turn the exterior lamp switch to
position M (
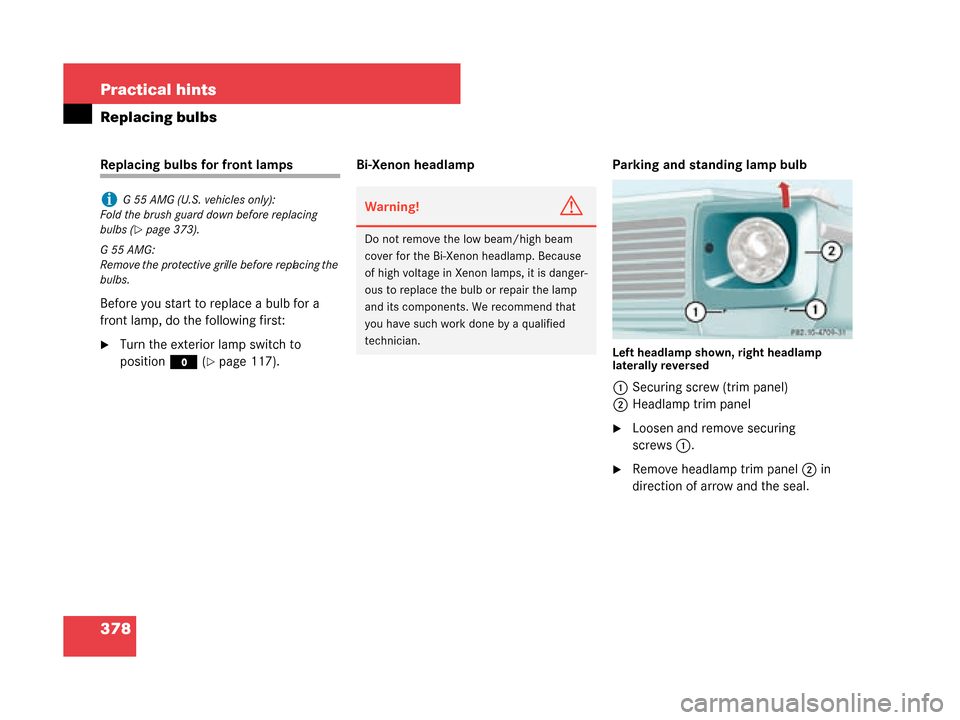
�page 117). Bi-Xenon headlamp
Parking and standing lamp bulbLeft headlamp shown, right headlamp
laterally reversed
1Securing screw (trim panel)
2 Headlamp trim panel
�Loosen and remove securing
screws 1.
�Remove headlamp trim panel 2 in
direction of arrow and the seal.
iG 55 AMG (U.S. vehicles only):
Fold the brush guard down before replacing
bulbs (
�page 373).
G55AMG:
Remove the protective grille before replacing the
bulbs.
Warning!G
Do not remove the low beam/high beam
cover for the Bi-Xenon headlamp. Because
of high voltage in Xeno n lamps, it is danger-
ous to replace the bulb or repair the lamp
and its components. We recommend that
you have such work done by a qualified
technician.
W463.boo Seite 378 Montag, 19 . November 2007 8:41 08
Page 387 of 457

386 Practical hints
Replacing wiper blades
Wiper blades
�Remove the SmartKey from the starter
switch.Removing
�Fold the wiper arms forward until they
engage.
1 Safety tab
2 Wiper blade
3 Wiper arm
4 Attachment link
Warning!G
For safety reasons, switch off wipers and
remove SmartKey from starter switch
before replacing a wipe r blade. Otherwise,
the wiper motor could suddenly turn on and
cause injury.
Warning!G
Wiper blades are components that are
subject to wear and tear. Replace the wiper
blades twice a year, preferably in the spring
and fall. Otherwise the windows will not be
properly wiped. As a result, you may not be
able to observe surrounding traffic condi-
tions and could cause an accident.
!Never open the hood when the wiper arm is
folded forward.
Hold on to the wiper when folding the wiper arm
back. If released, the force of the impact from
the tensioning spring could crack the windshield.
Do not allow the wiper arms to contact the wind-
shield glass without a wiper blade inserted.
For your convenience, you should have this work
carried out at an authorized Mercedes-Benz
Light Truck Center.!Do not pull on the wiper blade inserts. They
could tear.
W463.boo Seite 386 Montag, 19 . November 2007 8:41 08
Page 389 of 457

388 Practical hints
Flat tire
When you replace the vehicle’s tires, you
can use the spare wheel as a regular wheel
if:
�it is not more than 6 years old
�rim and tire are the same model as the
regular wheels
Preparing the vehicle
�Park the vehicle in a safe distance from
moving traffic on a hard, flat surface
when possible.
�Turn on the hazard warning flasher
(
�page 124).
�Turn the steering wheel so that the
front wheels are in a straight-ahead
position.
�Set the parking brake (�page 62).
�Move the gear selector lever to park
position P (
�page 162).
�Turn off the engine (�page 64).
�Remove the SmartKey from the starter
switch.
�Have any passenger exit the vehicle at
a safe distance from the roadway.
Warning!G
If the spare tire is more than 6 years old or
is not the same model as the regular tires,
have the spare tire replaced with a new tire
at the nearest Mercedes-Benz Light Truck
Center.
Never operate the vehicle with more than
one spare wheel mounted.
Warning!G
G55AMG:
Vehicles with different tire dimensions on
the front and rear axle: rim and tire size of
spare wheel and regular wheel differ.
Handling will be adversely affected when the
spare wheel is used.
Do not exceed the maximum speed of
50 mph (80 km/h).
iOpen door only when conditions are safe to
do so.
W463.boo Seite 388 Montag, 19 . November 2007 8:41 08
Page 390 of 457
.
�Remove the spare wheel from the
spare wheel carrier (
�page 366).
�Take")
389
Practical hints
Flat tire
Mounting the spare wheel
Preparing the vehicle
�Prepare the vehicle as described
(
�page 388).
�Remove the spare wheel from the
spare wheel carrier (
�page 366).
�Take the vehicle tool kit out of its
storage compartment (
�page 364).
�Take the vehicle jack
out of its storage
compartment (
�page 365). Lifting the vehicle
�Prevent the vehicle from rolling away
by blocking wheels with wheel chocks
(not included) or other sizeable
objects.
When changing wheel on a level surface:
�Place one wheel chock in front of and
one behind the wheel that is diagonally
opposite to the wheel being changed.
Always try lifting the vehicle using the jack
on a level surface. However, should
circumstances require you to do so on a
hill, place the wheel chocks as follows:
�Place the wheel chocks on the downhill
side blocking both wheels of the axle
not being worked on.
Warning!G
For your safety, remove spare wheel from
spare wheel carrier before undertaking any
further steps.
Warning!G
The jack is designed exclusively for jacking
up the vehicle under the axle housing. To
help avoid personal inju ry, use the jack only
to lift the vehicle during a wheel change.
Never get beneath the vehicle while it is
supported by the jack. Keep hands and feet
away from the area under the lifted vehicle.
Always firmly set parking brake and block
wheels before raising vehicle with jack.
Do not disengage park ing brake while the
vehicle is raised. Be certain that the jack is
always vertical (plumb line) when in use,
especially on hills. Always try to use the jack
on level surface.
Make sure the jack is positioned correctly
under the axle housin g. Always lower the
vehicle onto sufficient capacity jackstands
before working under the vehicle.
If the vehicle is not raised as described, it
could slip off the jack as a result of vibra-
tions (e.g. opening or closing a door or the
tailgate).
��
W463.boo Seite 389 Montag, 19 . November 2007 8:41 08
Page 392 of 457

as seen from the side, even if the
vehicle is parked on a")
391
Practical hints
Flat tire
�Place jack on firm ground.
�Position jack under the axle housing,
so that it is always vertical (plumb-line)
as seen from the side, even if the
vehicle is parked on an incline.
Be certain the jack arm is positioned
correctly under the axle housing (axle
must fall into jack contour).
�Jack up the vehicle by pumping
(indicated by the arrow) until the wheel
is a maximum of 1.2 in (3 cm) from the
ground.
Removing the wheel
�Remove the wheel bolts.
�Remove the wheel.
!Do not position the jack on the body of the
vehicle, as this may cause damage to the
vehicle.
Warning!G
The jack is intended only for lifting the
vehicle briefly for wheel changes. It is not
suited for performing maintenance work
under the vehicle.
�Never start the engine when the vehicle
is raised.
�Never lie down under the raised vehicle.
!Do not place wheel bolts in sand or dirt. This
could result in damage to the bolt and wheel hub
threads.
Warning!G
Make sure no one is injured when removing
the wheel.
Grip wheel from the sides.
Keep hands from beneath the wheel.
W463.boo Seite 391 Montag, 19 . November 2007 8:41 08
Page 393 of 457

392 Practical hints
Flat tire
Mounting the new wheel
�Clean contact surfaces of wheel and
wheel hub.
�Push the wheel onto the wheel hub and
press firmly.
�Insert wheel bolts and tighten them
slightly. Lowering the vehicle
�Using the pump handle, turn the
release bolt of the jack counter-
clockwise approximately one turn
(
�page 390).
�Lower the vehicle until it is resting fully
on its own weight.
�Remove the jack.
!To avoid paint damage, place wheel flat
against hub and hold it there while installing first
wheel bolt.
Warning!G
Always replace wheel bolts that are
damaged or rusted.
Never apply oil or grease to wheel bolts.
Damaged wheel hub threads should be
repaired immediately. Do not continue to
drive under these circumstances! Contact
an authorized Mercedes-Benz Light Truck
Center.
Incorrect wheel bolts or improperly tight-
ened wheel bolts can cause the wheel to
come off. This could cause an accident.
Make sure to use the correct wheel bolts.
Warning!G
Only use genuine Mercedes-Benz wheel
bolts. Other wheel bolts may come loose.
Do not tighten the wheel bolts when the
vehicle is raised. Otherwise the vehicle
could tip over.
iNever turn the release bolt of the jack more
than one or two revolut ions. Otherwise hydraulic
fluid can escape.
W463.boo Seite 392 Montag, 19 . November 2007 8:41 08
Page 394 of 457
, until all wheel bolts
are tight. Observe a tightening")
393
Practical hints
Flat tire
1
-5 Wheel bolts
�Tighten the five wheel bolts evenly,
following the diagonal sequence illus-
trated ( 1 to 5), until all wheel bolts
are tight. Observe a tightening torque
of 96 lb-ft (130 Nm).
�Disassemble the pump handle
(
�page 390).
�Put the pump handle and the wheel
wrench back into the vehicle tool kit.
�Store the vehicle tool kit in the
designated storage compartment
(
�page 364).
�Press the jack piston in again and close
the lowering screw (
�page 390).
�Store the jack in the designated
storage compartment (
�page 365).
�After changing the wheel, secure the
damaged wheel on the spare wheel
carrier (
�page 367). Make sure the
wheel cannot come loose.
�Check the tire inflation pressure and
correct it if necessary.
Follow recommended cold tire inflation
pressures listed on the Tire and
Loading Information placard on the
driver’s door B-pillar (
�page 280).
Warning!G
Have the tightening torque checked after
changing a wheel. The wheels could come
loose if they are not tightened to a torque of
96 lb-ft (130 Nm).
W463.boo Seite 393 Montag, 19 . November 2007 8:41 08
Page 395 of 457

394 Practical hints
Battery
The battery is located in front of the rear
seat bench and below the cup holder.
Jump starting terminals are located on the
driver’s side of the engine compartment
(
�page 398).
The battery should always be sufficiently
charged in order to achieve its rated
service life. Refer to Maintenance Booklet
for battery maintenance intervals.
If you use your vehicle mostly for
short-distance trips, you will need to have
the battery charge checked more
frequently.
When replacing the battery, always use
batteries approved by Mercedes-Benz.
If you do not intend to operate your vehicle
for an extended period of time, consult an
authorized Mercedes-Benz Light Truck
Center about steps you need to observe. Batteries contain materials that can harm
the environment if disposed of improperly.
Large 12-volt storag
e batteries contain
lead. Recycling of batteries is the preferred
method of disposal. Many states require
sellers of batteries to accept old batteries
for recycling.
iMercedes-Benz recommends to have the
battery replaced at an authorized
Mercedes-Benz Light Truck Center.
Warning!G
Observe all safety instructions and precau-
tions when handling automotive batteries.
Risk of explosion.
Fire, open flames and smoking
are prohibited when handling
batteries. Avoid creating sparks.
Battery acid is caustic. Do not
allow it to come into contact
with skin, eyes or clothing.
Wear suitable protective cloth-
ing, especially gloves, apron and
faceguard.
Wear eye protection.
Rinse any acid spills imme-
diately with clear water. Contact
a physician if necessary.
Keep children away.
Follow the instructions in this
Operator’s Manual.
W463.boo Seite 394 Montag, 19 . November 2007 8:41 08