Page 361 of 457

360 Practical hints
What to do if …
Display symbolDisplay messagesPossible cause/consequencePossible solution
HCorrect the
tire pressureThe pressure is too low in one or more
tires.�Check and correct tire inflation pressure as
required (
�page 288).
Tire pressure
Caution
Tire defectOne or more tires are deflating.�Carefully bring the vehicle to a halt, avoiding
abrupt steering and braking maneuvers.
�If necessary, change the wheel (�page 389).
Tire pressure
Check tiresThe tire pressure in one or more tires
is already below the minimum value.�Carefully bring the vehicle to a halt, avoiding
abrupt steering and braking maneuvers.
�Check and adjust tire pressure as required.
�If necessary, change the wheel (�page 389).
Warning!G
Do not drive with a flat tire. A flat tire affects
the ability to steer or brake the vehicle.
You may lose control of the vehicle. Contin-
ued driving with a flat tire will cause exces-
sive heat build-up and possibly a fire.
Warning!G
Follow recommend tire inflation pressures.
Do not underinflate tires. Underinflated tires
wear excessively and/or unevenly, adverse-
ly affect handling and fuel economy, and are
more likely to fail from being overheated.
Do not overinflate tires. Overinflated tires
can adversely affect handling and ride com-
fort, wear unevenly, in crease stopping dis-
tance, and result in sudden deflation
(blowout) because they are more likely to
become punctured or damaged by road de-
bris, potholes etc.
W463.boo Seite 360 Montag, 19 . November 2007 8:41 08
Page 362 of 457
361
Practical hints
What to do if …
Display symbolDisplay messagePossible cause/consequencePossible solution
§Transfer
case
Visit
workshopThe transfer case is malfunctioning.�Do not switch the transfer case on.
�Contact an authoriz
ed Mercedes-Benz
Light Truck Center as soon as
possible.
TC
shift
procedure
canceledThe shift process in the transfer case was
canceled because of a malfunction.�Repeat the shift process (�page 170).
TC
shift
conditions
not fulfilledYou have not met the shift conditions for
a selection process in the transfer case.�Repeat the shift process (�page 170).
TC
in neutralNo gear has been selected in the transfer
case, it is in NEUTRAL.�Engage transfer case to gear position
HIGH or LOW (
�page 170).
Warning!G
If the transfer case is in NEUTRAL,
the Pposition of the transmission will not
hold the vehicle. The parking brake must be
applied to hold vehicle in place.
W463.boo Seite 361 Montag, 19 . November 2007 8:41 08
Page 366 of 457

365
Practical hints
Where will I find...?
Vehicle jack
The vehicle jack is stored in a storage com-
partment under the rear bench seat on the
passenger side.
1 Cover
2 Tab
3 Vehicle jack
�Fold the rear bench seat forward
(
�page 207).
�Open cover 1.
�Open tab 2 and remove vehicle
jack 3 from the compartment. Observe the safety guid
elines in the “Flat
tire” section (
�page 388) when using the
vehicle jack.
Warning!G
The jack is designed exclusively for jacking
up the vehicle under the axle housing. To
help avoid personal inju ry, use the jack only
to lift the vehicle during a wheel change.
Never get beneath the vehicle while it is
supported by the jack. Keep hands and feet
away from the area under the lifted vehicle.
Always firmly set parking brake and block
wheels before raising vehicle with jack.
Do not disengage park ing brake while the
vehicle is raised. Be certain that the jack is
always vertical (plumb line) when in use,
especially on hills. Always try to use the jack
on level surface.
Make sure the jack is positioned correctly
under the axle housin g. Always lower the
vehicle onto sufficient capacity jackstands
before working under the vehicle.
If the vehicle is not raised as described, it
could slip off the jack as a result of vibra-
tions (e.g. opening or closing a door or the
tailgate).
W463.boo Seite 365 Montag, 19 . November 2007 8:41 08
Page 368 of 457
367
Practical hints
Where will I find...?
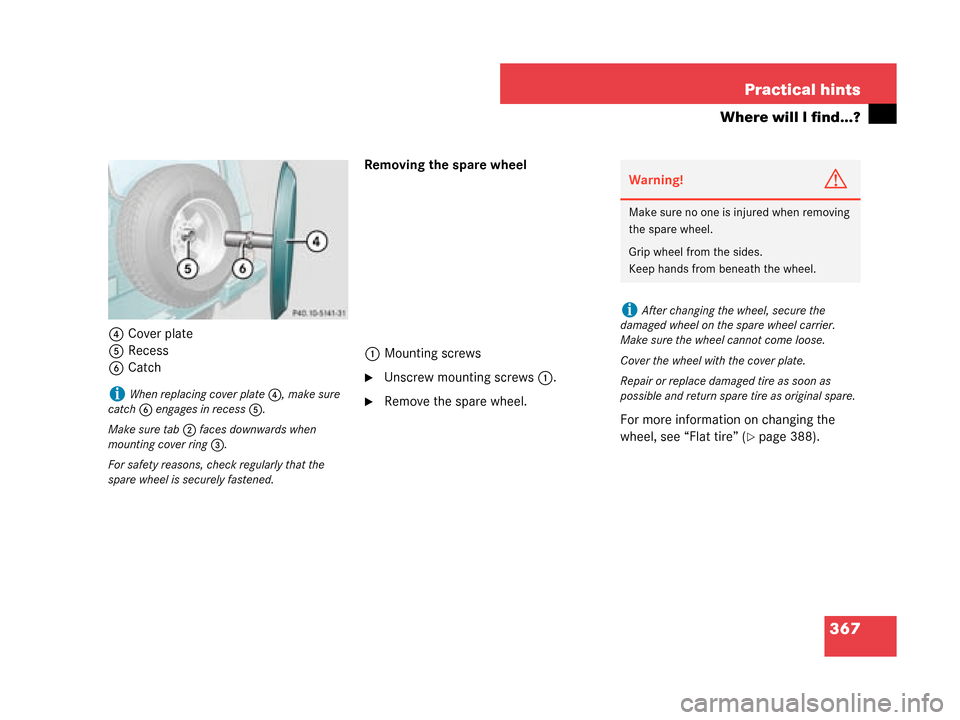
4
Cover plate
5 Recess
6 Catch Removing the spare wheel
1 Mounting screws
�Unscrew mounting screws 1.
�Remove the spare wheel.
For more information on changing the
wheel, see “Flat tire” (
�page 388).
iWhen replacing cover plate4, make sure
catch 6 engages in recess 5.
Make sure tab 2 faces downwards when
mounting cover ring 3.
For safety reasons, ch eck regularly that the
spare wheel is securely fastened.
Warning!G
Make sure no one is injured when removing
the spare wheel.
Grip wheel from the sides.
Keep hands from beneath the wheel.
iAfter changing the wheel, secure the
damaged wheel on the spare wheel carrier.
Make sure the wheel cannot come loose.
Cover the wheel with the cover plate.
Repair or replace damaged tire as soon as
possible and return spare tire as original spare.
W463.boo Seite 367 Montag, 19 . November 2007 8:41 08
Page 370 of 457

369
Practical hints
Unlocking/locking in an emergency
Unlocking the tailgate�Insert the mechanical key into lock
cylinder
2.
�Turn the mechanical key counterclock-
wise to position 1 and release it.
�Remove the mechanical key.
�Press lock cylinder 2 and pull on door
handle 3 to open the tailgate.
Locking the vehicle
If you cannot lock the vehicle with the
SmartKey, lock the vehicle with the
mechanical key carrying out the following
steps:
�Close the front passenger door, the
rear doors and the tailgate.
�Open the driver’s door.
�Press the central locking switch in the
center console (
�page 107).
The locking knobs on the front
passenger door, the rear doors and the
tailgate move down.
If the vehicle battery is disconnected or
drained:
�Press down the locking knobs on
the front passenger door, the rear
doors and the tailgate manually.
�Exit the vehicle.
1Unlocking in an emergency
2Lock cylinder
3Door handle
Warning!G
The tailgate swings open to one side. Always
make sure there is sufficient clearance for
tailgate.
��
W463.boo Seite 369 Montag, 19 . November 2007 8:41 08
Page 374 of 457
.
Lowering and raising brush guard
1 Locking and unlocking handle
2 Quick lock
3 Lock
4 End s")
373
Practical hints
Brush guard
� Brush guard
The brush guard is available on G 55 AMG
(U.S vehicles only).
Lowering and raising brush guard
1 Locking and unlocking handle
2 Quick lock
3 Lock
4 End stop joint Lowering
�While holding brush guard firmly, open
quick lock
2 using locking and unlock-
ing handle 1.
�Gently lower brush guard until it
reaches its fully lowered position.
Raising and securing
�Flip up brush guard until it contacts end
stop joint 4.
Quick lock stop pin 2 must engage
the cross slot recess in lock 3.
�Now turn quick lock 2 so that quick
lock makes contact with end stop
joint 4.
�Lock quick lock 2 on both sides of
brush guard using locking and unlock-
ing handle 1.
Warning!G
The brush guard is designed solely to
enhance the appearance of the vehicle and
help protect grille and headlights from minor
mishaps, either on- or off-road. Since the
safety characteristics are limited in the
event of an accident, brush guards are not
intended to prevent inju ry or damage in the
event of an accident. Also check state and
local regulations on installation and use.
Raise and lower brush guard in an open
space with plenty of room.
To help prevent personal injury when open-
ing or closing the brush guard, use extreme
caution not to trap hands or feet.
The brush guard must be in raised and
locked position while driving.
iOnly lower brush guard to clean headlamps
or to replace bulbs.
!Make sure both quick stop pins 2 are
seated fully in lock 3.
W463.boo Seite 373 Montag, 19 . November 2007 8:41 08
Page 375 of 457

374 Practical hints
Replacing SmartKey batteries
If the batteries in the SmartKey are
discharged, the vehicle can no longer be
locked or unlocked. It is recommended to
have the batteries replaced at an autho-
rized Mercedes-Benz Light Truck Center.
Batteries contain materials that can harm
the environment if disposed of improperly.
Recycling of batteries is the preferred
method of disposal. Many states require
sellers of batteries to accept old batteries
for recycling. Replacement batteries: Lithium, type
CR 2025 or equivalent.
�Remove the mechanical key from the
SmartKey (
�page 368).
1 Mechanical key
2 Slide
3 Battery compartment
�Insert mechanical key 1 in direction
of the arrow in side opening.
�Using mechanical key 1, push gray
slide 2 to unlatch battery
compartment 3.
�Pull battery compartment 3 out of the
housing in direction of the arrow. 4
Battery
5 Contact spring
�Remove discharged batteries 4 in
direction of the arrow.
�Using a lint-free cloth, insert new
batteries under contact spring 5 with
the positive terminal (+) facing up.
�Return battery compartment 3 into
the housing until it locks into place.
�Slide mechanical key 1 back into the
SmartKey.
�Check the operation of the SmartKey.
Warning!G
Keep the batteries out of reach of children.
If a battery is swallowe d, seek medical help
immediately.
iWhen inserting the batteries, make sure
they are clean and free of lint.
iWhen replacing batteries, always replace
both batteries.
The required replacement batteries are available
at any Mercedes-Benz Light Truck Center.
W463.boo Seite 374 Montag, 19 . November 2007 8:41 08
Page 378 of 457

377
Practical hints
Replacing bulbs
Notes on bulb replacement
�Only use 12-volt bulbs of the same type
and with the specified watt rating.
�Switch lights off before changing a bulb
to prevent short circuits.
�Always use a clean lint-free cloth when
handling bulbs.
�Your hands should be dry and free of oil
and grease.
�If the newly installed bulb does not
come on, contact an authorized
Mercedes-Benz Light Truck Center.
Have the LEDs and bulbs for the following
lamps replaced at an authorized
Mercedes-Benz Light Truck Center:
�the additional turn signal lamps in the
exterior rear view mirrors
�the high mounted brake lamp
�the Bi-Xenon lamps
�the locator lighting lamps in the
exterior rear view mirrors
Warning!G
Bulbs and bulb sockets can be very hot.
Allow the lamp to cool down before
changing a bulb.
Keep bulbs out of reach of children.
Halogen lamps contain pressurized gas.
A bulb can explode if you:
�touch or move it when hot
�drop the bulb
�scratch the bulb
Wear eye and hand protection.
Because of high voltage in Xenon lamps, it is
dangerous to replace the bulb or repair the
lamp and its components. We recommend
that you have such work done by a qualified
technician.
!Do not replace the LEDs yourself. You could
otherwise damage the LEDs or parts of the vehi-
cle. Only have the LEDs replaced at an autho-
rized Mercedes-Benz Light Truck Center.
W463.boo Seite 377 Montag, 19 . November 2007 8:41 08