Page 370 of 457

369
Practical hints
Unlocking/locking in an emergency
Unlocking the tailgate�Insert the mechanical key into lock
cylinder
2.
�Turn the mechanical key counterclock-
wise to position 1 and release it.
�Remove the mechanical key.
�Press lock cylinder 2 and pull on door
handle 3 to open the tailgate.
Locking the vehicle
If you cannot lock the vehicle with the
SmartKey, lock the vehicle with the
mechanical key carrying out the following
steps:
�Close the front passenger door, the
rear doors and the tailgate.
�Open the driver’s door.
�Press the central locking switch in the
center console (
�page 107).
The locking knobs on the front
passenger door, the rear doors and the
tailgate move down.
If the vehicle battery is disconnected or
drained:
�Press down the locking knobs on
the front passenger door, the rear
doors and the tailgate manually.
�Exit the vehicle.
1Unlocking in an emergency
2Lock cylinder
3Door handle
Warning!G
The tailgate swings open to one side. Always
make sure there is sufficient clearance for
tailgate.
��
W463.boo Seite 369 Montag, 19 . November 2007 8:41 08
Page 371 of 457
370 Practical hints
Unlocking/locking in an emergency
�Close the driver’s door.
�Slide the mechanical key out of the
SmartKey (
�page 368).
�Insert the mechanical key into the
driver’s door lock cylinder until it stops.
�Turn the mechanical key clockwise.
The vehicle is locked.
�Check if the tailgate is locked. If
necessary lock the tailgate with the
mechanical key.
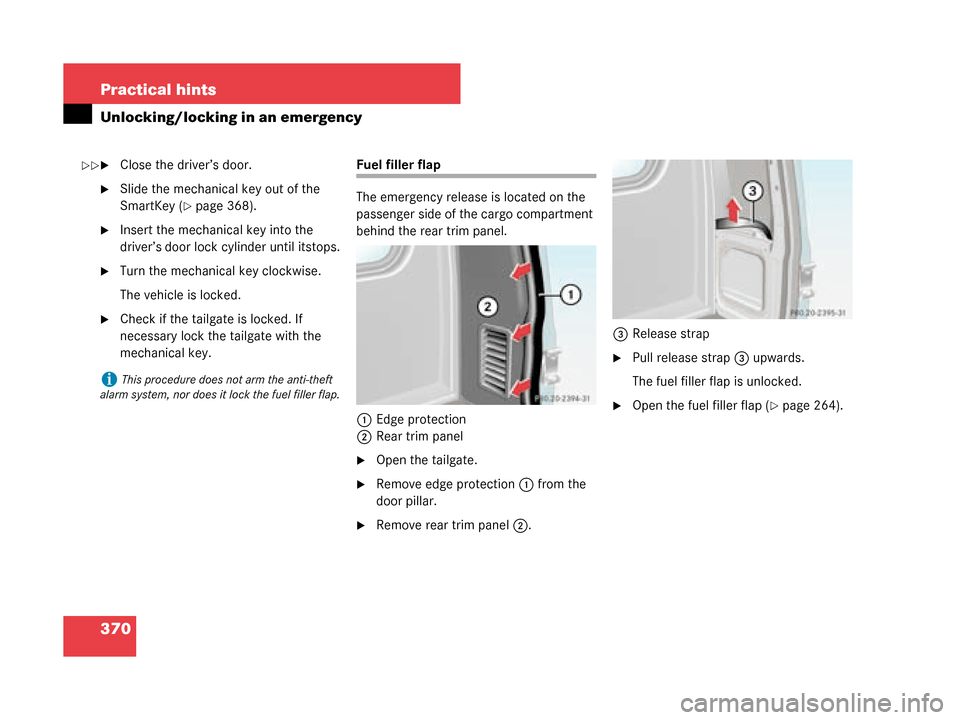
Fuel filler flap
The emergency release is located on the
passenger side of the cargo compartment
behind the rear trim panel.1 Edge protection
2 Rear trim panel
�Open the tailgate.
�Remove edge protection 1 from the
door pillar.
�Remove rear trim panel 2. 3
Release strap
�Pull release strap 3 upwards.
The fuel filler flap is unlocked.
�Open the fuel filler flap (�page 264).
iThis procedure does not arm the anti-theft
alarm system, nor does it lock the fuel filler flap.
��
W463.boo Seite 370 Montag, 19 . November 2007 8:41 08
Page 373 of 457
372 Practical hints
Opening/closing in an emergency
Tilt/sliding sunroof
You can open or close the tilt/sliding
sunroof manually should an electrical
malfunction occur.
The tilt/sliding sunroof drive is located on
the driver’s side of the cargo compartment
behind the rear trim panel.1 Edge protection
2 Rear trim panel�Open the tailgate.
�Remove edge protection 1 from the
door pillar.
�Remove rear trim panel 2.
3 Key
4 Screwdriver
�Take the vehicle tool kit out of its
storage compartment (
�page 364).
�Take key 3 and screwdriver 4 out of
the vehicle tool kit.
�Fit key 3 into hexagon nut of drive.
�Insert screwdriver 4 (as a lever) into
hole of key 3.
�Turn screwdriver 4 clockwise to
�slide sunroof closed
�raise sunroof at the rear
�Turn screwdriver 4 counterclockwise
to
�slide sunroof open
�lower sunroof at the reariDo not disconnect electrical connectors.
W463.boo Seite 372 Montag, 19 . November 2007 8:41 08
Page 380 of 457
379
Practical hints
Replacing bulbs
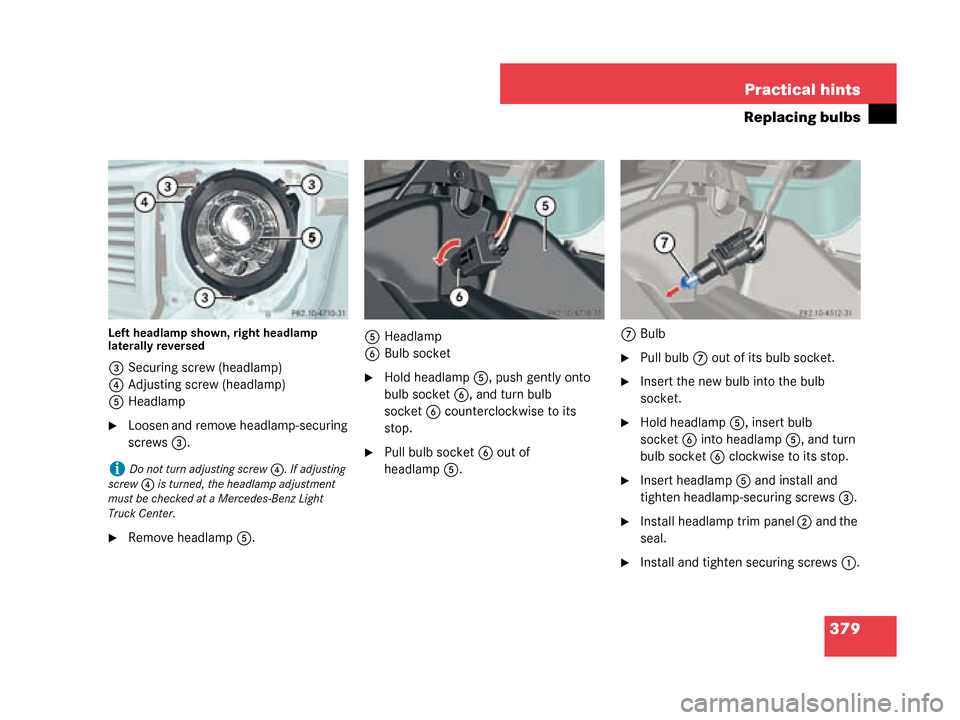
Left headlamp shown, right headlamp
laterally reversed
3
Securing screw (headlamp)
4 Adjusting screw (headlamp)
5 Headlamp
�Loosen and remove headlamp-securing
screws 3.
�Remove headlamp 5. 5
Headlamp
6 Bulb socket
�Hold headlamp 5, push gently onto
bulb socket 6, and turn bulb
socket 6 counterclockwise to its
stop.
�Pull bulb socket 6 out of
headlamp 5. 7
Bulb
�Pull bulb 7 out of its bulb socket.
�Insert the new bulb into the bulb
socket.
�Hold headlamp 5, insert bulb
socket 6 into headlamp 5, and turn
bulb socket 6 clockwise to its stop.
�Insert headlamp 5 and install and
tighten headlamp-securing screws 3.
�Install headlamp trim panel 2 and the
seal.
�Install and tighten securing screws 1.
iDo not turn adjusting screw 4. If adjusting
screw 4 is turned, the headlamp adjustment
must be checked at a Mercedes-Benz Light
Truck Center.
W463.boo Seite 379 Montag, 19 . November 2007 8:41 08
Page 381 of 457
380 Practical hints
Replacing bulbs
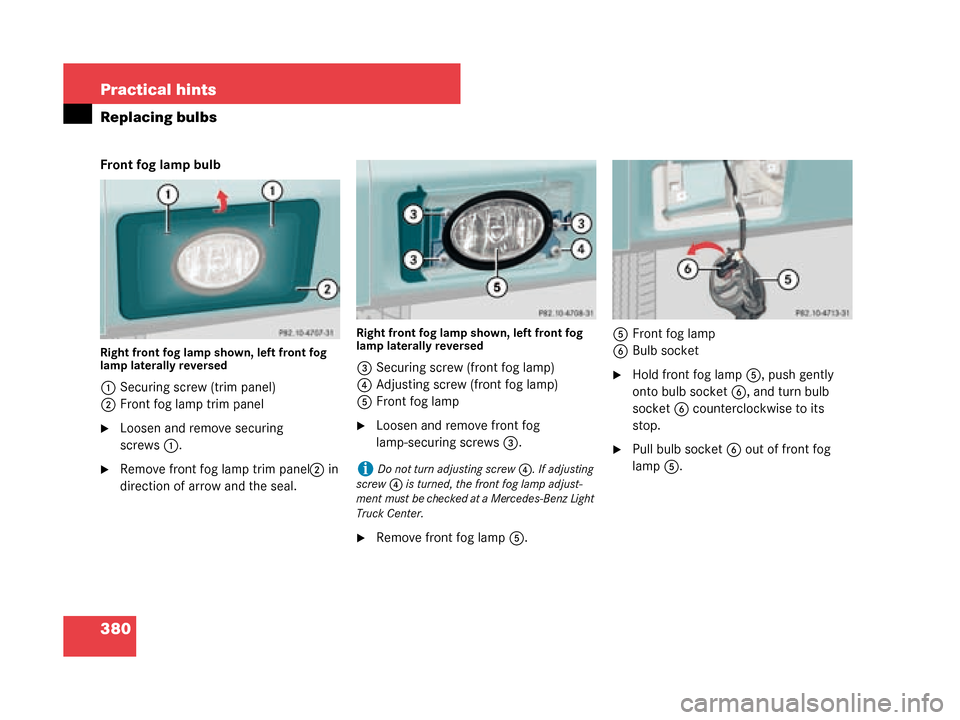
Front fog lamp bulb
Right front fog lamp shown, left front fog
lamp laterally reversed
1Securing screw (trim panel)
2 Front fog lamp trim panel
�Loosen and remove securing
screws 1.
�Remove front fog lamp trim panel 2 in
direction of arrow and the seal.
Right front fog lamp shown, left front fog
lamp laterally reversed
3 Securing screw (front fog lamp)
4 Adjusting screw (front fog lamp)
5 Front fog lamp
�Loosen and remove front fog
lamp-securing screws 3.
�Remove front fog lamp 5. 5
Front fog lamp
6 Bulb socket
�Hold front fog lamp 5, push gently
onto bulb socket 6, and turn bulb
socket 6 counterclockwise to its
stop.
�Pull bulb socket 6 out of front fog
lamp 5.
iDo not turn adjusting screw 4. If adjusting
screw 4 is turned, the front fog lamp adjust-
ment must be checked at a Mercedes-Benz Light
Truck Center.
W463.boo Seite 380 Montag, 19 . November 2007 8:41 08
Page 382 of 457
381
Practical hints
Replacing bulbs
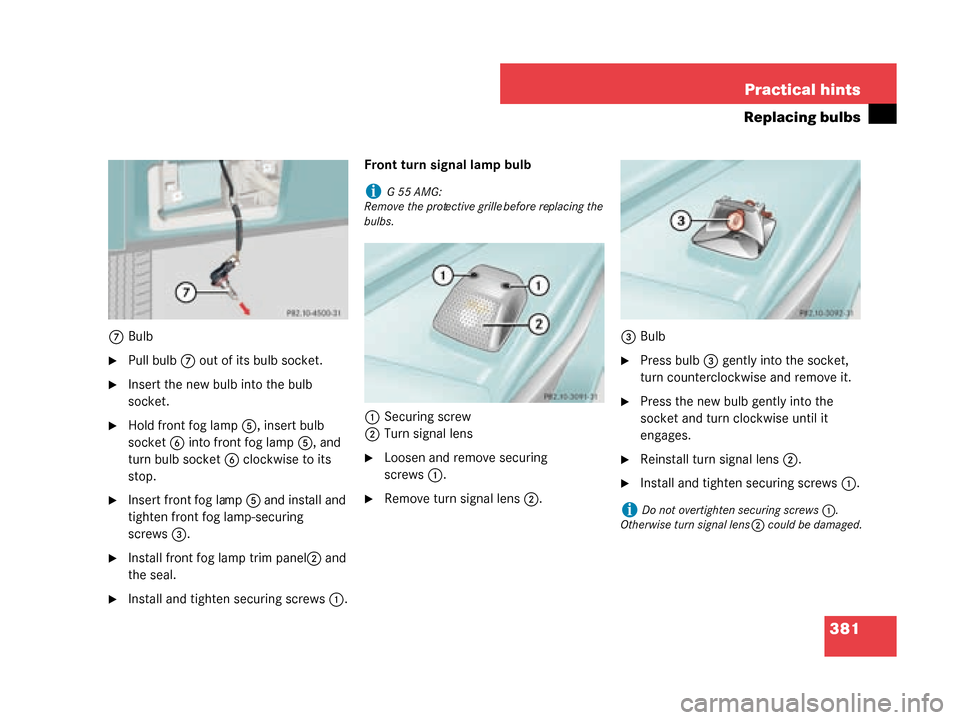
7
Bulb
�Pull bulb 7 out of its bulb socket.
�Insert the new bulb into the bulb
socket.
�Hold front fog lamp 5, insert bulb
socket 6 into front fog lamp 5, and
turn bulb socket 6 clockwise to its
stop.
�Insert front fog lamp 5 and install and
tighten front fog lamp-securing
screws 3.
�Install front fog lamp trim panel 2 and
the seal.
�Install and tight en securing screws 1. Front turn signal lamp bulb
1 Securing screw
2 Turn signal lens
�Loosen and remove securing
screws 1.
�Remove turn signal lens 2. 3
Bulb
�Press bulb 3 gently into the socket,
turn counterclockwise and remove it.
�Press the new bulb gently into the
socket and turn clockwise until it
engages.
�Reinstall turn signal lens 2.
�Install and tighten securing screws 1.
iG55AMG:
Remove the protective grille before replacing the
bulbs.
iDo not overtighten securing screws 1.
Otherwise turn signal lens 2 could be damaged.
W463.boo Seite 381 Montag, 19 . November 2007 8:41 08
Page 383 of 457
382 Practical hints
Replacing bulbs
Side marker lamp bulb
The following description applies to both,
the front and the rear side marker lamps.
Front side marker shown
1Securing screw
2 Side marker lamp housing
�Loosen and remove securing
screws 1.
�Remove side marker lamp housing 2. 2
Side marker lamp housing
3 Dust cover
�Remove dust cover 3.
�Press catch aside and pull out the bulb
socket with the bulb from side marker
lamp housing 2. 4
Bulb
�Press gently onto bulb 4 and turn
counterclockwise out of its bulb
socket.
�Press the new bulb gently into the bulb
socket and turn clockwise until it
engages.
�Insert the bulb socket back into side
marker lamp housing 2.
�Reinstall dust cover 3.
W463.boo Seite 382 Montag, 19 . November 2007 8:41 08
Page 385 of 457

384 Practical hints
Replacing bulbs
Left tail lamp unit shown, right tail lamp
unit laterally reversed
3Turn signal lamp bulb
4 Brake, tail, parking and standing lamp
bulb
5 Tail, parking and standing lamp bulb
�Press gently onto respective
bulb 3,4 , or 5 and turn counter-
clockwise out of its bulb socket.
�Press the new bulb gently into the bulb
socket and turn clockwise until it
engages.
�Reinstall tail lamp lens 2.
�Install and tighten securing screws 1. Rear fog lamp bulb/Backup lamp bulb
The following description applies to both,
the rear fog lamp and the backup lamp.
Rear fog lamp shown
1
Securing screw
2 Lamp lens
�Loosen and remove securing
screws 1.
�Remove lamp lens 2. 3
Bulb
�Press gently onto bulb 3 and turn
counterclockwise out of its bulb
socket.
�Press the new bulb gently into the bulb
socket and turn clockwise until it
engages.
�Reinstall lamp lens 2.
�Install and tight en securing screws 1.
iDo not overtighten securing screws 1.
Otherwise tail lamp lens 2 could be damaged.
iDo not overtighten securing screws 1.
Otherwise lamp lens 2 could be damaged.
��
W463.boo Seite 384 Montag, 19 . November 2007 8:41 08