Page 213 of 457
212 Controls in detail
Loading
Pulling partition net tight3 Lift tensioner
4 Tightening belt
5 Belt hook
6 Cargo tie-down ring Lift tensioner
3 on tightening belt 4
must point in direction of the windshield
(indicated by the arrow).
�Use lift tensioner 3 to set the length
of tightening belt 4 to cargo tie-down
ring 6.
�Hook belt hook 5 into cargo tie-down
ring 6.
�Pull tightening belt 4 by the loose end
until the partition net is slightly pulled
tight.
�Fold the rear seat bench rearward until
it locks into place.
The partition net will be tightened by
the rear seat bench.
�After driving a short distance, make
sure the partition net is still tight and, if
necessary, pull it tight again. Installation partition net behind front
seats
Partition net installe
d behind front seats
�Fold the rear seat bench (together with
the rear seat backrest) forward
(
�page 207).
W463.boo Seite 212 Montag, 19 . November 2007 8:41 08
Page 214 of 457

213
Controls in detail
Loading
Hanging up partition net
1 Partition net
2 Holder
�Hang partition net 1 on holder 2 and
push forward in direction of the arrow. Pulling partition net tight
3 Lift tensioner
4 Tightening belt
5 Belt hook
6 Cargo tie-down ring
Lift tensioner 3 on tightening belt 4
must point in direction of the tailgate.
�Use lift tensioner 3 to set the length
of tightening belt 4 to cargo tie-down
ring 6.
�Hook belt hook 5 into cargo tie-down
ring 6.
�Pull tightening belt 4 by the loose end
until the partition net is pulled tight.
�After driving a short distance, make
sure the partition net is still tight and, if
necessary, pull it tight again.
Loosening partition net
�Loosen tightening belt 4 by pulling lift
tensioner 3 upward.
�Remove belt hook 5 from cargo
tie-down ring 6.
Removing and storing partition net
�Take partition net 1 out of holder 2.
�Roll up partition net and secure it.
�Store partition net behind the rear seat
bench.
W463.boo Seite 213 Montag, 19 . November 2007 8:41 08
Page 297 of 457
 indicates
the nominal tire width in mm.
Aspect ratio
The aspect ratio 2 (
�page 295) is the
dimensional relationship between ti")
296 Operation
Tires and wheels
Tire width
The tire width1 (
�page 295) indicates
the nominal tire width in mm.
Aspect ratio
The aspect ratio 2 (
�page 295) is the
dimensional relationship between tire
section height and section width and is
expressed in percentage. The aspect ratio
is arrived at by dividing section height by
section width.
Tire code
The tire code 3 (
�page 295) indicates
the tire construction type. The “R” stands
for radial tire type. Letter “D” means
diagonal or bias ply construction; letter “B”
means belted-bias ply construction.
At the tire manufacturer’s option, any tire
with a speed capability above 149 mph
(240 km/h) can include a “ZR” in the size
designation (for example: 245/40 ZR 18).
For additional information, see “Tire speed
rating” (
�page 297). Rim diameter
The rim diameter
4 (
�page 295) is the
diameter of the bead seat, not the
diameter of the rim edge. Rim diameter is
indicated in inches (in).
Tire load rating
The tire load rating 5 (
�page 295) is a
numerical code associated with the
maximum load a tire can support.
For example, a load rating of 91 corre-
sponds to a maximum load of 1 356 lbs
(615 kg) the tire is designed to support.
See also “Maximum tire load”
(
�page 300) where the maximum load
associated with the load index is indicated
in kilograms and lbs.
Warning!G
The tire load rating mu st always be at least
half of the GAWR (
�page 305) of your
vehicle. Otherwise, tire failure may be the
result which may cause an accident and/or
serious personal injury to you or others.
Always replace rims and tires with the same
designation, manufacturer and type as
shown on the original part.
Warning!G
Do not overload the tires by exceeding the
specified load limit as indicated on the Tire
and Loading Information placard located on
the driver’s door B-pillar. Overloading the
tires can overheat them , possibly causing a
blowout. Overloading the tires can also
result in handling or steering problems, or
brake failure.
W463.boo Seite 296 Montag, 19 . November 2007 8:41 08
Page 317 of 457

316 Operation
Vehicle care
Paintwork, painted body components
Mercedes-Benz approved Paint Care
should be applied when water drops on the
paint surface do not “bead up”. This should
normally be done every 3 to 5 months,
depending on the climate and washing
detergent used.
Mercedes-Benz approved Paint Cleaner
should be applied if the paint surface
shows signs of dirt embedding (i.e. loss of
gloss).
Do not apply any of these products or wax
if your vehicle is parked in the sun or if the
hood is still hot.
�Use the appropriate MB-Touch-Up
Stick for quick and provisional repairs
of minor paint damage (i.e. chips from
stones, vehicle doors, etc.).Engine cleaning
Prior to cleaning the engine compartment,
make sure to protect electrical compo-
nents and connectors from the intrusion of
water and cleaning agents.
Corrosion protection, such as
MB Anticorrosion Wax, should be applied
to the engine compartment after every
engine cleaning. Before applying, all con-
trol linkage bushings and joints should be
lubricated. The poly-V-belt and all pulleys
should be protected from any wax.
Vehicle washing
In the winter, thoroughly remove all traces
of road salt as soon as possible.
When washing the vehicle underbody, do
not forget to clean the inner sides of the
wheels.
Hand-wash
Do not use hot water or wash your vehicle
in direct sunlight.
�Only use a mild car wash detergent,
such as Mercedes-Benz approved Car
Shampoo.
�Thoroughly spray the vehicle with a
diffused jet of water.
Direct only a very weak spray towards
the ventilation intake.
�Use plenty of water and rinse the
sponge and chamois frequently.
!Affixing stickers, adhesive tape or similar
materials to painted body components may
damage the paintwork.
W463.boo Seite 316 Montag, 19 . November 2007 8:41 08
Page 322 of 457

321
Operation
Vehicle care
Hard plastic trim items
�Use Mercedes-Benz approved Interior
Care, a soft, lint-free cloth and apply
with light pressure.
Steering wheel and gear selector lever
�Wipe with a damp cloth and dry
thoroughly or clean with
Mercedes-Benz approved Leather
Care.
Carpets
�Use Mercedes-Benz approved Carpet
and Fabric Care for cleaning the
carpets.
Headliner
�Use a soft bristle brush or a
dry-shampoo cleaner in case of
excessive dirt. Seat belts
�Only use clear, lukewarm water and
soap.
!Do not use oil, wax or scouring agents on
these parts.
Never apply strong force and only use a soft,
non-scratching cloth when cleaning the surface.
Do not attempt to wipe the surface with a dry
cloth or sponge.
Otherwise you may scratch or damage the
surface.
!Never apply strong force and only use a soft,
non-scratching cloth when cleaning the surface.
Do not attempt to wipe the surface with a dry
cloth or sponge.
Otherwise you may scratch or damage the
surface.
!The seat belts must not be treated with
chemical cleaning agents. Do not dry the seat
belts at temperatures above 176°F (80°C) or in
direct sunlight.
Warning!G
Do not bleach or dye seat belts as this may
severely weaken them. In a crash they may
not be able to provide adequate protection.
W463.boo Seite 321 Montag, 19 . November 2007 8:41 08
Page 332 of 457

331
Practical hints
What to do if …
ProblemPossible cause/consequenceSuggested solution
vThe yellow ESP® warning lamp
comes on and remains on while
driving.The ESP® is deactivated because of inter-
rupted power supply. The ABS may still be
operational.�Read and observe messages in the
multifunction display (
�page 336).
The ESP®, ABS, BAS, EBB or 4-ETS has
detected a malfunction. All driving systems
are switched off.
Risk of accident!
Adapt your speed and driving to the
prevailing road conditions.�Read and observe messages in the
multifunction display (
�page 336).
The yellow fuel tank reserve warning lamp
comes on while driving.The fuel level has dropped below the reserve
mark.�Refuel at the next gas station
(
�page 264).
�Read and observe messages in the
multifunction display (
�page 336).
The yellow fuel tank reserve warning lamp is
blinking.The fuel cap is not closed tight.�Check the fuel filler cap (�page 264).
�Read and observe messages in the
multifunction display (
�page 336).
nates briefly after starting the
engine.The warning lamp reminds you to fasten seat
belt.�Fasten your seat belt.
W463.boo Seite 331 Montag, 19 . November 2007 8:41 08
Page 343 of 457
342 Practical hints
What to do if …
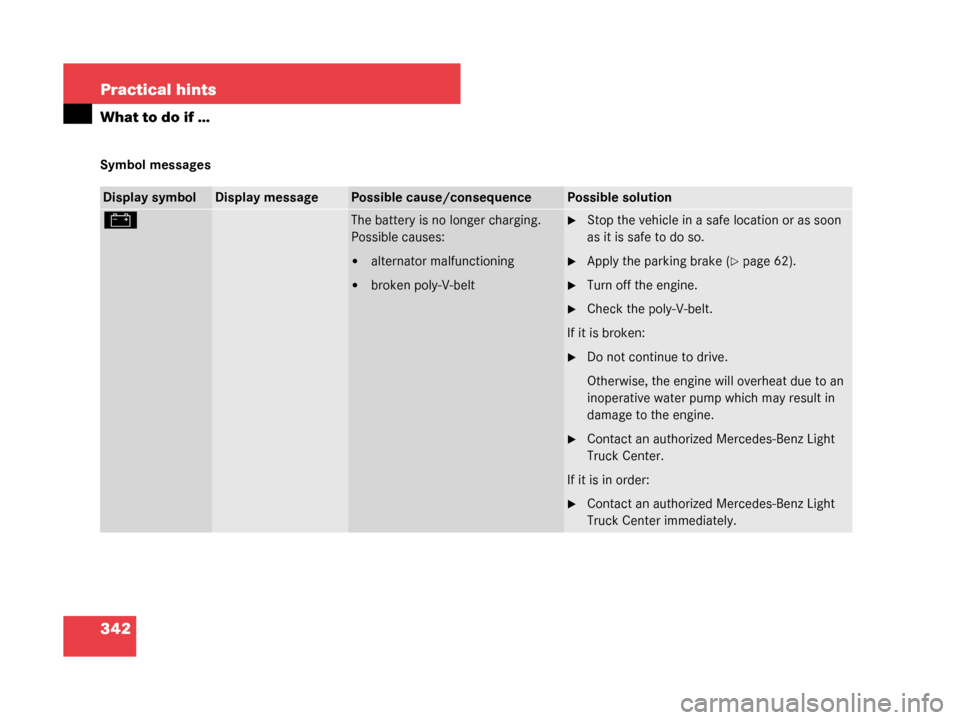
Symbol messages
Display symbolDisplay messagePossible cause/consequencePossible solution
#The battery is no longer charging.
Possible causes:
�alternator malfunctioning
�broken poly-V-belt
�Stop the vehicle in a safe location or as soon
as it is safe to do so.
�Apply the parking brake (�page 62).
�Turn off the engine.
�Check the poly-V-belt.
If it is broken:
�Do not continue to drive.
Otherwise, the engine will overheat due to an
inoperative water pump which may result in
damage to the engine.
�Contact an authorized Mercedes-Benz Light
Truck Center.
If it is in order:
�Contact an authorized Mercedes-Benz Light
Truck Center immediately.
W463.boo Seite 342 Montag, 19 . November 2007 8:41 08
Page 347 of 457
346 Practical hints
What to do if …
Display symbolDisplay messagePossible cause/consequencePossible solution
•Coolant
Stop, turn
engine offThe coolant is too hot.
Among other possible causes, the
poly-V-belt could be broken.�Stop the vehicle in a safe location or as soon
as it is safe to do so.
�Apply the parking brake (�page 62).
�Turn off the engine.
�Check the poly-V-belt.
If it is broken:
�Do not continue to drive.
Otherwise, the engine will overheat due to an
inoperative water pump which may result in
damage to the engine.
�Contact an authorized Mercedes-Benz Light
Truck Center.
If it is in order:
�Wait for the message to disappear before
restarting the engine.
Doing otherwise could result in serious engine
damage that is not covered by the
Mercedes-Benz Limited Warranty.
(Continued on next page)
W463.boo Seite 346 Montag, 19 . November 2007 8:41 08