2008 MERCEDES-BENZ E-CLASS SALOON seat adjustment
[x] Cancel search: seat adjustmentPage 9 of 401

6Service display . . . . . . . . . . . . . . .
.243
Symbol messages . . . . . . . . . . . . .266
Text messages . . . . . . . . . . . . . . . .258
up (AMG menu) . . . . . . . . . . . . . . .126
Distance warning function . . . . . . ..149
Distance warning lamp . . . . . . . . . ..149
Distronic . . . . . . . . . . . . . . . . . . . . . . .145
Cleaning the sensors . . . . . . . . . . .248
Cove r.. . . . . . . . . . . . . . . . . . . . . .248
Display message . . . . . . . . . . . . . .259
Distance warning function . . . . . . .149
Driving tips . . . . . . . . . . . . . . . . . . .151
Warning lamp . . . . . . . . . . . . . . . . .286
Door
Automatic locking . . . . . . . . . . . . . .70
Display message . . . . . . . . . . . . . .267
Emergency locking . . . . . . . . . . . . .307
Emergency unlocking . . . . . . . . . . .306
Opening (from the inside) . . . . . . . .69
Door control panel
Overview . . . . . . . . . . . . . . . . . . . . .35
Drinks holder
see Cup holder
Driver's airbag . . . . . . . . . . . . . . . . . . .44
Driver's door Unlocking (KEYLESS GO) . . . . . . . . .69
Driver's seat position . . . . . . . . . . . ..97
Driving abroad . . . . . . . . . . . . . . . . . .238
Driving safety system . . . . . . . . . . . ..58
ABS . . . . . . . . . . . . . . . . . . . . . . . . .58ADAPTIVE BRAK
E.. . . . . . . . . . . . . .61
Adaptive brake lamps . . . . . . . . . . .59
BAS . . . . . . . . . . . . . . . . . . . . . . . . .59
EBV . . . . . . . . . . . . . . . . . . . . . . . . .61
ESP ®
. . . . . . . . . . . . . . . . . . . . . . . .60
Driving system . . . . . . . . . . . . . . . . . .142
4MATIC . . . . . . . . . . . . . . . . . . . . .158
Airmatic DC . . . . . . . . . . . . . . . . . .156
Cruise control . . . . . . . . . . . . . . . .143
Distronic . . . . . . . . . . . . . . . . . . . .145
HOLD . . . . . . . . . . . . . . . . . . . . . . .155
Parktroni c.. . . . . . . . . . . . . . . . . .158
Speedtronic . . . . . . . . . . . . . . . . . .152
Driving tip
Braking . . . . . . . . . . . . . . . . . . . . . .236
Distronic . . . . . . . . . . . . . . . . . . . .151
Driving abroad . . . . . . . . . . . . . . . .238
Driving on flooded road s.. . . . . ..238
Driving on wet road s.. . . . . . . . ..238
Trailer towing . . . . . . . . . . . . . . . . .240
Winter . . . . . . . . . . . . . . . . . . . . . .235
DVD audio
Operating (on-board computer) . . .129
DVD video
Operating (on-board computer) . . .130
Dynamic driving seat . . . . . . . . . . . ..84
Selecting seat adjustment (on-
board computer) . . . . . . . . . . . . . .139 E
Easy-entry/exit feature Activating/deactivating (on-
board computer) . . . . . . . . . . . . . .138
Easy-entry feature . . . . . . . . . . . . . . ..90
Easy-exit feature . . . . . . . . . . . . . . . . .90
Easy-Pack fix kit . . . . . . . . . . . . . . . .202
Easy-Pack stowage box . . . . . . . . ..204
Easy-Pack system . . . . . . . . . . . . . ..202
EBV (electronic brake-power distri-
bution) . . . . . . . . . . . . . . . . . . . . . . . . .61
Display message . . . . . . . . . . . . . .269
Electrical/electronic equipment
Retrofitting . . . . . . . . . . . . . . . . . . .345
Electronic brake-power distribution
see EBV
Electronic Stability Program
see ESP ®
e mark . . . . . . . . . . . . . . . . . . . . . . . . .345
Emergency engine starting . . . . . ..339
Emergency key element Lost . . . . . . . . . . . . . . . . . . . . . . . .301
Emergency locking
Vehicle . . . . . . . . . . . . . . . . . . . . . .307
Emergency running mode
Automatic transmission . . . . . . . . .297 Index
211_AKB; 2; 5, en-GB
mkalafa,
Version: 2.9.4 2008-02-29T16:57:07+01:00 - Seite 6Dateiname: 6515_3416_02_buchblock.pdf; preflight
Page 81 of 401
Seats
78 G
Risk of injury
Make sure that nobody can become trap-
ped when you adjust the seat.
Observe the notes concerning the airbag
system.
Secure children as recommended; see
"Children in the vehicle" section.
! When you move the seats, make sure that
there are no objects in the footwell or
behind the seats. Otherwise, you could
damage the seats and the objects.
i The head restraints in the front seats are
fitted with the NECK-PRO system
(Y page 47). For this reason, it is not pos-
sible to remove the head restraints from
the front seats.
For design reasons, some rear-compart-
ment head restraints cannot be removed
(Y page 83).
Please contact a Mercedes-Benz Service
Centre for more information. Adjusting the seats manually and
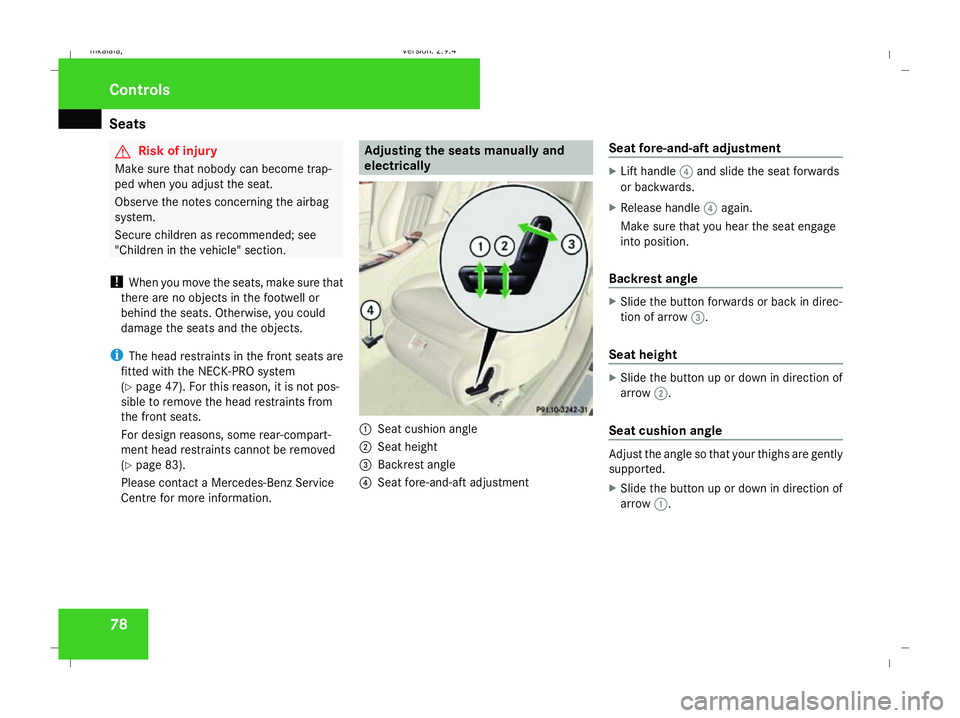
electrically 1
Seat cushion angle
2 Seat height
3 Backrest angle
4 Seat fore-and-aft adjustment Seat fore-and-aft adjustment X
Lift handle 4and slide the seat forwards
or backwards.
X Release handle 4again.
Make sure that you hear the seat engage
into position.
Backrest angle X
Slide the button forwards or back in direc-
tion of arrow 3.
Seat height X
Slide the button up or down in direction of
arrow 2.
Seat cushion angle Adjust the angle so that your thighs are gently
supported.
X Slide the button up or down in direction of
arrow 1. Controls
211_AKB; 2; 5, en-GB
mkalafa,
Version: 2.9.4 2008-02-29T16:57:07+01:00 - Seite 78Dateiname: 6515_3416_02_buchblock.pdf; preflight
Page 83 of 401

Seats
80 Adjusting the seat electrically*
1
Head restraint height
2 Seat cushion angle
3 Seat height
4 Seat fore-and-aft adjustment
5 Backrest angle
i On vehicles with the memory function*, if
PRE-SAFE ®
is triggered, the front-
passenger seat will be moved to a better
position if it was previously in an unfavour-
able position.
Seat fore-and-aft adjustment X
Slide the button forwards or back in the
direction of arrow 4. i
Estate with memory function*/saloon
with the through-loading feature* and
memory function*:
When the rear seat backrest is folded
forward, the front-passenger seat is moved
forwards slightly if necessary to prevent
contact with the backrest.
Seat height X
Slide the button up or down in the direction
of arrow 3.
Seat cushion angle Adjust the angle so that your thighs are gently
supported.
X
Slide the button up or down in the direction
of arrow 2.
Backrest angle X
Slide the button forwards or back in the
direction of arrow 5. Head restraint height G
Risk of injury
Make sure that the central area of the head
restraint supports the back of your head at
about eye level. You could seriously injure
your neck if your head is not correctly sup-
ported by the head restraint in the event of
an accident. Never travel without a cor-
rectly adjusted and engaged head restraint.
X Slide the button up or down in the direction
of arrow 1.
Head restraint position X
Push or pull the head restraint in the direc-
tion of the arrow. Controls
* optional
211_AKB; 2; 5, en-GB
mkalafa,
Version: 2.9.4 2008-02-29T16:57:07+01:00 - Seite 80Dateiname: 6515_3416_02_buchblock.pdf; preflight
Page 84 of 401
Seats
81
Luxury head restraint* G
Risk of injury
When folding back the head restraint side
bolsters, do not put your hands between
the side bolster and the cushion holder.
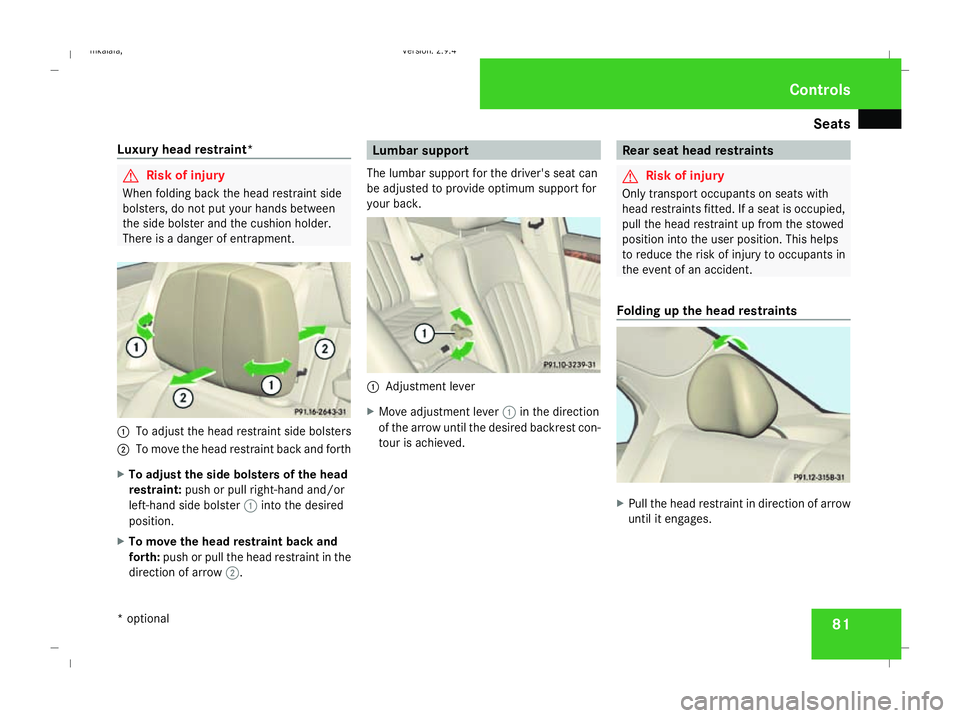
There is a danger of entrapment. 1
To adjust the head restraint side bolsters
2 To move the head restraint back and forth
X To adjust the side bolsters of the head
restraint: push or pull right-hand and/or
left-hand side bolster 1into the desired
position.
X To move the head restraint back and
forth: push or pull the head restraint in the
direction of arrow 2. Lumbar support
The lumbar support for the driver's seat can
be adjusted to provide optimum support for
your back. 1
Adjustment lever
X Move adjustment lever 1in the direction
of the arrow until the desired backrest con-
tour is achieved. Rear seat head restraints
G
Risk of injury
Only transport occupants on seats with
head restraints fitted. If a seat is occupied,
pull the head restraint up from the stowed
position into the user position. This helps
to reduce the risk of injury to occupants in
the event of an accident.
Folding up the head restraints X
Pull the head restraint in direction of arrow
until it engages. Controls
* optional
211_AKB; 2; 5, en-GB
mkalafa,
Version: 2.9.4 2008-02-29T16:57:07+01:00 - Seite 81 ZDateiname: 6515_3416_02_buchblock.pdf; preflight
Page 88 of 401
Seats
85
5
Lumbar region support
6 Seat cushion length
X To activate/deactivate: press button1.
The indicator lamp in the button lights up/
goes out.
When switched on, the message Driving
dynamics seat adjustment appears in
the multi-function display for five seconds.
Massage function (PULSE) The massage function helps you to prevent
muscle tension on long journeys.
X Press button 3.
The indicator lamp in the button lights up.
The air cushions in the lumbar region
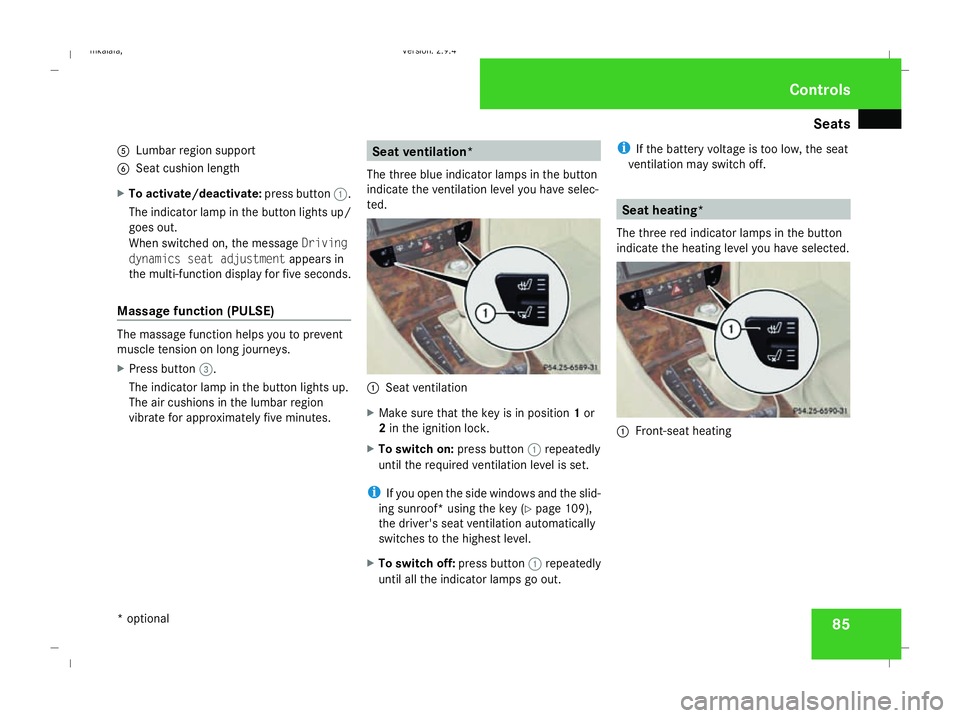
vibrate for approximately five minutes. Seat ventilation*
The three blue indicator lamps in the button
indicate the ventilation level you have selec-
ted. 1
Seat ventilation
X Make sure that the key is in position 1or
2 in the ignition lock.
X To switch on: press button1repeatedly
until the required ventilation level is set.
i If you open the side windows and the slid-
ing sunroof* using the key (Y page 109),
the driver's seat ventilation automatically
switches to the highest level.
X To switch off: press button1repeatedly
until all the indicator lamps go out. i
If the battery voltage is too low, the seat
ventilation may switch off. Seat heating*
The three red indicator lamps in the button
indicate the heating level you have selected. 1
Front-seat heating Controls
* optional
211_AKB; 2; 5, en-GB
mkalafa,
Version: 2.9.4 2008-02-29T16:57:07+01:00 - Seite 85 ZDateiname: 6515_3416_02_buchblock.pdf; preflight
Page 97 of 401

Memory functions*
94 Calling up a stored setting
G
Risk of accident
Only use the memory function on the
driver’s side when the vehicle is stationary.
You could otherwise be distracted from the
traffic conditions by the steering wheel and
seat moving of their own accord, and cause
an accident.
X Press and hold the relevant storage posi-
tion switch 1,2or 3until the seat, steering
wheel and mirrors are in the stored posi-
tion.
i The setting procedure is interrupted as
soon as you release the storage position
switch. Storing a parking position
To make it easier to park, you can store the
front-passenger side exterior mirror position
in such a way that you can see the rear wheel
on that side as soon as you engage reverse
gear.
You can store a parking position for the exte-
rior mirror on the front-passenger side using
the memory button.
You will find information about using the exte-
rior mirror's parking position in the "Parking
aid" section (Y page 92). 1
Exterior mirror on the driver's side
2 Adjustment button
3 Exterior mirror on the front-passenger
side
4 Memory button M X
Make sure that the vehicle is stationary and
that the key is in position 2in the ignition
lock.
X Press button 3for the exterior mirror on
the front-passenger side.
X Use button 2to adjust the exterior mirror
to a position which allows you to see the
rear wheel and the kerb.
X Press memory button M4.
X Press one of the arrows on adjustment but-
ton 2within three seconds.
The parking position is stored if the exterior
mirror does not move.
i If the mirror moves out of position, repeat
the steps. You can adjust the exterior mir-
ror again after storing the setting. Controls
* optional
211_AKB; 2; 5, en-GB
mkalafa
, Version: 2.9.4 2008-02-29T16:57:07+01:00 - Seite 94Dateiname: 6515_3416_02_buchblock.pdf; preflight
Page 100 of 401
Seat belts
97Belt warning for driver and front
passenger
The < seat belt warning lamp in the instru-
ment cluster reminds you that all occupants
should fasten their seat belts. The
or it may flash. Additionally, there may be a
warning tone.
The < seat belt warning lamp goes out and
the warning tone ceases when the driver and
the front passenger have fastened their seat
belt.
For certain countries only: regardless of
whether the driver or the front passenger is
already secured, the
has been started. The
front passenger have fastened their seat belt.
i Further information about the
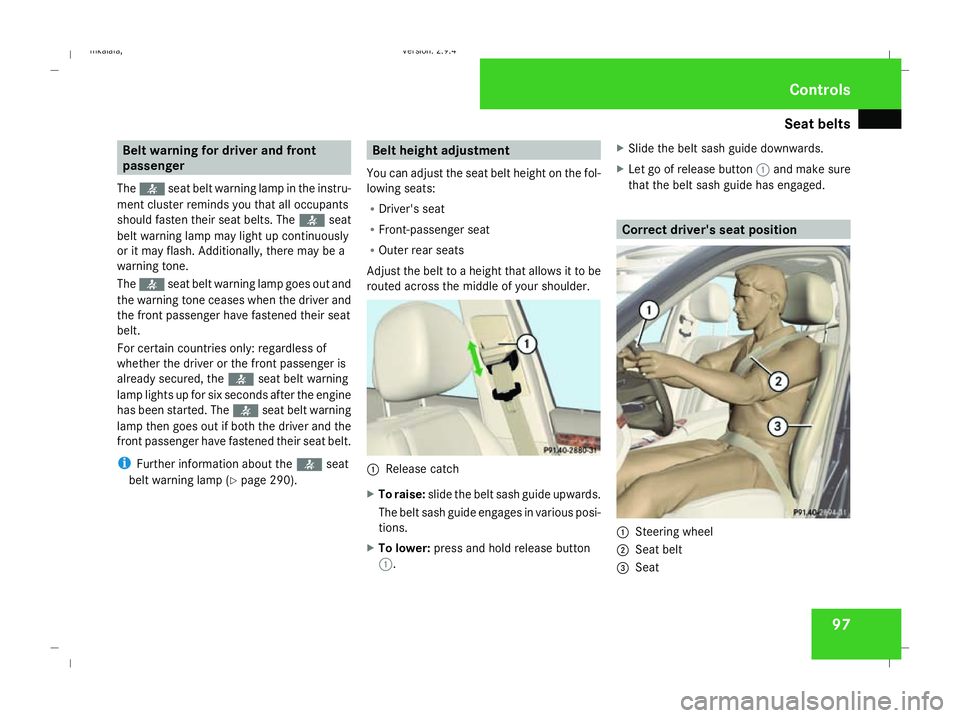
You can adjust the seat belt height on the fol-
lowing seats:
R Driver's seat
R Front-passenger seat
R Outer rear seats
Adjust the belt to a height that allows it to be
routed across the middle of your shoulder. 1
Release catch
X To raise: slide the belt sash guide upwards.
The belt sash guide engages in various posi-
tions.
X To lower: press and hold release button
1. X
Slide the belt sash guide downwards.
X Let go of release button 1and make sure
that the belt sash guide has engaged. Correct driver's seat position
1
Steering wheel
2 Seat belt
3 Seat Controls
211_AKB; 2; 5, en-GB
mkalafa,
Version: 2.9.4 2008-02-29T16:57:07+01:00 - Seite 97 ZDateiname: 6515_3416_02_buchblock.pdf; preflight
Page 101 of 401
Seat belts
98 G
Risk of accident
Only adjust the driver's seat when the vehi-
cle is stationary. You will otherwise be dis-
tracted from the road and traffic conditions
and you could lose control of the vehicle as
a result of the seat moving. This could
cause an accident. G
Risk of accident
Only adjust the steering wheel when the
vehicle is stationary and do not pull away
until the steering wheel adjustment mech-
anism is locked in position. You might oth-
erwise drive without the steering wheel
adjustment mechanism being locked in
position. As a result you could be distracted
from road and traffic conditions by an unex-
pected movement of the steering wheel
and thereby cause an accident.
The steerability of the vehicle is however
not affected.
X Check whether seat 3and the head
restraint are adjusted properly
(Y page 77). Make sure that:
R
you are as far away from the driver's front
airbag as possible
R you are sitting in a normal upright posi-
tion
R you can fasten the seat belt properly
R you have moved the backrest to an
almost vertical position
R you have set the seat angle so that your
thighs are gently supported
R you can depress the pedals properly
R you have adjusted the head restraint so
that the back of your head is supported
at eye level by the central area of the
head restraint
X Check whether steering wheel 1is adjus-
ted properly (Y page 89).
Make sure that:
R you can hold the steering wheel with your
arms slightly bent
R you can move your legs freely
R you can see all the displays in the instru-
ment cluster clearly
X Check whether you have fastened seat belt
2 properly (Y page 95). It should:
R
fit snugly across your body
R be routed across the middle of your
shoulder
R routed in your pelvic area across the hip
joints Controls
211_AKB; 2; 5, en-GB
mkalafa,
Version: 2.9.4 2008-02-29T16:57:07+01:00 - Seite 98Dateiname: 6515_3416_02_buchblock.pdf; preflight