2008 MERCEDES-BENZ E-CLASS SALOON phone
[x] Cancel search: phonePage 214 of 401
Features
211Mobile phone*
G
Risk of accident
Observe the legal requirements of the
country in which you are currently driving
regarding operating mobile communica-
tions equipment in a vehicle.
If it is permitted by law to operate commu-
nications equipment while the vehicle is in
motion, you must only do so when the traf-
fic situation allows. You could otherwise be
distracted from the traffic conditions,
cause an accident and injure yourself and
others.
Two-way radios and fax equipment used
without low-reflection exterior aerials can
interfere with the vehicle's electronics and
thereby jeopardise the operating safety of
the vehicle and your safety. You must there-
fore only use this equipment if it is correctly
connected to a separate reflection-free
exterior aerial. G
Risk of injury
Excessive electromagnetic radiation may
cause damage to your health and the health
of others. Using an exterior aerial takes into
account current scientific discussions relating to the possible health risk posed by
electromagnetic fields.
i In order to ensure optimum signal quality
for mobile phones and to minimise mutual
interference between the vehicle electron-
ics and mobile phones, Mercedes-Benz rec-
ommends the use of an approved exterior
aerial. An exterior aerial conducts the elec-
tromagnetic fields generated by a wireless
device to the exterior of the vehicle; the
field strength within the vehicle interior is
lower than in a vehicle that does not have
an exterior aerial.
i There are various mobile phone brackets
that may be fitted to your vehicle; in some
cases these are country-specific. You can
obtain these mobile phone brackets from a
qualified specialist workshop, e.g. a
Mercedes-Benz Service Centre. The func-
tions and services available when you use
the phone depend on your mobile phone
model and service provider.
The mobile phone bracket is in the armrest.
X Open the telephone compartment
(Y page 206). Inserting the mobile phone into the
mobile phone bracket If the mobile phone is inserted into the mobile
phone bracket, you can only speak to the per-
son you are calling using the hands-free sys-
tem.
! Do not attempt to remove the mobile
phone and the telephone bracket together.
You could otherwise damage the mobile
phone bracket.
X Remove the cover of the aerial plug from
the back of the mobile phone and keep it in
a safe place. Cont
rols
* optional
211_AKB; 2; 5, en-GB
mkalafa ,V ersion: 2.9.4
2008-02-29T16:57:07+01:00 - Seite 211 ZDateiname: 6515_3416_02_buchblock.pdf; preflight
Page 215 of 401
Features
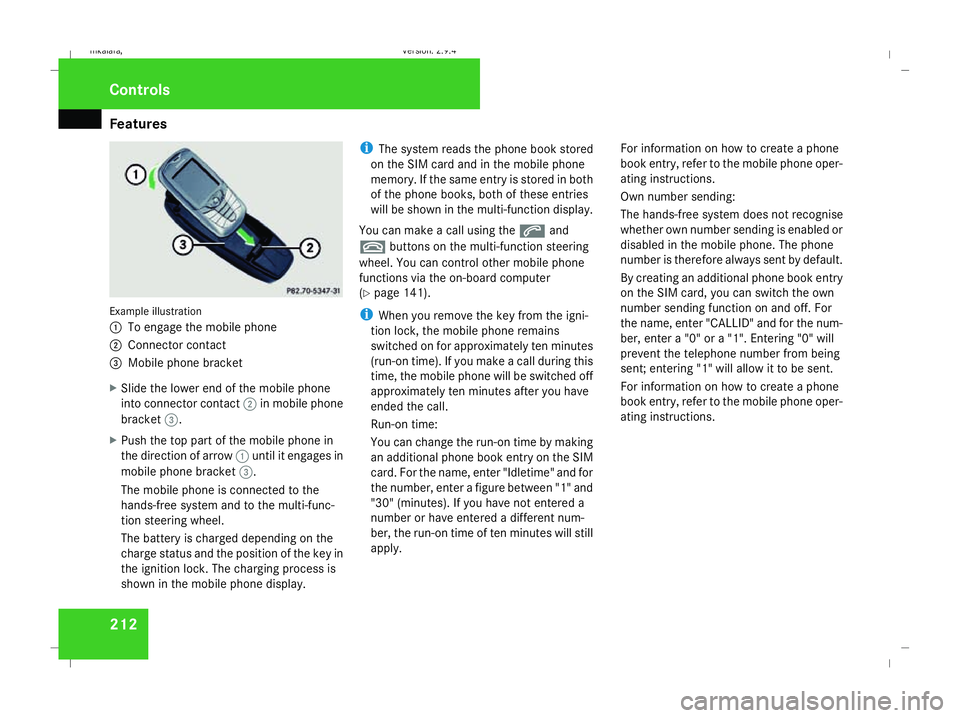
212Example illustration
1
To engage the mobile phone
2 Connector contact
3 Mobile phone bracket
X Slide the lower end of the mobile phone
into connector contact 2in mobile phone
bracket 3.
X Push the top part of the mobile phone in
the direction of arrow 1until it engages in
mobile phone bracket 3.
The mobile phone is connected to the
hands-free system and to the multi-func-
tion steering wheel.
The battery is charged depending on the
charge status and the position of the key in
the ignition lock. The charging process is
shown in the mobile phone display. i
The system reads the phone book stored
on the SIM card and in the mobile phone
memory. If the same entry is stored in both
of the phone books, both of these entries
will be shown in the multi-function display.
You can make a call using the sand
t buttons on the multi-function steering
wheel. You can control other mobile phone
functions via the on-board computer
(Y page 141).
i When you remove the key from the igni-
tion lock, the mobile phone remains
switched on for approximately ten minutes
(run-on time). If you make a call during this
time, the mobile phone will be switched off
approximately ten minutes after you have
ended the call.
Run-on time:
You can change the run-on time by making
an additional phone book entry on the SIM
card. For the name, enter "Idletime" and for
the number, enter a figure between "1" and
"30" (minutes). If you have not entered a
number or have entered a different num-
ber, the run-on time of ten minutes will still
apply. For information on how to create a phone
book entry, refer to the mobile phone oper-
ating instructions.
Own number sending:
The hands-free system does not recognise
whether own number sending is enabled or
disabled in the mobile phone. The phone
number is therefore always sent by default.
By creating an additional phone book entry
on the SIM card, you can switch the own
number sending function on and off. For
the name, enter "CALLID" and for the num-
ber, enter a "0" or a "1". Entering "0" will
prevent the telephone number from being
sent; entering "1" will allow it to be sent.
For information on how to create a phone
book entry, refer to the mobile phone oper-
ating instructions.Controls
211_AKB; 2; 5, en-GB
mkalafa,
Version: 2.9.4 2008-02-29T16:57:07+01:00 - Seite 212Dateiname: 6515_3416_02_buchblock.pdf; preflight
Page 216 of 401
Features
213
Removing the mobile phone from the
mobile phone bracket Example illustration
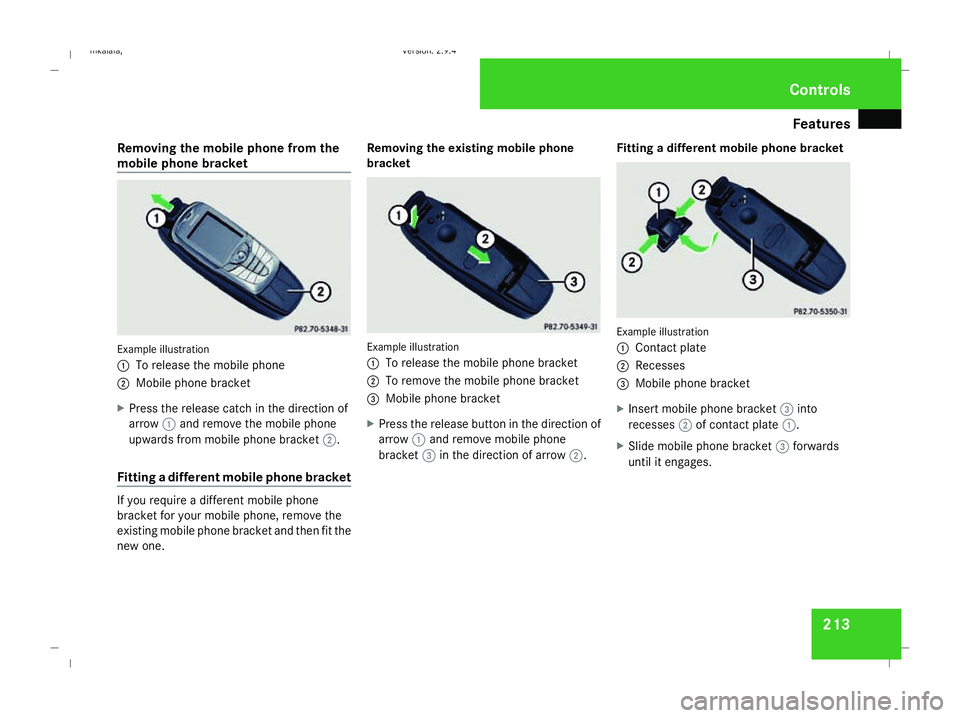
1
To release the mobile phone
2 Mobile phone bracket
X Press the release catch in the direction of
arrow 1and remove the mobile phone
upwards from mobile phone bracket 2.
Fitting a different mobile phone bracket If you require a different mobile phone
bracket for your mobile phone, remove the
existing mobile phone bracket and then fit the
new one. Removing the existing mobile phone
bracket
Example illustration
1 To release the mobile phone bracket
2 To remove the mobile phone bracket
3 Mobile phone bracket
X Press the release button in the direction of
arrow 1and remove mobile phone
bracket 3in the direction of arrow 2.Fitting a different mobile phone bracket Example illustration
1
Contact plate
2 Recesses
3 Mobile phone bracket
X Insert mobile phone bracket 3into
recesses 2of contact plate 1.
X Slide mobile phone bracket 3forwards
until it engages. Cont
rols
211_AKB; 2; 5, en-GB
mkalafa
,V ersion: 2.9.4
2008-02-29T16:57:07+01:00 - Seite 213 ZDateiname: 6515_3416_02_buchblock.pdf; preflight
Page 227 of 401

Engine compartment
224
R
Add 1.5 litres to reach maximum oil
level
R Add 2.0 litres to reach maximum oil
level
X Top up the oil if necessary ( Ypage 225).
Other messages in the multi-function dis-
play
If the engine is at normal operating tempera-
ture and there is too much oil, you will see the
following message:
Eng. oil level
Reduce oil level
X Have excess oil siphoned off.
! There is a risk of damage to the engine or
the catalytic converter if there is excess oil
in the engine.
If the Switch ignition on to check
engine oil level message appears:
X Turn the key to position 2in the ignition
lock (Y page 76).
You will see the following message if you did
not observe the required waiting time:
Observe waiting period X
Repeat the measurement after about five
minutes if the engine is at normal operating
temperature.
X Repeat the measurement after about
30 minutes if the engine is not at normal
operating temperature (if the engine was
only started briefly).
The following message appears if the engine
is running:
Engine oil level Not when engine on
X Switch off the engine and wait for five
minutes if the engine is at normal operating
temperature, or for about 30 minutes if the
engine is not at normal operating temper-
ature (if the engine was only started
briefly), before measuring.
i If you wish to cancel the measurement,
press the korj button on the multi-
function steering wheel. Using the oil dipstick Illustration: vehicle with a petrol engine (E 350)
1
Oil dipstick
2 Maximum mark
3 Minimum mark
X Pull oil dipstick 1out of the oil dipstick
tube.
X Wipe off oil dipstick 1.
X Insert oil dipstick 1into the oil dipstick
tube to the stop, and take it out again.
The oil level is correct if the level is between
minimum mark 3and maximum mark
2.
X Top up the oil if necessary. Operation
211_AKB; 2; 5, en-GB
mkalafa,
Version: 2.9.4
2008-02-29T16:57:07+01:00 - Seite 224 Dateiname: 6515_3416_02_buchblock.pdf; preflight
Page 228 of 401

Engine compartment
225
i
The difference in quantity between mini-
mum mark 3and maximum mark 2is
approximately 2 litres.
i On vehicles with a 4-cylinder petrol
engine and vehicles with an 8-cylinder pet-
rol engine, the difference between MIN
mark 3and MAX mark 2is approxi-
mately 1.5 litres.
Topping up the engine oil Illustration: vehicle with a petrol engine (E 500)
1
Cover Example of a vehicle with a diesel engine (E 220
CDI)
1 Cover
X Unscrew cap 1and remove it.
X Top up with the amount of oil required.
! Do not add too much oil. If too much oil
is added and the oil level is above the max-
imum mark on the dipstick, the engine or
catalytic converter could be damaged.
Have excess oil siphoned off.
X Screw cap 1onto the filler neck. H
Environmental note
When topping up the oil, take care not to
spill any. Oil must not be allowed to escape
into the soil or waterways. You would oth-
erwise be damaging the environment. Coolant
G
Risk of injury
The cooling system is pressurised. There-
fore, only unscrew the cap once the engine
has cooled down. The coolant temperature
gauge must display less than 70°C. You
could otherwise be scalded by escaping hot
coolant.
Coolant consists of water and antifreeze/cor-
rosion inhibitor. Only check the coolant level
when the vehicle is on a level surface and the
engine has cooled down. Operation
211_AKB; 2; 5, en-GB
mkalafa,
Version: 2.9.4
2008-02-29T16:57:07+01:00 - Seite 225 ZDateiname: 6515_3416_02_buchblock.pdf; preflight
Page 235 of 401
Tyres and wheels
232Restart Run Flat Indicator?
Yes Cancel
disappears.
The tyre pressure values stored at the last
restart will continue to be monitored. Checking the tyre pressure electroni-
cally*
The tyre pressure monitor only functions if
the correct wheel electronics are fitted to all
wheels. These monitor the pressure in all four
tyres, which you have set when restarting the
tyre pressure monitor. The monitor warns you
when the pressure drops in one or more of
the tyres. G
Risk of accident
The tyre pressure monitor does not warn
you of an incorrectly set tyre pressure. The
table on the inside of the fuel filler flap will
help you decide whether the tyre pressures
should be corrected.
The tyre pressure monitor is not able to
warn you of a sudden loss of pressure, e.g.
if the tyre is penetrated by a foreign object.
In the event of a sudden loss of pressure,
bring the vehicle to a halt by braking care-
fully. Do not make any sudden steering
movements when doing so. i
The operation of the tyre pressure moni-
tor can be affected by interference from
radio transmitting equipment (e.g. radio
headphones, two-way radios) that may be
being operated in or near the vehicle.
i If you are carrying a deflated tyre in the
vehicle, you may only reactivate the tyre
pressure monitor if:
R the deflated tyre is no longer in the vehi-
cle
R you have adjusted the tyre pressure cor-
rectly
Calling up the tyre pressure using the
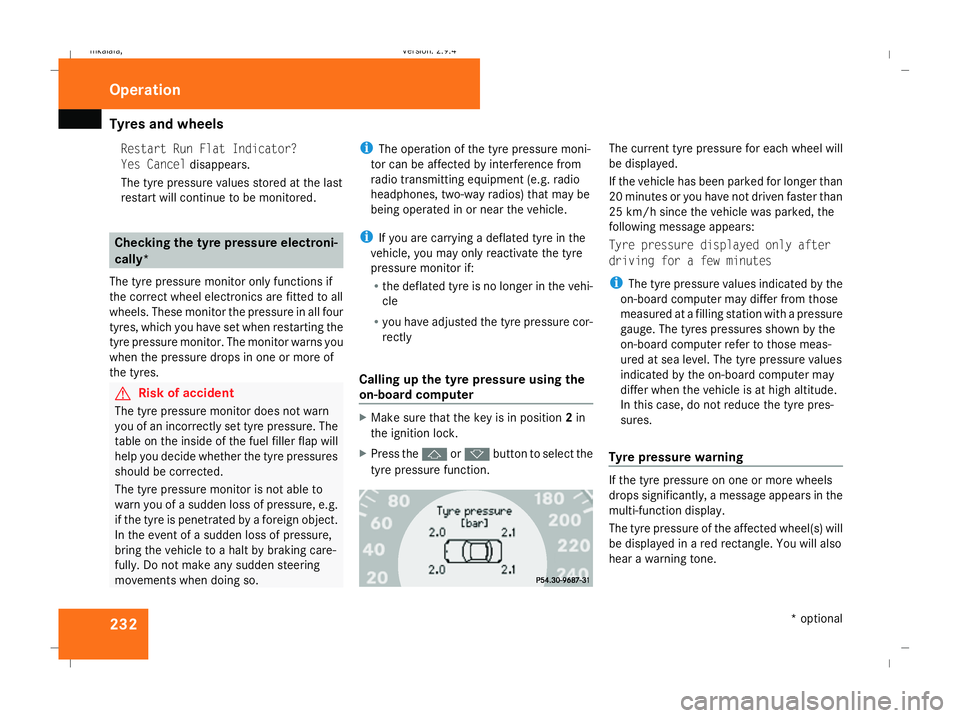
on-board computer X
Make sure that the key is in position 2in
the ignition lock.
X Press the jork button to select the
tyre pressure function. The current tyre pressure for each wheel will
be displayed.
If the vehicle has been parked for longer than
20 minutes or you have not driven faster than
25 km/h since the vehicle was parked, the
following message appears:
Tyre pressure displayed only after
driving for a few minutes
i
The tyre pressure values indicated by the
on-board computer may differ from those
measured at a filling station with a pressure
gauge. The tyres pressures shown by the
on-board computer refer to those meas-
ured at sea level. The tyre pressure values
indicated by the on-board computer may
differ when the vehicle is at high altitude.
In this case, do not reduce the tyre pres-
sures.
Tyre pressure warning If the tyre pressure on one or more wheels
drops significantly, a message appears in the
multi-function display.
The tyre pressure of the affected wheel(s) will
be displayed in a red rectangle. You will also
hear a warning tone.Operation
* optional
211_AKB; 2; 5, en-GB
mkalafa
,V ersion: 2.9.4
2008-02-29T16:57:07+01:00 - Seite 232 Dateiname: 6515_3416_02_buchblock.pdf; preflight
Page 249 of 401

Care
246R
battery
R connectors
R lights
R seals
Damaged seals or electrical components
can lead to failures or leaks.
Cleaning the wiper blades and the out-
side of the windscreen G
Risk of injury
Turn the key to position 0in the ignition
lock before cleaning the windscreen or the
wiper blades. There is otherwise a risk of
the windscreen wipers being set in motion
and causing injury.
X Turn the key to position 1in the ignition
lock (Y page 76).
X Set the windscreen wipers to position
u on the combination switch
(Y page 105).
X Turn the key to position 0or remove it when
the wiper arms are vertical (Y page 76).!
Only fold the wiper arms away from the
windscreen when they are in a vertical posi-
tion, otherwise you will damage the bonnet.
X Fold the wiper arms away from the wind-
screen until you feel them engage.
X Clean the windscreen and the wiper blades.
X Fold the windscreen wipers back again
before the ignition is switched on.
! Do not clean the wiper blades too often,
otherwise the rubber may become porous,
resulting in wiper noise.
Cleaning the windows !
Do not use dry cloths, abrasive products,
solvents or cleaning agents containing sol-
vents to clean the inside of the windows.
Clean the insides of the windows with a
damp cloth or commercially-available glass
cleaner. Avoid touching the inside of the
rear windscreen and the side windows with
hard objects, e.g. ice scrapers or rings. You
could otherwise cause damage to the win-
dows, rear window heating or aerial on the
rear window. i
Anti-glare film retrofitted to the insides of
the windows could interfere with radio or
mobile phone reception, especially if it is
conductive or metal-coated film. Informa-
tion about anti-glare film can be obtained
from any Mercedes-Benz Service Centre.
Cleaning the headlamps X
Clean the headlamp lenses with a wet
sponge.
! Only use washer fluid which is suitable
for plastic lenses. Unsuitable washer fluid
could damage the plastic lenses of the
headlamps.
Do not use the following:
R dry cloths
R abrasive cleaning agents
R solvents
R cleaning agents containing solvent
You could otherwise scratch or damage the
surface of the lenses. Operation
211_AKB; 2; 5, en-GB
mkalafa,
Version: 2.9.4 2008-02-29T16:57:07+01:00 - Seite 246Dateiname: 6515_3416_02_buchblock.pdf; preflight
Page 284 of 401
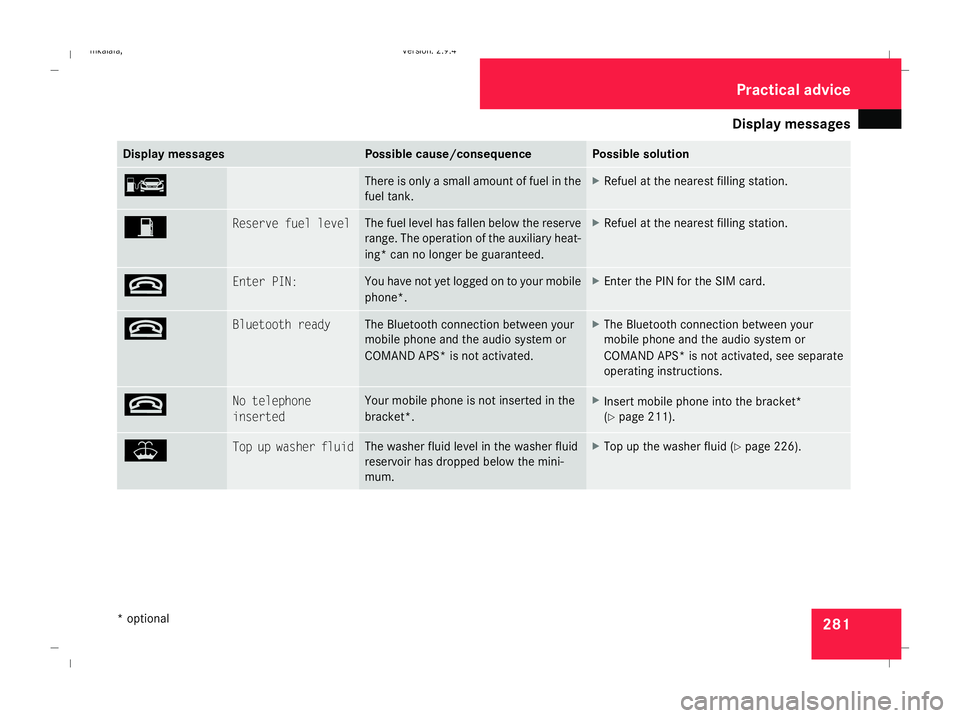
Display
messages 281Display messages Possible cause/consequence Possible solution
¿ There is only a small amount of fuel in the
fuel tank. X
Refuel at the nearest filling station. W Reserve fuel level The fuel level has fallen below the reserve
range. The operation of the auxiliary heat-
ing* can no longer be guaranteed. X
Refuel at the nearest filling station. t Enter PIN: You have not yet logged on to your mobile
phone*. X
Enter the PIN for the SIM card. t Bluetooth ready The Bluetooth connection between your
mobile phone and the audio system or
COMAND APS* is not activated. X
The Bluetooth connection between your
mobile phone and the audio system or
COMAND APS* is not activated, see separate
operating instructions. t No telephone
inserted Your mobile phone is not inserted in the
bracket*. X
Insert mobile phone into the bracket*
(Y page 211). W Top up washer fluid The washer fluid level in the washer fluid
reservoir has dropped below the mini-
mum. X
Top up the washer fluid (Y page 226). Practical advi
ce
* optional
211_AKB; 2; 5, en-GB
mkalafa,
Version: 2.9.4 2008-02-29T16:57:07+01:00 - Seite 281 ZDateiname: 6515_3416_02_buchblock.pdf; preflight