2008 MERCEDES-BENZ E-CLASS SALOON key
[x] Cancel search: keyPage 310 of 401
Locking/unlocking in an emergency
307Locking the vehicle
If the vehicle can no longer be locked cen-
trally with the key or the KEYLESS GO key*:
X Open the driver's door.
X Close the front-passenger door, the rear
doors and the boot lid/tailgate.
X Press the locking button (Y page 70).
X Check whether the locking knobs on the
doors are still visible. Press the locking
knobs down manually if necessary.
X Close the driver's door.
X Remove the emergency key element from
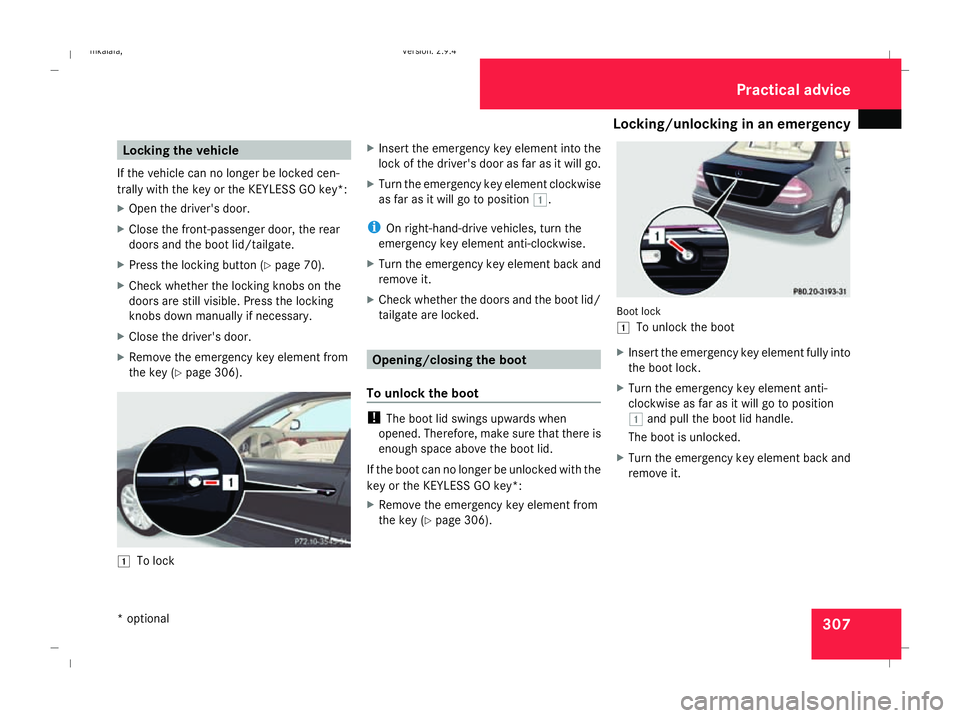
the key (Y page 306). $
To lock X
Insert the emergency key element into the
lock of the driver's door as far as it will go.
X Turn the emergency key element clockwise
as far as it will go to position $.
i On right-hand-drive vehicles, turn the
emergency key element anti-clockwise.
X Turn the emergency key element back and
remove it.
X Check whether the doors and the boot lid/
tailgate are locked. Opening/closing the boot
To unlock the boot !
The boot lid swings upwards when
opened. Therefore, make sure that there is
enough space above the boot lid.
If the boot can no longer be unlocked with the
key or the KEYLESS GO key*:
X Remove the emergency key element from
the key (Y page 306). Boot lock
$
To unlock the boot
X Insert the emergency key element fully into
the boot lock.
X Turn the emergency key element anti-
clockwise as far as it will go to position
$ and pull the boot lid handle.
The boot is unlocked.
X Turn the emergency key element back and
remove it. Practical advice
* optional
211_AKB; 2; 5, en-GB
mkalafa,
Version: 2.9.4 2008-02-29T16:57:07+01:00 - Seite 307 ZDateiname: 6515_3416_02_buchblock.pdf; preflight
Page 311 of 401
Locking/unlocking in an emergency
308
Opening the boot manually (remote
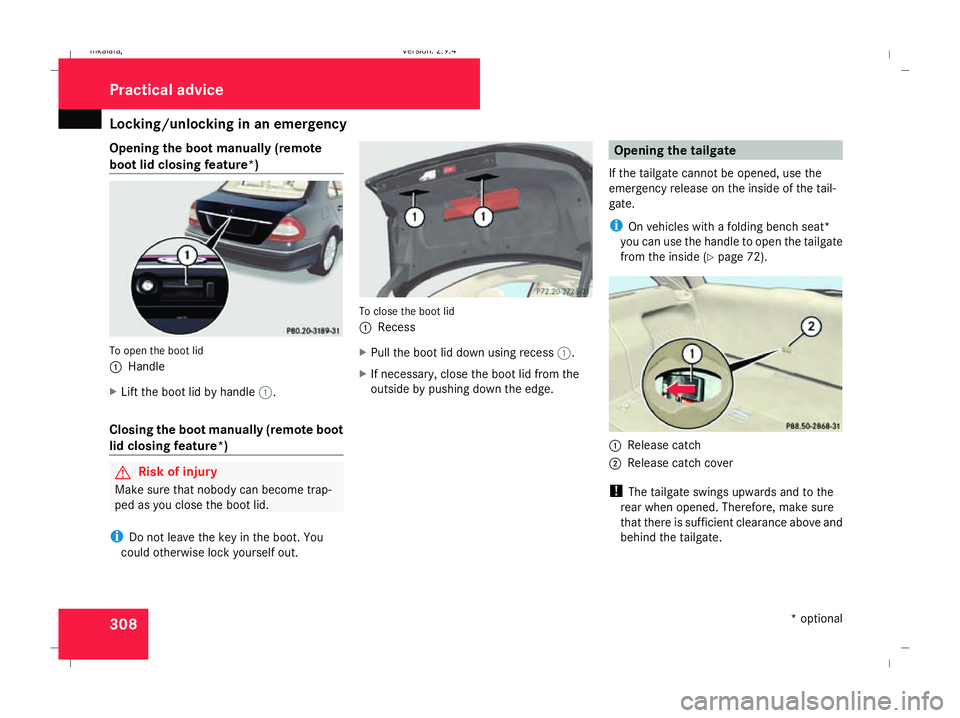
boot lid closing feature*) To open the boot lid
1
Handle
X Lift the boot lid by handle 1.
Closing the boot manually (remote boot
lid closing feature*) G
Risk of injury
Make sure that nobody can become trap-
ped as you close the boot lid.
i Do not leave the key in the boot. You
could otherwise lock yourself out. To close the boot lid
1
Recess
X Pull the boot lid down using recess 1.
X If necessary, close the boot lid from the
outside by pushing down the edge. Opening the tailgate
If the tailgate cannot be opened, use the
emergency release on the inside of the tail-
gate.
i On vehicles with a folding bench seat*
you can use the handle to open the tailgate
from the inside (Y page 72). 1
Release catch
2 Release catch cover
! The tailgate swings upwards and to the
rear when opened. Therefore, make sure
that there is sufficient clearance above and
behind the tailgate. Practical advice
* optional
211_AKB; 2; 5, en-GB
mkalafa,
Version: 2.9.4 2008-02-29T16:57:07+01:00 - Seite 308Dateiname: 6515_3416_02_buchblock.pdf; preflight
Page 313 of 401
Changing the batteries
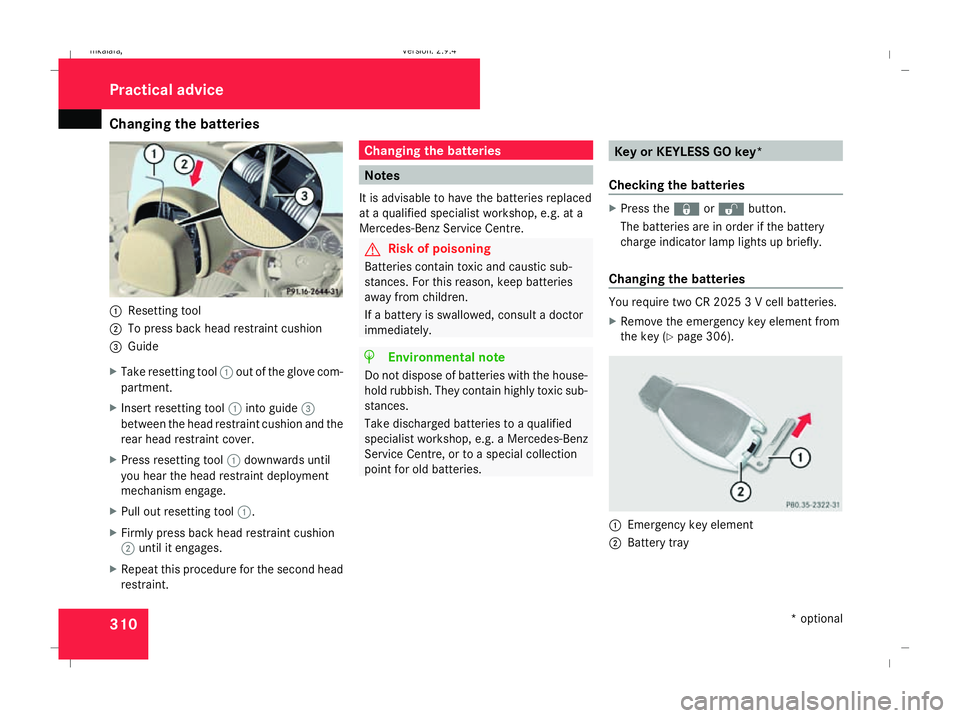
3101
Resetting tool
2 To press back head restraint cushion
3 Guide
X Take resetting tool 1out of the glove com-
partment.
X Insert resetting tool 1into guide 3
between the head restraint cushion and the
rear head restraint cover.
X Press resetting tool 1downwards until
you hear the head restraint deployment
mechanism engage.
X Pull out resetting tool 1.
X Firmly press back head restraint cushion
2 until it engages.
X Repeat this procedure for the second head
restraint. Changing the batteries
Notes
It is advisable to have the batteries replaced
at a qualified specialist workshop, e.g. at a
Mercedes-Benz Service Centre. G
Risk of poisoning
Batteries contain toxic and caustic sub-
stances. For this reason, keep batteries
away from children.
If a battery is swallowed, consult a doctor
immediately. H
Environmental note
Do not dispose of batteries with the house-
hold rubbish. They contain highly toxic sub-
stances.
Take discharged batteries to a qualified
specialist workshop, e.g. a Mercedes-Benz
Service Centre, or to a special collection
point for old batteries. Key or KEYLESS GO key*
Checking the batteries X
Press the jork button.
The batteries are in order if the battery
charge indicator lamp lights up briefly.
Changing the batteries You require two CR 2025 3 V cell batteries.
X
Remove the emergency key element from
the key (Y page 306). 1
Emergency key element
2 Battery tray Practical advice
* optional
211_AKB; 2; 5, en-GB
mkalafa,
Version: 2.9.4 2008-02-29T16:57:07+01:00 - Seite 310Dateiname: 6515_3416_02_buchblock.pdf; preflight
Page 314 of 401
Changing the bulbs
311
X
Insert emergency key element 1into the
opening in the key and push in the direction
of the arrow.
Battery tray 2is released.
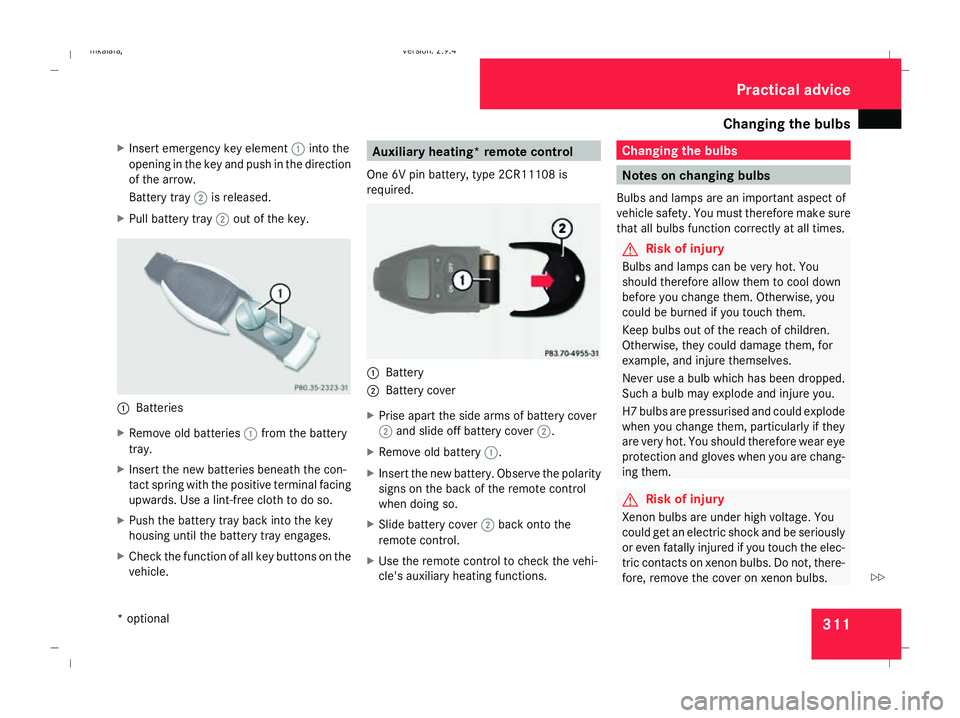
X Pull battery tray 2out of the key. 1
Batteries
X Remove old batteries 1from the battery
tray.
X Insert the new batteries beneath the con-
tact spring with the positive terminal facing
upwards. Use a lint-free cloth to do so.
X Push the battery tray back into the key
housing until the battery tray engages.
X Check the function of all key buttons on the
vehicle. Auxiliary heating* remote control
One 6V pin battery, type 2CR11108 is
required. 1
Battery
2 Battery cover
X Prise apart the side arms of battery cover
2 and slide off battery cover 2.
X Remove old battery 1.
X Insert the new battery. Observe the polarity
signs on the back of the remote control
when doing so.
X Slide battery cover 2back onto the
remote control.
X Use the remote control to check the vehi-
cle's auxiliary heating functions. Changing the bulbs
Notes on changing bulbs
Bulbs and lamps are an important aspect of
vehicle safety. You must therefore make sure
that all bulbs function correctly at all times. G
Risk of injury
Bulbs and lamps can be very hot. You
should therefore allow them to cool down
before you change them. Otherwise, you
could be burned if you touch them.
Keep bulbs out of the reach of children.
Otherwise, they could damage them, for
example, and injure themselves.
Never use a bulb which has been dropped.
Such a bulb may explode and injure you.
H7 bulbs are pressurised and could explode
when you change them, particularly if they
are very hot. You should therefore wear eye
protection and gloves when you are chang-
ing them. G
Risk of injury
Xenon bulbs are under high voltage. You
could get an electric shock and be seriously
or even fatally injured if you touch the elec-
tric contacts on xenon bulbs. Do not, there-
fore, remove the cover on xenon bulbs. Practical advice
* optional
211_AKB; 2; 5, en-GB
mkalafa,
Version: 2.9.4 2008-02-29T16:57:07+01:00 - Seite 311 ZDateiname: 6515_3416_02_buchblock.pdf; preflight
Page 318 of 401
Replacing the wiper blades
315Changing the rear bulbs
Changing the bulbs in the licence plate
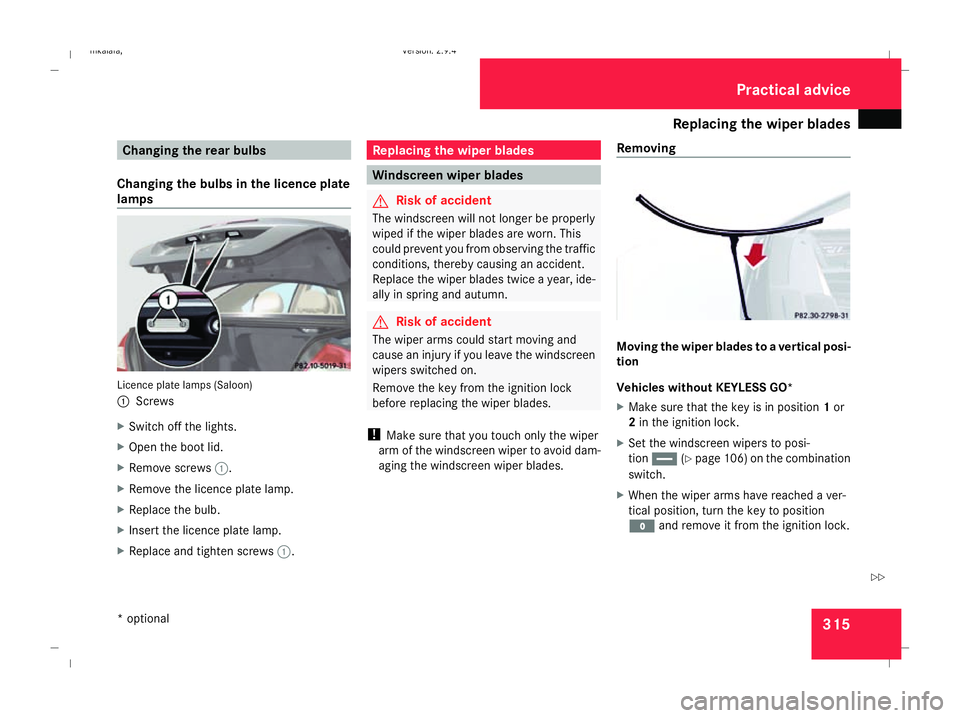
lamps Licence plate lamps (Saloon)
1
Screws
X Switch off the lights.
X Open the boot lid.
X Remove screws 1.
X Remove the licence plate lamp.
X Replace the bulb.
X Insert the licence plate lamp.
X Replace and tighten screws 1. Replacing the wiper blades
Windscreen wiper blades
G
Risk of accident
The windscreen will not longer be properly
wiped if the wiper blades are worn. This
could prevent you from observing the traffic
conditions, thereby causing an accident.
Replace the wiper blades twice a year, ide-
ally in spring and autumn. G
Risk of accident
The wiper arms could start moving and
cause an injury if you leave the windscreen
wipers switched on.
Remove the key from the ignition lock
before replacing the wiper blades.
! Make sure that you touch only the wiper
arm of the windscreen wiper to avoid dam-
aging the windscreen wiper blades. Removing Moving the wiper blades to a vertical posi-
tion
Vehicles without KEYLESS GO*
X
Make sure that the key is in position 1or
2 in the ignition lock.
X Set the windscreen wipers to posi-
tion u (Ypage 106) on the combination
switch.
X When the wiper arms have reached a ver-
tical position, turn the key to position
M and remove it from the ignition lock. Practical advice
* optional
211_AKB; 2; 5, en-GB
mkalafa ,V ersion: 2.9.4
2008-02-29T16:57:07+01:00 - Seite 315 ZDateiname: 6515_3416_02_buchblock.pdf; preflight
Page 319 of 401
Replacing the wiper blades
316
X
Fold the wiper arm away from the wind-
screen until it engages.
X Set the wiper blade at right angles to the
wiper arm.
Vehicles with KEYLESS GO*
X Switch off the engine.
X Take your foot off the brake pedal.
X Set the windscreen wipers to posi-
tion u (Ypage 106) on the combination
switch.
X Press the KEYLESS GO button repeatedly
until the windscreen wipers start.
X When the wiper arms have reached a ver-
tical position, press the KEYLESS GO but-
ton.
X Fold the wiper arm away from the wind-
screen until it engages.
X Set the wiper blade at right angles to the
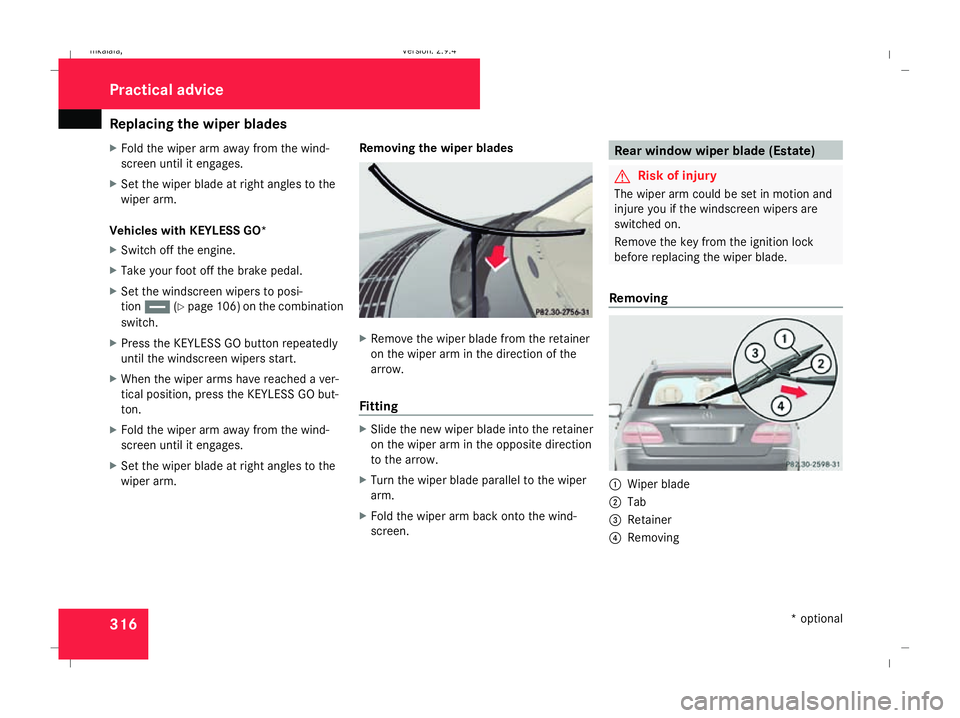
wiper arm. Removing the wiper blades X
Remove the wiper blade from the retainer
on the wiper arm in the direction of the
arrow.
Fitting X
Slide the new wiper blade into the retainer
on the wiper arm in the opposite direction
to the arrow.
X Turn the wiper blade parallel to the wiper
arm.
X Fold the wiper arm back onto the wind-
screen. Rear window wiper blade (Estate)
G
Risk of injury
The wiper arm could be set in motion and
injure you if the windscreen wipers are
switched on.
Remove the key from the ignition lock
before replacing the wiper blade.
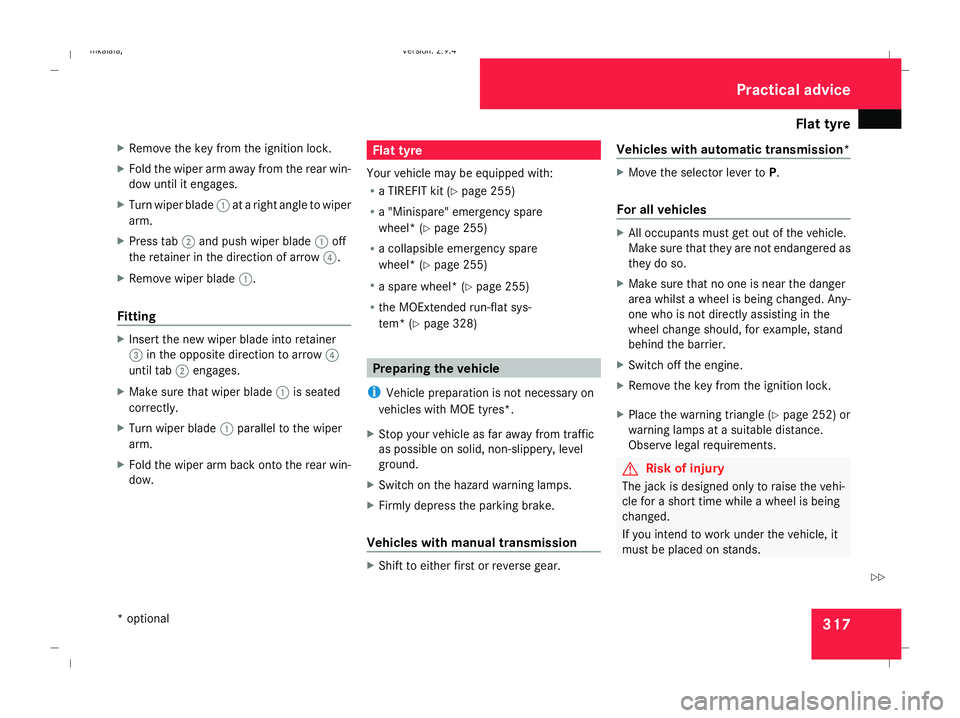
Removing 1
Wiper blade
2 Tab
3 Retainer
4 Removing Practical advice
* optional
211_AKB; 2; 5, en-GB
mkalafa
, Version: 2.9.4 2008-02-29T16:57:07+01:00 - Seite 316Dateiname: 6515_3416_02_buchblock.pdf; preflight
Page 320 of 401
Flat tyre
317
X
Remove the key from the ignition lock.
X Fold the wiper arm away from the rear win-
dow until it engages.
X Turn wiper blade 1at a right angle to wiper
arm.
X Press tab 2and push wiper blade 1off
the retainer in the direction of arrow 4.
X Remove wiper blade 1.
Fitting X
Insert the new wiper blade into retainer
3 in the opposite direction to arrow 4
until tab 2engages.
X Make sure that wiper blade 1is seated
correctly.
X Turn wiper blade 1parallel to the wiper
arm.
X Fold the wiper arm back onto the rear win-
dow. Flat tyre
Your vehicle may be equipped with:
R a TIREFIT kit (Y page 255)
R a "Minispare" emergency spare
wheel* (Y page 255)
R a collapsible emergency spare
wheel* (Y page 255)
R a spare wheel* (Y page 255)
R the MOExtended run-flat sys-
tem* (Y page 328) Preparing the vehicle
i Vehicle preparation is not necessary on
vehicles with MOE tyres*.
X Stop your vehicle as far away from traffic
as possible on solid, non-slippery, level
ground.
X Switch on the hazard warning lamps.
X Firmly depress the parking brake.
Vehicles with manual transmission X
Shift to either first or reverse gear. Vehicles with automatic transmission* X
Move the selector lever to P.
For all vehicles X
All occupants must get out of the vehicle.
Make sure that they are not endangered as
they do so.
X Make sure that no one is near the danger
area whilst a wheel is being changed. Any-
one who is not directly assisting in the
wheel change should, for example, stand
behind the barrier.
X Switch off the engine.
X Remove the key from the ignition lock.
X Place the warning triangle ( Ypage 252) or
warning lamps at a suitable distance.
Observe legal requirements. G
Risk of injury
The jack is designed only to raise the vehi-
cle for a short time while a wheel is being
changed.
If you intend to work under the vehicle, it
must be placed on stands. Practical advice
* optional
211_AKB; 2; 5, en-GB
mkalafa,
Version: 2.9.4
2008-02-29T16:57:07+01:00 - Seite 317 ZDateiname: 6515_3416_02_buchblock.pdf; preflight
Page 323 of 401

Flat tyre
320a
Pressure release screw
b Pressure gauge
X Make sure pressure release screw aon
pressure gauge bis fully closed.
X Screw filler hose 8onto valve 9.
X Insert plug 5into the socket of the ciga-
rette lighter* (Y page 209) or into a 12V
power socket in your vehicle
(Y page 210).
X Turn the key to position 1(Y page 76) in
the ignition lock. X
Press on/off switch 4on the electric air
pump to I.
The electric air pump is switched on. The
tyre is inflated.
i First, TIREFIT is pumped into the tyre. The
pressure can briefly rise to around 5 bar.
Do not switch off the electric pump dur-
ing this phase.
X Let the electric pump run for five minutes.
The tyre should then have a pressure of at
least 1.8 bar.
! Do not operate the electric air pump for
longer than six minutes without a break.
Otherwise, it may overheat.
The air pump can be operated again once
it has cooled down.
If a pressure of 1.8 bar is not reached after
five minutes:
X Switch off and disconnect the electric air
pump and drive the vehicle forwards or
backwards approximately 10 m.
This distributes the TIREFIT more evenly.
X Remove TIREFIT filler bottle 1from the
electric pump.
X Pump up the tyre again. G
Risk of accident
If a pressure of 1.8 bar is not achieved after
five minutes, the tyre is too badly damaged.
Do not drive any further. Consult a qualified
specialist workshop which has the neces-
sary specialist knowledge and tools to carry
out the work required. Mercedes-Benz rec-
ommends that you use a Mercedes-Benz
Service Centre for this purpose. In particu-
lar, work relevant to safety or on safety-
related systems must be carried out at a
qualified specialist workshop.
If a tyre pressure of 1.8 bar is reached:
X Press on/off switch 4on the electric air
pump to 0.
The electric air pump is switched off.
X Disconnect the electric air pump and stow
it away.
X Fold up the warning triangle and stow it
away.
X Pull away immediately.
This distributes the TIREFIT more evenly
around the tyre.
X Stop after driving for approximately ten
minutes and check the tyre pressure with
the electric air pump. Practical advice
* optional
211_AKB; 2; 5, en-GB
mkalafa,
Version: 2.9.4 2008-02-29T16:57:07+01:00 - Seite 320Dateiname: 6515_3416_02_buchblock.pdf; preflight