2008 MERCEDES-BENZ E-CLASS SALOON service indicator
[x] Cancel search: service indicatorPage 6 of 401

31, 2, 3 ...
4MATIC (permanent four-wheel
drive) . . . . . . . . . . . . . . . . . . . . . . . . . .158
7G–TRONIC . . . . . . . . . . . . . . . . . . . . .116 A
ABS (Anti-lock Braking System) . . . ..58
Display message . . . . . . . . . .258, 269
Warning lamp . . . . . . . . . . . . . . . . .285
Acceleration
Technical data . . . . . . . . . . . . . . . .354
Accident
Notes . . . . . . . . . . . . . . . . . . . . . . .293
Active Service System
see ASSYST PLUS
ADAPTIVE BRAKE . . . . . . . . . . . . . . . . .61
Adaptive brake lamps . . . . . . . . . . . ..59
Adaptive damping system see ADS
ADS . . . . . . . . . . . . . . . . . . . . . . . . . . .157
Airbag Activatio n.. . . . . . . . . . . . . . . . . . . .41
Control unit . . . . . . . . . . . . . . . . . . .41
Driver's . . . . . . . . . . . . . . . . . . . . . . .44
Front . . . . . . . . . . . . . . . . . . . . . . . .44
Front passenger . . . . . . . . . . . . . . . .44
PASSENGER AIRBAG OFF warning
lamp . . . . . . . . . . . . . . . . . . . . . . .283
Sidebag s.. . . . . . . . . . . . . . . . . . . .45System . . . . . . . . . . . . . . . . . . . . . .
.43
Windowbags . . . . . . . . . . . . . . . . . . .46
Air cleaner
Display message . . . . . . . . . . . . . .276
Air conditioning
2-zone Thermatic . . . . . . . . . . . . . .164
4-zone Thermotronic . . . . . . . . . . .166
Activating/deactivating . . . . . . . . .169
Activating/deactivating air-recir-
culation mode . . . . . . . . . . . . . . . .175
Air-recirculation mode with con-
venience opening/closing feature .176
Auxiliary heating/ventilation . . . . .177
Controlling automatically . . . . . . . .170
Cooling with air dehumidification . .169
Demisting the windscreen . . . . . . .174
Malfunction indicator lamp . . . . . .283
Misted-up windows . . . . . . . . . . . .175
Rear compartment . . . . . . . . . . . . .169
Rear window heating . . . . . . . . . . .175
Setting the air distribution . . . . . . .173
Setting the airflow . . . . . . . . . . . . .174
Setting the air vents . . . . . . . . . . . .171
Setting the temperature . . . . . . . . .170
Setting the temperature (rear
compartment) . . . . . . . . . . . . . . . .171
Switching the residual heat func-
tion on/off . . . . . . . . . . . . . . . . . . .176
see Climate control
Airmatic DC (Dual Control) . . . . . . ..156 Air pump, electric
. . . . . . . . . . . . . ..255
Ambient lighting Setting (on-board computer) . . . . .136
Antifreeze concentration . . . ..389, 390
Anti-lock braking system see ABS
Anti-theft alarm system
see ATA
Anti-theft systems . . . . . . . . . . . . . . ..62
Ashtray . . . . . . . . . . . . . . . . . . . . . . . .209
ASSYST PLUS . . . . . . . . . . . . . . . . . . .243
ATA (anti-theft alarm system) . . . . ..62
Switching off the alarm . . . . . . . . . .62
Audible warning signal . . . . . . . . . ..292
AUTO lights Display message . . . . . . . . . . . . . .273
Automatic car wash . . . . . . . . . . . ..245
Automatic transmission Changing gear yoursel f.. . . . . . . .116
Display in the speedometer . . . . . .115
Driving tips . . . . . . . . . . . . . . . . . . .117
Emergency running mode . . . . . . .297
Malfunction . . . . . . . . . . . . . . . . . .297
One-touch gearshifting . . . . . . . . .116
Program selector button . . . . . . . .117
Releasing the parking lock man-
ually . . . . . . . . . . . . . . . . . . . . . . . .309
Selector lever positions . . . . . . . . .115
Shift ranges . . . . . . . . . . . . . . . . . .116
Trailer towing . . . . . . . . . . . . . . . . .117 Index
211_AKB; 2; 5, en-GB
mkalafa,
Version: 2.9.4
2008-02-29T16:57:07+01:00 - Seite 3 Dateiname: 6515_3416_02_buchblock.pdf; preflight
Page 15 of 401

12
Rear-view mirror
Adjustin g.. . . . . . . . . . . . . . . . . . . .91
Anti-dazzle (manual) . . . . . . . . . . . . .91
Anti-dazzle mode (automatic) . . . . .92
Rear window
Cleaning . . . . . . . . . . . . . . . . . . . . .246
Rear window blind . . . . . . . . . . . . . ..208
Rear window heating . . . . . . . . . . ..175
Malfunction indicator lamp . . . . . .283
Rear window wiper . . . . . . . . . . . . ..106
Replacing the wiper blade . . . . . . .316
Refuelling . . . . . . . . . . . . . . . . . . . . . .218
Remote control Auxiliary heating . . . . . . . . . . . . . .178
Changing the batteries (auxiliary
heating) . . . . . . . . . . . . . . . . . . . . .311
Garage door opene r.. . . . . . . . . . .214
Programming (garage door
opener) . . . . . . . . . . . . . . . . . . . . . .214
Replacing the wiper blades . . . . . ..315
Reserve Display message . . . . . . . . . . . . . .281
Reserve fuel . . . . . . . . . . . . . . . . . . . .378
Display message . . . . . . . . . . . . . .281
Fuel tank . . . . . . . . . . . . . . . . . . . .378
Warning lamp . . . . . . . . . . . . . . . . .291
Reset button . . . . . . . . . . . . . . . . . . .120
Restraint system Display message . . . . . . . . . . . . . .265 Restraint System
see SRS
Restraint systems
For children . . . . . . . . . . . . . . . . . . .48
Retaining hooks (boot) . . . . . . . . . ..195
Rev counter . . . . . . . . . . . . . . . . . . . .121
Reverse gear Engaging (automatic transmission) 115
Engaging (manual transmission) . .115
Reversing lamp
Display message . . . . . . . . . . . . . .276
Roller sunblind
Opening/closing . . . . . . . . . . . . . .184
Rear side window . . . . . . . . . . . . . .208
Rear window . . . . . . . . . . . . . . . . .208
Roof load, maximum
. . . . . . . . . . . . . .370, 371, 372, 373, 374
Roof rack . . . . . . . . . . . . . . . . . . . . . .187
Run-on time (mobile phone) . . . . . ..212 S
Safety net . . . . . . . . . . . . . . . . . . . . . .201
Seat Adjusting . . . . . . . . . . . . . . .77, 78, 80
Correct driver's seat position . . . . . .97
Storing settings . . . . . . . . . . . . . . . .93Seat belt
Adjusting the height . . . . . . . . . . . . .97
Fastening . . . . . . . . . . . . . . . . . . . . .95
Warning lamp . . . . . . . . . . . . . .97, 290
Seat cushion
Removing (rear bench seat) . .197, 200
Seat heating . . . . . . . . . . . . . . . . . . . . .85
Seat ventilation . . . . . . . . . . . . . . . . . .85
Malfunction indicator lamp . . . . . .282
Securing a load . . . . . . . . . . . . . . . . .191
Selector lever Display message . . . . . . . . . . . . . .261
Positions . . . . . . . . . . . . . . . . . . . .115
Service
Display message . . . . . . . . . . . . . .243
Service display
see ASSYST PLUS
Service indicator
see ASSYST PLUS
Service products . . . . . . . . . . . . . . . .377
Brake fluid . . . . . . . . . . . . . . . . . . .390
Coolant . . . . . . . . . . . . . . . . . . . . .388
Windscreen washer fluid . . . . . . . .390
Settings
Calling up a stored setting . . . . . . . .94
Factory (key ).. . . . . . . . . . . . . .66, 67
Factory (KEYLESS GO) . . . . . . . . . . .68
Factory (on-board computer) . . . . .132 Index
211_AKB; 2; 5, en-GB
mkalafa,
Version: 2.9.4 2008-02-29T16:57:07+01:00 - Seite 12Dateiname: 6515_3416_02_buchblock.pdf; preflight
Page 102 of 401

Lights
99Lights
Light switch
For reasons of safety, Mercedes-Benz recom-
mends that you drive with the lights switched
on even during the daytime. In some coun-
tries, daytime operation of headlamps varies
due to legal requirements and self-imposed
obligations. In these countries, the dipped-
beam headlamps are automatically switched
on when the engine is started.
i If you drive in countries in which traffic
drives on the opposite side of the road to
the country where the vehicle is registered,
oncoming traffic may be dazzled by the
asymmetrical dipped-beam headlamps.
Have the headlamps changed to symmet-
rical dipped beam when driving in these
countries. You can obtain information
about this from any Mercedes-Benz Service
Centre. $
a
Left-hand parking lamp
% g
Right-hand parking lamp
& M
Lights off/constant headlamp mode
( U
Automatic headlamp mode/con-
stant headlamp mode
) C
Side lamps, licence plate and instru-
ment lighting
* B
Dipped-beam headlamps or main-
beam headlamps
, ¥
Foglamps
. †
Rear foglamp
i The exterior lighting automatically
switches off when you remove the key from
the ignition lock or open the door while the
ignition is switched off (ignition key in posi-
tion 0). !
Switch off the side lamps or parking lamp
when you leave the vehicle. This prevents
the battery from discharging.
Dipped-beam headlamps X
Make sure that the key is in position 2of
the ignition lock or that the engine is run-
ning.
X To switch on: turn the light switch to
B.
The dipped-beam headlamps, parking
lamps and licence plate lamps are switched
on. The green dipped-beam indicator lamp
in the instrument cluster light up.
Constant headlamp mode In countries in which constant headlamp
mode is not a legal requirement, you can
make this setting using the on-board com-
puter.
You can activate or deactivate "constant
headlamp mode" using the on-board com-
puter (Y page 135). Controls
211_AKB; 2; 5, en-GB
mkalafa,
Version: 2.9.4 2008-02-29T16:57:07+01:00 - Seite 99 ZDateiname: 6515_3416_02_buchblock.pdf; preflight
Page 129 of 401
On-board computer
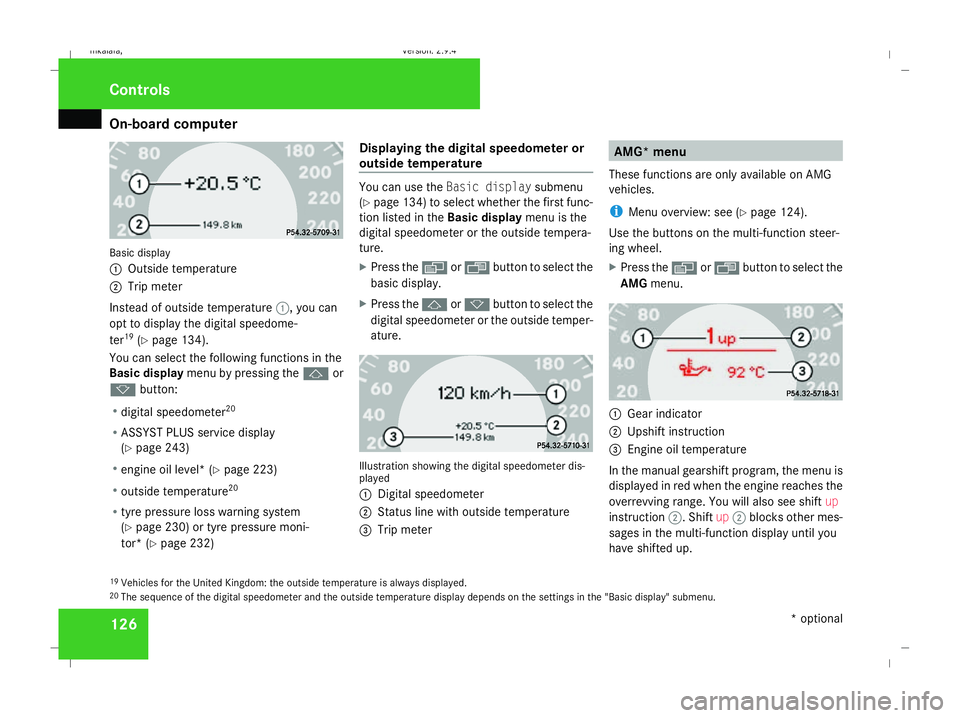
126Basic display
1
Outside temperature
2 Trip meter
Instead of outside temperature 1, you can
opt to display the digital speedome-
ter 19
(Y page 134).
You can select the following functions in the
Basic display menu by pressing the jor
k button:
R digital speedometer 20
R ASSYST PLUS service display
(Y page 243)
R engine oil level* (Y page 223)
R outside temperature 20
R tyre pressure loss warning system
(Y page 230) or tyre pressure moni-
tor* (Y page 232) Displaying the digital speedometer or
outside temperature You can use the
Basic display submenu
(Y page 134) to select whether the first func-
tion listed in the Basic displaymenu is the
digital speedometer or the outside tempera-
ture.
X Press the èor· button to select the
basic display.
X Press the jork button to select the
digital speedometer or the outside temper-
ature. Illustration showing the digital speedometer dis-
played
1
Digital speedometer
2 Status line with outside temperature
3 Trip meter AMG* menu
These functions are only available on AMG
vehicles.
i Menu overview: see (Y page 124).
Use the buttons on the multi-function steer-
ing wheel.
X Press the èor· button to select the
AMG menu. 1
Gear indicator
2 Upshift instruction
3 Engine oil temperature
In the manual gearshift program, the menu is
displayed in red when the engine reaches the
overrevving range. You will also see shift up
instruction 2. Shiftup2 blocks other mes-
sages in the multi-function display until you
have shifted up.
19 Vehicles for the United Kingdom: the outside temperature is always displayed.
20 The sequence of the digital speedometer and the outside temperature display depends on the settings in the "Basic display" submenu. Controls
* optional
211_AKB; 2; 5, en-GB
mkalafa,
Version: 2.9.4 2008-02-29T16:57:07+01:00 - Seite 126Dateiname: 6515_3416_02_buchblock.pdf; preflight
Page 181 of 401
Air conditioning
178
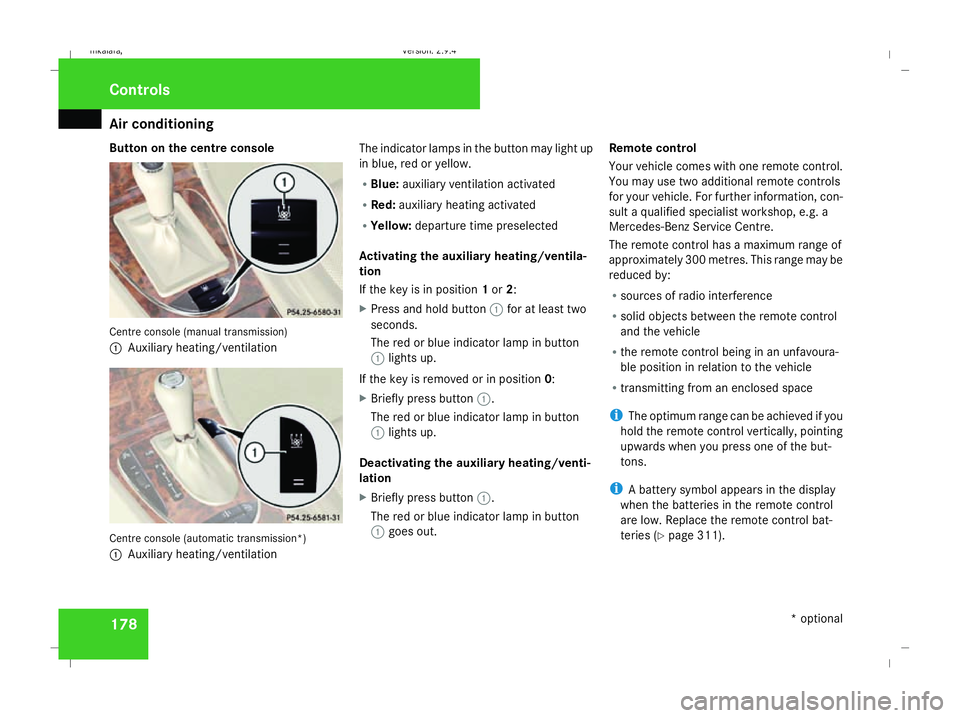
Button on the centre console
Centre console (manual transmission)
1
Auxiliary heating/ventilation Centre console (automatic transmission*)
1 Auxiliary heating/ventilation The indicator lamps in the button may light up
in blue, red or yellow.
R
Blue: auxiliary ventilation activated
R Red: auxiliary heating activated
R Yellow: departure time preselected
Activating the auxiliary heating/ventila-
tion
If the key is in position 1or 2:
X Press and hold button 1for at least two
seconds.
The red or blue indicator lamp in button
1 lights up.
If the key is removed or in position 0:
X Briefly press button 1.
The red or blue indicator lamp in button
1 lights up.
Deactivating the auxiliary heating/venti-
lation
X Briefly press button 1.
The red or blue indicator lamp in button
1 goes out. Remote control
Your vehicle comes with one remote control.
You may use two additional remote controls
for your vehicle. For further information, con-
sult a qualified specialist workshop, e.g. a
Mercedes-Benz Service Centre.
The remote control has a maximum range of
approximately 300 metres. This range may be
reduced by:
R sources of radio interference
R solid objects between the remote control
and the vehicle
R the remote control being in an unfavoura-
ble position in relation to the vehicle
R transmitting from an enclosed space
i The optimum range can be achieved if you
hold the remote control vertically, pointing
upwards when you press one of the but-
tons.
i A battery symbol appears in the display
when the batteries in the remote control
are low. Replace the remote control bat-
teries (Y page 311). Controls
* optional
211_AKB; 2; 5, en-GB
mkalafa
, Version: 2.9.4 2008-02-29T16:57:07+01:00 - Seite 178Dateiname: 6515_3416_02_buchblock.pdf; preflight
Page 217 of 401
Features
214 Infrared reflecting windscreen*
The infrared reflecting glass prevents the
vehicle interior from becoming too hot. It also
blocks radio waves up into the gigahertz
range. 1
Areas transparent to radio waves
In order to operate radio-controlled equip-
ment (e.g. toll recording systems), areas 1
on the windscreen are transparent to radio
waves. You can install radio-controlled sys-
tems here. These areas can best be seen from
outside the vehicle by observing the light
reflected off the windscreen. Garage door opener*
The remote control integrated in the rear-view
mirror allows you to operate up to three dif-
ferent door and gate systems.
i The garage door opener is only available
for certain countries. Observe the legal
requirements in all countries concerned.
The HomeLink ®
garage door opener is
compatible with most European garage and
gate opener drives. More information on
HomeLink ®
and/or compatible products is
available from:
R any Mercedes-Benz Service Centre
R the HomeLink ®
hotline
(0) 08000 466 354 65 (free of charge) or
+49 (0) 6839 907-27 7(at a charge)
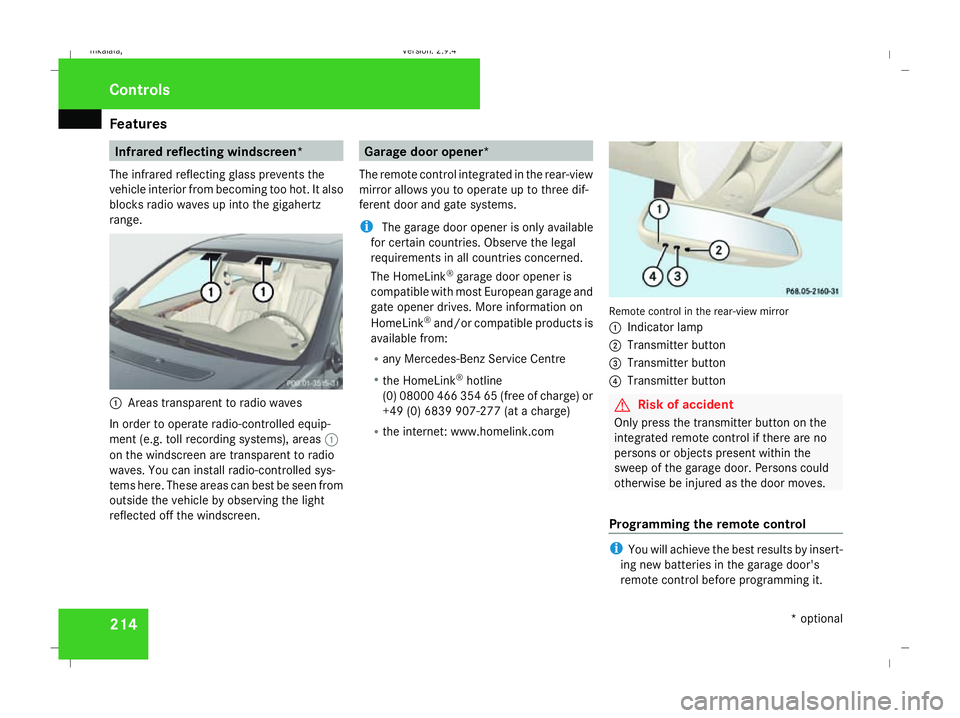
R the internet: www.homelink.com Remote control in the rear-view mirror
1
Indicator lamp
2 Transmitter button
3 Transmitter button
4 Transmitter button G
Risk of accident
Only press the transmitter button on the
integrated remote control if there are no
persons or objects present within the
sweep of the garage door. Persons could
otherwise be injured as the door moves.
Programming the remote control i
You will achieve the best results by insert-
ing new batteries in the garage door's
remote control before programming it. Controls
* optional
211_AKB; 2; 5, en-GB
mkalafa,
Version: 2.9.4 2008-02-29T16:57:07+01:00 - Seite 214Dateiname: 6515_3416_02_buchblock.pdf; preflight
Page 245 of 401
Trailer towing
2421
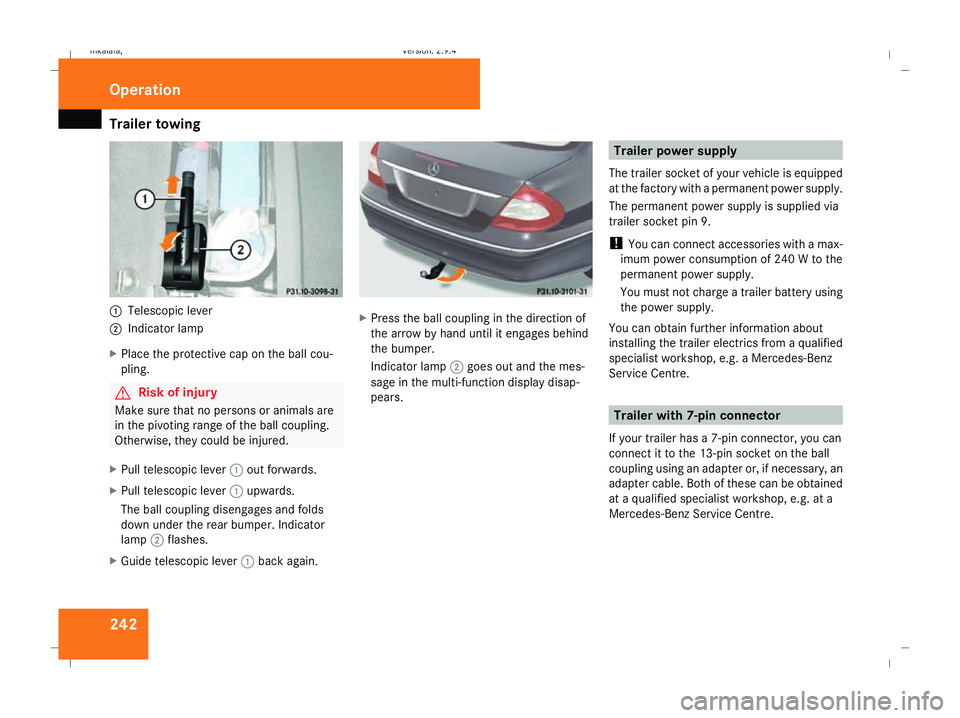
Telescopic lever
2 Indicator lamp
X Place the protective cap on the ball cou-
pling. G
Risk of injury
Make sure that no persons or animals are
in the pivoting range of the ball coupling.
Otherwise, they could be injured.
X Pull telescopic lever 1out forwards.
X Pull telescopic lever 1upwards.
The ball coupling disengages and folds
down under the rear bumper. Indicator
lamp 2flashes.
X Guide telescopic lever 1back again. X
Press the ball coupling in the direction of
the arrow by hand until it engages behind
the bumper.
Indicator lamp 2goes out and the mes-
sage in the multi-function display disap-
pears. Trailer power supply
The trailer socket of your vehicle is equipped
at the factory with a permanent power supply.
The permanent power supply is supplied via
trailer socket pin 9.
! You can connect accessories with a max-
imum power consumption of 240 W to the
permanent power supply.
You must not charge a trailer battery using
the power supply.
You can obtain further information about
installing the trailer electrics from a qualified
specialist workshop, e.g. a Mercedes-Benz
Service Centre. Trailer with 7-pin connector
If your trailer has a 7-pin connector, you can
connect it to the 13-pin socket on the ball
coupling using an adapter or, if necessary, an
adapter cable. Both of these can be obtained
at a qualified specialist workshop, e.g. at a
Mercedes-Benz Service Centre. Operation
211_AKB; 2; 5, en-GB
mkalafa
, Version: 2.9.4 2008-02-29T16:57:07+01:00 - Seite 242Dateiname: 6515_3416_02_buchblock.pdf; preflight
Page 247 of 401
Care
244 Exceeding the service due date
One of the following messages appears in the
multi-function display:
Service A overdue by .. days
Service A overdue by .. km
You will also hear a warning tone.
A qualified specialist workshop, e.g. a
Mercedes-Benz Service Centre, will reset the
service indicator when it carries out the nec-
essary service work.
i If you fail to have the service performed
by the specified date, you may be contra-
vening the relevant laws, your warranty
may be invalidated and ex gratia claims
may be refused. Calling up the service due date
Use the buttons on the multi-function steer-
ing wheel.
X Switch on the ignition.
X Press èorÿ to select the Basic
display menu (Y page 125).
X Press jork to select the service
information.
The 9 service symbol and the service
due date are displayed.
X To select a different display, press j,
è orÿ. Care
Notes on care
Regular and proper care maintains the value
of your vehicle.
i It is advisable to use Mercedes-Benz care
products.
Scratches, corrosive deposits, areas affected
by corrosion and damage caused by inade-
quate care cannot always be completely
repaired. In such cases, visit a qualified spe-
cialist workshop immediately, e.g. a
Mercedes-Benz Service Centre.
Repair damage caused by loose chippings
and remove the following substances imme-
diately, whilst avoiding rubbing too hard:
R Soak insect remains with insect remover
and rinse off afterwards.
R Soak bird droppings with water and rinse
off afterwards.
R Remove tree resin, oils, fuels and greases
by rubbing gently with a cloth soaked in
petroleum ether or lighter fluid.
R Use silicone remover to remove wax.
R Use tar remover to remove tar stains. Operation
211_AKB; 2; 5, en-GB
mkalafa,
Version: 2.9.4 2008-02-29T16:57:07+01:00 - Seite 244Dateiname: 6515_3416_02_buchblock.pdf; preflight