2008 MERCEDES-BENZ E-CLASS ESTATE brake
[x] Cancel search: brakePage 290 of 401
Troubleshooting
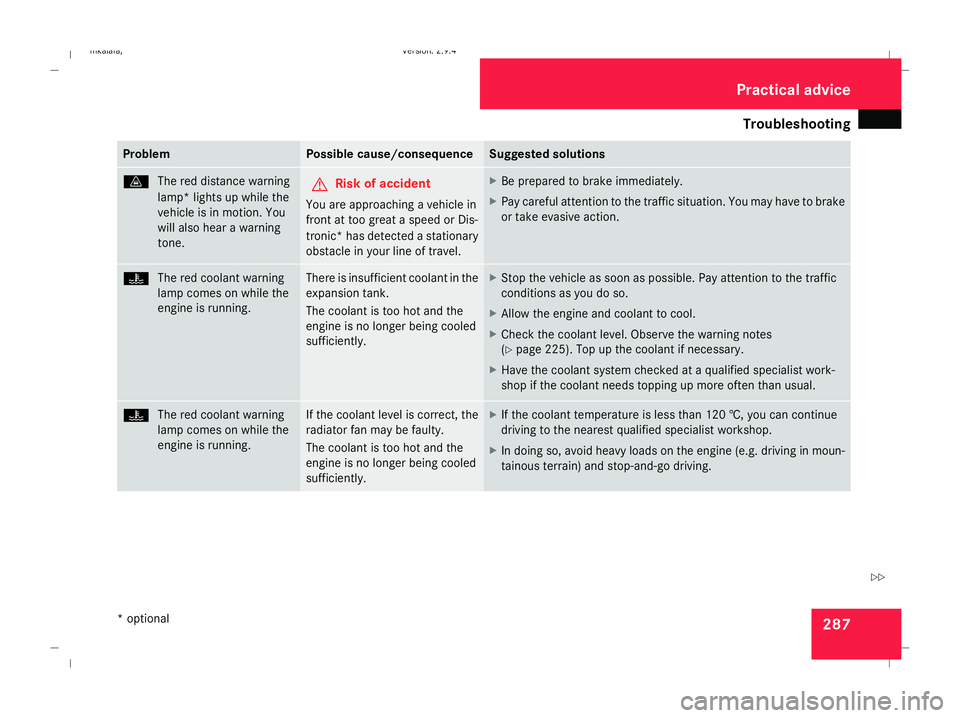
287Problem Possible cause/consequence Suggested solutions
l
The red distance warning
lamp* lights up while the
vehicle is in motion. You
will also hear a warning
tone. G
Risk of accident
You are approaching a vehicle in
front at too great a speed or Dis-
tronic* has detected a stationary
obstacle in your line of travel. X
Be prepared to brake immediately.
X Pay careful attention to the traffic situation. You may have to brake
or take evasive action. D
The red coolant warning
lamp comes on while the
engine is running. There is insufficient coolant in the
expansion tank.
The coolant is too hot and the
engine is no longer being cooled
sufficiently. X
Stop the vehicle as soon as possible. Pay attention to the traffic
conditions as you do so.
X Allow the engine and coolant to cool.
X Check the coolant level. Observe the warning notes
(Y page 225). Top up the coolant if necessary.
X Have the coolant system checked at a qualified specialist work-
shop if the coolant needs topping up more often than usual. D
The red coolant warning
lamp comes on while the
engine is running. If the coolant level is correct, the
radiator fan may be faulty.
The coolant is too hot and the
engine is no longer being cooled
sufficiently. X
If the coolant temperature is less than 120 †, youcan continue
driving to the nearest qualified specialist workshop.
X In doing so, avoid heavy loads on the engine (e.g. driving in moun-
tainous terrain) and stop-and-go driving. Practical advice
* optional
211_AKB; 2; 5, en-GB
mkalafa
,V ersion: 2.9.4
2008-02-29T16:57:07+01:00 - Seite 287 ZDateiname: 6515_3416_02_buchblock.pdf; preflight
Page 295 of 401
Troubleshooting
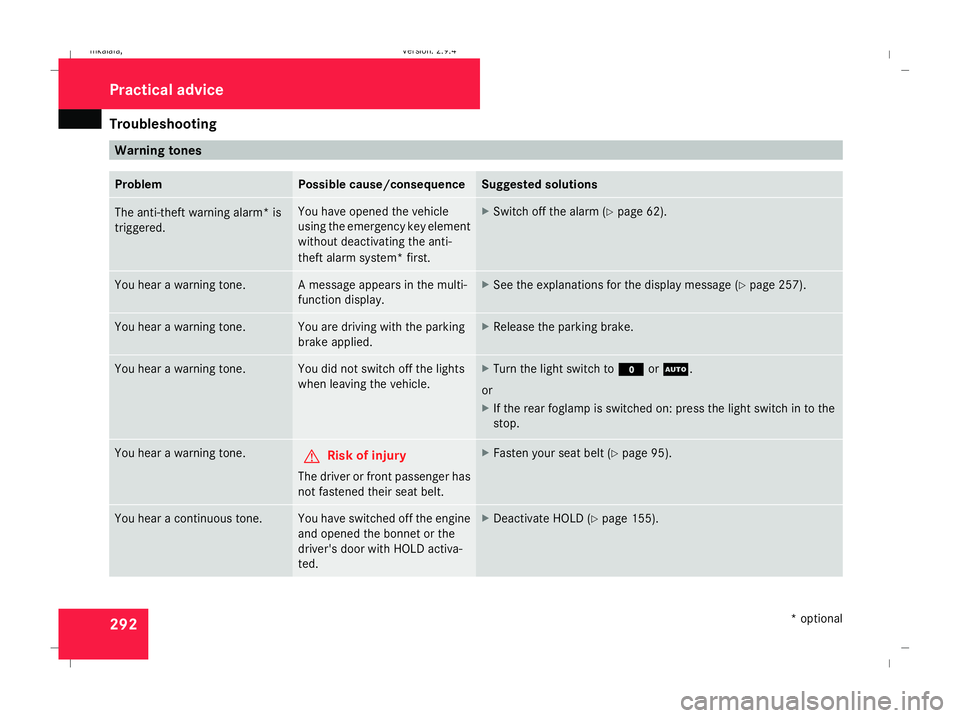
292 Warning tones
Problem Possible cause/consequence Suggested solutions
The anti-theft warning alarm* is
triggered. You have opened the vehicle
using the emergency key element
without deactivating the anti-
theft alarm system* first. X
Switch off the alarm (Y page 62).You hear a warning tone. A message appears in the multi-
function display. X
See the explanations for the display message (Y page 257).You hear a warning tone. You are driving with the parking
brake applied. X
Release the parking brake. You hear a warning tone. You did not switch off the lights
when leaving the vehicle. X
Turn the light switch to MorU.
or
X If the rear foglamp is switched on: press the light switch in to the
stop. You hear a warning tone.
G
Risk of injury
The driver or front passenger has
not fastened their seat belt. X
Fasten your seat belt (Y page 95).You hear a continuous tone. You have switched off the engine
and opened the bonnet or the
driver's door with HOLD activa-
ted. X
Deactivate HOLD (Y page 155). Practical advice
* optional
211_AKB; 2; 5, en-GB
mkalafa
,V ersion: 2.9.4
2008-02-29T16:57:07+01:00 - Seite 292 Dateiname: 6515_3416_02_buchblock.pdf; preflight
Page 307 of 401
Troubleshooting
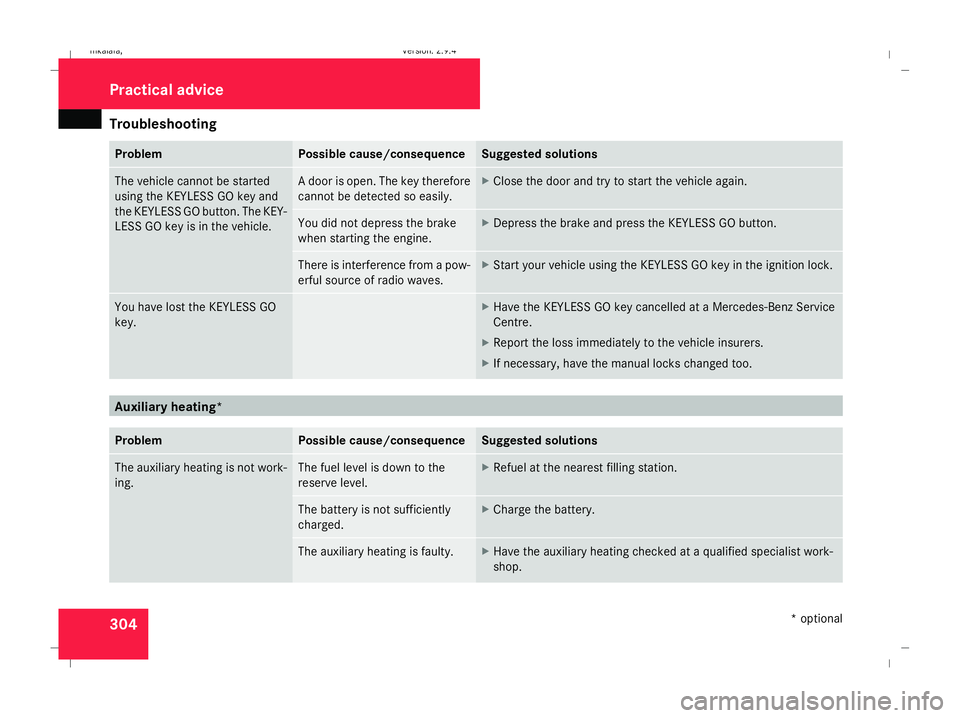
304 Problem Possible cause/consequence Suggested solutions
The vehicle cannot be started
using the KEYLESS GO key and
the KEYLESS GO button. The KEY-
LESS GO key is in the vehicle. A door is open. The key therefore
cannot be detected so easily. X
Close the door and try to start the vehicle again. You did not depress the brake
when starting the engine. X
Depress the brake and press the KEYLESS GO button. There is interference from a pow-
erful source of radio waves. X
Start your vehicle using the KEYLESS GO key in the ignition lock. You have lost the KEYLESS GO
key. X
Have the KEYLESS GO key cancelled at a Mercedes-Benz Service
Centre.
X Report the loss immediately to the vehicle insurers.
X If necessary, have the manual locks changed too. Auxiliary heating*
Problem Possible cause/consequence Suggested solutions
The auxiliary heating is not work-
ing. The fuel level is down to the
reserve level. X
Refuel at the nearest filling station. The battery is not sufficiently
charged. X
Charge the battery. The auxiliary heating is faulty. X
Have the auxiliary heating checked at a qualified specialist work-
shop. Practical advice
* optional
211_AKB; 2; 5, en-GB
mkalafa
,V ersion: 2.9.4
2008-02-29T16:57:07+01:00 - Seite 304 Dateiname: 6515_3416_02_buchblock.pdf; preflight
Page 316 of 401
Changing the bulbs
313
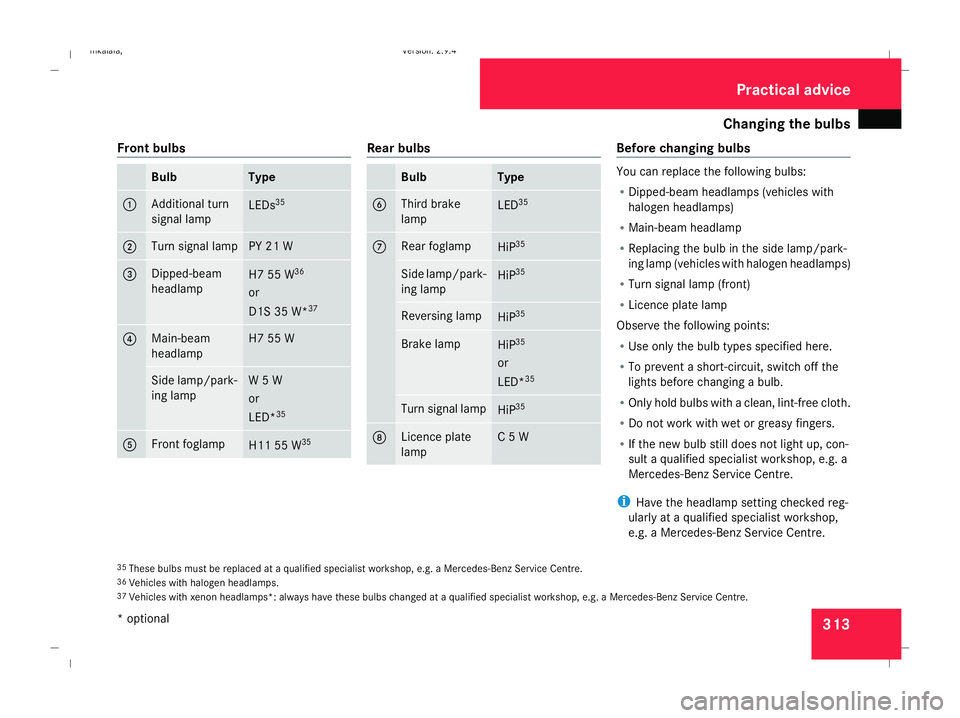
Front bulbs Bulb Type
1 Additional turn
signal lamp
LEDs
35 2 Turn signal lamp PY 21 W
3 Dipped-beam
headlamp
H7 55 W
36
or
D1S 35 W* 37 4 Main-beam
headlamp H7 55 W
Side lamp/park-
ing lamp W 5 W
or
LED*
35 5 Front foglamp
H11 55 W
35 Rear bulbs
Bulb Type
6 Third brake
lamp
LED
35 7 Rear foglamp
HiP
35 Side lamp/park-
ing lamp
HiP
35 Reversing lamp
HiP
35 Brake lamp
HiP
35
or
LED* 35 Turn signal lamp
HiP
35 8 Licence plate
lamp C 5 W Before changing bulbs
You can replace the following bulbs:
R
Dipped-beam headlamps (vehicles with
halogen headlamps)
R Main-beam headlamp
R Replacing the bulb in the side lamp/park-
ing lamp (vehicles with halogen headlamps)
R Turn signal lamp (front)
R Licence plate lamp
Observe the following points:
R Use only the bulb types specified here.
R To prevent a short-circuit, switch off the
lights before changing a bulb.
R Only hold bulbs with a clean, lint-free cloth.
R Do not work with wet or greasy fingers.
R If the new bulb still does not light up, con-
sult a qualified specialist workshop, e.g. a
Mercedes-Benz Service Centre.
i Have the headlamp setting checked reg-
ularly at a qualified specialist workshop,
e.g. a Mercedes-Benz Service Centre.
35 These bulbs must be replaced at a qualified specialist workshop, e.g. a Mercedes-Benz Service Centre.
36 Vehicles with halogen headlamps.
37 Vehicles with xenon headlamps*: always have these bulbs changed at a qualified specialist workshop, e.g. a Mercedes-Benz Service Centre. Practical advice
* optional
211_AKB; 2; 5, en-GB
mkalafa,
Version: 2.9.4
2008-02-29T16:57:07+01:00 - Seite 313 ZDateiname: 6515_3416_02_buchblock.pdf; preflight
Page 319 of 401
Replacing the wiper blades
316
X
Fold the wiper arm away from the wind-
screen until it engages.
X Set the wiper blade at right angles to the
wiper arm.
Vehicles with KEYLESS GO*
X Switch off the engine.
X Take your foot off the brake pedal.
X Set the windscreen wipers to posi-
tion u (Ypage 106) on the combination
switch.
X Press the KEYLESS GO button repeatedly
until the windscreen wipers start.
X When the wiper arms have reached a ver-
tical position, press the KEYLESS GO but-
ton.
X Fold the wiper arm away from the wind-
screen until it engages.
X Set the wiper blade at right angles to the
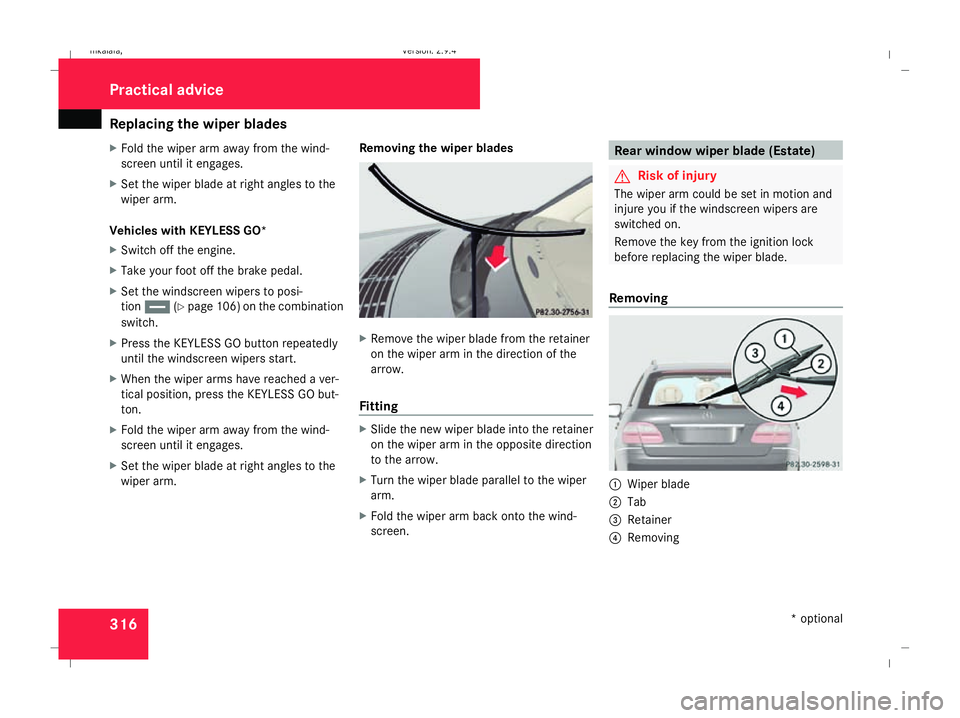
wiper arm. Removing the wiper blades X
Remove the wiper blade from the retainer
on the wiper arm in the direction of the
arrow.
Fitting X
Slide the new wiper blade into the retainer
on the wiper arm in the opposite direction
to the arrow.
X Turn the wiper blade parallel to the wiper
arm.
X Fold the wiper arm back onto the wind-
screen. Rear window wiper blade (Estate)
G
Risk of injury
The wiper arm could be set in motion and
injure you if the windscreen wipers are
switched on.
Remove the key from the ignition lock
before replacing the wiper blade.
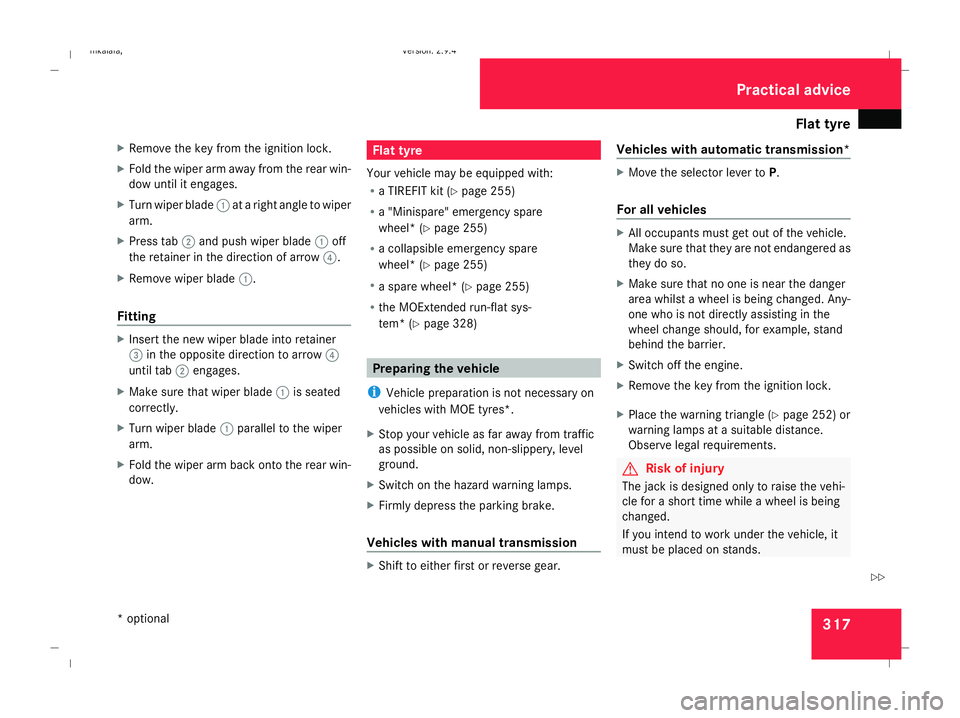
Removing 1
Wiper blade
2 Tab
3 Retainer
4 Removing Practical advice
* optional
211_AKB; 2; 5, en-GB
mkalafa
, Version: 2.9.4 2008-02-29T16:57:07+01:00 - Seite 316Dateiname: 6515_3416_02_buchblock.pdf; preflight
Page 320 of 401
Flat tyre
317
X
Remove the key from the ignition lock.
X Fold the wiper arm away from the rear win-
dow until it engages.
X Turn wiper blade 1at a right angle to wiper
arm.
X Press tab 2and push wiper blade 1off
the retainer in the direction of arrow 4.
X Remove wiper blade 1.
Fitting X
Insert the new wiper blade into retainer
3 in the opposite direction to arrow 4
until tab 2engages.
X Make sure that wiper blade 1is seated
correctly.
X Turn wiper blade 1parallel to the wiper
arm.
X Fold the wiper arm back onto the rear win-
dow. Flat tyre
Your vehicle may be equipped with:
R a TIREFIT kit (Y page 255)
R a "Minispare" emergency spare
wheel* (Y page 255)
R a collapsible emergency spare
wheel* (Y page 255)
R a spare wheel* (Y page 255)
R the MOExtended run-flat sys-
tem* (Y page 328) Preparing the vehicle
i Vehicle preparation is not necessary on
vehicles with MOE tyres*.
X Stop your vehicle as far away from traffic
as possible on solid, non-slippery, level
ground.
X Switch on the hazard warning lamps.
X Firmly depress the parking brake.
Vehicles with manual transmission X
Shift to either first or reverse gear. Vehicles with automatic transmission* X
Move the selector lever to P.
For all vehicles X
All occupants must get out of the vehicle.
Make sure that they are not endangered as
they do so.
X Make sure that no one is near the danger
area whilst a wheel is being changed. Any-
one who is not directly assisting in the
wheel change should, for example, stand
behind the barrier.
X Switch off the engine.
X Remove the key from the ignition lock.
X Place the warning triangle ( Ypage 252) or
warning lamps at a suitable distance.
Observe legal requirements. G
Risk of injury
The jack is designed only to raise the vehi-
cle for a short time while a wheel is being
changed.
If you intend to work under the vehicle, it
must be placed on stands. Practical advice
* optional
211_AKB; 2; 5, en-GB
mkalafa,
Version: 2.9.4
2008-02-29T16:57:07+01:00 - Seite 317 ZDateiname: 6515_3416_02_buchblock.pdf; preflight
Page 334 of 401
Battery
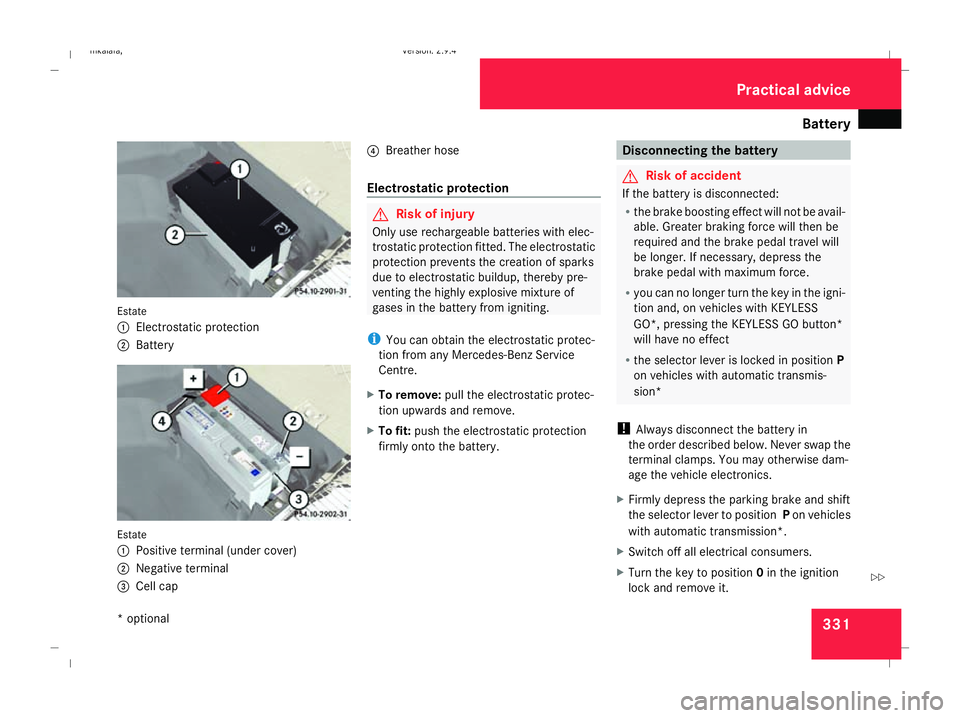
331Estate
1 Electrostatic protection
2 Battery Estate
1 Positive terminal (under cover)
2 Negative terminal
3 Cell cap 4
Breather hose
Electrostatic protection G
Risk of injury
Only use rechargeable batteries with elec-
trostatic protection fitted. The electrostatic
protection prevents the creation of sparks
due to electrostatic buildup, thereby pre-
venting the highly explosive mixture of
gases in the battery from igniting.
i You can obtain the electrostatic protec-
tion from any Mercedes-Benz Service
Centre.
X To remove: pull the electrostatic protec-
tion upwards and remove.
X To fit: push the electrostatic protection
firmly onto the battery. Disconnecting the battery
G
Risk of accident
If the battery is disconnected:
R the brake boosting effect will not be avail-
able. Greater braking force will then be
required and the brake pedal travel will
be longer. If necessary, depress the
brake pedal with maximum force.
R you can no longer turn the key in the igni-
tion and, on vehicles with KEYLESS
GO*, pressing the KEYLESS GO button*
will have no effect
R the selector lever is locked in position P
on vehicles with automatic transmis-
sion*
! Always disconnect the battery in
the order described below. Never swap the
terminal clamps. You may otherwise dam-
age the vehicle electronics.
X Firmly depress the parking brake and shift
the selector lever to position Pon vehicles
with automatic transmission*.
X Switch off all electrical consumers.
X Turn the key to position 0in the ignition
lock and remove it. Practical advice
* optional
211_AKB; 2; 5, en-GB
mkalafa
, Version: 2.9.4 2008-02-29T16:57:07+01:00 - Seite 331 ZDateiname: 6515_3416_02_buchblock.pdf; preflight
Page 337 of 401
Jump-starting
334 G
Risk of injury
There is a risk of acid burns when jump-
starting a vehicle due to the gases which
escape from the battery. Do not lean over
the battery while the engine is being jump-
started. G
Risk of explosion
Gases escaping from the battery during
jump-starting may cause minor explosions.
Avoid creating sparks. Keep naked flames
away from the battery, and do not smoke.
Comply with safety precautions and take
protective measures when handling batter-
ies. You will find these under “Battery” in
the index.
X Make sure that the two vehicles do not
touch.
X Depress the parking brake.
X Manual transmission: engage neutral.
X Automatic transmission*: move the
selector lever to P.
X All vehicles: switch off all electrical con-
sumers. Saloon
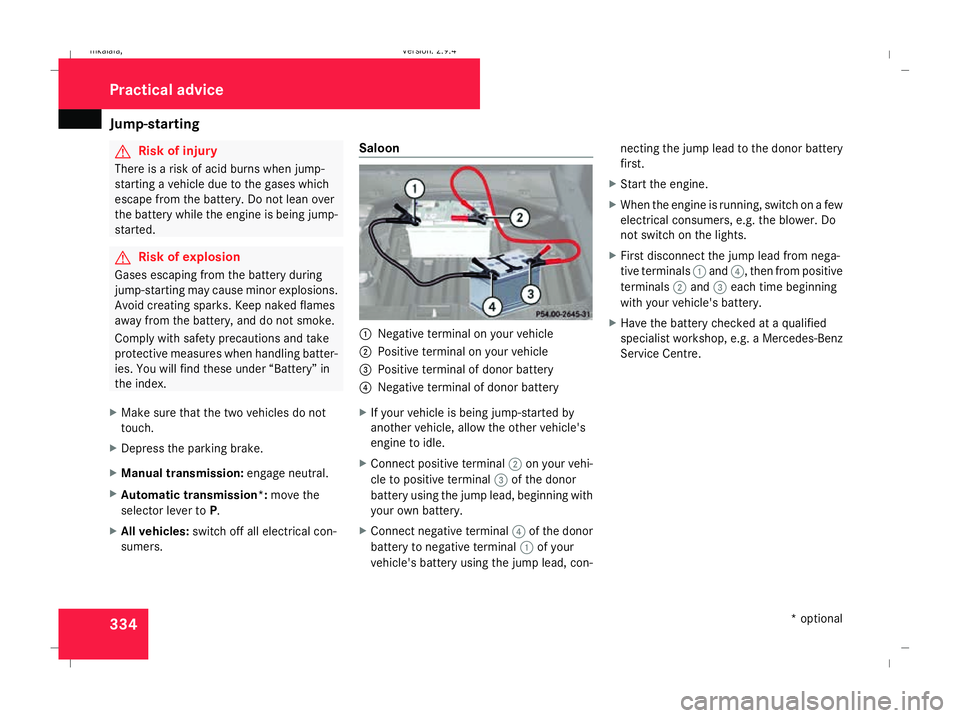
1
Negative terminal on your vehicle
2 Positive terminal on your vehicle
3 Positive terminal of donor battery
4 Negative terminal of donor battery
X If your vehicle is being jump-started by
another vehicle, allow the other vehicle's
engine to idle.
X Connect positive terminal 2on your vehi-
cle to positive terminal 3of the donor
battery using the jump lead, beginning with
your own battery.
X Connect negative terminal 4of the donor
battery to negative terminal 1of your
vehicle's battery using the jump lead, con- necting the jump lead to the donor battery
first.
X Start the engine.
X When the engine is running, switch on a few
electrical consumers, e.g. the blower. Do
not switch on the lights.
X First disconnect the jump lead from nega-
tive terminals 1and 4, then from positive
terminals 2and 3each time beginning
with your vehicle's battery.
X Have the battery checked at a qualified
specialist workshop, e.g. a Mercedes-Benz
Service Centre. Practical advice
* optional
211_AKB; 2; 5, en-GB
mkalafa,
Version: 2.9.4
2008-02-29T16:57:07+01:00 - Seite 334 Dateiname: 6515_3416_02_buchblock.pdf; preflight