2008 MERCEDES-BENZ E-CLASS ESTATE brake
[x] Cancel search: brakePage 189 of 401
Loading and stowing
186 Loading and stowing
Cup holder
G
Risk of injury
Keep the cup holder closed while the vehi-
cle is in motion. Otherwise, vehicle occu-
pants could be injured by objects being
thrown around if you:
R brake sharply
R change direction suddenly
R are involved in an accident
Only use the cup holders for containers of
a suitable size and which have lids. Other-
wise, the drinks could spill.
Cup holders should not be used for hot
drinks. Otherwise, you may scald yourself. Cup holder* in the centre console X
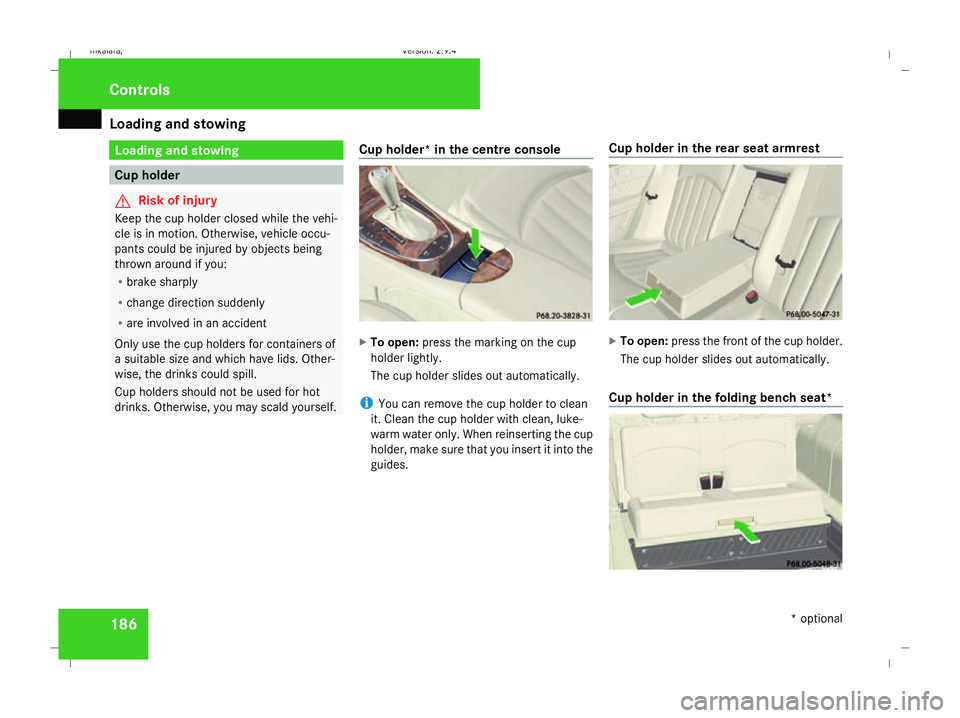
To open: press the marking on the cup
holder lightly.
The cup holder slides out automatically.
i You can remove the cup holder to clean
it. Clean the cup holder with clean, luke-
warm water only. When reinserting the cup
holder, make sure that you insert it into the
guides. Cup holder in the rear seat armrest X
To open: press the front of the cup holder.
The cup holder slides out automatically.
Cup holder in the folding bench seat* Controls
* optional
211_AKB; 2; 5, en-GB
mkalafa,
Version: 2.9.4 2008-02-29T16:57:07+01:00 - Seite 186Dateiname: 6515_3416_02_buchblock.pdf; preflight
Page 194 of 401
Loading and stowing
191
R
Only load the additional loading floor in the
boot up to a maximum of 20 kg.
R Secure the load with sufficiently strong and
wear-resistant load restraints. Pad sharp
edges for protection.
i Load restraints are available at any quali-
fied specialist workshop, e.g. a Mercedes-
Benz Service Centre. R
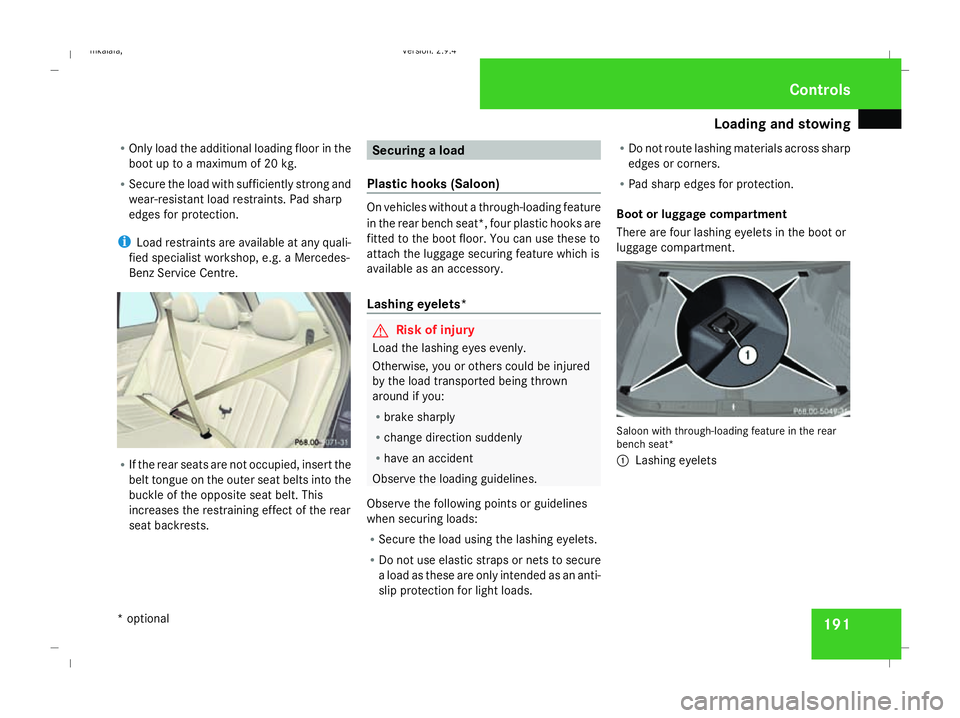
If the rear seats are not occupied, insert the
belt tongue on the outer seat belts into the
buckle of the opposite seat belt. This
increases the restraining effect of the rear
seat backrests. Securing a load
Plastic hooks (Saloon) On vehicles without a through-loading feature
in the rear bench seat*, four plastic hooks are
fitted to the boot floor. You can use these to
attach the luggage securing feature which is
available as an accessory.
Lashing eyelets*
G
Risk of injury
Load the lashing eyes evenly.
Otherwise, you or others could be injured
by the load transported being thrown
around if you:
R brake sharply
R change direction suddenly
R have an accident
Observe the loading guidelines.
Observe the following points or guidelines
when securing loads:
R Secure the load using the lashing eyelets.
R Do not use elastic straps or nets to secure
a load as these are only intended as an anti-
slip protection for light loads. R
Do not route lashing materials across sharp
edges or corners.
R Pad sharp edges for protection.
Boot or luggage compartment
There are four lashing eyelets in the boot or
luggage compartment. Saloon with through-loading feature in the rear
bench seat*
1
Lashing eyelets Controls
* optional
211_AKB; 2; 5, en-GB
mkalafa,
Version: 2.9.4 2008-02-29T16:57:07+01:00 - Seite 191 ZDateiname: 6515_3416_02_buchblock.pdf; preflight
Page 208 of 401
Loading and stowing
205
Installing the stowage box
X
Fold the two backrests 3forward
(Y page 198).
X Guide stowage box 1into the luggage
compartment through one of the rear doors
with the opening facing towards the front
of the vehicle.
X Press catches 4on stowage box 1into
the gap between backrest 3and the lug-
gage compartment floor.
X Fold backrest 3back (Y page 200).
i Stowage box 1is also held in place from
above by the combined luggage cover and
net.
Loading the stowage box
X Fold backrest 3forward (Y page 198).
X Load stowage box 1through the opening
on the front.
i Stowage box 1in the luggage compart-
ment is closed off by the rear bench seat
and can carry a maximum load of 20 kg.
X Fold backrest 3back (Y page 200). Removing the stowage box
X
Fold double backrest 3forward
(Y page 198).
X Slide stowage box 1with catches 4for-
wards to remove it from the mountings.
X Remove stowage box 1sideways through
a rear door.
X Fold backrest 3back (Y page 200). Stowage compartments
G
Risk of injury
The stowage compartments must be closed
when items are stored in them. Luggage
nets are not designed to secure heavy
items of luggage.
You or other vehicle occupants could be
injured by objects being thrown around if
you:
R brake sharply
R change direction suddenly
R have an accident
Sharp-edged and fragile objects must not
be carried in the luggage net. Do not carry hard objects in the ruffled
pockets. Objects must not protrude over
the top of the ruffled pockets.
i You will find an overview of the stowage
compartments on (Y page 36).
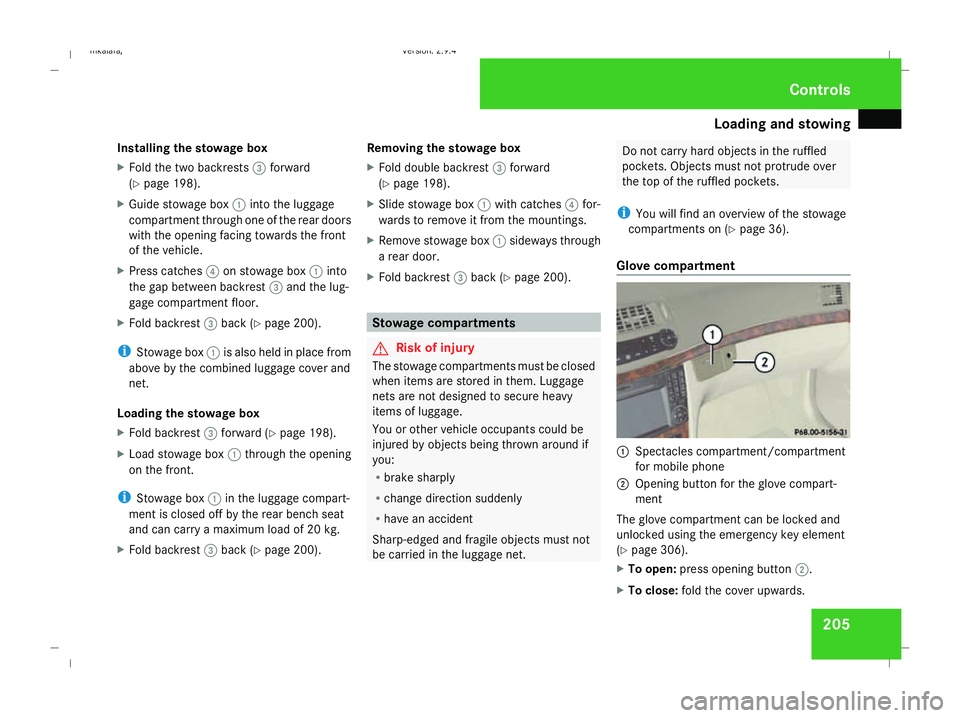
Glove compartment 1
Spectacles compartment/compartment
for mobile phone
2 Opening button for the glove compart-
ment
The glove compartment can be locked and
unlocked using the emergency key element
(Y page 306).
X To open: press opening button 2.
X To close: fold the cover upwards. Controls
211_AKB; 2; 5, en-GB
mkalafa,
Version: 2.9.4 2008-02-29T16:57:07+01:00 - Seite 205 ZDateiname: 6515_3416_02_buchblock.pdf; preflight
Page 221 of 401
Refuelling
218 Running-in notes
The first 1,500 km
If you treat the engine with sufficient care
from the very start, it will reward you with
excellent performance for a very long period
afterwards.
R You should therefore drive at varying road
and engine speeds for the first 1,500 km.
R Avoid heavy loads, e.g. driving at full throt-
tle, during this time. Do not exceed 2
/ 3 of
the maximum permissible engine speed for
each gear.
R Change gear in good time.
R Do not shift down a gear manually in order
to brake.
Vehicles with automatic transmission*:
R Try to avoid depressing the accelerator
pedal beyond the pressure point (kick-
down).
R Only use ranges 3,2or 1for slow driving,
e.g. in mountainous terrain.
After 1,500 km you may gradually bring the
vehicle up to full road and engine speeds.
Additional driving tips for AMG vehicles: R
Do not drive faster than 140 km/h for the
first 1,500 km.
R Only bring the engine up to a maximum
speed of 4,500 rpm for a brief period.
i You should also observe these notes if the
engine or rear axle transmission on your
vehicle has been replaced. AMG vehicles with a rear axle differ-
ential lock*
Your vehicle is equipped with a self-locking
differential on the rear axle. To better protect
the differential gear on the rear axle, you
should perform an oil change after a running-
in phase of 3,000 km. This oil change will
increase the service life of your differential.
Have the oil change performed at a qualified
specialist workshop. Mercedes-Benz recom-
mends that you use a Mercedes-Benz Service
Centre for this purpose. Refuelling
Refuelling
G
Risk of explosion
Fuel is highly flammable. Fire, naked flames
and smoking are therefore prohibited when
handling fuels.
Switch off the engine and the auxiliary heat-
ing* before refuelling. G
Risk of injury
Do not come into direct contact with fuel.
Direct skin contact with fuels or the inha-
lation of fuel vapours is a health hazard. G
Risk of fire
Do not use petrol to refuel vehicles with a
diesel engine. Never mix diesel with petrol.
This causes damage to the fuel system and
engine and could result in the vehicle catch-
ing fire.
! Do not use petrol to refuel vehicles with a
diesel engine. Do not use diesel to refuel
vehicles with a petrol engine. Even small
amounts of the wrong fuel will cause dam-
age to the injection system. Damage result-
ing from adding the wrong fuel is not
covered by the warranty. Operation
* optional
211_AKB; 2; 5, en-GB
mkalafa
,V ersion: 2.9.4
2008-02-29T16:57:07+01:00 - Seite 218 Dateiname: 6515_3416_02_buchblock.pdf; preflight
Page 230 of 401
Tyres and wheels
227
X
To open: pull cap1upwards by the tab.
X To close: press cap 1onto the filler neck
until it clicks into place. Tyres and wheels
Points to remember
! For safety reasons, Mercedes-Benz rec-
ommends that you only use tyres and
wheels which have been approved by
Mercedes-Benz specifically for your vehi-
cle. These tyres have been specially adap-
ted for use with the control systems, such
as ABS or ESP ®
, and are marked as follows:
R MO = Mercedes-Benz Original
R MOE = Mercedes-Benz Original Extended
(with run-flat characteristics)*
Mercedes-Benz Original Extended tyres*
should only be used on wheels that have
been specifically approved by Mercedes-
Benz.
If you use other tyres and wheels,
Mercedes-Benz cannot accept any respon-
sibility for damage that may result from
this. Further information about tyres,
wheels and approved combinations can be
obtained from any Mercedes-Benz Service
Centre.
If you use tyres other than those tested and
recommended for Mercedes-Benz vehi-
cles, characteristics such as handling, vehi-
cle noise emissions and fuel consumption may be adversely affected. In addition, the
wheels may come into contact with the
body or axle components when heavily loa-
ded or when driving with snow chains. This
could result in damage to the tyres or the
vehicle.
! Retreaded tyres are neither tested nor
recommended by Mercedes-Benz, since
previous damage cannot always be detec-
ted on retreaded tyres. As a result,
Mercedes-Benz cannot guarantee vehicle
safety if retreaded tyres are fitted. Do not
fit used tyres if you have no information
about their previous usage. G
Risk of accident
If wheels or tyres other than those which
have been tested are fitted:
R the brakes or chassis components could
be damaged
R wheel and tyre clearances can no longer
be guaranteed
This could cause an accident.
Modification work on the brake system and
wheels is not permitted, nor is the use of
spacer plates or brake dust shields. This inva-
lidates the General Operating Permit for the
vehicle. Operation
* optional
211_AKB; 2; 5, en-GB
mkalafa
,V ersion: 2.9.4
2008-02-29T16:57:07+01:00 - Seite 227 ZDateiname: 6515_3416_02_buchblock.pdf; preflight
Page 236 of 401
Tyres and wheels
233
Restarting the tyre pressure monitor In most cases, the tyre pressure monitor will
automatically detect the new reference val-
ues, e.g. if you have:
R
changed the tyre pressure
R changed the wheels or tyres
R fitted new wheels or tyres
If you wish to define the new reference values
manually:
X Use the table on the inside of the fuel filler
flap to ensure that the tyre pressure is set
correctly in all four tyres for the current
operating conditions.
Also observe the notes in the section on
tyre pressures (Y page 229).
X Make sure that the key is in position 2in
the ignition lock.
The standard display appears in the multi-
function display (Y page 125).
X Press the jork button to select the
Tyre pressure function or wait until the
following message appears:
Tyre pressure displayed only after
driving for a few minutes X
Press the reset button on the left of the
instrument cluster (Y page 243).
The following message appears in the
multi-function display: Check current
tyre pressure?
X Press the æbutton.
The following message appears in the
multi-function display:
Tyre pressure monitor restarted
The tyre pressure monitor has stored the
pressure of the tyres as a new reference
value.
If you wish to cancel the restart:
X Press the çbutton. Interchanging the wheels
G
Risk of accident
Interchange the front and rear wheels only
if they have the same dimensions: for exam-
ple size, offset, etc.
After every wheel interchange/change,
have the tightening torque checked at a
qualified specialist workshop that has the
necessary specialist knowledge and tools
to carry out the work required. Mercedes- Benz recommends that you use a
Mercedes-Benz Service Centre for this pur-
pose. In particular, work relevant to safety
or on safety-related systems must be car-
ried out at a qualified specialist workshop.
The wheels could work loose if they are not
tightened to a torque of 130 Nm.
For safety reasons, Mercedes-Benz recom-
mends that you only use wheel bolts of the
correct size which have been approved for
Mercedes-Benz vehicles.
The wheels may be interchanged every
5,000 km to 10,000 km depending on the
degree of tyre wear, provided that the vehicle
has the same size front and rear tyres. Do not
reverse the direction of tyre rotation.
The wear patterns on the front and rear tyres
differ depending on the operating conditions.
Interchange the wheels before a clear wear
pattern has formed on the tyres. The front
tyres typically wear more on the shoulders
and the rear tyres in the centre.
Clean the contact surfaces of the wheel and
the brake disc thoroughly every time a wheel
is interchanged. Check the tyre pressure and,
if necessary, restart the tyre pressure loss
warning system or the tyre pressure moni-
tor*. Operation
* optional
211_AKB; 2; 5, en-GB
mkalafa
,V ersion: 2.9.4
2008-02-29T16:57:07+01:00 - Seite 233 ZDateiname: 6515_3416_02_buchblock.pdf; preflight
Page 239 of 401
Driving
tips 236 Driving tips
Rolling with the engine switched off
G
Risk of accident
Do not switch off the engine while the vehi-
cle is in motion.
There is no power assistance for the steer-
ing or the service brake when the engine is
not running.
Steering and braking require significantly
more effort and you could lose control of
the vehicle and cause an accident as a
result. Braking
G
Risk of accident
Do not change down for additional engine
braking on a slippery road surface. This
could cause the drive wheels to lose their
grip and the vehicle could skid. G
Risk of accident
Make sure that other road users are not
endangered by your braking. Downhill gradients On long and steep downhill stretches, espe-
cially if the vehicle is laden or towing a trailer,
you must shift to a lower gear in good time or,
on vehicles with automatic transmission*,
select shift range
1,2or 3.
i This also applies if you have activated
cruise control, Speedtronic or Distronic*.
This uses the braking effect of the engine and
you will not have to brake to such an extent
to maintain the same speed. This relieves the
load on the brake system and prevents the
brakes from overheating and wearing too
quickly. If you need additional braking,
depress the brake pedal repeatedly rather
than continuously.
Heavy and light loads If the brakes have been subjected to a heavy
load, do not stop the vehicle immediately, but
drive on for a short while. This allows the air-
flow to cool the brakes more quickly.
G
Risk of accident
Never depress the brake pedal continu-
ously while the vehicle is in motion, e.g.
never cause the brakes to rub by applying constant slight pedal pressure. This causes
the brake system to overheat, increases
the braking distance and can lead to the
brakes failing completely.
If the brakes have been used only moderately,
you should occasionally test their effective-
ness. To do this, brake more firmly from a
higher speed. This improves the grip of the
brakes.
Wet roads If driving in heavy rain for a prolonged period
of time without braking, there may be a
delayed reaction from the brakes, when brak-
ing for the first time. You must brake harder.
You must therefore maintain a greater dis-
tance from the vehicle in front.
Brake firmly after driving on a wet road. This
way the brake discs will become warm, drying
more quickly, which will protect them against
corrosion. Operation
* optional
211_AKB; 2; 5, en-GB
mkalafa
,V ersion: 2.9.4
2008-02-29T16:57:07+01:00 - Seite 236 Dateiname: 6515_3416_02_buchblock.pdf; preflight
Page 240 of 401
Driving
tips 237
Limited braking performance on salted
roads G
Risk of accident
The layer of salt on the brake discs and the
brake pads/linings may cause a delay in
the braking effect, resulting in a signifi-
cantly longer braking distance, which could
lead to an accident.
To avoid this danger, you should:
R occasionally brake carefully, without put-
ting other road users at risk, when you
are driving on salted roads. This helps to
remove any salt that may have started to
build up on the brake discs and the brake
pads/linings.
R maintain a greater distance to the vehicle
ahead and drive with particular care.
R carefully apply the brakes at the end of a
trip and immediately after commencing a
new trip, so that salt residues are
removed from the brake disc.
New brake pads/linings For safety reasons, Mercedes-Benz recom-
mends that you only have brake pads/linings
fitted to your vehicle that have been approved for Mercedes-Benz vehicles or which corre-
spond to an equivalent quality standard.
Brake pads/linings which have not been
approved for Mercedes-Benz or which are not
of an equivalent quality could affect your vehi-
cle's operating safety. G
Risk of accident
New brake pads/linings only reach their
optimum braking effect after several hun-
dred kilometres of driving. Before this opti-
mum braking effect is reached, you should
compensate for the reduced braking effect
by applying greater pressure when braking.
This also applies after the brake discs or the
brake pads/linings have been replaced.
High-performance brake system for
AMG vehicles The high-performance brake system is
designed for heavy loads. Braking can there-
fore cause noises. This will depend on:
R speed
R braking force
R environmental conditions, such as temper-
ature and humidity
The wear of individual components of the
brake system, such as the brake pads/linings or brake discs, depends on the individual driv-
ing style and operating conditions.
Because of this, it is impossible to state a
mileage that will be valid under all circum-
stances. An aggressive driving style will lead
to high wear. Tyre grip
G
Risk of accident
Whereas the vehicle can be fully controlled
at a certain speed on dry roads, you must
reduce your speed on wet or icy roads to
achieve the same road safety. Otherwise
you could cause an accident.
Pay particular attention to the road condi-
tions at temperatures around freezing
point.
If ice has formed on the road surface (e.g.
from fog), a light film of water rapidly forms
on the ice when you brake, considerably
reducing tyre grip. Drive with particular
care in such weather conditions. Operation
211_AKB; 2; 5, en-GB
mkalafa
,V ersion: 2.9.4
2008-02-29T16:57:07+01:00 - Seite 237 ZDateiname: 6515_3416_02_buchblock.pdf; preflight