2008 MERCEDES-BENZ E-CLASS ESTATE boot
[x] Cancel search: bootPage 207 of 401
Loading and stowing
204
i
The belt reel can be used to secure light
loads against the side wall of the boot/lug-
gage compartment to prevent them from
moving around.
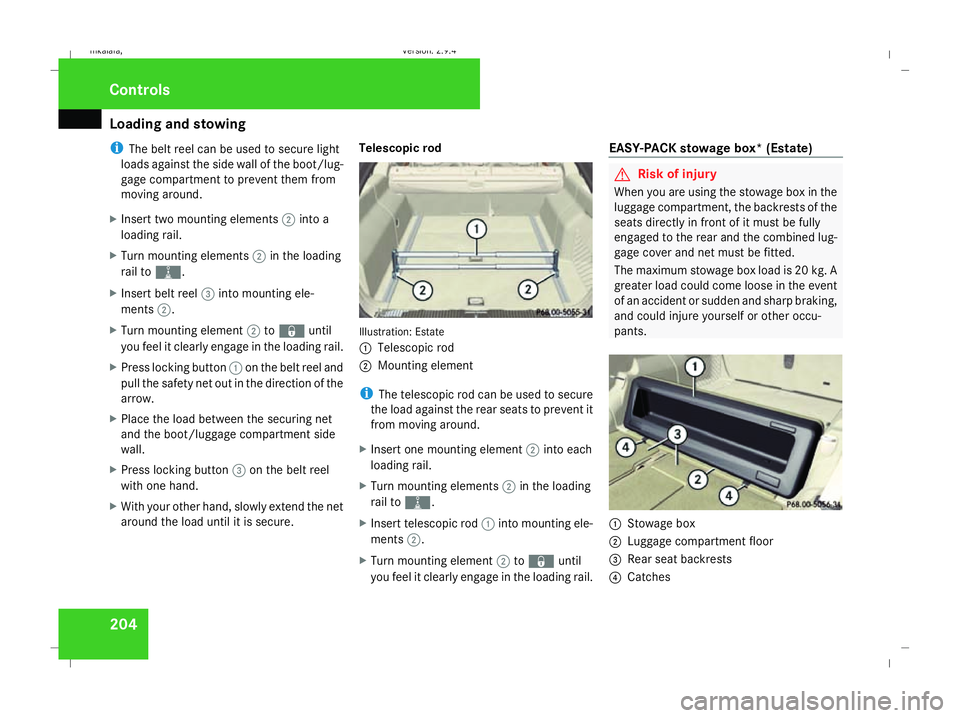
X Insert two mounting elements 2into a
loading rail.
X Turn mounting elements 2in the loading
rail to N.
X Insert belt reel 3into mounting ele-
ments 2.
X Turn mounting element 2to‹ until
you feel it clearly engage in the loading rail.
X Press locking button 1on the belt reel and
pull the safety net out in the direction of the
arrow.
X Place the load between the securing net
and the boot/luggage compartment side
wall.
X Press locking button 3on the belt reel
with one hand.
X With your other hand, slowly extend the net
around the load until it is secure. Telescopic rod Illustration: Estate
1
Telescopic rod
2 Mounting element
i The telescopic rod can be used to secure
the load against the rear seats to prevent it
from moving around.
X Insert one mounting element 2into each
loading rail.
X Turn mounting elements 2in the loading
rail to N.
X Insert telescopic rod 1into mounting ele-
ments 2.
X Turn mounting element 2to‹ until
you feel it clearly engage in the loading rail. EASY-PACK stowage box* (Estate) G
Risk of injury
When you are using the stowage box in the
luggage compartment, the backrests of the
seats directly in front of it must be fully
engaged to the rear and the combined lug-
gage cover and net must be fitted.
The maximum stowage box load is 20 kg. A
greater load could come loose in the event
of an accident or sudden and sharp braking,
and could injure yourself or other occu-
pants. 1
Stowage box
2 Luggage compartment floor
3 Rear seat backrests
4 Catches Controls
211_AKB; 2; 5, en-GB
mkalafa,
Version: 2.9.4 2008-02-29T16:57:07+01:00 - Seite 204Dateiname: 6515_3416_02_buchblock.pdf; preflight
Page 242 of 401
Trailer towing
2391
Switchover lever
X Switch lever 1over.
X Replace the cap. G
Risk of accident
Have your headlamps switched back to
asymmetrical dipped beam if you visit a
country in which traffic drives on the same
side of the road as in the country in which
your vehicle was registered. You may oth-
erwise dazzle the oncoming traffic and
could cause an accident. Trailer towing
Folding out the ball coupling
Before you can tow a trailer with your vehicle,
you must fit the ball coupling.
i In vehicles with a folding bench seat, first
remove the folding bench seat cushion
(Y page 86) and fold up the luggage com-
partment floor ( Ypage 195).
The telescopic lever is under the boot/lug-
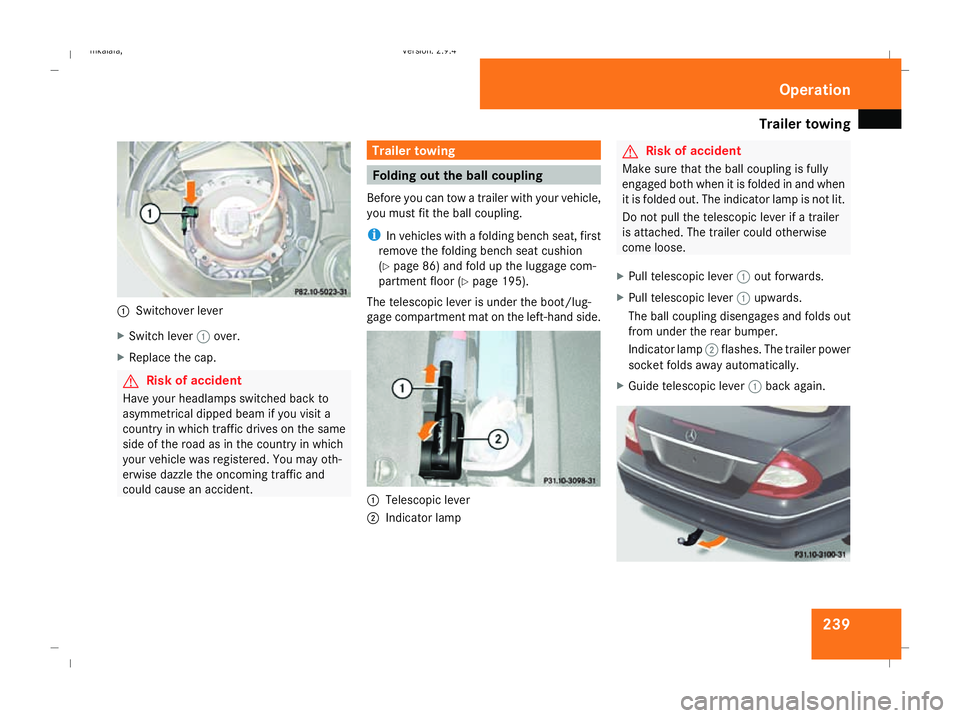
gage compartment mat on the left-hand side. 1
Telescopic lever
2 Indicator lamp G
Risk of accident
Make sure that the ball coupling is fully
engaged both when it is folded in and when
it is folded out. The indicator lamp is not lit.
Do not pull the telescopic lever if a trailer
is attached. The trailer could otherwise
come loose.
X Pull telescopic lever 1out forwards.
X Pull telescopic lever 1upwards.
The ball coupling disengages and folds out
from under the rear bumper.
Indicator lamp 2flashes. The trailer power
socket folds away automatically.
X Guide telescopic lever 1back again. Operation
211_AKB; 2; 5, en-GB
mkalafa
, Version: 2.9.4 2008-02-29T16:57:07+01:00 - Seite 239 ZDateiname: 6515_3416_02_buchblock.pdf; preflight
Page 255 of 401
Where will I find...?
252 Where will I find...?
Warning triangle
Saloon The warning triangle is secured on the inside
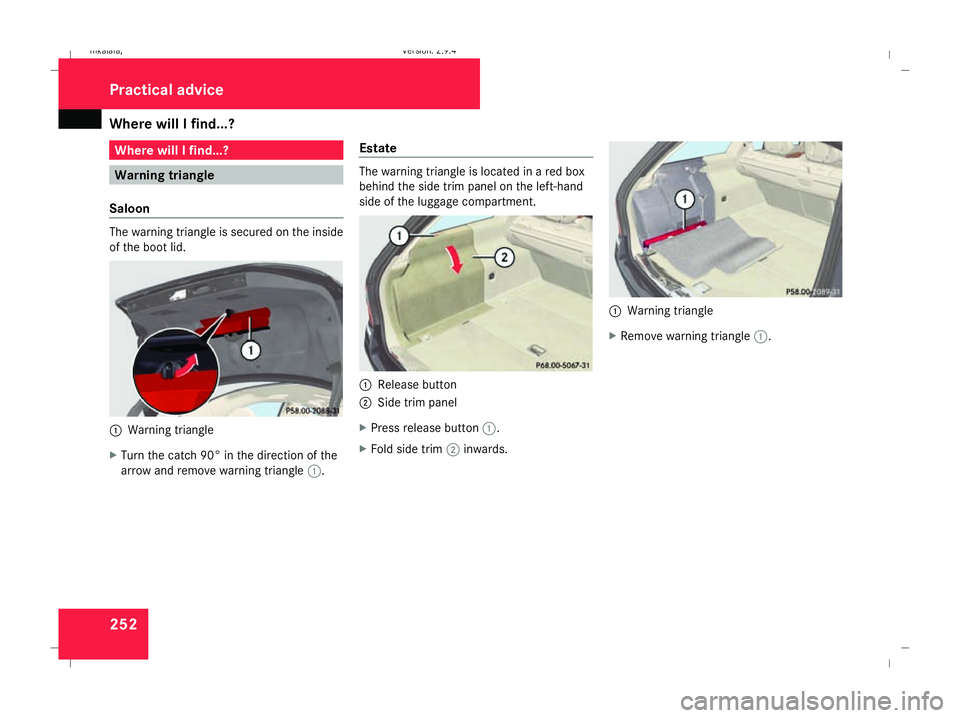
of the boot lid. 1
Warning triangle
X Turn the catch 90° in the direction of the
arrow and remove warning triangle 1.Estate The warning triangle is located in a red box
behind the side trim panel on the left-hand
side of the luggage compartment.
1
Release button
2 Side trim panel
X Press release button 1.
X Fold side trim 2inwards. 1
Warning triangle
X Remove warning triangle 1.Practical advice
211_AKB; 2; 5, en-GB
mkalafa,
Version: 2.9.4 2008-02-29T16:57:07+01:00 - Seite 252Dateiname: 6515_3416_02_buchblock.pdf; preflight
Page 257 of 401
Where will I find...?
254 Vehicle tool kit, jack and spare
wheel*
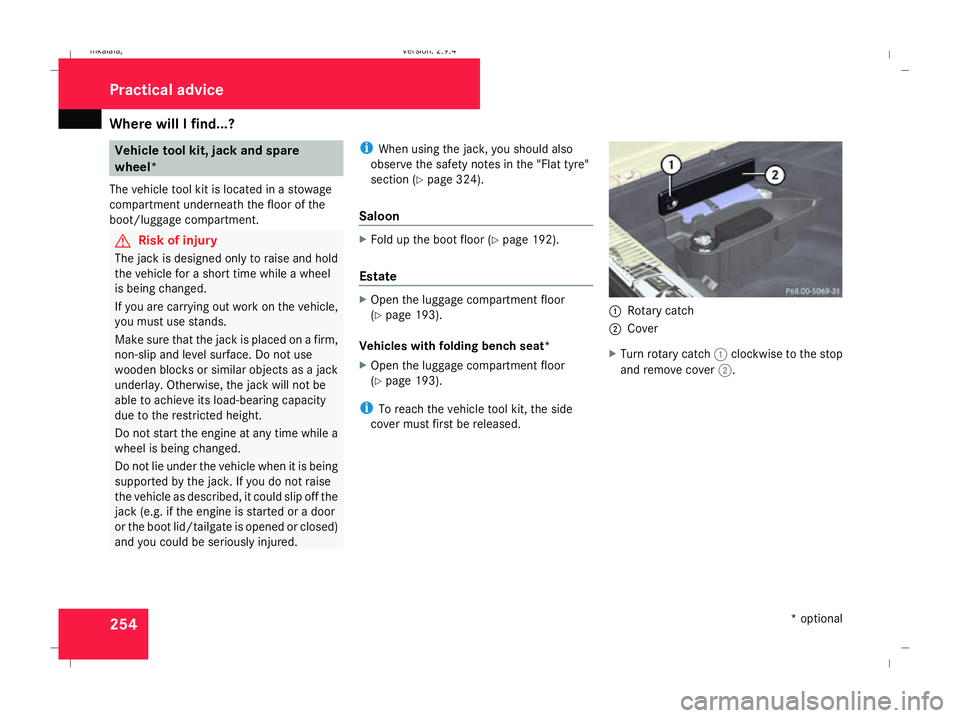
The vehicle tool kit is located in a stowage
compartment underneath the floor of the
boot/luggage compartment. G
Risk of injury
The jack is designed only to raise and hold
the vehicle for a short time while a wheel
is being changed.
If you are carrying out work on the vehicle,
you must use stands.
Make sure that the jack is placed on a firm,
non-slip and level surface. Do not use
wooden blocks or similar objects as a jack
underlay. Otherwise, the jack will not be
able to achieve its load-bearing capacity
due to the restricted height.
Do not start the engine at any time while a
wheel is being changed.
Do not lie under the vehicle when it is being
supported by the jack. If you do not raise
the vehicle as described, it could slip off the
jack (e.g. if the engine is started or a door
or the boot lid/tailgate is opened or closed)
and you could be seriously injured. i
When using the jack, you should also
observe the safety notes in the "Flat tyre"
section (Y page 324).
Saloon X
Fold up the boot floor (Y page 192).
Estate X
Open the luggage compartment floor
(Y page 193).
Vehicles with folding bench seat*
X Open the luggage compartment floor
(Y page 193).
i To reach the vehicle tool kit, the side
cover must first be released. 1
Rotary catch
2 Cover
X Turn rotary catch 1clockwise to the stop
and remove cover 2. Practical advice
* optional
211_AKB; 2; 5, en-GB
mkalafa,
Version: 2.9.4 2008-02-29T16:57:07+01:00 - Seite 254Dateiname: 6515_3416_02_buchblock.pdf; preflight
Page 259 of 401
Where will I find...?
256
Removing the "Minispare" emergency
spare wheel*/collapsible emergency
spare wheel or spare wheel*
X Saloon: remove the luggage well
(Y page 256).
X Estate: remove the luggage compartment
floor (Y page 194).
X Turn fastening element 3anti-clockwise.
X Remove the "Minispare" emergency spare
wheel/collapsible emergency spare wheel
or the spare wheel 2.
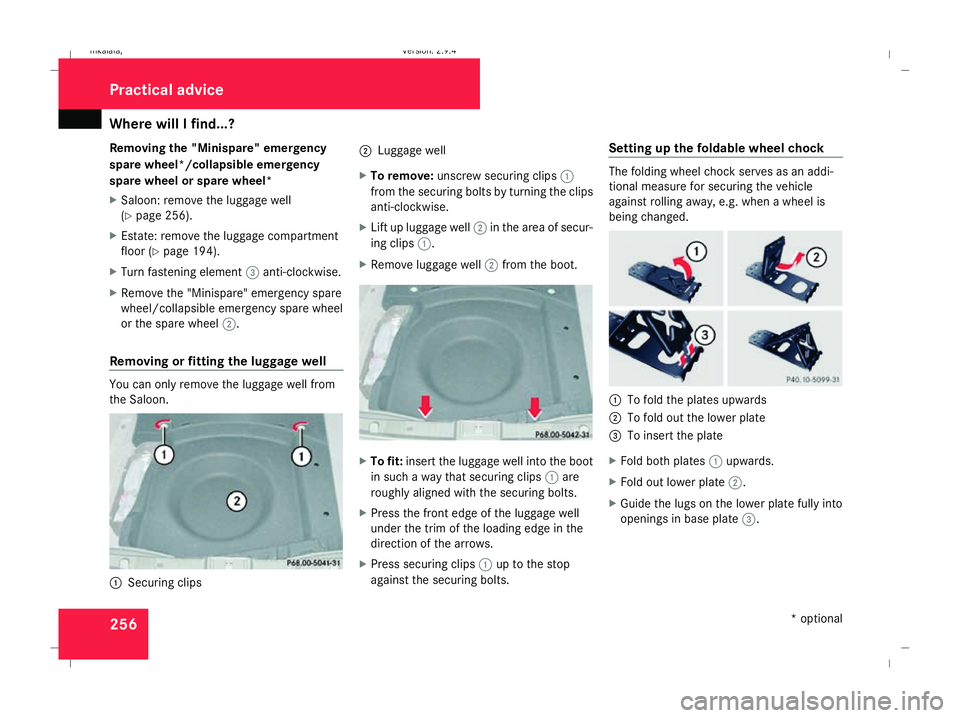
Removing or fitting the luggage well You can only remove the luggage well from
the Saloon. 1
Securing clips 2
Luggage well
X To remove: unscrew securing clips 1
from the securing bolts by turning the clips
anti-clockwise.
X Lift up luggage well 2in the area of secur-
ing clips 1.
X Remove luggage well 2from the boot. X
To fit: insert the luggage well into the boot
in such a way that securing clips 1are
roughly aligned with the securing bolts.
X Press the front edge of the luggage well
under the trim of the loading edge in the
direction of the arrows.
X Press securing clips 1up to the stop
against the securing bolts. Setting up the foldable wheel chock The folding wheel chock serves as an addi-
tional measure for securing the vehicle
against rolling away, e.g. when a wheel is
being changed.
1
To fold the plates upwards
2 To fold out the lower plate
3 To insert the plate
X Fold both plates 1upwards.
X Fold out lower plate 2.
X Guide the lugs on the lower plate fully into
openings in base plate 3.Practical advice
* optional
211_AKB; 2; 5, en-GB
mkalafa,
Version: 2.9.4 2008-02-29T16:57:07+01:00 - Seite 256Dateiname: 6515_3416_02_buchblock.pdf; preflight
Page 269 of 401
Display
messages 266 Symbol messages
G
Risk of accident and injury
The operating safety of the vehicle could be impaired if service work is carried out incorrectly. There is a risk that you could lose control of
the vehicle and cause an accident. The safety systems may no longer be able to protect you or others as they are designed to do.
Always have maintenance work carried out at a qualified specialist workshop which has the necessary specialist knowledge and tools to
carry out the work required.
Mercedes-Benz recommends that you use a Mercedes-Benz Service Centre for this purpose.
In particular, work relevant to safety or on safety-related systems must be carried out at a qualified specialist workshop. Display messages Possible cause/consequence Possible solution
# The battery is not being charged. Possible
causes are:
R
a faulty alternator
R a torn poly-V-belt
R a malfunction in the electronics X
Stop immediately and safely when traffic con-
ditions allow and check the poly-V-belt.
X If it has torn: do not drive on. Contact the
nearest qualified specialist workshop.
X If it is not damaged: have the vehicle checked
as soon as possible at a qualified specialist
workshop. & Estate: the tailgate is open. X
Close the tailgate. Ê Saloon: the boot lid is open. X
Close the boot lid. Practical advi
ce
211_AKB; 2; 5, en-GB
mkalafa,
Version: 2.9.4 2008-02-29T16:57:07+01:00 - Seite 266Dateiname: 6515_3416_02_buchblock.pdf; preflight
Page 309 of 401
Locking/unlocking in an emergency
306 Locking/unlocking in an emergency
Emergency key
If the vehicle can no longer be unlocked or
locked with the key or the KEYLESS GO
key*, use the emergency key element.
If you use the emergency key element to
unlock and open the driver's door or the boot
lid (Saloon), the anti-theft alarm system* will
be triggered (Y page 62).
There are several ways to turn off the alarm:
X Press the korj button on the key.
or
X Insert the key into the ignition lock.
or
X Press the KEYLESS GO button* on the
selector lever. The KEYLESS GO key* must
be in the vehicle.
or
X Lock or unlock the vehicle using KEYLESS
GO*. The KEYLESS GO key* must be out-
side the vehicle. Releasing and removing the emergency
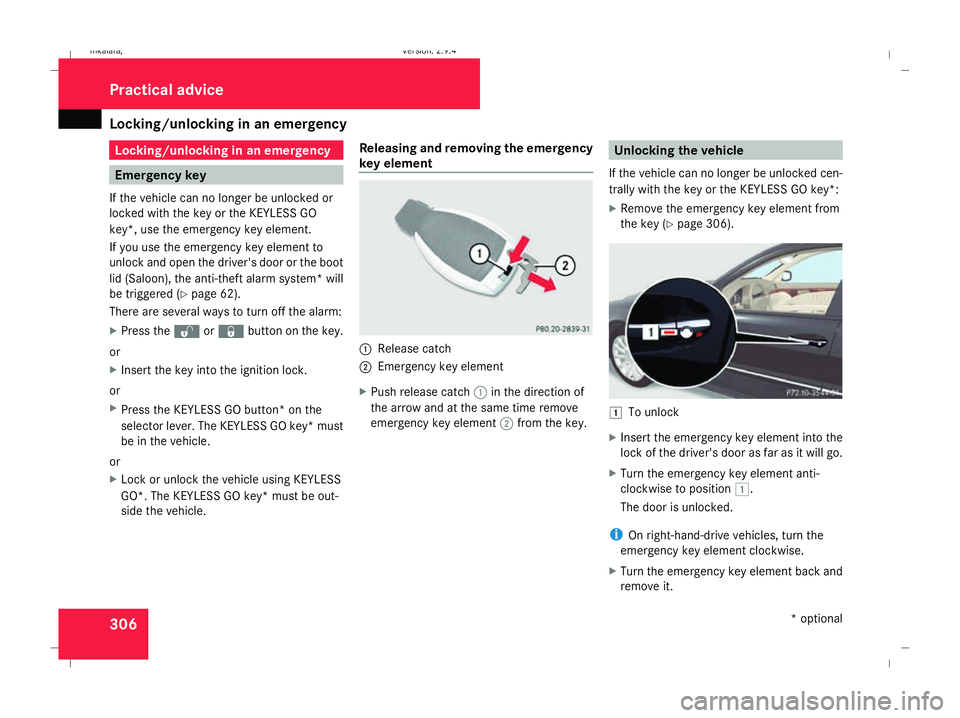
key element 1
Release catch
2 Emergency key element
X Push release catch 1in the direction of
the arrow and at the same time remove
emergency key element 2from the key. Unlocking the vehicle
If the vehicle can no longer be unlocked cen-
trally with the key or the KEYLESS GO key*:
X Remove the emergency key element from
the key (Y page 306). $
To unlock
X Insert the emergency key element into the
lock of the driver's door as far as it will go.
X Turn the emergency key element anti-
clockwise to position $.
The door is unlocked.
i On right-hand-drive vehicles, turn the
emergency key element clockwise.
X Turn the emergency key element back and
remove it. Practical advice
* optional
211_AKB; 2; 5, en-GB
mkalafa,
Version: 2.9.4 2008-02-29T16:57:07+01:00 - Seite 306Dateiname: 6515_3416_02_buchblock.pdf; preflight
Page 310 of 401
Locking/unlocking in an emergency
307Locking the vehicle
If the vehicle can no longer be locked cen-
trally with the key or the KEYLESS GO key*:
X Open the driver's door.
X Close the front-passenger door, the rear
doors and the boot lid/tailgate.
X Press the locking button (Y page 70).
X Check whether the locking knobs on the
doors are still visible. Press the locking
knobs down manually if necessary.
X Close the driver's door.
X Remove the emergency key element from
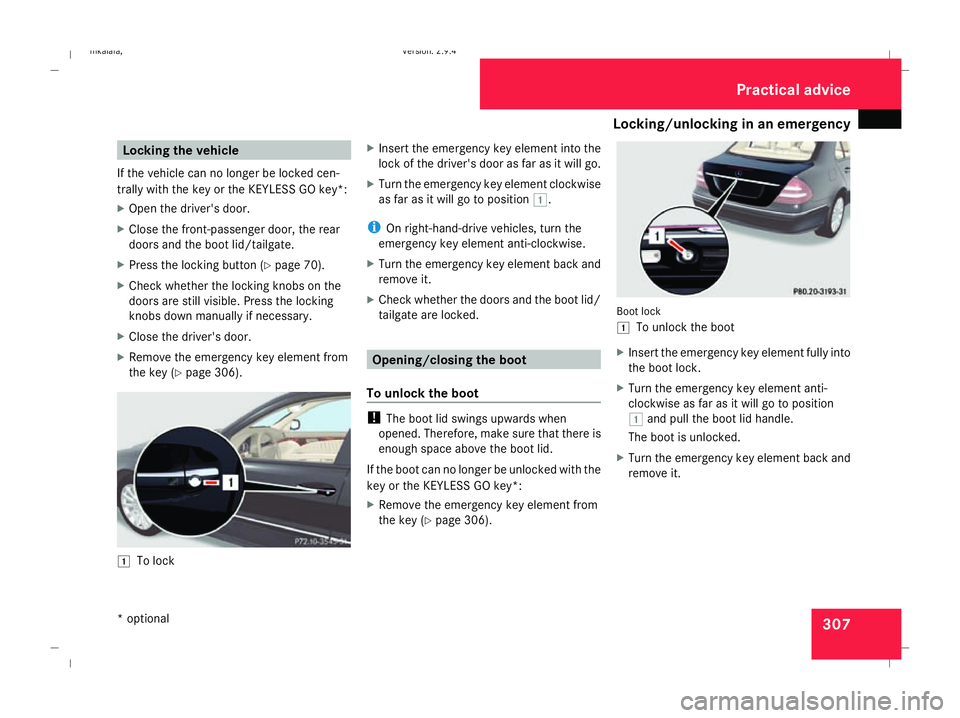
the key (Y page 306). $
To lock X
Insert the emergency key element into the
lock of the driver's door as far as it will go.
X Turn the emergency key element clockwise
as far as it will go to position $.
i On right-hand-drive vehicles, turn the
emergency key element anti-clockwise.
X Turn the emergency key element back and
remove it.
X Check whether the doors and the boot lid/
tailgate are locked. Opening/closing the boot
To unlock the boot !
The boot lid swings upwards when
opened. Therefore, make sure that there is
enough space above the boot lid.
If the boot can no longer be unlocked with the
key or the KEYLESS GO key*:
X Remove the emergency key element from
the key (Y page 306). Boot lock
$
To unlock the boot
X Insert the emergency key element fully into
the boot lock.
X Turn the emergency key element anti-
clockwise as far as it will go to position
$ and pull the boot lid handle.
The boot is unlocked.
X Turn the emergency key element back and
remove it. Practical advice
* optional
211_AKB; 2; 5, en-GB
mkalafa,
Version: 2.9.4 2008-02-29T16:57:07+01:00 - Seite 307 ZDateiname: 6515_3416_02_buchblock.pdf; preflight