2008 MERCEDES-BENZ E-CLASS ESTATE reset
[x] Cancel search: resetPage 128 of 401
On-board computer
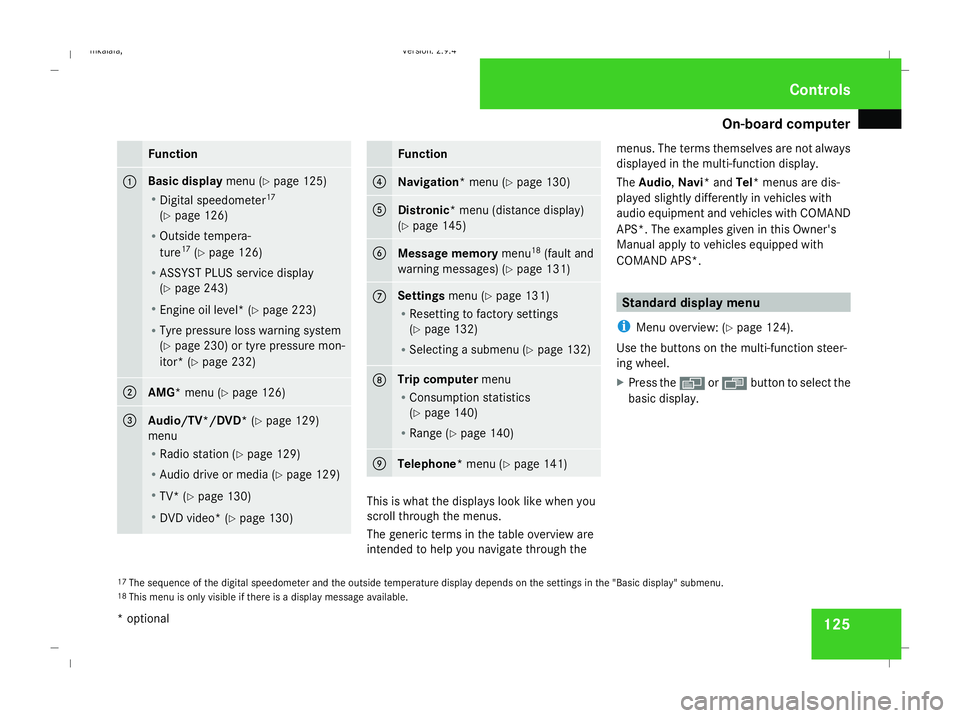
125Function
1 Basic display
menu (Ypage 125)
R Digital speedometer 17
(Y page 126)
R Outside tempera-
ture 17
(Y page 126)
R ASSYST PLUS service display
(Y page 243)
R Engine oil level* (Y page 223)
R Tyre pressure loss warning system
(Y page 230) or tyre pressure mon-
itor* (Y page 232) 2
AMG* menu (Y
page 126) 3
Audio/TV*/DVD*
(Ypage 129)
menu
R Radio station ( Ypage 129)
R Audio drive or media (Y page 129)
R TV* (Y page 130)
R DVD video* (Y page 130) Function
4
Navigation* menu (Y
page 130) 5
Distronic
* menu (distance display)
(Y page 145) 6
Message memory
menu18
(fault and
warning messages) (Y page 131) 7 Settings
menu (Ypage 131)
R Resetting to factory settings
(Y page 132)
R Selecting a submenu (Y page 132) 8 Trip computer
menu
R Consumption statistics
(Y page 140)
R Range (Y page 140) 9
Telephone*
menu (Ypage 141) This is what the displays look like when you
scroll through the menus.
The generic terms in the table overview are
intended to help you navigate through themenus. The terms themselves are not always
displayed in the multi-function display.
The Audio, Navi* and Tel* menus are dis-
played slightly differently in vehicles with
audio equipment and vehicles with COMAND
APS*. The examples given in this Owner's
Manual apply to vehicles equipped with
COMAND APS*. Standard display menu
i Menu overview: (Y page 124).
Use the buttons on the multi-function steer-
ing wheel.
X Press the èor· button to select the
basic display.
17 The sequence of the digital speedometer and the outside temperature display depends on the settings in the "Basic display" submenu.
18 This menu is only visible if there is a display message available. Controls
* optional
211_AKB; 2; 5, en-GB
mkalafa,
Version: 2.9.4
2008-02-29T16:57:07+01:00 - Seite 125 ZDateiname: 6515_3416_02_buchblock.pdf; preflight
Page 131 of 401
On-board computer
128
3
Fastest lap time (best lap)
4 Lap
Resetting the current lap
X Press the æbutton to stop the RACE-
TIMER.
X Press the çbutton to reset the lap time
to "0".
Deleting all laps
If you have switched off the engine, the RACE-
TIMER is reset to "0" after 30 seconds. All laps
are deleted.
It is not possible to delete a single stored lap
on its own.
X Press the æbutton to stop the RACE-
TIMER.
X Press the reset button on the left of the
instrument cluster twice.
X Press the æbutton to start the RACE-
TIMER.
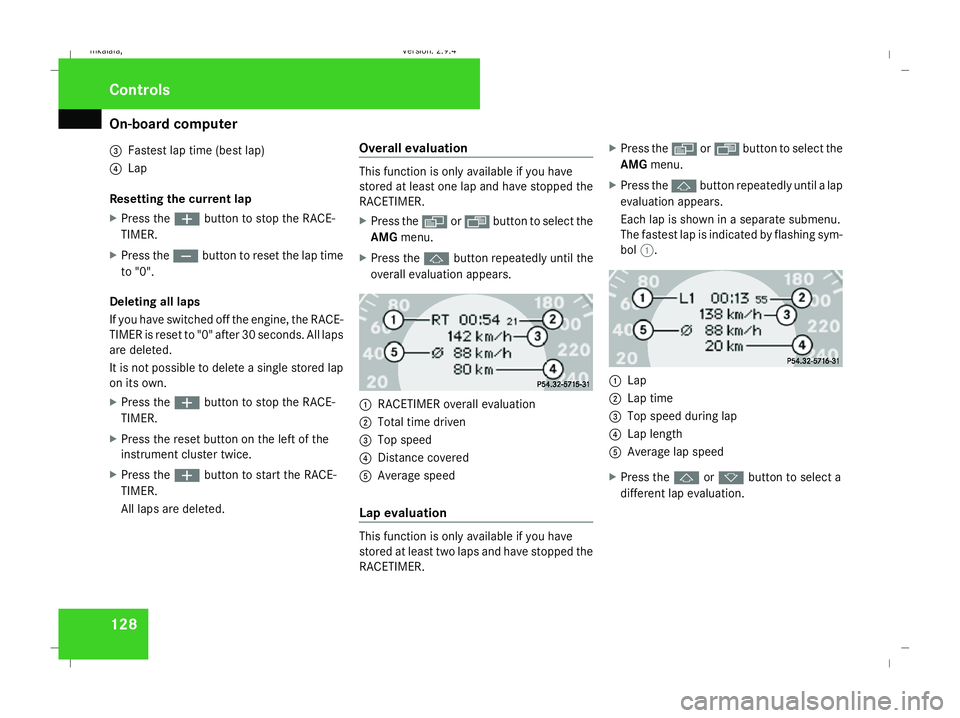
All laps are deleted. Overall evaluation This function is only available if you have
stored at least one lap and have stopped the
RACETIMER.
X
Press the èor· button to select the
AMG menu.
X Press the jbutton repeatedly until the
overall evaluation appears. 1
RACETIMER overall evaluation
2 Total time driven
3 Top speed
4 Distance covered
5 Average speed
Lap evaluation This function is only available if you have
stored at least two laps and have stopped the
RACETIMER.X
Press the èor· button to select the
AMG menu.
X Press the jbutton repeatedly until a lap
evaluation appears.
Each lap is shown in a separate submenu.
The fastest lap is indicated by flashing sym-
bol 1. 1
Lap
2 Lap time
3 Top speed during lap
4 Lap length
5 Average lap speed
X Press the jork button to select a
different lap evaluation. Controls
211_AKB; 2; 5, en-GB
mkalafa, Version: 2.9.4 2008-02-29T16:57:07+01:00 - Seite 128Dateiname: 6515_3416_02_buchblock.pdf; preflight
Page 132 of 401
On-board computer
129Audio/TV*/DVD* menu
Use the functions in the Audio/TV/DVD
menu to operate the audio equipment or
COMAND APS*. If the audio equipment or
COMAND APS* is switched off, the multi-
function display shows the Audio offmes-
sage.
i Menu overview: see (Y page 124).
Use the buttons on the multi-function steer-
ing wheel.
Selecting a radio station You can only store new stations using the
audio systemor COMAND APS *.Please refer
to the separate operating instructions for
notes on how to do this.
X Switch on the audio equipment or
COMAND APS* and select Radio (see the
separate operating instructions).
X Use the èor· button to select the
Audio/TV/DVD menu. X
To select a stored station: briefly press
the j ork button.
X To select a channel from the channel
list: press and hold the jork but-
ton.
X To select a station using the station
search (only if no station list is being
received): press and hold the jor
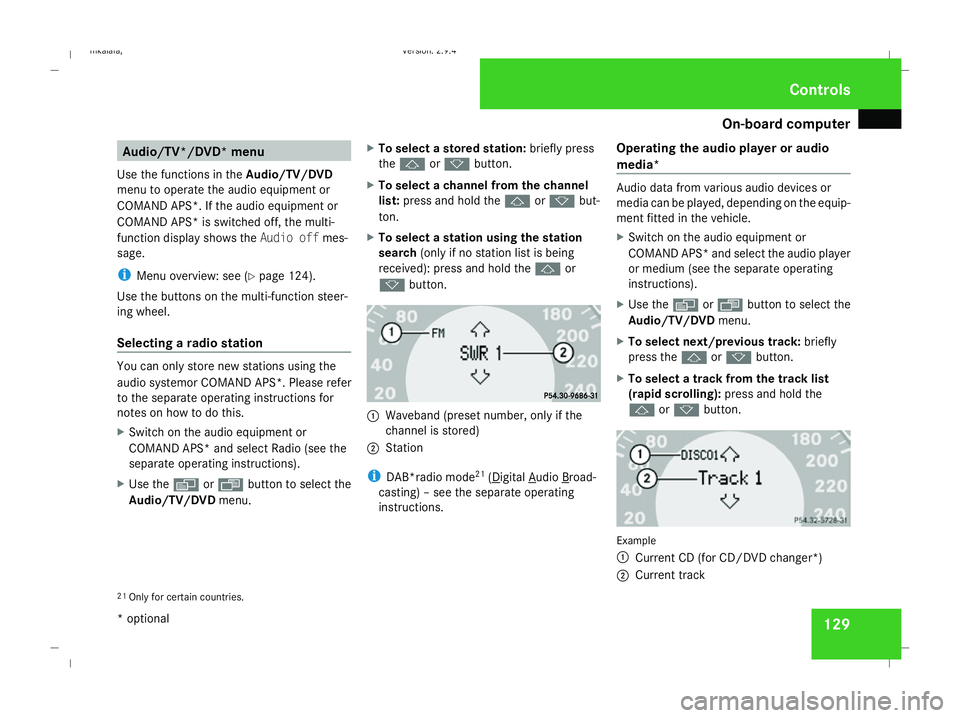
k button. 1
Waveband (preset number, only if the
channel is stored)
2 Station
i DAB*radio mode 21
( Digital Audio Broad-
casting) – see the separate operating
instructions. Operating the audio player or audio
media* Audio data from various audio devices or
media can be played, depending on the equip-
ment fitted in the vehicle.
X
Switch on the audio equipment or
COMAND APS* and select the audio player
or medium (see the separate operating
instructions).
X Use the èor· button to select the
Audio/TV/DVD menu.
X To select next/previous track: briefly
press the jork button.
X To select a track from the track list
(rapid scrolling): press and hold the
j ork button. Example
1
Current CD (for CD/DVD changer*)
2 Current track
21 Only for certain countries. Controls
* optional
211_AKB; 2; 5, en-GB
mkalafa,
Version: 2.9.4 2008-02-29T16:57:07+01:00 - Seite 129 ZDateiname: 6515_3416_02_buchblock.pdf; preflight
Page 133 of 401
On-board computer
130
In audio AUX mode, the current track is not
displayed.
Operating the TV* X
Switch on COMAND and select TV (see the
separate operating instructions).
X Use the èor· button to select the
Audio/TV/DVD menu.
X To select a stored station: briefly press
the j ork button.
X To select a channel from the channel
list: press and hold the jork but-
ton.
X To select a channel with the channel
search (only if COMAND is not receiving a
channel list): press and hold the jor
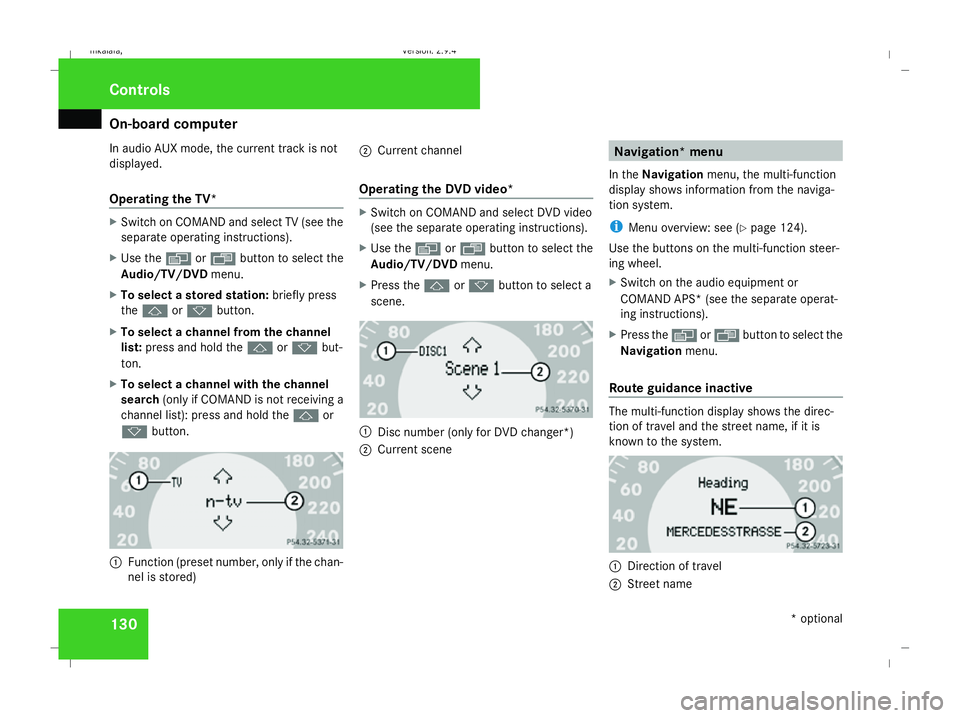
k button. 1
Function (preset number, only if the chan-
nel is stored) 2
Current channel
Operating the DVD video* X
Switch on COMAND and select DVD video
(see the separate operating instructions).
X Use the èor· button to select the
Audio/TV/DVD menu.
X Press the jork button to select a
scene. 1
Disc number (only for DVD changer*)
2 Current scene Navigation* menu
In the Navigation menu, the multi-function
display shows information from the naviga-
tion system.
i Menu overview: see (Y page 124).
Use the buttons on the multi-function steer-
ing wheel.
X Switch on the audio equipment or
COMAND APS* (see the separate operat-
ing instructions).
X Press the èor· button to select the
Navigation menu.
Route guidance inactive The multi-function display shows the direc-
tion of travel and the street name, if it is
known to the system.
1
Direction of travel
2 Street name Controls
* optional
211_AKB; 2; 5, en-GB
mkalafa,
Version: 2.9.4
2008-02-29T16:57:07+01:00 - Seite 130 Dateiname: 6515_3416_02_buchblock.pdf; preflight
Page 134 of 401
On-board computer
131
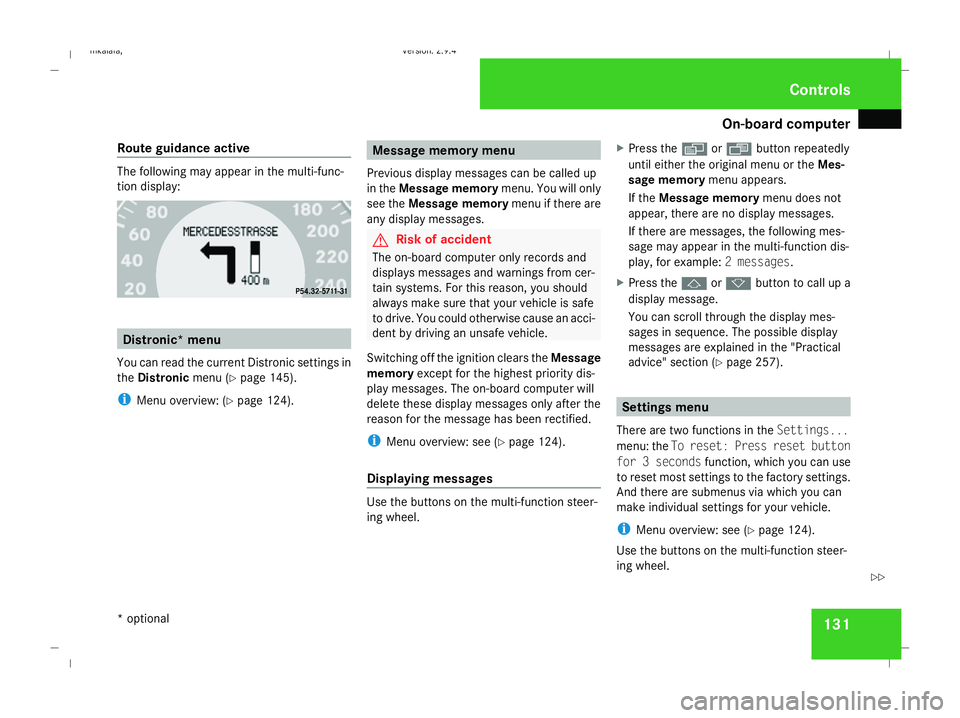
Route guidance active The following may appear in the multi-func-
tion display:
Distronic* menu
You can read the current Distronic settings in
the Distronic menu (Ypage 145).
i Menu overview: (Y page 124). Message memory menu
Previous display messages can be called up
in the Message memory menu. You will only
see the Message memory menu if there are
any display messages. G
Risk of accident
The on-board computer only records and
displays messages and warnings from cer-
tain systems. For this reason, you should
always make sure that your vehicle is safe
to drive. You could otherwise cause an acci-
dent by driving an unsafe vehicle.
Switching off the ignition clears the Message
memory except for the highest priority dis-
play messages. The on-board computer will
delete these display messages only after the
reason for the message has been rectified.
i Menu overview: see (Y page 124).
Displaying messages Use the buttons on the multi-function steer-
ing wheel. X
Press the èor· button repeatedly
until either the original menu or the Mes-
sage memory menu appears.
If the Message memory menu does not
appear, there are no display messages.
If there are messages, the following mes-
sage may appear in the multi-function dis-
play, for example: 2 messages.
X Press the jork button to call up a
display message.
You can scroll through the display mes-
sages in sequence. The possible display
messages are explained in the "Practical
advice" section (Y page 257). Settings menu
There are two functions in the Settings...
menu: the To reset: Press reset button
for 3 seconds function, which you can use
to reset most settings to the factory settings.
And there are submenus via which you can
make individual settings for your vehicle.
i Menu overview: see (Y page 124).
Use the buttons on the multi-function steer-
ing wheel. Controls
* optional
211_AKB; 2; 5, en-GB
mkalafa,
Version: 2.9.4 2008-02-29T16:57:07+01:00 - Seite 131 ZDateiname: 6515_3416_02_buchblock.pdf; preflight
Page 135 of 401
On-board computer
132
Resetting to factory settings For safety reasons, not all functions are reset:
permanent Speedtronic can only be set in the
Vehicle menu. The Headlamp mode function
in the Lighting submenu is only reset if the
vehicle is stationary.
X Press the èor· button to select the
Settings... menu.
X Press and hold the reset button on the left-
hand side of the instrument cluster for
approximately three seconds.
A prompt appears in the multi-function dis-
play asking you to press the reset button
again to confirm.
X Press the reset button again.
The functions of most submenus are
restored to the factory settings.
or
X If you want to retain the settings, do not
press the reset button a second time.
After approximately 5 seconds, the Set-
tings... menu appears again. Submenus in the Settings menu X
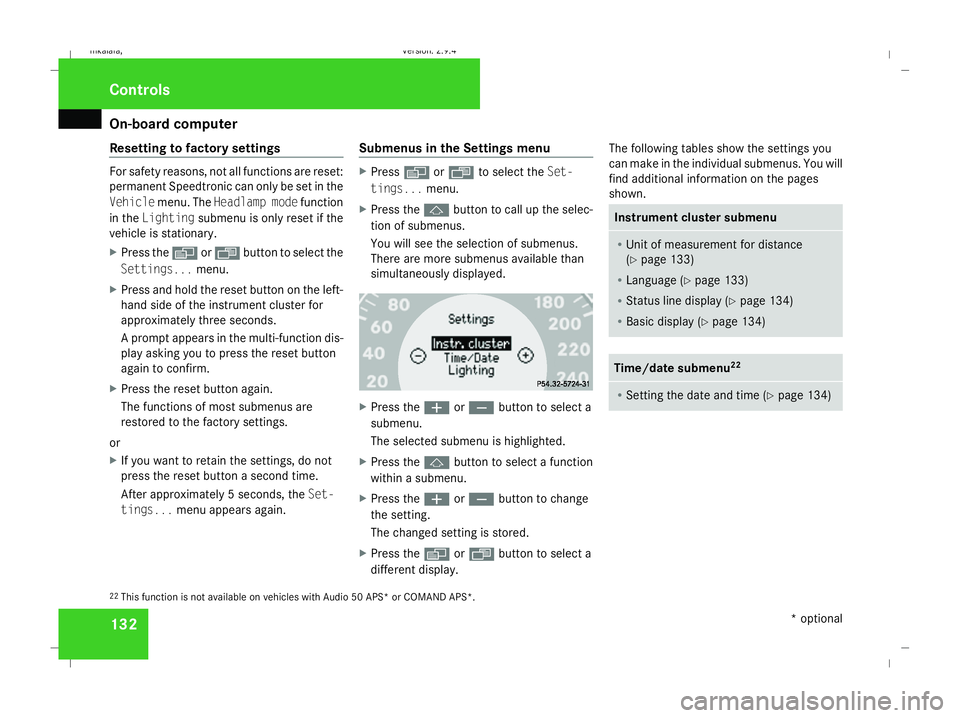
Press èor· to select the Set-
tings... menu.
X Press the jbutton to call up the selec-
tion of submenus.
You will see the selection of submenus.
There are more submenus available than
simultaneously displayed. X
Press the æorç button to select a
submenu.
The selected submenu is highlighted.
X Press the jbutton to select a function
within a submenu.
X Press the æorç button to change
the setting.
The changed setting is stored.
X Press the èorÿ button to select a
different display. The following tables show the settings you
can make in the individual submenus. You will
find additional information on the pages
shown. Instrument cluster submenu
R
Unit of measurement for distance
(Y page 133)
R Language (Y page 133)
R Status line display (Y page 134)
R Basic display ( Ypage 134) Time/date submenu
22 R
Setting the date and time (Y page 134)22
This function is not available on vehicles with Audio 50 APS* or COMAND APS*. Controls
* optional
211_AKB; 2; 5, en-GB
mkalafa,
Version: 2.9.4 2008-02-29T16:57:07+01:00 - Seite 132Dateiname: 6515_3416_02_buchblock.pdf; preflight
Page 138 of 401
On-board computer
135
X
Press the èor· button to select the
Settings... menu.
X Press the jbutton to call up the selec-
tion of submenus.
X Press the æorç button to select the
Time/Date submenu.
Setting the time
X Use the jbutton to select Clock,
hours Press R to confirm (orClock,
minutes Press R to confirm ).
X Press the æorç button to set a
value.
X Press the reset button on the left of the
instrument cluster.
The set time is stored.
Setting the date
X Press the jbutton to select Set date
Day (orSet date Month orSet date
Year).
X Press the æorç button to set the
values.
X Press the j,èorÿ button to
select a different display. Setting constant headlamp mode If you have set constant headlamp mode and
the light switch is in position MorU,
the side lamps, dipped-beam headlamps and
licence plate lighting are switched on auto-
matically when the engine is running. Turning
the light switch to a different position
switches on the corresponding lights. Make
sure that the light switch is turned to Bor
U if you switch off constant headlamp
mode while driving in the dark.
In countries in which constant headlamp
mode is a legal requirement, Constantis the
factory setting.
X Press the èor· button to select the
Settings... menu.
X Press the jbutton to call up the selec-
tion of submenus.
X Press the æorç button to select the
Lighting submenu.
X Press the jbutton to select Headlamp
mode. X
Press the æorç button to set the
mode for the headlamps to ManualorCon-
stant (constant headlamp mode).
X Press the j,èorÿ button to
select a different display.
Switching the surround lighting on or
off If the surround lighting is switched on, the
following lights will be switched on automat-
ically in the dark after you have unlocked the
vehicle using the key:
R
the side lamps
R the tail lamps
R the licence plate lighting
R the front foglamps
The surround lighting switches off automati-
cally if you open the driver's door or after 40
seconds.
X Press èor· to select the Set-
tings... menu.
X Press the jbutton to call up the selec-
tion of submenus.
X Press the æorç button to select the
Lighting submenu. Controls
211_AKB; 2; 5, en-GB
mkalafa,
Version: 2.9.4
2008-02-29T16:57:07+01:00 - Seite 135 ZDateiname: 6515_3416_02_buchblock.pdf; preflight
Page 142 of 401
On-board computer
139ally activate the easy-entry/exit feature
and become trapped.
X Press the èor· button to select the
Settings... menu.
X Press the jbutton to call up the selec-
tion of submenus.
X Press the æorç button to select the
Convenience submenu.
X Press the jbutton to select the EASY-
ENTRY system.
X Press the æorç button to activate
or deactivate the EASY-ENTRY system.
X Press the j,èorÿ button to
select a different display.
Activating/deactivating the Fold in mir-
rors when locking* function The
Fold in mirrors when locking func-
tion allows you to determine whether the
exterior mirrors should fold in when you lock
the vehicle. When you switch on the ignition,
the exterior mirrors fold out again.
If you have switched the function on and you
fold in the exterior mirrors using the button
on the door (Y page 92), they will not fold out automatically. The exterior mirrors can then
only be folded out using the button on the
door.
X
Press the èor· button to select the
Settings... menu.
X Press the jbutton to call up the selec-
tion of submenus.
X Press the æorç button to select the
Convenience submenu.
X Press the jbutton to select Fold in
mirrors when locking .
X Press the æorç button to activate
or deactivate the Fold in mirrors when
locking feature.
X Press the j,èorÿ button to
select a different display.
Selecting a setting for the dynamic driv-
ing seat* i
For more information on the dynamic driv-
ing seat, see (Y page 84).
X Press the èor· button to select the
Settings... menu.
X Press the jbutton to call up the selec-
tion of submenus. X
Press the æorç button to select the
Driving dynamics seat adjustment
submenu.
X Press the jbutton to select Driving
dyn. seat adjust., driver orDriving
dyn. seat adjust., front-pass..
X Press the æorç button to select the
desired seat setting: Gentlefor a soft seat
setting or Vigorous for a hard seat setting.
X Press the j,èorÿ button to
select a different display. Trip computer menu
You can use the Trip computermenu to call
up or reset statistical data for your vehicle.
i You can select kmormiles as the unit of
measurement for distance (Y page 133).
i Menu overview: see (Y page 124).
Use the buttons on the multi-function steer-
ing wheel.
Consumption statistics from start The values refer to the start of the journey. Controls
* optional
211_AKB; 2; 5, en-GB
mkalafa,
Version: 2.9.4
2008-02-29T16:57:07+01:00 - Seite 139 ZDateiname: 6515_3416_02_buchblock.pdf; preflight