2008 MERCEDES-BENZ E-CLASS ESTATE turn signal
[x] Cancel search: turn signalPage 69 of 401
Opening and closing
66 Opening and closing
Key
The vehicle's equipment includes two keys
with remote control. Each key contains an
emergency key element.
The key is configured at the factory to cen-
trally lock and unlock the following:
R the doors
R the boot lid/tailgate
R the fuel filler flap G
Risk of accident
If children are left unsupervised in the vehi-
cle, they could:
R open a door from the inside at any time,
even if it has been locked
R start the vehicle using a key which has
been left in the vehicle
R release the parking brake
They could endanger themselves and oth-
ers. Never leave children unsupervised in
the vehicle. Always take the key with you
when leaving the vehicle, even if you are
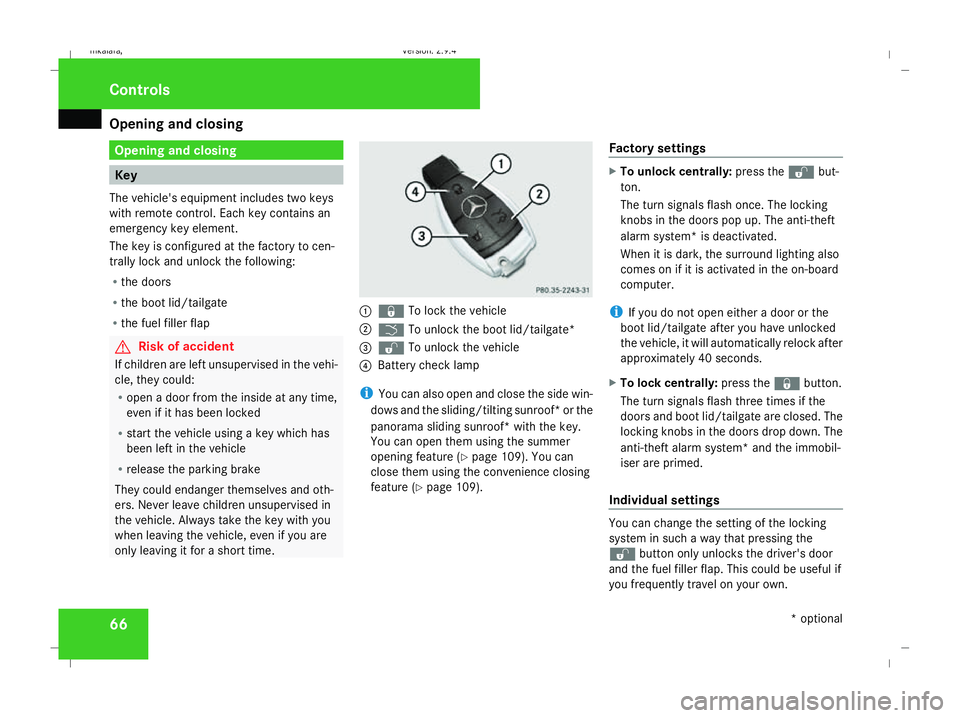
only leaving it for a short time. 1
j To lock the vehicle
2 i To unlock the boot lid/tailgate*
3 k To unlock the vehicle
4 Battery check lamp
i You can also open and close the side win-
dows and the sliding/tilting sunroof* or the
panorama sliding sunroof *with the key.
You can open them using the summer
opening feature (Y page 109). You can
close them using the convenience closing
feature (Y page 109). Factory settings X
To unlock centrally: press thekbut-
ton.
The turn signals flash once. The locking
knobs in the doors pop up. The anti-theft
alarm system* is deactivated.
When it is dark, the surround lighting also
comes on if it is activated in the on-board
computer.
i If you do not open either a door or the
boot lid/tailgate after you have unlocked
the vehicle, it will automatically relock after
approximately 40 seconds.
X To lock centrally: press thejbutton.
The turn signals flash three times if the
doors and boot lid/tailgate are closed. The
locking knobs in the doors drop down. The
anti-theft alarm system* and the immobil-
iser are primed.
Individual settings You can change the setting of the locking
system in such a way that pressing the
k
button only unlocks the driver's door
and the fuel filler flap. This could be useful if
you frequently travel on your own. Controls
* optional
211_AKB; 2; 5, en-GB
mkalafa, Version: 2.9.4 2008-02-29T16:57:07+01:00 - Seite 66Dateiname: 6515_3416_02_buchblock.pdf; preflight
Page 71 of 401
Opening and closing
68(Y
page 109). You can close them using
the convenience closing feature
(Y page 109).
i If the vehicle has been parked for a long
time, you must pull the door handle to acti-
vate the KEYLESS GO functions.
Important notes R
If the KEYLESS GO key is removed from the
vehicle (e.g. in luggage or an article of
clothing), it will no longer be possible to
lock or start the vehicle.
R If the KEYLESS GO key is removed from the
vehicle while the engine is running, e.g. if
the front passenger leaves the vehicle with
the KEYLESS GO key, the following mes-
sage will appear in the multi-function dis-
play as you pull away: Key not detec-
ted.
R If the KEYLESS GO key is in the vehicle, the
vehicle can be started at any time. If you
have left the KEYLESS GO key in the vehi-
cle, the following message will appear in
the multi-function display when you lock
the vehicle: Key still in vehicle .Factory settings X
To unlock centrally: pull the door handle.
The turn signals flash once. The locking
knobs in the doors pop up. The anti-theft
alarm system* is deactivated.
When it is dark, the surround lighting also
comes on if it is activated in the on-board
computer.
i If you do not open either a door or the
boot lid/tailgate after you have unlocked
the vehicle, it will automatically relock after
approximately 40 seconds.
i There is a danger of the vehicle being
unlocked unintentionally. This could occur
if the KEYLESS GO key is within one metre
of the vehicle and the door handle is
splashed with water. This could also occur
when cleaning the door handle. 1
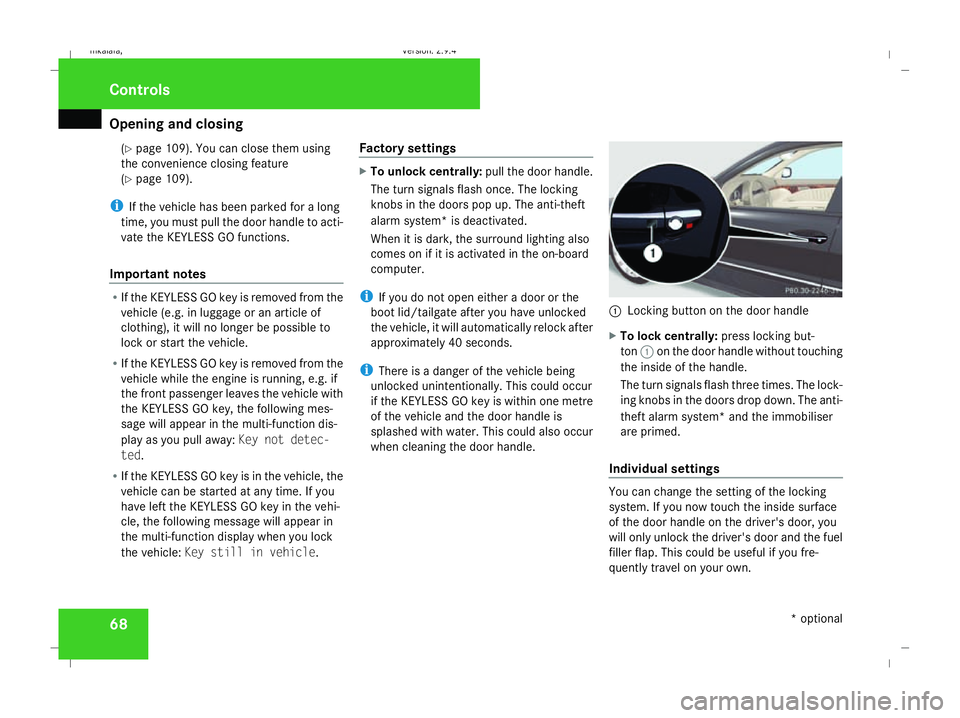
Locking button on the door handle
X To lock centrally: press locking but-
ton 1on the door handle without touching
the inside of the handle.
The turn signals flash three times. The lock-
ing knobs in the doors drop down. The anti-
theft alarm system* and the immobiliser
are primed.
Individual settings You can change the setting of the locking
system. If you now touch the inside surface
of the door handle on the driver's door, you
will only unlock the driver's door and the fuel
filler flap. This could be useful if you fre-
quently travel on your own. Controls
* optional
211_AKB; 2; 5, en-GB
mkalafa,
Version: 2.9.4 2008-02-29T16:57:07+01:00 - Seite 68Dateiname: 6515_3416_02_buchblock.pdf; preflight
Page 104 of 401
Lights
101Combination switch (turn signals,
main-beam headlamps and headlamp
flasher)
Turn signal Combination switch
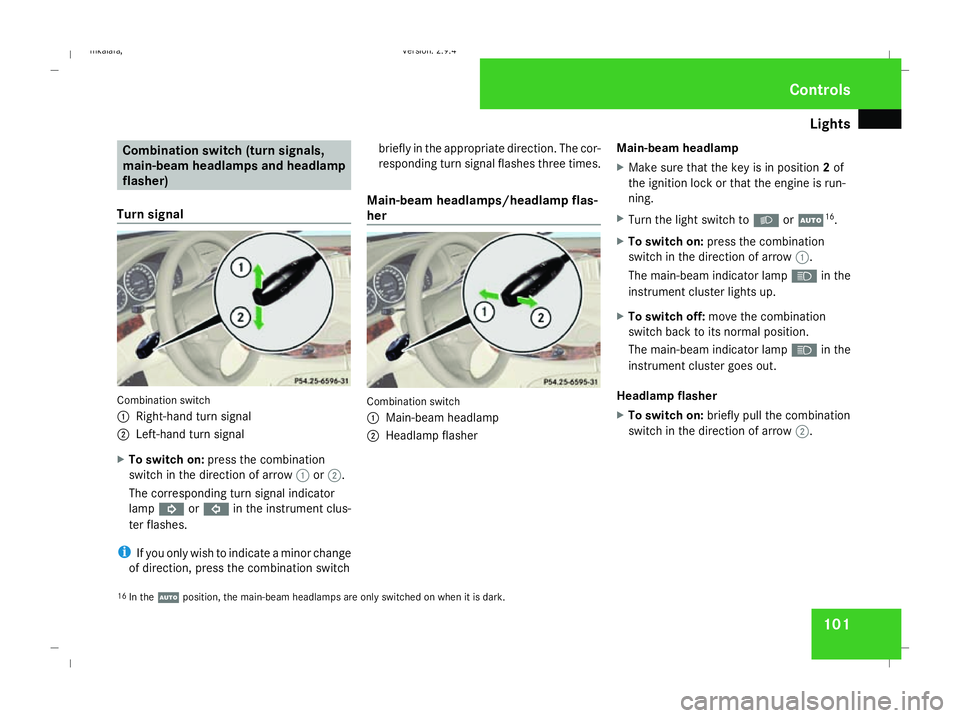
1
Right-hand turn signal
2 Left-hand turn signal
X To switch on: press the combination
switch in the direction of arrow 1or2.
The corresponding turn signal indicator
lamp K orL in the instrument clus-
ter flashes.
i If you only wish to indicate a minor change
of direction, press the combination switch briefly in the appropriate direction. The cor-
responding turn signal flashes three times.
Main-beam headlamps/headlamp flas-
her Combination switch
1
Main-beam headlamp
2 Headlamp flasher Main-beam headlamp
X
Make sure that the key is in position 2of
the ignition lock or that the engine is run-
ning.
X Turn the light switch to BorU 16
.
X To switch on: press the combination
switch in the direction of arrow 1.
The main-beam indicator lamp Ain the
instrument cluster lights up.
X To switch off: move the combination
switch back to its normal position.
The main-beam indicator lamp Ain the
instrument cluster goes out.
Headlamp flasher
X To switch on: briefly pull the combination
switch in the direction of arrow 2.
16 In the Uposition, the main-beam headlamps are only switched on when it is dark. Controls
211_AKB; 2; 5, en-GB
mkalafa,
Version: 2.9.4 2008-02-29T16:57:07+01:00 - Seite 101 ZDateiname: 6515_3416_02_buchblock.pdf; preflight
Page 105 of 401
Lights
102 Hazard warning lamps
Centre console
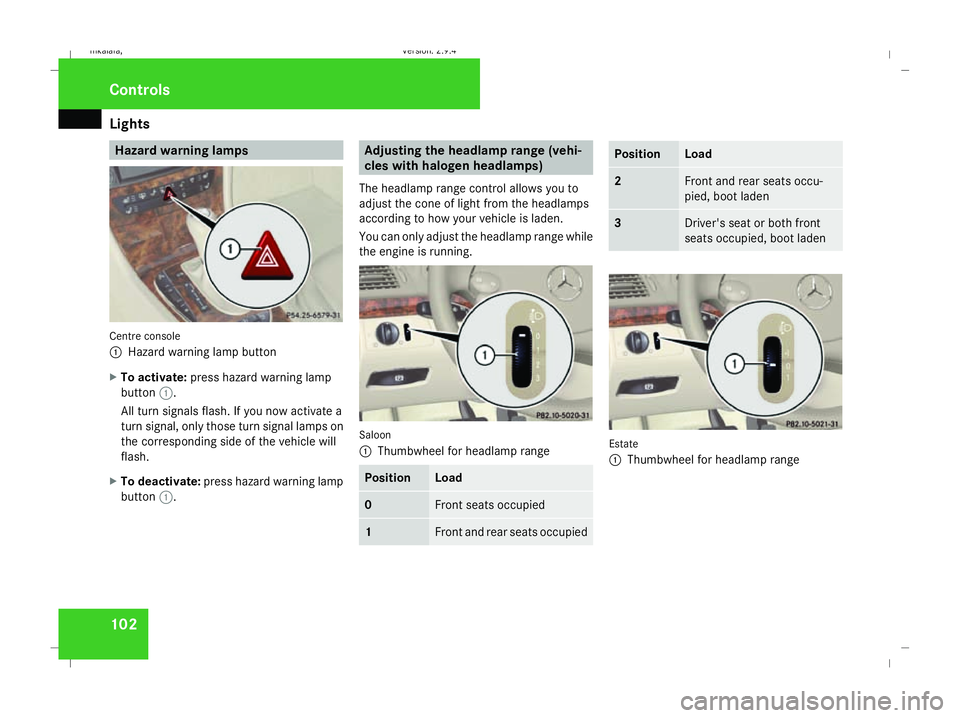
1
Hazard warning lamp button
X To activate: press hazard warning lamp
button 1.
All turn signals flash. If you now activate a
turn signal, only those turn signal lamps on
the corresponding side of the vehicle will
flash.
X To deactivate: press hazard warning lamp
button 1. Adjusting the headlamp range (vehi-
cles with halogen headlamps)
The headlamp range control allows you to
adjust the cone of light from the headlamps
according to how your vehicle is laden.
You can only adjust the headlamp range while
the engine is running. Saloon
1
Thumbwheel for headlamp range Position Load
0 Front seats occupied
1 Front and rear seats occupied Position Load
2 Front and rear seats occu-
pied, boot laden
3 Driver's seat or both front
seats occupied, boot laden
Estate
1
Thumbwheel for headlamp range Controls
211_AKB; 2; 5, en-GB
mkalafa,
Version: 2.9.4
2008-02-29T16:57:07+01:00 - Seite 102 Dateiname: 6515_3416_02_buchblock.pdf; preflight
Page 106 of 401
Lights
103Position Load
-1 Front and rear seats occupied
or
Front and rear seats occu-
pied, luggage compartment
laden
0 Front seats occupied
1 Driver's seat occupied, lug-
gage compartment laden
X
Turn thumbwheel for headlamp range 1to
the position which corresponds to the load
in your vehicle. Headlamp cleaning system*
The headlamps are cleaned automatically if
the "Wipe with windscreen washer fluid" func-
tion is operated five times while the lights are
on and the engine is running. When you
switch off the ignition, the automatic head-
lamp cleaning system is reset and counting is
resumed from 0. Intelligent Light System* (vehicles
with bi-xenon headlamps*)
The Intelligent Light System adapts the light-
ing of the front headlamps to the prevailing
driving conditions so that the road is illumi-
nated better.
i The Intelligent Light System is only active
when it is dark.
The Intelligent Light System comprises:
R Active light function
R Cornering light function
R Motorway mode
R Extended range foglamps Active light function For the active light function, the dipped-beam
headlamps swivel horizontally. The swivel
angle changes according to the respective
driving situation. The active light function is
not active when the vehicle is stationary.
Cornering light function
Specially designed headlamps light up the
area into which you are driving when turning
corners.
If you are driving at speeds below 40 km/h,
the cornering light function is activated either
by the turn signals or when the steering wheel
is turned. If you are driving at speeds above
40 km/h the cornering light function is deac-
tivated.
Switching on
X
Make sure that the engine is running.
X Switch on the dipped-beam headlamps.
X Switch off the fog lights.
X Switch on the turn signal.
The cornering light on the same side as the
turn signal comes on, even if you turn the
steering wheel in the opposite direction
after indicating. Controls
* optional
211_AKB; 2; 5, en-GB
mkalafa,
Version: 2.9.4
2008-02-29T16:57:07+01:00 - Seite 103 ZDateiname: 6515_3416_02_buchblock.pdf; preflight
Page 107 of 401
Lights
104
or
X
Turn the steering wheel in the desired
direction.
When in a forwards gear: the cornering
lamp on the inside of the bend comes on.
When in reverse gear: the cornering light on
the outside of the bend comes on.
Switching off
X Turn the steering wheel back to the straight
ahead position.
The turn signal switches off. The cornering
lamp may remain lit for a short time.
or
X Switch off the turn signal.
The cornering lamp may remain lit for a
short time.
The cornering light will go out after a maxi-
mum of three minutes.
Motorway mode Motorway mode optimises the illumination of
the road by:
R controlling the brightness
R adapting the headlamp range Motorway mode is activated if you are driving
faster than 110 km/h and do not make any
large steering movements for 1,000 m.
Extended range foglamps The extended range foglamps reduce the
glare experienced by the driver and improve
the illumination of the edge of the carriage-
way.
X To switch on: switch on the rear foglamp.
The front foglamps and the rear foglamp
are switched on. The extended range fog-
lamps are activated if you are driving slower
than 70 km/h.
X To switch off: switch off the rear foglamp.
i The extended range foglamps switch off
automatically when you drive faster than
100 km/h. Interior lighting
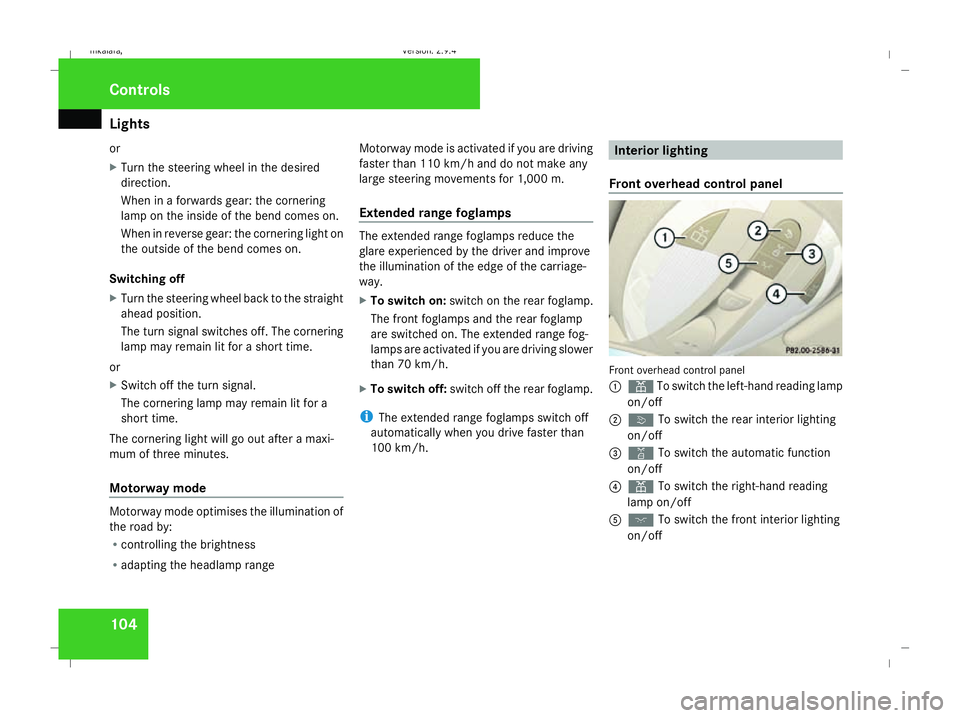
Front overhead control panel Front overhead control panel
1
X To switch the left-hand reading lamp
on/off
2 ò To switch the rear interior lighting
on/off
3 ¡ To switch the automatic function
on/off
4 X To switch the right-hand reading
lamp on/off
5 ð To switch the front interior lighting
on/off Controls
211_AKB; 2; 5, en-GB
mkalafa,
Version: 2.9.4
2008-02-29T16:57:07+01:00 - Seite 104 Dateiname: 6515_3416_02_buchblock.pdf; preflight
Page 183 of 401
Sliding sunroof
180
The following messages can appear in the
display: Display Meaning
The auxiliary heating/
ventilation is deactiva-
ted.
The signal transmission
between the transmitter
and the vehicle is faulty.
Checking the status of the auxiliary heat-
ing
X
Press the por obutton.
The following messages can appear in the
display: Display Meaning
The auxiliary heating/
ventilation is deactiva-
ted. A malfunction has occur-
red in the auxiliary heat-
ing/ventilation. The
heating or ventilation
function selected by the
system is not available.
The vehicle battery is not
charged sufficiently or
the system is faulty.
The signal transmission
between the transmitter
and the vehicle is faulty.
The auxiliary ventilation
is switched on. The num-
ber in the display shows
the remaining time (in
minutes) for the auxiliary
ventilation.
The auxiliary heating is
switched on. The number
in the display shows the
remaining time (in
minutes) for the auxiliary
heating. Sliding sunroof
Sliding/tilting sunroof*
G
Risk of injury
Never leave children unsupervised in the
vehicle. They could operate the sliding/tilt-
ing sunroof and injure themselves. Always
take the key with you when leaving the
vehicle, even if you only leave it for a short
time. G
Risk of injury
Make sure that nobody can become trap-
ped when you are opening and closing the
sliding/tilting sunroof. If danger threatens,
release the switch and push it briefly in any
direction to stop the sliding/tilting sunroof. G
Risk of injury
The glass in the sliding/tilting sunroof
could break in an accident. If you are not
wearing a seat belt, there is a risk that you
could be thrown through the opening in the
event of the vehicle overturning. Therefore,
always wear a seat belt to reduce the risk
of injuries. Controls
* optional
211_AKB; 2; 5, en-GB
mkalafa,
Version: 2.9.4 2008-02-29T16:57:07+01:00 - Seite 180Dateiname: 6515_3416_02_buchblock.pdf; preflight
Page 218 of 401
Features
215
X
Erase the memory of the integrated remote
control (Y page 216) before programming
it for the first time.
X Turn the key to position 2in the ignition
lock.
X Press and hold one of transmitter buttons
2 to4 on the integrated remote control.
Indicator lamp 1starts to flash after a
short while. It flashes about once a second.
i Indicator lamp 1flashes immediately
the first time the transmitter button is pro-
grammed. If this transmitter button has
already been programmed, indicator
lamp 1will only start flashing at a rate of
once a second after 20 seconds have
elapsed.
X Keep the transmitter buttons depressed.
X Point the garage door's remote control with
the transmitter towards the left-hand side
of the rear-view mirror from a distance of 5
to 20 cm.
i The distance between the garage door's
remote control and the integrated garage
door opener depends on the system of the
garage door drive. You might require sev-
eral attempts. You should test every posi- tion for at least 20 seconds before trying
another position.
X Keep the transmitter button on the garage
door's remote control depressed until indi-
cator lamp 1starts to flash rapidly.
The programming was successful if indica-
tor lamp 1flashes rapidly.
X Release the transmitter buttons on the
garage door's remote control and the inte-
grated remote control.
If indicator lamp 1goes out after approxi-
mately 20 seconds and did not flash rapidly
before this:
X Release the transmitter buttons on the
integrated and portable remote controls.
X Repeat the programming procedure. At the
same time change the distance between
the garage door's remote control and the
transmitter buttons in the rear-view mirror.
i If the garage door system works with a
rolling code, after programming you must
synchronise the remote control integrated
in the rear-view mirror with the garage door
system receiver.
You will find further information in the
garage door opening system's operating instructions, e.g. the sections on “Synchro-
nising the transmitter” or “Registering a
new transmitter”. You can also call the hot-
line mentioned above.
Opening or closing the garage door Once programmed, the integrated remote
control will assume the function of the garage
door system's remote control. Please read
the operating instructions for the garage door
system.
X
Turn the key to position 2in the ignition
lock.
X Press the transmitter button on the rear-
view mirror that you have programmed to
operate the garage door.
Garage door system with fixed code: indi-
cator lamp 1lights up continuously.
Garage door system with rolling code: indi-
cator lamp 1flashes briefly and then lights
up for approximately two seconds. This is
repeated for up to 20 seconds.
i The transmitter will transmit a signal for
as long as the transmitter button is being
pressed. The transmission will be halted
after a maximum of 20 seconds and indi- Cont
rols
211_AKB; 2; 5, en-GB
mkalafa
,V ersion: 2.9.4
2008-02-29T16:57:07+01:00 - Seite 215 ZDateiname: 6515_3416_02_buchblock.pdf; preflight