Page 333 of 401
Battery
330 step out of the vehicle first and touch the
bodywork.
R Do not wipe the battery using a cloth. The
battery may explode as a result of elec-
trostatic charge or due to flying sparks.
! Switch the engine off and remove the key
before unscrewing or disconnecting the
terminal clamps from the battery. You may
otherwise destroy electronic components
such as the alternator.
i Mercedes-Benz recommends that you
have all work involving the battery, e.g.
removing, charging and replacing, carried
out at a qualified specialist workshop, e.g.
a Mercedes-Benz Service Centre.
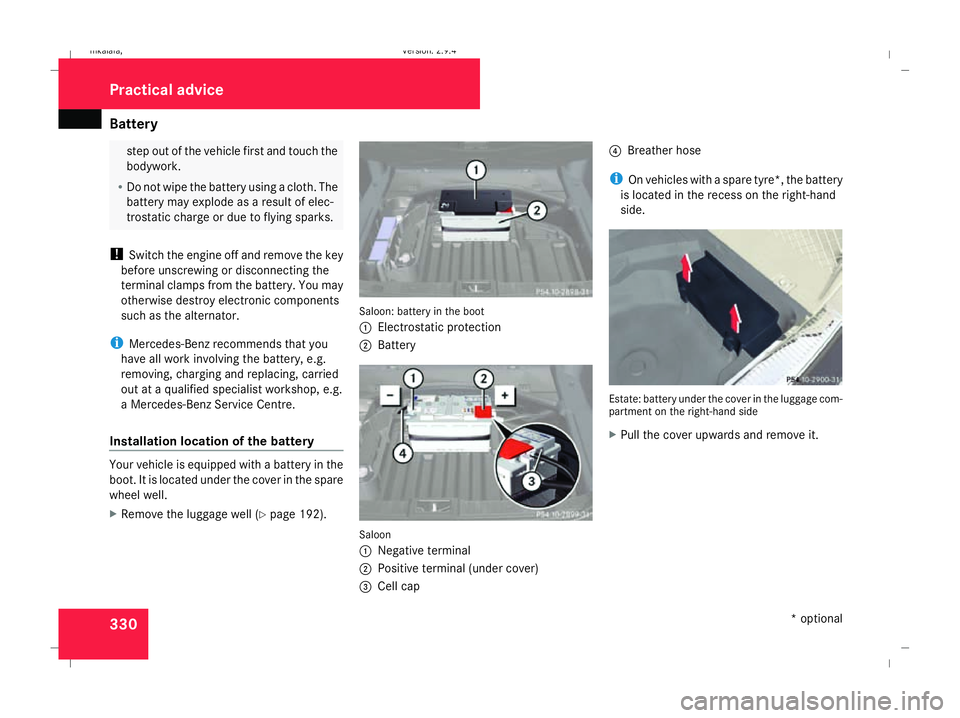
Installation location of the battery Your vehicle is equipped with a battery in the
boot. It is located under the cover in the spare
wheel well.
X Remove the luggage well (Y page 192). Saloon: battery in the boot
1
Electrostatic protection
2 Battery Saloon
1
Negative terminal
2 Positive terminal (under cover)
3 Cell cap 4
Breather hose
i On vehicles with a spare tyre*, the battery
is located in the recess on the right-hand
side. Estate: battery under the cover in the luggage com-
partment on the right-hand side
X
Pull the cover upwards and remove it. Practical advice
* optional
211_AKB; 2; 5, en-GB
mkalafa,
Version: 2.9.4 2008-02-29T16:57:07+01:00 - Seite 330Dateiname: 6515_3416_02_buchblock.pdf; preflight
Page 341 of 401
Towing and tow-starting
338-
you cannot switch on the ignition
- you cannot move the selector lever
to N(on vehicles with automatic trans-
mission*)
- you have no support when braking
i Switch off the automatic locking feature
before the vehicle is towed (Y page 137).
You could otherwise be locked out when
pushing or towing the vehicle. Fitting the towing eye
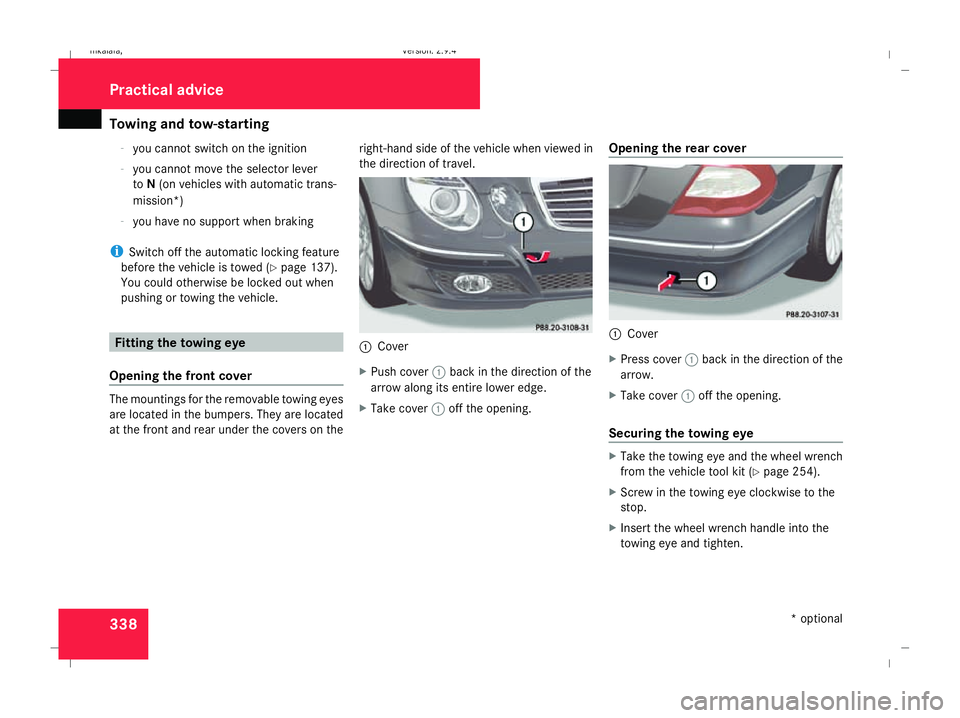
Opening the front cover The mountings for the removable towing eyes
are located in the bumpers. They are located
at the front and rear under the covers on the right-hand side of the vehicle when viewed in
the direction of travel. 1
Cover
X Push cover 1back in the direction of the
arrow along its entire lower edge.
X Take cover 1off the opening. Opening the rear cover 1
Cover
X Press cover 1back in the direction of the
arrow.
X Take cover 1off the opening.
Securing the towing eye X
Take the towing eye and the wheel wrench
from the vehicle tool kit ( Ypage 254).
X Screw in the towing eye clockwise to the
stop.
X Insert the wheel wrench handle into the
towing eye and tighten. Practical advice
* optional
211_AKB; 2; 5, en-GB
mkalafa
,V ersion: 2.9.4
2008-02-29T16:57:07+01:00 - Seite 338 Dateiname: 6515_3416_02_buchblock.pdf; preflight
Page 342 of 401
Towing and tow-starting
339Towing the vehicle
! You may tow the vehicle for a maximum
of 50 km. A towing speed of 50 km/h must
not be exceeded.
With towing distances over 50 km, the
entire vehicle needs to be lifted up and
transported.
! Vehicles with 4MATIC* may not be towed
with the front or rear axle raised.
! The engine must be switched off (key in
ignition lock in position 0or position 1) if
the vehicle is being towed with the rear axle
raised or if the parking brake is being tested
on a dynamometer. Intervention by ESP ®
could otherwise damage the brake system.
Vehicles with manual transmission X
Turn the key to position 2in the ignition
lock.
X Shift to neutral. Vehicles with automatic transmission* X
Turn the key to position 2in the ignition
lock.
X Move the selector lever to N. Tow-starting (emergency engine
starting)
Please note:
R Vehicles with an automatic transmission*
must not be tow-started.
R The battery must be connected.
R The engine and catalytic converter must be
cold.
R Avoid repeated and lengthy starting
attempts.
Vehicles with manual transmission X
Turn the key to position 2in the ignition
lock.
X Fully depress the clutch pedal.
X Shift to neutral. X
Tow the vehicle or let it roll.
X Shift to a suitable gear and bring the clutch
pedal up slowly. Do not depress the accel-
erator pedal.
The engine is started. Removing the towing eye
X Take the wheel wrench from the vehicle
tool kit ( Ypage 254).
X Insert the wheel wrench handle into the
towing eye and turn it anti-clockwise.
X Unscrew the towing eye.
X Replace the cover and press it until it
engages.
X Return the towing eye and the wheel
wrench to the vehicle tool kit. Practical advice
* optional
211_AKB; 2; 5, en-GB
mkalafa
,V ersion: 2.9.4
2008-02-29T16:57:07+01:00 - Seite 339 ZDateiname: 6515_3416_02_buchblock.pdf; preflight
Page 343 of 401
Fuses
340 Transporting the vehicle
The towing eyes can be used to pull the vehi-
cle onto a trailer or transporter for transport-
ing purposes.
! Only lash the vehicle down by the wheels
or wheel rims, not by parts of the vehicle
such as axle or steering components. The
vehicle could otherwise be damaged.
Vehicles with manual transmission X
Shift to neutral.
Vehicles with automatic transmission* X
Turn the key to position 2in the ignition
lock.
X Move the selector lever to N. Fuses
Notes on changing fuses
The fuses in your vehicle serve to close down
faulty circuits. If a fuse blows, all the compo-
nents on the circuit and their functions will
fail.
Blown fuses must be replaced with fuses of
the same rating, which you can recognise by
the colour and value. The fuse ratings are lis-
ted in the fuse allocation chart. A Mercedes-
Benz Service Centre will be happy to advise
you. G
Risk of fire
Only use fuses that have been approved for
Mercedes-Benz vehicles and which have
the correct fuse rating for the systems con-
cerned. Do not attempt to repair or bridge
faulty fuses. Otherwise, a circuit overload
could cause a fire. Have the cause traced
and rectified at a qualified specialist work-
shop, e.g. a Mercedes-Benz Service Centre.
If the newly inserted fuse also blows, have the
cause traced and rectified at a qualified spe-
cialist workshop, e.g. a Mercedes-Benz
Service Centre. !
Only use fuses that have been approved
for Mercedes-Benz vehicles and which
have the correct fuse rating for the system
concerned. Otherwise, components or sys-
tems could be damaged.
The fuses are located in various fuse boxes:
R Main fuse box on the driver's side of the
dashboard
R Fuse box in the boot/luggage compart-
ment on the left-hand side of the vehicle
Fuse allocation chart The fuse allocation chart is in the main fuse
box in the dashboard.
Before changing a fuse
X Park the vehicle.
X Switch off all electrical consumers.
X Remove the key from the ignition lock. Practical advice
* optional
211_AKB; 2; 5, en-GB
mkalafa,
Version: 2.9.4 2008-02-29T16:57:07+01:00 - Seite 340Dateiname: 6515_3416_02_buchblock.pdf; preflight
Page 346 of 401
343
Introduction to technical data
.........344
Genuine Mercedes-Benz parts .........344
Vehicle electronics ...........................345
Vehicle identification plates ............346
Engine ................................................ 348
Performance ...................................... 352
Tyres and wheels .............................. 356
Vehicle dimensions ..........................366
Vehicle weights ................................. 369
Trailer coupling* ............................... 375
Service products and capacities .....377
Frequencies for garage door open-
ers* .................................................... 391 Technical data
211_AKB; 2; 5, en-GB
mkalafa,
Version: 2.9.4 2008-02-29T16:57:07+01:00 - Seite 343Dateiname: 6515_3416_02_buchblock.pdf; preflight
Page 359 of 401
Tyres and wheels
356 Tyres and wheels
! For safety reasons, Mercedes-Benz rec-
ommends that you only use tyres which
have been approved by Mercedes-Benz
specifically for your vehicle. These tyres are
specially adapted for use with the control
systems, such as ABS or ESP ®
, and are
marked as follows:
R MO = Mercedes-Benz Original
R MOE = Mercedes-Benz Original Exten-
ded* (with run-flat characteristics)
If you use other tyres, Mercedes-Benz can-
not accept any responsibility for damage
which may occur. Information about tyres
can be obtained from any Mercedes-Benz
Service Centre.
! If you fit tyres other than those tested and
recommended by Mercedes-Benz, charac-
teristics such as handling, noise levels and
fuel consumption, etc. could be adversely
affected. In addition, when driving with a
load, dimensional variations and different
tyre deformation characteristics could
cause the tyres to come into contact with
the bodywork and axle components. This
could result in damage to the tyres or the
vehicle. i
Further information about tyres and
wheels can be obtained from any
Mercedes-Benz Service Centre.
You will find a table of tyre pressures on the
inside of your vehicle's fuel filler flap . You
will find further information about tyre pres-
sures in the "Operation" section
(Y page 229). Technical data
* optional
211_AKB; 2; 5, en-GB
mkalafa
,V ersion: 2.9.4
2008-02-29T16:57:07+01:00 - Seite 356 Dateiname: 6515_3416_02_buchblock.pdf; preflight
Page 360 of 401
Tyres and wheels
357Tyres
Saloon E 200 KOMPRESSOR/
E 200 CDI/E 220 CDI E 230/E 280/E 280 4MATIC E 300 Bluetec/E 350/
E 350 4MATIC/E 350/CGI/
E 280 CDI/E 280 CDI 4MATIC/
E 320 CDI/E 320 CDI 4MATIC
Both axles Summer tyres 205/6
0 R16 92V 205/60 R16 92W –
Winter
tyres39 205/60 R16 92H M+S 205/60 R16 92H M+S –
Wheels
39 7J x 16 H2 ET 33 7J x 16 H2 ET 33 –
Both axles Summer tyres 225/55 R16 95V 225/55 R16 95W 225/55 R16 95W
Winter tyres 225/55 R16 95H M+S 225/55 R16 95H M+S 225/55 R16 95H M+S
Wheels 7.5J x 16 H2 ET 42 or
8J x 16 H2 ET 36 7.5J x 16 H2 ET 42 or
8J x 16 H2 ET 36 7.5J x 16 H2 ET 42 or
8J x 16 H2 ET 36
39
Not in conjunction with sports package* optional equipment. Technical data
* optional
211_AKB; 2; 5, en-GB
mkalafa,
Version: 2.9.4 2008-02-29T16:57:07+01:00 - Seite 357 ZDateiname: 6515_3416_02_buchblock.pdf; preflight
Page 361 of 401
Tyres and wheels
358 All models except E 63 AMG E 63 AMG
Both axles
Summer tyres
40 245/4
5 R17 95W –
Su
mmer tyres 40,41 245/4
5 R17 95W MO Extended –
Winter tyres
40 245/45 R17 99V XL M+S –
Winter tyres
40
,4 1, 42 245/45 R17 99V XL M+S MOExtended –
Winter tyres – 245/40 R18 97V XL M+S
Wheels 8J x 17 H2 ET 38 or
8.5J x 17 H2 ET 38 8.5J x 18 H2 ET 38
40
Only in conjunction with sports suspension*, AIRMATIC DC* or AVANTGARDE suspension*.
41 Tyres with run-flat characteristics and only in conjunction with the tyre pressure loss warning system or tyre pressure monitor* activated.
42 Not available directly from the factory. Further information can be obtained at a qualified specialist workshop, e.g. a Mercedes-Benz Service Centre. Technical data
* optional
211_AKB; 2; 5, en-GB
mkalafa,
Version: 2.9.4 2008-02-29T16:57:07+01:00 - Seite 358Dateiname: 6515_3416_02_buchblock.pdf; preflight