Page 90 of 481

89 Safety and Security
Driving safety systems
�Driving safety systems
In this section you will find information on
the following driving safety systems:
�ABS (Antilock Brake System)
�Adaptive Brake
�BAS (Brake Assist System)
�EBP (Electronic Brake Proportioning)
�ESP® (Electronic Stability Program)
ABS
The Antilock Brake System (ABS) regulates
the brake pressure so that the wheels do
not lock during braking. This allows you to
maintain the ability to steer your vehicle.
The ABS is functional above a speed of
approximately 5 mph (8 km/h) indepen-
dent of road surface conditions.
On slippery road surfaces, the ABS will
respond even with light brake pressure.
The -indicator lamp in the instrument
cluster comes on when you switch on the
ignition. It goes out when the engine is run-
ning.
Warning!G
The following factors increase the risk of
accidents:
�Excessive speed, especially in turns
�Wet and slippery road surfaces
�Following another vehicle too closely
The driving safety systems described in this
section cannot reduce these risks or pre-
vent the natural laws of physics from acting
on the vehicle.
Always adapt your driving style to the pre-
vailing road and weather conditions and
keep a safe distance to other road users and
objects on the street.
iIn winter operation, the maximum
effectiveness of the ABS, BAS, ESP® and Adap-
tive Brake is only achieved with winter tires
(
�page 328) or snow chains as required.
Warning!G
Do not pump the brake pedal. Use firm,
steady brake pedal pressure instead. Pump-
ing the brake pedal defeats the purpose of
the ABS and significantly reduces braking
effectiveness.
Page 93 of 481

92 Safety and Security
Driving safety systems
EBP
The Electronic Brake Proportioning (EBP)
enhances braking effectiveness by allow-
ing the rear brakes to supply a greater pro-
portion of the braking effort in straight line
breaking without a loss of vehicle stability.ESP®
The Electronic Stability Program (ESP®) is
operational as soon as the engine is run-
ning and monitors the vehicle’s traction
(force of adhesive friction between the
tires and the road surface) and handling.
The ESP
® recognizes when a wheel is spin-
ning or if the vehicle starts to skid. By ap-
plying the brakes to the appropriate wheel
and by limiting engine output, the ESP
®
works to stabilize the vehicle. The ESP® is
especially useful while driving off and on
wet or slippery road surfaces. The ESP
®
also stabilizes the vehicle during braking
and steering maneuvers.
The ESP
® warning lamp v in the
instrument cluster flashes when the ESP®
is engaged.
The ESP
® warning lamp v in the
instrument cluster comes on when you
switch on the ignition. It goes out when the
engine is running.
Warning!G
When the EBP is malfunctioning, the ABS,
BAS, ESP® are also switched off.
If the EBP is malfunctioning, the brake sys-
tem will still function with full brake boost.
However, the rear wheels could lock up dur-
ing emergency braking situations, for exam-
ple. You could lose control of the vehicle and
cause an accident. Adapt your driving style
to the changed driving characteristics.
Warning!G
Never switch off the ESP® when you see the
ESP® warning lamp v flashing in the in-
s t r u m e n t c l u s t e r . I n t h i s c a s e p r o c e e d a s f o l -
lows:
�While driving off, apply as little throttle
as possible.
�While driving, ease up on the accelera-
tor.
�Adapt your speed and driving style to
the prevailing road conditions.
Failure to observe these guidelines could
cause the vehicle to skid.
The ESP
® cannot prevent accidents result-
ing from excessive speed.
Page 94 of 481

93 Safety and Security
Driving safety systems
For more information, see the “Practical
hints” section (
�page 345) and
(
�page 363).Electronic traction system
The electronic traction system is a
component of ESP
®.
The electronic traction system improves
the vehicle’s ability to utilize available
traction, especially under slippery road
conditions by applying the brakes to a
spinning wheel.
Except CLS 63 AMG:
When you switch off the ESP
®, the
electronic traction system is still enabled.
Warning!G
The ESP® cannot prevent the natural laws of
physics from acting on the vehicle, nor can
it increase the traction afforded. The ESP
®
cannot prevent accidents, including those
resulting from excessive speed in turns, or
hydroplaning. Only a safe, attentive, and
skillful driver can prevent accidents. The ca-
pabilities of an ESP
® equipped vehicle must
never be exploited in a reckless or danger-
ous manner which could jeopardize the us-
er’s safety or the safety of others.
!The ESP® will only function properly if you
use wheels of the recommended tire size
(
�page 438).
!Because the ESP® operates automatically,
the engine and the ignition must be shut off
(SmartKey in starter switch position0 or1 or
KEYLESS-GO start/stop button* in position0
or1) when:
�the parking brake is being tested on a brake
test dynamometer
�the vehicle is being towed with the front axle
raised
Active braking action through the ESP
® may oth-
erwise seriously damage the brake system.
Warning!G
If you are driving too fast, the electronic
traction system cannot reduce the risk of an
accident.
The electronic traction system cannot pre-
vent the natural laws of physics from acting
on the vehicle.
Page 117 of 481

116 Controls in detail
Locking and unlocking
Automatic central locking
The doors and the trunk automatically lock
when the ignition is switched on and the
wheels are turning at vehicle speeds of ap-
proximately 9 mph (15 km / h) or more.
The locking knobs in the doors move down.
You can open a locked door from the in-
side. Open door only when conditions are
safe to do so.
You can deactivate the automatic locking
mode using the control system
(
�page 163).
Locking and unlocking from the inside
You can lock or unlock the doors and the
trunk from inside using the central locking
switch. This can be useful, for example, if
you want to lock the vehicle before starting
to drive.
The fuel filler flap cannot be locked or un-
locked with the central locking switch.
Central locking switch
1Unlocking
2LockingiThe doors are designed to unlock automati-
cally after an accident if the force of the impact
exceeds a preset threshold. The vehicle locks au-
tomatically when the ignition is switched on and
the wheels are turning at vehicle speeds of ap-
proximately 9 mph (15 km/h) or more. You could
therefore lock yourself out when the vehicle
�is pushed or towed
�is on a test stand
Warning!G
When leaving the vehicle, always remove the
SmartKey or SmartKey with KEYLESS-GO*
from the starter switch, take it with you, and
lock the vehicle. Do not leave children unat-
tended in the vehicle, or with access to an
unlocked vehicle. A child’s unsupervised ac-
cess to a vehicle could result in an accident
and/or serious personal injury.
Page 120 of 481
119 Controls in detail
Seats
Folding head restraints back
The rear seat head restraints can be folded
backward for increased visibility.
1Head restraint release switch
�Switch on the ignition (�page 38).
�Press the symbol-side on rocker
switch1 to release the head re-
straints.
The head restraints will fold backward.Placing head restraints upright
�Pull the head restraint forward until it
locks into position.
Lumbar support
The curvature of the front seats can be ad-
justed to help enhance lower back support
and seating comfort.
1Adjustment lever
�Move adjustment lever1 in direction
of the arrows until you have reached a
comfortable seating position.
!Make sure the head restraints engage when
placing them upright. Otherwise their protective
function cannot be assured.
Page 121 of 481

120 Controls in detail
Seats
Multicontour seat*
The multicontour seat has a movable seat
cushion and inflatable air cushions built
into the backrest to provide additional lum-
bar and side support.
The seat cushion movement, backrest
cushion height and curvature can be con-
tinuously varied with switches right side of
the seat on the driver side, or the left side
of the seat on the passenger side.1Seat cushion depth
2Backrest bottom
3Backrest center
4Backrest side bolsters
�Switch on the ignition (�page 38).Seat cushion depth
�Adjust the seat cushion depth to the
length of your upper leg using
switch1.
Backrest contour
�Adjust the contour of the backrest to
the desired position using æ or
ç.
�Move the backrest support cushion to
the bottom by using button2 o r t o t h e
center by using button3.
Backrest side bolsters
�Adjust the side bolsters so that they
provide good lateral support using
switch4.
iIf, after a period of time, the seat no longer
provides the desired contour, then repeat the ad-
justment procedure.
Page 122 of 481

121 Controls in detail
Seats
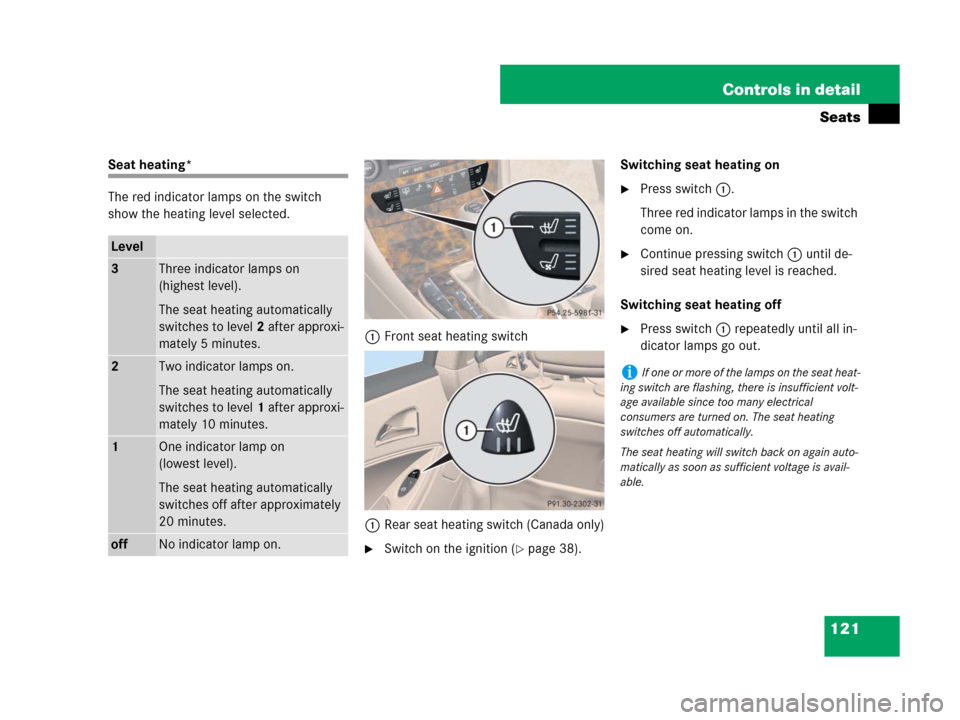
Seat heating*
The red indicator lamps on the switch
show the heating level selected.
1Front seat heating switch
1Rear seat heating switch (Canada only)
�Switch on the ignition (�page 38).Switching seat heating on
�Press switch1.
Three red indicator lamps in the switch
come on.
�Continue pressing switch1 until de-
sired seat heating level is reached.
Switching seat heating off
�Press switch1 repeatedly until all in-
dicator lamps go out.
Level
3Three indicator lamps on
(highest level).
The seat heating automatically
switches to level2 after approxi-
mately 5 minutes.
2Two indicator lamps on.
The seat heating automatically
switches to level1 after approxi-
mately 10 minutes.
1One indicator lamp on
(lowest level).
The seat heating automatically
switches off after approximately
20 minutes.
offNo indicator lamp on.
iIf one or more of the lamps on the seat heat-
ing switch are flashing, there is insufficient volt-
age available since too many electrical
consumers are turned on. The seat heating
switches off automatically.
The seat heating will switch back on again auto-
matically as soon as sufficient voltage is avail-
able.
Page 123 of 481

122 Controls in detail
Seats
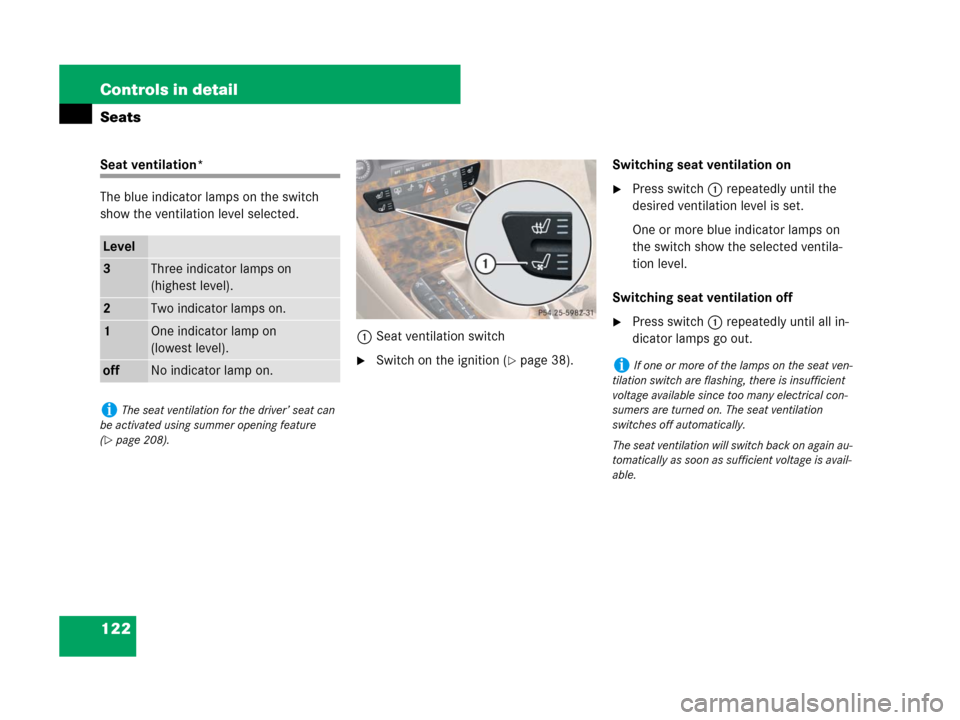
Seat ventilation*
The blue indicator lamps on the switch
show the ventilation level selected.
1Seat ventilation switch
�Switch on the ignition (�page 38).Switching seat ventilation on
�Press switch1 repeatedly until the
desired ventilation level is set.
One or more blue indicator lamps on
the switch show the selected ventila-
tion level.
Switching seat ventilation off
�Press switch1 repeatedly until all in-
dicator lamps go out.
Level
3Three indicator lamps on
(highest level).
2Two indicator lamps on.
1One indicator lamp on
(lowest level).
offNo indicator lamp on.
iThe seat ventilation for the driver’ seat can
be activated using summer opening feature
(
�page 208).
iIf one or more of the lamps on the seat ven-
tilation switch are flashing, there is insufficient
voltage available since too many electrical con-
sumers are turned on. The seat ventilation
switches off automatically.
The seat ventilation will switch back on again au-
tomatically as soon as sufficient voltage is avail-
able.